The 2021 NRA F-Class National Championships are underway right now at Camp Atterbury, Indiana. The Mid-Range Nationals concluded yesterday with the Team Match, and the Long-Range F-Class Nationals commence today, July 27, 2021 and run through Friday, July 30th. For F-Class competitors, making the right wind call is a vital skill. Many shooters and team wind coaches will be using Kestrel Wind Meters, widely regarded as the best on the market.
This article reviews the advanced Kestrel 5700 Elite Wind Meter with sophisticated ballistics capabilities. Our review features three videos by F-Class John that show how the Kestrel 5700 Elite works with Applied Ballistics APP software and LiNK connection.
This Part I Video starts with a basic Kestrel Anemometer (blue case, 00:00-00:40) wind meter. Then reviewer F-Class John looks at the “smart” Kestrel 5700 Elite with Applied Ballistics functionality and LiNK Bluetooth connectivity. John explains the many features of the Kestrel 5700 and how it holds a powerful ballistics calculator in the convenient, easy-to-tote Kestrel package. With the Kestrel 5700 Elite, once you enter data about your bullets, velocity, zero, and rifle, the Kestrel can calculate come-ups and wind corrections. If you don’t yet own a Kestrel, we highly recommend you watch this series of videos that explains advanced Kestrel features in detail.
This Part II Video shows the key features of the advanced software APP used by the Kestrel 5700 Elite unit with Applied Ballistics. The Kestrel 5700 can “talk” to a mobile device that runs the Applied Ballistics software APP that contains bullet databases and allows you to enter key information such as muzzle velocity, bullet BC, zero distance, velocity, wind, and environmental factors (altitude, temperature etc.). There are also gun-specific factors such as scope height over bore and barrel twist rate. The video also explains how “range cards” are created and how to view them with your Elite Ballistics-enabled Kestrel. John notes: “The APP is great because you don’t have to fiddle with the Kestrel’s buttons. It’s much easier to enter data and change settings with the APP.”
This Part III video shows how to determine true wind direction by aligning the SIDE of the unit into the wind. You essentially want to set the unit 90 degrees to the wind direction so the impeller runs as slowly as possible. Then, after you set your target distance (See 3:03), the unit can give you precise come-ups for your intended target (10.28 MOA for 559 yards here). The Kestrel then calculates the cross-wind correction as well (See 3:12).
DISCLAIMER: This video and description contains affiliate links, which means that if you click on one of the product links, the video author may receive a small commission. This helps support F-Class John’s YouTube channel and allows him to continue to make videos like this.
We know you guys like taking photos of your rifles at the range. And, if you’re selling a rifle, scope, front rest, or rear bag, you need good photos to post in our Forum classifieds. Here’s a basic photography tip that can help you produce dramatically better photos. Use your camera’s ability to add “fill flash” even in daylight.
There’s plenty of light on a bright day. But bright light also means strong shadows. The shadows can leave parts of your subject literally in the dark. Daylight flash will help fill in those dark spots. In addition, if you are on a covered firing area, and want to include the range in your photo, you can benefit from using flash. This will prevent the foreground subject from being too dark while the downrange background is much too bright.
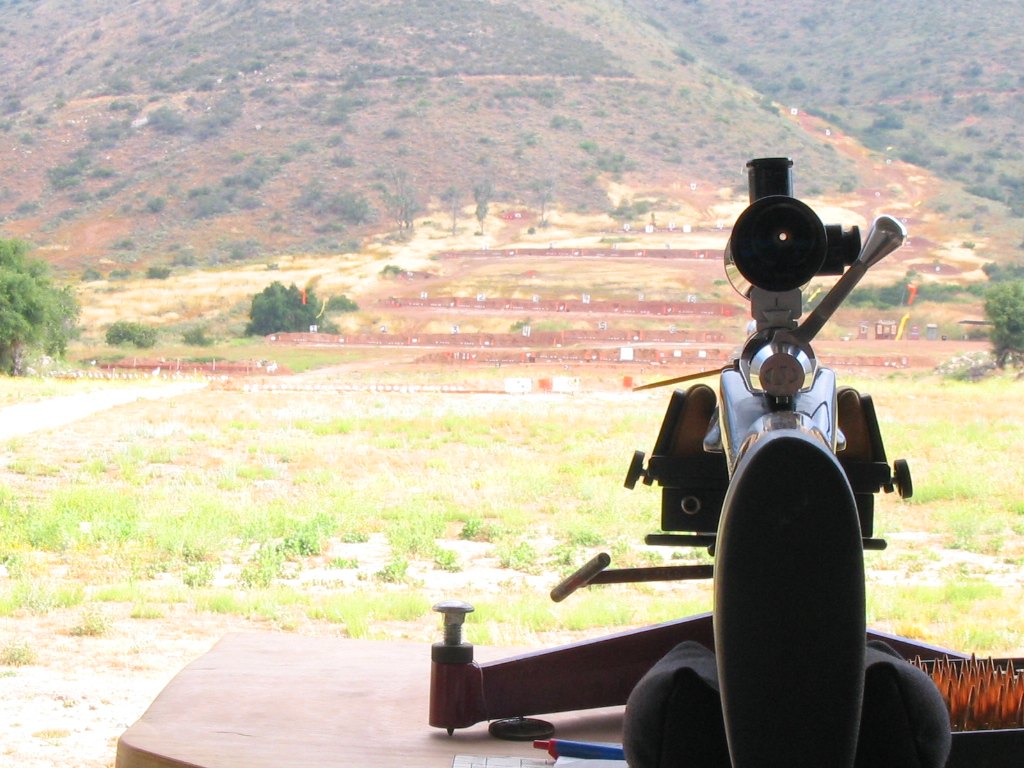
Photo without Flash
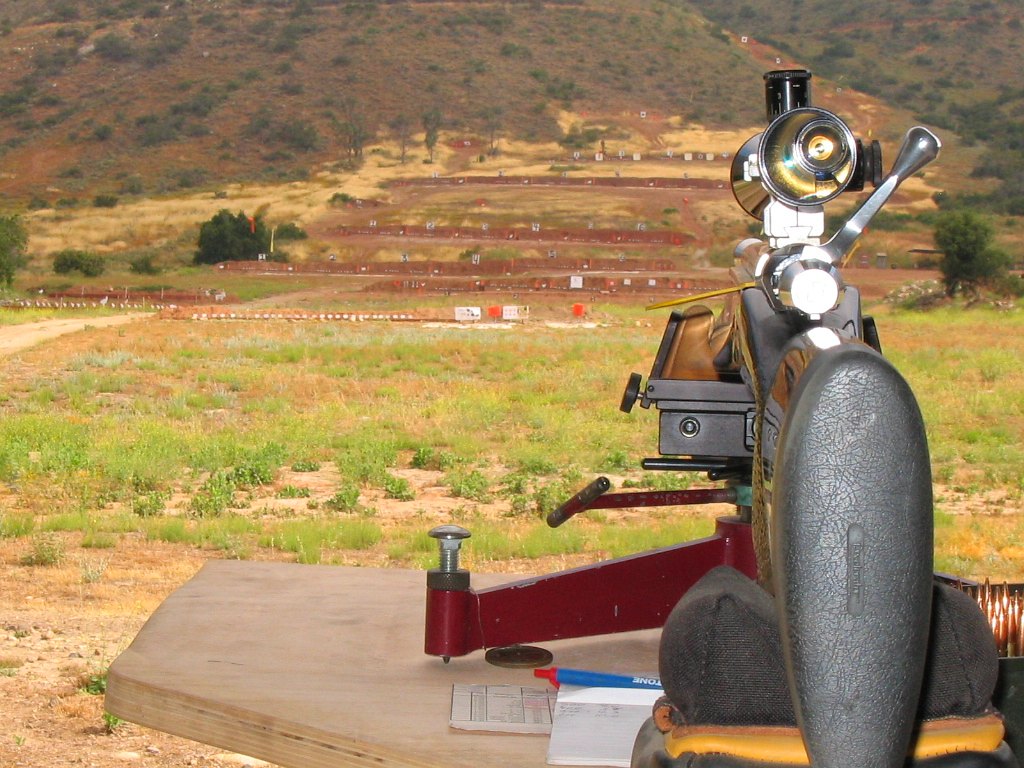
The photo above was taken without flash. As you can see, the rifle is too dark so details are lost. At the same time, the background (downrange) is over-exposed and washed out. The second photo below is taken with daylight flash. The difference is dramatic. Now you can see details of the rifle, while the background is exposed properly. Note how much easier it is to see the the targets downrange and the colors of the front rest. NOTE: these two photos were taken at the same time — just seconds apart.
Photo with Daylight “Fill-Flash”
Be sure to click on the larger versions of each photo.
How to Activate Daylight Flash
Most digital cameras have daylight flash capability. Some cameras have a separate setting for “auto fill flash”. On other cameras, you’ll have to set the camera to aperture priority and stop down the aperture to force the flash to fire. Read your camera’s manual. On many Canons, a menu that lets you set the “flash output”. For “fill flash” we like to set the flash at 30% to 50% output. This fills in the shadows sufficiently without “killing contrast” or creating too much reflection on shiny metal. Below is a photo taken with 30% flash output. Note the rich colors and how the exposure is balanced between foreground and background. Without flash the sky and target area would be “washed out”.
Here’s another tip for Canon owners. If you like deep, rich colors, use the “Vivid” setting in the effects menu. This punches up saturation and contrast.
Forum member F-Class John is an avid F-Class competitor and expert handloader. John reviews reloading hardware and shooting-related products for his popular F-Class John YouTube Channel, which now boasts 220+ videos. John also does important product testing for AccurateShooter.com. Through his YouTube channel, John has reviewed many of the latest and greatest reloading tools and accessories. For today’s Video Showcase, we selected eight F-Class John tool and reloading product reviews.
If you like these selected videos, consider joining F-Class John’s Patreon Channel for live video meetings, more in-depth videos, and detailed explanations.
21st Century Hydro Press and Standard Arbor Press
John notes: “You can’t really talk about precision reloading without taking about inline dies and arbor presses. For my money there’s nothing better than the lineup from 21st Century Shooting. They offer the Hydro Seater which is hands-down the best manual seater out there as well as their standard arbor press which is great for taking on the road to push back bullets as needed.”
Primal Rights Competition Priming Seater (CPS) Review
If there is a Ferrari of priming tools, it has to be the Primal Rights Competition Primer Seater (CPS). This impressive bench-mounted tool allows very precise control over primer seating depth. A vertical tube holds primers ready for insertion. The action is smooth and precise. John believes that this is definitely the best priming tool on the market, though it may not be for everyone given its premium $600.00 price.
Lyman Powered Case Trimmer Review
The Lyman Case Trim Xpress is an efficient, precise unit that allows easy adjustment of trim length with a click-adjustable collar. The trimmer comes with a set of cartridge-specific bushings that index off the case shoulder. One nice feature is a variable speed control. For the price, $154.99 on Amazon, this trimmer delivers excellent performance. F-Class John has another video review of the Lyman Case Trim Xpress which shows set-up and operation.
Dillon 750 Tips and Tricks
The Dillon XL 750 is a favorite of high-volume reloaders. With the optional case feeder, the XL 750 offers high output with great reliability. And Dillon offers one of the best warranties in the business. In this video, F-Class John features upgrades including the Armanov tool-head holders from Europe. These are drilled and tapped for all FIVE stations allowing the user to put threaded dies in any station.
Gunsmithing Torque Wrench Comparisons
When you are working on custom rifles that might cost $5000+, and mounting scopes that can run $3000 (or more), you need to use very high-quality tools. Precise torque settings are essential, both to avoid damage to valuable parts, and to have the rifle and optic perform optimally. In this video, F-Class John looks at a variety of torque wrenches suitable for gunsmithing duties.
Concentricity Checking with Accuracy One Gauge
Every serious hand-loader needs a quality concentricity gauge. The Accuracy One Concentricity Gauge boasts a smart design that delivers precise, repeatable results. We like the unit’s easy adjustability and its ability to work in a variety of configurations. The Accuracy One Gauge measures internal and external neck runout of cartridge cases as well as seated bullet runout. It can also measure the runout of the ogive, bearing surface, and boat-tail of individual bullets. And it can even measure your primer pocket runout.
Teslong Rigid (Shaft) Borescope with Monitor
Seeing inside your barrel can provide clues to how well you’re cleaning and the bore’s overall health. One of the best tools on the market is the Teslong Rigid Borescope. This features a solid rod for easy use in barrels. Plus it comes with a self-contained high-definition viewing monitor so no smartphones or WiFi tablets are needed. If you’re looking for something more portable and a bit more versatile, try the Teslong Flexible Borescope, $99.99 including monitor. John was impressed with the new rigid Teslong he tested, and he likes having a dedicated monitor (no WiFi required).
Zero Turret Press with Whidden Sizing Die
The new Zero Press from Area 419 is arguably the best turret press ever crafted. It offers unrivaled precision, along with the highest-capacity turret head with NINE die/tool stations. Milled from billet aluminum and stainless steel, this press moves with the help of 14 bearings. In this video, F-Class John shows how to use a Whidden Gunworks full-length sizing die on the Zero Press. And John has two other video reviews of the $1200 Zero Press: 1. Zero Press First Thoughts Video; 2. Loading on a Zero Press.
Performs as Promised — Prevents Mess at Home or at Range
When cleaning rifles, wet and dirty patches can make a real mess. And solvent spray from the muzzle is another issue. Here’s a solution — the MTM Gun Cleaning Patch Catcher. Simply slip it over your barrel to contain all the patches pushed out the muzzle. No more mess and stains on your bench/table. When cleaning tasks are done, simply remove the Patch Catcher and dump the contents into the trash.
We’ve tried this product and it definitely helps keep your work surfaces and floors clean. No more messes on the bench or spray from solvents. Purchasers really like this product — it has 80% five-star reviews on Amazon (current Price $9.03). Watch the video to see how the MTM Patch Catcher works.
Here are product reviews from actual MTM Patch Catcher purchasers:
“This box straps over the muzzle end of a barrel and keeps the mess completely contained. Excess cleaning solvents collect in the bottom. Patches fall off the jag and are captured as well when the cleaning rod is withdrawn. It also completely contains the splatter burst when a bore brush exits the muzzle of whatever firearm is being cleaned.” — D.J. Bradley
“This little device is more than a patch catcher. It also contains that dirty, smelly spray when a bore bristle exits the barrel. With the top open, it will also catch spray cleaners and lubes when used on small parts. It takes a little work to mount it on a railed over/under, but it gets the job done there too.” — TwoBoxer
“This does exactly what it claims. It keeps the table or floor clean while you are cleaning barrels. It is easy to use and easy to clean. If you are cleaning guns outside on a range, then you probably don’t need this. If you cleaning them in your garage, then buy this. Your garage and workbench will love you.” — DDDnotes
Q: Does this fit securely if you have a standard muzzle break?
Answer: Yes, I regularly use this product on all of my rifles including my Savage 111 Long Range Hunter with a factory brake. It really keeps the smell down with the top closed. Also stops the splatter of a stiff brush exiting the muzzle. Great Product! — Iklwa
Q: Has anyone used this with an AR15?
Answer: It works quite well — goes on and off easily. Slide it on the barrel until you can tighten the strap behind the flash suppressor.” — Cactus
Tumblers and walnut/corncob media are old school. These days many shooters prefer processing brass rapidly with an ultrasonic cleaning machine. When used with the proper solution, a good ultrasonic cleaning machine can quickly remove remove dust, carbon, oil, and powder residue from your cartridge brass. The ultrasonic process will clean the inside of the cases, and even the primer pockets. Tumbling works well too, but for really dirty brass, ultrasonic cleaning may be a wise choice.
Our friend Gavin Gear recently put an RCBS Ultrasonic cleaning machine through its paces using RCBS Ultrasonic Case Cleaning Solution (RCBS #87058). To provide a real challenge, Gavin used some very dull and greasy milsurp brass: “I bought a huge lot of military once-fired 7.52x51mm brass (fired in a machine gun) that I’ve been slowly prepping for my DPMS LR-308B AR-10 style rifle. Some of this brass was fully prepped (sized/de-primed, trimmed, case mouths chamfered, primer pockets reamed) but it was gunked up with lube and looking dingy.”
UltimateReloader.com Case Cleaning Video (7.5 minutes):
Gavin describes the cleaning exercise step-by-step on UltimateReloader.com. Read Gavin’s Cartridge Cleaning Article to learn how he mixed the solution, activated the heater, and cycled the machine for 30 minutes. As you can see in the video above, the results were impressive. If you have never cleaned brass with ultrasound before, you should definitely watch Gavin’s 7.5-minute video — it provides many useful tips and shows the cleaning operation in progress from start to finish.
Ultra Dry Necks After Ultrasonic Cleaning — Some Suggestions
The Ultrasonic cleaning process gets cartridge brass so “squeaky clean” that increased force may be required to seat your bullets, or they may “grab” as they go in the necks. To reduce bullet-seating effort, you may benefit from adding a little dry case lube inside the case-neck before loading (use a nylon brush). Another trick is adding a teaspoon of Ballistol lube to the cleaning solution. That provides a trace lubricant inside the necks, but does not interfere with powder ignition in any way.
The latest Gen2 RCBS ultrasonic cleaning machine has a large 6.3-quart capacity. That’s nearly 100% larger than the first generation machine in Gavin’s video. The Gen2 machine, $385.49 on Amazon, features a second ceramic heater and transducer to better clean brass cases and firearm parts. The LED is easily programmable, and the timer can be set for up to 30 minutes of cleaning. The original 3.2 quart-capacity RCBS ultrasonic machine, as shown in Gavin’s video, is still available for $180.72 at Midsouth Shooters.
The Where To Shoot Mobile App quickly locates shooting ranges near you, drawing on North America’s most comprehensive directory of shooting ranges. Users can search by current location, state, or zip code. Once you locate a range, you can view activities offered along with a summary of range facilities. You can even get driving directions.
The app is modeled after NSSF’s popular WhereToShoot.org® website and is updated frequently with range information for every U.S. state and Canadian province. Once you’ve located a place to shoot, the App can provide directions to the range. The App also includes video tips for shooters, news, and firearm-safety information.
Here’s a very cool 3D Animation showing pistol rounds being fired. Computer-generated graphics provide a look inside the cartridge at the moment of ignition as the primer fires and the flame front moves through the ignited powder. It’s really kind of mesmerizing. If you’ve every wondered just what happens inside your cartridges the moment that firing pin strikes, then watch this video…
Watch Video to See Handgun Ammo Being Chambered and Fired:
Mute Enabled — Click Speaker Icon to Hear Audio. Firing Sequence Starts at 1:28.
This animated video from German ammo-maker GECO (part of the Swiss RUAG group of companies) reveals the inside of a pistol cartridge, showing jacket, lead core, case, powder and primer. Employing advanced 3D rendering and computer graphics, the video shows an X-ray view of ammo being loaded in a handgun, feeding from a magazine.
Then it really gets interesting. At 1:28 – 1:50 you’ll see the firing pin strike the primer cup, the primer’s hot jet streaming through the flash-hole, and the powder igniting. Finally you can see the bullet as it moves down the barrel and spins its way to a target. This is a very nicely-produced video. If you’ve ever wondered what happens inside a cartridge when you pull the trigger, this video shows all. They say “a picture’s worth a thousand words”… well a 3D video is even better.
Running out of space in your gun safe? Here’s a clever product that will allow you to store more long guns in your current vault. The plastic Rifle Rods from Gun Storage Solutions slip in long-gun barrels and then grip the shelf above using Velcro pads. This allows you to nestle your rifles and shotguns much closer together than with the conventional racks provided with most gunsafes. The rods are offered in bright orange or basic black. We prefer the safety orange rods (shown above with the Velcro “receiver” shelf liner provided with the Rod Kit).
Rifles with narrow furniture (such as lever guns) can be placed very close together, saving lots of space. For benchrest or varmint rifles with wider fore-ends, you won’t benefit as much. Note that, in the photo above, all of the guns are fairly slim — none have wide fore-ends. Still we think these Rifle Rods could open up 12″ or more horizontal clearance in a medium-sized safe — that could easily allow you to store six (6) more guns in two rows, as shown.
Rifle Rod Kits Starting at $21.70
A kit with 5 Rifle Rods and fabric shelf liner costs $21.70 on Amazon.com, while the 10-Rod Kit with liner costs $34.70 on Amazon. That’s a lot cheaper than buying a new safe. A six-pack of additional rods is $19.95 from StoreMoreGuns.com. NOTE: Some Amazon kits have black rods. To get the bright orange rods you may have to pay a few dollars more and order directly from Gun Storage Solutions.
WARNING: Always REMOVE Rod from barrel before taking gun to the range. Never place live ammunition in a gun with storage Rod in the barrel!
Here’s a product we’re pleased to see on the market. Walker’s, a major supplier of hearing protection for shooters, offers smaller-sized NRR 23 ear muffs specifically designed for small children from six months to eight years of age. Walker’s basic Kid’s Folding Muffs provide protection for children against dangerous loud noises. The muffs are designed to fit smaller heads properly, and protect the sensitive hearing of youngsters. Priced under $15.00 on Amazon, these are very affordable so there’s no excuse not to protect your childrens’ hearing.
The adjustable headband on these muffs is designed for the smaller heads of kids up to age 8. These Kids’ Folding Muffs have a 23 NRR noise reduction rating. We wish that were at least 25 NRR, but this can be supplemented with foam plugs for extra protection (plugs under the muffs). The important thing is that these muffs are sized right for youngsters and fit properly (for a good sound-seal). Walker’s Kids’ Folding Muffs start at $14.99 MSRP and come in seven color choices: Coral, Highlighter Yellow, NEXT Camo, Blue, Green, Orange, and Pink. (Other colors are offered on Amazon including Purple and Black.)
In addition, Walker’s has a new series of Youth and Infant Muffs, designed expressly for smaller kids. These fit the smaller heads of youngsters and have comfortable padding so the young ones will tolerate them for longer periods. There is an Infant Muff for children 0-2 years, and a larger Youth Muff for kids 3-7 years. CLICK HERE for Product Info.
Baby BANZ for Children 0-2 Years Parents of very young infants should consider Baby BANZ Muffs, which are designed for infants 0-2 years. These small-sized muffs can protect toddlers’ hearing during rock concerts, when loud machinery is running, during fireworks displays, or other noisy activities. With an impressive NRR 31 dB rating, these really work for tiny tots and toddlers.
One mother reports: “I bought these for my two-month old and they work great! He’s never fought us putting them on. He’s now falling asleep with them. He’s slept through a demolition derby and a rowdy wedding reception. I’m ordering another pair for my nephew.” Another mom says: “We bought these when we took our four month-old to a loud event. They fit her head well and were well-padded. She looked very comfortable, so comfortable in fact that she slept for most of her first rock concert. I’d say they worked exceptionally well!”
In recent months, Forster Co-Ax® presses have been hard to find, as demand has out-stripped supply. But the folks at Forster Products are working hard to get these excellent presses out to vendors. Be patient, check with multiple sellers, and you should be able to find one.
If you are not yet familiar with the many unique features of the Forster Co-Ax, we recommend you watch the video embedded below. This shows how the press operates and highlights the design elements which set the Co-Ax apart from every other reloading press on the market.
Video Shows Special Features of Forster Co-Ax Reloading Press
Forster Co-Ax Press Video Review
This is a very thorough review of the Forster Co-Ax done by Rex Roach. This 14-minute video shows the key Co-Ax features, explaining how the floating case-holder jaws work (3:30 time-mark), how the dies are held in place (4:40 time-mark), how spent primers are captured (6:10 time-mark), and how to set the primer seating depth (10:00 time-mark). We’ve used a Co-Ax for years and we still learned a few new things by watching this detailed video. If you are considering purchasing a Co-Ax, definitely watch this video start to finish.
The Co-Ax case-holder features spring-loaded, floating jaws. These jaws have two sets of openings, small and large. This allows the system to adapt to various rim diameters. The jaw plates can simply be reversed to switch from small jaw to large jaw. In the photo above, the Co-Ax is configured with the large jaw openings in the center.


 We know you guys like taking photos of your rifles at the range. And, if you’re selling a rifle, scope, front rest, or rear bag, you need good photos to post in our Forum classifieds. Here’s a basic photography tip that can help you produce dramatically better photos. Use your camera’s ability to add “fill flash” even in daylight.





 This animated video from German ammo-maker






 In recent months, Forster Co-Ax® presses have been hard to find, as demand has out-stripped supply. But the folks at


