What anti-corrosion products really fight rust effectively? You’ll hear many opinions, but what do actual field tests reveal? One rifle shooter, who posts on YouTube as BlueonGoldZ, wanted to separate myth (and marketing claims) from reality, so he completed his own long-term rust test using metal samples. First he used ordinary tap water spray, and then he did a second, longer-duration test with a salt-spray solution. Nine different products were tested: Break Free CLP, Corrosion-X, Frog Lube, M-Pro 7, Outers, Pro-Shot Zero Friction, Rem Oil, Slip 2000, and Tetra Gun Triple Action CLP.
BlueonGoldZ initially examined each product for its “beading” properties with a normal tap water spray. But the main test involved many multiple weeks of exposure after a “dense” salt-water spray. (No rust formed after two weeks tap water exposure, so the test was accelerated with salt-water exposure).
The clear winners in the test, as shown by the screen shot above, were Corrosion-X (Best), and Frog-Lube (Second Best). The photo shows the test samples two weeks after being sprayed with salt water. The results are pretty dramatic — you can see with your own eyes what happened. We think this is a very useful bit of real-world research.
Results from Similar Long-Term Salt Exposure Test
Unfortunately, BlueonGoldZ’s test did NOT include Eezox, which we have found to be extremely effective (on a par with Corrosion-X). In another long-term test of corrosion preventatives, the two best rust fighters were Eezox and Corrosion-X in that order. Since that test was completed, Corrosion-X, already an excellent product, has been enhanced. CLICK HERE for Long-Term Salt Exposure Test Report.
Our friend Gavin Gear of UlimateReloader.com got a chance to visit a SilencerCo dealer, The Range LLC in Yakima, WA. During his visit, Gavin was able to test a number of suppressors (aka “moderators” or “silencers”) for both rifle and pistols. Gavin has released a lengthy article covering his experiences. If you are in the market for a suppressor, we highly recommend you read Gavin’s SilencerCo Products Overview on UltimateReloader.com.
Gavin was able to test three SilencerCo suppressors: the Omega 300, the Hybrid, and the Osprey 45. In addition Gavin was able to handle the Maxim 9, an integrally suppressed 9mm handgun.
Gavin reports the Omega 300, which is rated up to .300 Winchester Magnum, is a very popular “can”. According to Gavin, the Omega 300 has become the best-selling rifle suppressor in history for important reasons. First, it has an integral muzzle brake. Second, it can work for multiple calibers, from .223 up to .308. Third, “It is very tough — .300 Win Mag rated, and full-auto rated”.
SilencerCo lineup, from left: Omega 300, Hybrid, Osprey 45
Gavin says the Hybrid Suppressor is an interesting concept: “One suppressor that you can configure for multiple calibers, both rifle and pistol. This includes the ability to change out the threaded mount on the muzzle end, and you can also swap out end caps that will optimize sound suppression for different calibers. The Hybrid… is full-auto rated, and can handle rifle cartridges up to and including .338 Lapua Magnum! But this suppressor can also be used for pistol applications…from 9mm up to 44 ACP.”
Here’s a handy invention by Forum member RayJay from Georgia. It’s a simple wire clip that will hold the lid of your plastic ammo box fully open during use. RayJay explains: “Everybody probably uses the cheap plastic cartridge cases. The only problem I have with them is the lid is always in the way and sometimes when trying to open the lid farther the cartridge box tips and you can dump out the cases. I did some cogitating and came up with these .061″ music wire clips. They work great and the unexpected benefit is that the cases are more stable while sitting at the bench.”
RayJay adds: “The round wire is ideal because it still allows a cartridge to fit in the hole where the clip is placed. Now all I need to do is make another 15 or 20 so I can have one in every case I own.”
Another Answer — Buy Better Ammo Boxes with Mechanical Hinges
Many common types of ammo boxes do have this annoying issue of the lids resisting opening and not staying fully open. However, some of the better boxes from Plano and MTM now have a proper hinge, so that the lid lies flat. Even the basic MTM P50 boxes now have a Mechanical Hinge so the lid opens all the way and lies flat when open (see video at 00:48):
Thunder Beast Arms suppressors from the SilencerShop.
A bill has been introduced in the U.S. Congress to make it much easier to buy a suppressor (aka silencer). Well it’s about time! While other countries permit (and even encourage) suppressor use with minimal regulation, the USA still requires local police involvement, lengthy waits, onerous background checks, fingerprints, and a $200 tax stamp just to own a metal cannister that reduces the noise of a firearm. That doesn’t make sense. At last some politicians are working to change those restrictions.
The Hearing Protection Act (H.R. 95)
U.S. Congressman Jeff Duncan of South Carolina has introduced H.R. 95, The Hearing Protection Act. This bill would remove firearm suppressors from the 1934 National Firearms Act (NFA), eliminating onerous and duplicitous background checks. Instead, suppressors would be regulated under the 1968 Gun Control Act (GCA) with the same background check that is required for a retail firearm purchase.
It makes sense to change the law. Currently it is a major, costly burden to obtain a suppressor even though firearm suppressors are legal to own and possess in 42 states. Some countries actually REQUIRE the use of a suppressor when hunting or recreationally shooting. In Europe, suppressors are widely available and can often be purchased in a hardware store without a background check. So why is America so different? Because we have stupid, antiquated laws that do not recognize the many benefits of suppressors.
How to Obtain a Suppressor Currently — Too Many Hurdles and “Red Tape”
Under current law, an individual purchasing a suppressor must locate a retailer that is regulated as a NFA Class III dealer, complete a Bureau of Alcohol, Tobacco, Firearms and Explosives (ATF) Form 4 with the model and serial number of the suppressor, and obtain two passport photos and fingerprint cards from a local police department. The local chief law enforcement official must receive a completed copy of the application. Then the form, photographs and fingerprints must be sent to ATF along with a check to pay the $200 tax. Currently, it takes ATF about nine months to process the paperwork. Then, the customer can obtain the suppressor from the NFA Class III dealer upon an additional background check through FBI’s National Instant Criminal Background Check System (NICS).
Congressman Duncan’s legislation would eliminate those requirements and make suppressors available with the same paperwork, record-keeping, and background check procedure that is currently required for purchasing a firearm. So if you can buy a rifle, shotgun or pistol now, you could also buy a suppressor, with no extra fees, licenses, tax stamps, fingerprinting, or police approvals.
“This legislation removes barriers to owning an accessory that makes recreational shooting and hunting safer, more accurate and allows shooting ranges to be better neighbors”, said Lawrence Keane, NSSF Senior Vice President and General Counsel. “Firearm suppressors are a safety device designed to make recreational shooting safer. They were originally listed under the NFA over concerns of poaching during the Great Depression, but that never bore out. Even today, suppressors are exceedingly rarely used in crime.”
Firearm suppressors reduce the report of a firearm from a level typically about 165 decibels — roughly equal to that of a jet taking off. Sound levels that high can cause instant and permanent hearing loss. A quality suppressor can reduce the sound by 30 to 35 decibels. That suppressed noise level is still loud, but will not permanently damage hearing. Suppressors work similarly to a car’s muffler, redirecting exhaust gases. The suppressor/silencer was first patented more than 100 years ago by Hiram Maxim.
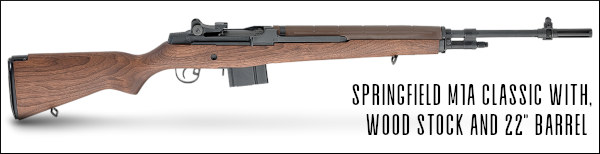
Do you own an M1A rifle? If so, you’ll want to view a new video from Springfield Armory (SA). As part of SA’s new Workbench Video Series, this 9-minute video is a detailed guide to the M1A rifle. The video can benefit any M1A owner or shooter: “These in-depth videos were developed to help new gun owners safely care for and maintain their firearms, as well as provide a useful resource for seasoned gun owners”, notes Steve Kramer of Springfield Armory. In the video, firearms expert Steve Horsman provides a step-by-step guide for the popular M1A semi-auto rifle.
Springfield Armory M1A Workbench Video:
“Descended from the M1 Garand, the M14 utilized multiple improvements that made it a far superior firearm for combat and a much better rifle for competition.” — Dick Jones, Shooting Sports USA.
An evolution of the M1 Garand, the M14 was designed to shoot the 7.62×51 (.308 Win) round instead of the larger .30-06 Springfield cartridge used in WWI, WWII and Korea. While the vast majority of today’s M1As are chambered for .308 Win/7.62×51, Springfield Armory also produces a 6.5 Creedmoor version
For many years, the semi-auto version of the M14 was “top dog” in iron sights Service Rifle competition. Now that discipline is dominated by .223 Rem (5.56×45) AR-type rifles, but the bigger .308-caliber rifle, now sold as the M1A, remains popular. Each summer, the CMP hosts a major M1A Match at Camp Perry, sponsored by Springfield Armory. This is a popular event with 100+ competitors and significant cash prizes.
See how the modern M1A is built in this Springfield Armory Video:
As racing improves automobiles, competition improves firearms, and the current crop of Springfield M1As, from the Basic to the top-of-the-line Super Match and Loaded models, reflects the years of development. The M14 and its variants are … still considered by many to be the best battle rifle in the history of the U.S. Military. — Dick Jones, Shooting Sports USA
Military Version Operation Revealed — M14 Training Film
The original military version of the M1A was the select-fire M14. The 27-minute official U.S. Army video below demonstrates the operation of the M14. Field-stripping is shown from the 5:13 time-mark through 8:30. Cut-away drawings show the M14’s gas operation at 8:40.
Watch M14 Functioning Cycle Starting at 9:25 Mark:
The M14’s complete 8-step functioning cycle is demonstrated from the 9:25 time-mark through 22:41. These eight operations are: 1) Feeding; 2) Chambering; 3) Locking; 4) Firing; 5) Unlocking; 6) Extracting; 7) Ejecting; and 8) Cocking. This movie is fairly long, but every M1A owner should definitely watch this video start to finish.
It’s great to be able to access online load data for your cartridges. You can quickly get load data for a particular powder and bullet weight. However, there are times when we prefer to consult old-fashioned printed/bound load manuals. The primary reason is that manuals produced by bullet- and tool-makers will, for a particular cartridge, include data for powders from multiple manufacturers. Having a single source can save you time and trouble. For example, if you want to find 6.5 Creedmoor loads using H4350 (Hodgdon), Reloder 16 (Alliant), and N150 (Vihtavuori) you would have to visit three different powder-maker websites, one after another. OR you can pick up a modern load manual and find everything in one place.
There are many excellent printed load manuals on the market. We have used the Berger Manual, Sierra Manual, Speer Manual, Lyman Manual, and Hornady Manual. We like the Berger and Sierra manuals for match rifle cartridges, and the Lyman and Hornady manuals for hunting loads and pistol cartridges. Unfortunately, the popular binder-format Sierra Manual is currently back-ordered. Get one if you can.
The Lyman Reloading Manuals have earn praise over the years:
“Every other reloading book I’ve used favors their own bullets over every other manufacturers. With Lyman you get an honest representation of a wide variety of different… manufacturers. [Lyman has] a ton of reloading data on just about any bullet style you can imagine. I’ve tried a wide range of their recipes and everyone I’ve tried has been spot on. The overall breadth of information this book covers is impressive.” Review by RangetoReal.com.
Nosler #9 Manual Features New Cartridges
If you are looking for the latest cartridge/bullet/powder updates, just last month (December 2020) Nosler released the new Nosler Reloading Guide #9, the latest in a respected series of hardback Nosler load manuals.
This 800-page guide covers 101 cartridge types. New in this edition you’ll find the popular 6mm Creedmoor, 6mm XC, 6.5 PRC, and 7.62×39, along with 20 Nosler, 22 Nosler, 24 Nosler, 27 Nosler and 33 Nosler. This manual is a good resource for PRS shooters and hunters. The Nosler #9 book draws from thousands of hours in the Nosler Ballistic Lab, along with the experience of many respected experts.
The book is available for $24.99 at Midsouth or $24.95 on Amazon. Keep in mind that much of the book’s latest load data is available for free on the Nosler.com online LOAD DATA Center. But to get ALL the data, PLUS all the technical articles, you’ll need to buy the book.
Along with the new Nosler #9 Manual, here are four other recommended Reloading Manuals:
Here Are Four General Instructional Books That Cover Reloading Procedures:
POWDER BURN RATE TABLE
Here is the most recent powder burn rate chart from Hodgdon/IMR that we could find. Click links below to access printable PDF. Note, some readers have suggested a couple powder ranking issues in the table. However, this is the latest official version from the IMR website, released in November 2019.
Gun-makers and barrel builders have adopted aerospace technology, using carbon fiber in their stocks and composite barrels. Today you’ll find carbon components on dozens of rifle brands. Some rifles sport full carbon stocks AND carbon-wrapped barrels. Others features a carbon stock with steel barrel, or a carbon-wrapped barrel in a conventional stock. Carbon is definitely here to stay. This advanced material allows rifles to be lighter yet stronger. The advantages for the hunter in the field are real — a carbon-wrapped barrel can save quite a few pounds. Here are some of the most notable carbon applications we saw at SHOT Show.
Sako 85 Carbon Wolf
One of the the best-looking carbon-stocked factory rifles is the Sako 85 Carbon Wolf, featured in our Top Photo. Introduced in 2018, this rifle features a full carbon composite stock, with the signature carbon fiber weave visible throughout. We found this rig very ergonomic and nice to handle. The advanced-design RTW carbon fiber stock offers quick, push-button adjustments for comb height and LOP. Though not carbon-wrapped, the conventional 24″ blued steel barrel is fluted, reducing the overall weight of the rifle. Without optics, this rifle weighs well under 8 pounds. We were impressed by the Carbon Wolf, but choked on the steep $3600.00 MSRP. Street price will be lower — EuroOptic.com is listing a $3148.00 price for the Sako 85 Carbon Wolf.
The Firearm Blog says: “The stock features Soft Touch coating. Is is not at all slippery or loud like some carbon stocks can be. The barrels are factory threaded as well. Both the weight and the balance of the Carbon Wolf rifle felt perfect. I may have to add one to my Finnish rifle collection.” This is offered in 6.5 Creedmoor, .308 Win, .30-06 Springfield, 7mm Mag, and .300 Win Mag.
Nosler M48 Long-Range Carbon Rifle
Nosler offers the M48 Long-Range Carbon rifle with the addition of a PROOF Research, carbon fiber-wrapped, match-grade barrel that significantly reduces the overall weight of the rifle. The carbon-wrapped Proof barrel is mated to a trued M48 receiver and bedded in a Manners MCS-T carbon fiber-strengthened stock. Nosler says: “The Model 48 Long-Range Carbon is an excellent choice for mountain hunting, backcountry excursions and long range competition where weight is a concern.” This rifle has been offered in 6.5 Creedmoor, 26 Nosler, 28 Nosler, 30 Nosler, .300 Win Mag, and 33 Nosler.
Christensen Arms TFM — Carbon Galore for 7.3-lb Rifle
As you can see there’s a whole lot of carbon fiber in the Christensen Arms TFM rifle. With a carbon-wrapped barrel and full carbon-fiber stock, this handsome rig weighs just 7.3 pounds (short action) or 7.8 pounds (long action). The carbon-wrapped stainless barrel and fully-adjustable Aerograde carbon-fiber stock are mated to a precision-machined action via integrated carbon fiber pillars. In addition, the TFM includes an integrated, 20-MOA optics rail, detachable magazine, and a titanium side-port brake. Impressively, Christensen Arms guarantees 0.5 MOA (half-MOA) accuracy.
Manners Full-Carbon F-Class Stock
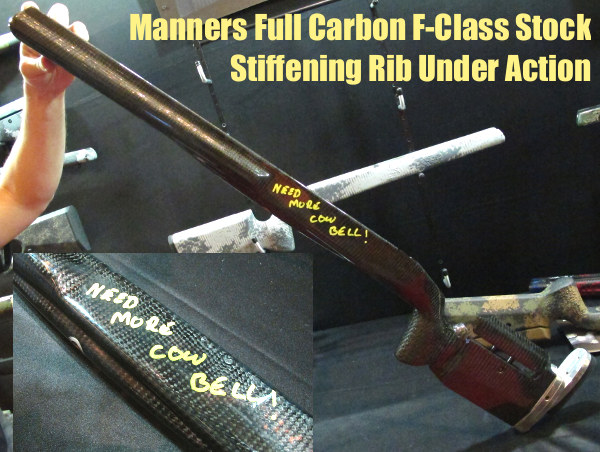
For many years now, Manners Composite Stocks has offered an ultra-stiff, Low-Profile ‘Fish Belly’ F-Class Stock. The shell is 100% carbon fiber with a very long, stiff fore-end. From the back of the action to the tip of the fore-end the stock measures 27″ long which is around 7 1/2″ longer than the Manners T4 stock. The idea is to provide a longer wheelbase to better balance the long, 30-32″ barrels favored by many F-Class competitors. The front half of the fore-end is very thin (from top to bottom) to achieve a low profile on the bags. Much thought has gone into controlling fore-end flex. The stock achieves greater vertical rigidity (less deflection under load) through an innovative “fish belly” design. The rounded undersection, like a canoe hull, strengthens the fore-end considerably.
Carbon Rival Rifle from Fierce Firearms
Fierce Firearms also offers a long-range hunting rig with a carbon-wrapped barrel. The Fierce RIVAL is an extremely light rig. Without scope or optional muzzle brake, the short-action version weighs just 6.5 pounds. It is available in a six different Camo finishes including Kuiu Vias and Kuiu Verde patterns. Then choose three different Cerakote finishes for the action. All this lightweight tech doesn’t come cheap. The Carbon rival starts at $2810.00. Add $100-$195 for your choice of steel or carbon muzzle brake. Fierce does offer a 0.5 MOA (half-MOA) accuracy guarantee, quite notable for an ultra-lightweight hunting rifle.
Weatherby Mark V with Carbon-Wrapped Barrel
Weatherby now offers rifles with Proof Research carbon fiber-wrapped barrels. The aerospace-grade carbon fiber in the Mark V Carbon barrel makes the barrel up to 64% lighter than traditional steel barrels of the same contour. Weatherby claims the carbon-fiber technology improves heat dissipation — so the barrel does not heat up as quickly with extended strings of fire. The 26” #4 contour carbon-wrapped barrel has a cut-rifled, hand-lapped 416R grade stainless steel core with a flush thread cap and 5/8-24 muzzle threads. It’s finished in tactical grey Cerakote. The Mark V Carbon carries Weatherby’s SUB-MOA (at 100 yards) accuracy guarantee when used with Weatherby factory or premium ammunition.
How Good Are Proof Research Carbon Barrels? — Commentary by Mike Davis
Over the past 15 years Davis Custom Rifle has installed barrels from most major barrel manufacturers. We are very fortunate to have such quality barrel makers. I think Proof Research falls into that top-of-the-line category. Proof Research carbon-wrapped steel barrels are super light-weight, yet offer rigidity and superb accuracy. I have used them for 22-250, 6mm/6.5mm Creedmoor, .308 Win builds and multiple long range hunting rifles in .280, .280 AI, .300 WSM, .300 Win Mag, 28 Nosler, and 30 Nosler. These builds with Proof Research barrels typically deliver quarter-MOA accuracy or better.
The Proof Research technology allows us to build lighter rifles with outstanding accuracy, easy cleaning, and the ability to shoot long strings without point of impact shift. It’s not hard to understand why hunting rifles with these capabilities are in high demand. Combined with other light-weight components (such as Titanium actions), it’s not difficult to get these rifles down to 6.25 to 7 pounds total weight before optics.
While nearly everybody now favors digital photography over “old-fashioned” 35mm film, don’t toss those old 35mm film canisters, especially the clear Fuji-type with secure snap-in lids. Small plastic film canisters have a multitude of uses for the shooter and reloader.
Here Are Things You Can Do with Plastic Film Canisters:
1. Hold thrown powder charges. If you weigh powder charges after throwing them with a manual powder dispenser, throw the charges first into a film canister and then use that to drop the powder into the measuring pan on your scale. The canister will catch every kernel of powder. If you throw charges directly into a weighing pan, powder can sometimes bounce out. Using the film canister will help keep spilled powder off your loading bench and floor.
2. Store extra sets of foam ear-plugs in the canister. You never want to be without ear protection. This editor has four film canisters filled with plugs. Two go in the range kit, one goes in the car’s glove compartment, and a second stays in a lock box I use to transport pistols. This way I never find myself at the range without ear protection.
3. Place smaller cotton patches in film canisters, marked by caliber. If you use the water-tight Fuji-style canisters, you can even pre-soak the patches with solvent. You can have one canister for wet patches, another for dry patches. That saves time when you’re at the range, and avoids spillage. One caution–some solvents may react with plastic, so test this first before you put a solvent-filled canister in your range kit.
4. Store your neck bushings, sorted by caliber in film canisters. With a permanent marking pen, you can mark the side or top of the canister with the bushing sizes, or caliber.
5. Store your favorite Bolt Grease (for rifles) or anti-seize compound (good for pistol slide rails), in the canister. You don’t need to fill it all the way up — a little dab will do ya. We only recommend this with the snap-top Fuji canisters.
6. Protect your muzzles with canisters, during transport. When shipping a rifle or barrel, slip the film canister over the muzzle, then secure it with electrical tape. This will protect the precious crown of a match barrel from dings or damage.
7. Protect front sights with linked film canisters. Forum member SPClark explains: “I’ve seen several shooters use film canisters to make up front match sight protection. Use some elastic cord between two canisters… that’s easy to remove once you get to the line.”
TELL US Your Tips!
There are countless other uses for 35mm film canisters. We invite readers to respond with their own tips on using these handy containers. If you don’t have some stashed in your workshop already, you can get empties for free at most film processing centers. The clear plastic Fuji canisters are the best — you can see what’s inside and the lids are watertight.
Today marks a New Year. 2020 is behind us (thank goodness!). We should start “Having Fun in 2021″. With that spirit, here are five “fun and games” targets. While each requires good conventional marksmanship skills — hitting a small aiming point — there are other strategies involved, such as playing darts or “making change” by hitting the right combination of coins. Most of us started shooting as kids, just plinking for fun. Here’s an opportunity to be like a kid again — to spend a day at the range just having fun with friends and family members.
Dartboard Target with Colored Rings
This printable Dartboard Shooting Target has the numbers inside the outer dartboard ring to allow a larger target. With this target you can shoot for the center bull, or actually play pub-style dart games, aiming for numbers and particular rings. If you don’t know how to play traditional dart games, visit NiceDarts.com for complete darts rules. One popular game is “Around The World”. The object is to hit the numbered zones, starting with number 1. Then you try for 2, 3, and so on. After hitting all the numbers 1 through 20, then hit the bullseye to win. CLICK HERE for Other Dart Board Color combinations.
American Coins Target — Make Change
This unique American Coin Target features actual-sized Eisenhower Dollars, Susan B. Anthony Dollars, and Kennedy Half Dollars in the top row. Below are rows of Quarters, Dimes, Nickels, and Pennies in descending order. NOTE: A U.S. Quarter has a diameter of approximately 1 inch, so it’s One MOA at 100 Yards. NOTE: When printing, select “100%” value and landscape mode — NOT “fit to page”! That will keep the dimensions of the coins accurate. Combining math with marksmanship, this target lets kids practice their math skills while having fun. Choose a money amount (such as $2.57 or $3.73), and “make change” by shooting a combination of coins.
NSSF Billiards Table Target
This Billiards Table Target offers 15 brightly-colored numbered balls with the cue ball at the bottom. Aim for the numbers, shooting 1-15 in sequence, or alternate between stripes and solids. You can also draw an “X” on the white cue ball (or attach a paster), and use that to set your zero. This target is fun for shooting outdoors with rifles at 50 or 100 yards or indoors with pistols.
This billiards target is part of a set of 12 Fun Targets from the NSSF. These were issued a couple seasons back for National Shooting Sports Month, held in August of each year. The other free targets include Golf Links, Bowling Pins, Fireworks, Baseball Diamond, Dutch Windmill, Water Balloons, Light Bulbs, Dartboard, and three Bullseye targets.
Flies in Circles Target
Now you can boast to your buddies that you hit a fly on your target — 16 times. On this target, 16 flies with bright red eyes are arranged in a inside circles, 16 to a page. There are various ways to use the fly targets. Some shoot to hit the head only — so aim for those red eyes. There are 11 other variations of this Fly Target available on the Targets.WS website.
Tic-Tac-Toe Fun Game Target
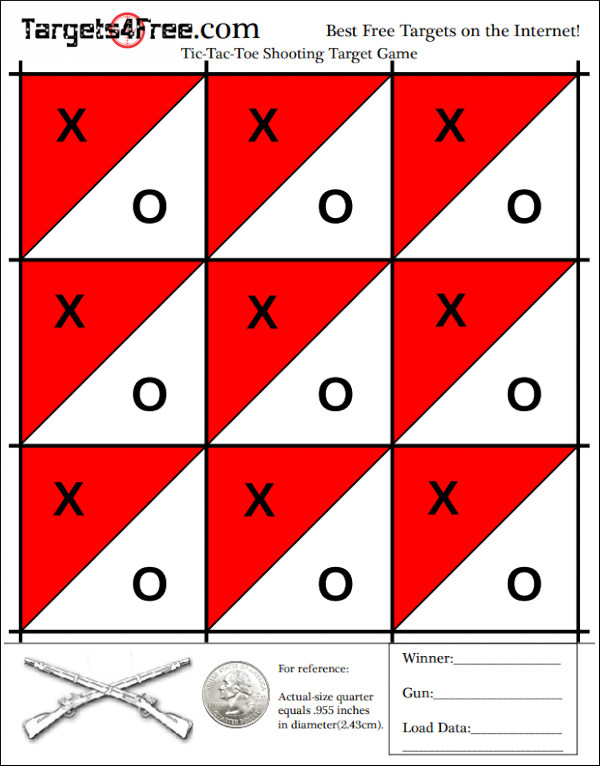
This Tic-Tac-Toe Shooting Game Target lets you challenge your shooting buddies at the range. One player can shoot the red triangles, while the other shoots the white zones, taking turns. You proceed just like a regular Tic-Tac-Toe game, alternating shots, with the goal of getting three of the same color in a row. This is a fun game for a parent and a young family member. You’ll find other fun targets on Targets4free.com.
Special BONUS — AccurateShooter.com Load Development Target
Our Load Development Target has been used by tens of thousands of shooters. It has proven very popular, since all your load data fits neatly in the boxes under each target. In fact this target is being employed by both rifle-makers (Bergara) and barrel-makers (including Criterion) to test their products. The target was designed for aiming efficiency. The red diamonds have 1/2″ sides and you can align your cross-hairs on the horizontal and vertical lines. It is a clean design that is easy to see even at 200 yards with a 20X scope. NOTE: When we test, we usually crank in a little elevation, setting the point-of-impact higher, so our shots fall in the gray circles. That way you leave the red diamonds intact for precise aiming.
Wouldn’t it be great if you could put up one BIG target that would handle a myriad of important tasks at the range: Zeroing, Load Development, Click Value Verification, and Click Tracking Repeatability Tests. Well the team at Box to Bench Precision (B2B) has developed what may be the most versatile (and biggest) precision targets ever developed. With ultra-accurate grid geometry, and razor-sharp printing, B2B’s targets set a new standard for target precision.
Click Tracking Grid Target The best procedure for checked the true value of your scope click values is to use a tall target that can dial in at least 25 MOA of “up”, and check where your cross-hairs air compared to exact pre-measured reference lins. B2B developed an advanced target just for that task. The 30″ tall by 23.5″ wide Rex Grid Target (shown below) provides a highly precise grid for testing elevation and windage clicks. The unique grid design has small tics denoting 1/4 MOA, 1/2 MOA, and 3/4 MOA. 1 MOA is marked with a “+” and the 5, 10, 15, 20, & 25 MOA elevation lines are bolded for better visibility. There are aiming points at 5 MOA intervals over the full grid.
This same target can also be used for “Box Tests” that verify click values and repeatability. with a box test you start in one corner with the initial shot (we recommend doing this with a warm barrel after a couple foulers). They you add “up” clicks to go straight up and take a second shot. Next add horizontal clicks to go across for the third shot. Then click down (the same number of cliks you went up) for the fourth shot. As a last step you reverse your horizontal clicks and take a fifth shot. If you have a good rifle and the scope clicks are repeatable, your fifth and final shot will be touching the first shot.
B2D’s Rex Grid Target can be used for Box Tests, as can B2B’s popularhttps://bit.ly/2BBe1jYLoad Development and Scope Tracking Target (left below) and B2B’s Sniper’s Hide 100-yard Target (right below).
B2B’s 100 Yard Long Range Load Development and Scope Tracking Target will perform many functions. This big, 30″ x 23.5″ target has specific aiming points for various tasks. In the upper left, there are 11 small orange circles for precision load testing. Over on the upper right are 7 more small, orange circles for doing a Seating Depth Comparison test.
The bottom half of the target has larger black-on-white circles that serve multiple functions. Use the corner circles to do a “Box Test” to confirm scope tracking. There’s another great feature on this target — running up the center of the target is a tall line that shows elevation in both MILs and MOA. That helps you confirm the TRUE click values of your optic. You’d be surprised how many scopes are slightly off — not exactly 1/4 MOA, 1/8 MOA, or 1/10 Mil as advertised. That’s why Long Range shooters absolutely need to verify their click values.
Buyers Praise the B2B Targets
We’ve handled the B2B Targets, which are printed on high-quality, tear-resistant card stock. We can attest the printing is very precise — with accurate elevation and windage values. These aren’t your ordinary targets — they are LARGE — nearly three feet tall. Verified buyers praise these targets:
“Thank you for talking to me about the MIL and MOA markers on your targets. They are very accurate. While using the Long Range 100-Yard Load Development/Scope Tracking target and my new scope, it helped me realize that my scope wasn’t tracking correctly (both turrets). So, I sent the scope to the manufacturer. When it came back, and using your target as my known constant… the scope is now ‘spot-on’ accurate. These targets are a great tool to gain a better understanding of your rifle, scope, turrets etc., all on one sheet.” — Stan, 2018
“Almost too nice to put holes in. I was in the printing industry for 35 years and these are really well done. Quality paper and precise printing … able to see bullet holes easily with these!” — Dan, 2018




 Nosler #9 Manual Features New Cartridges






 The best procedure for checked the true value of your scope click values is to use a tall target that can dial in at least 25 MOA of “up”, and check where your cross-hairs air compared to exact pre-measured reference lins. B2B developed an advanced target just for that task. The 30″ tall by 23.5″ wide Rex Grid Target (shown below) provides a highly precise grid for testing elevation and windage clicks. The unique grid design has small tics denoting 1/4 MOA, 1/2 MOA, and 3/4 MOA. 1 MOA is marked with a “+” and the 5, 10, 15, 20, & 25 MOA elevation lines are bolded for better visibility. There are aiming points at 5 MOA intervals over the full grid.


