Gun guys are always shipping stuff around the country — whether it’s a barrel to be chambered, or a scope that needs to go back for warranty repair. Or maybe you’ve sold some bullets or reloading dies you no longer need. To ensure your precious packages get to their destination in one piece, it’s important to take precautions when boxing up your items. And by all means insure packages for full value — even if your packaging is perfect, there is always the possibility that your shipment might be lost altogether. Sadly, that can happen, no matter which carrier you choose: Fedex, UPS, or the U.S. Postal Service (USPS). Here are some tips for shipping gun stuff — we explain how to pack items properly and how to minimize the risk of loss.
Tips for Shippers
Dennis Haffner from McGowen Precision Barrels offers some advice on how to avoid damage when shipping gun parts or other valuable or heavy items. Dennis explains:
“First, I started double-packing the contents and in many cases double-boxing. I spend a fortune on heavy-reinforced shipping tape. If the contents are loosely packed, the package is going to get crushed. On real important items or delicate items, wrap the content in plastic and spray the inside void areas with non-expanding foam. They make shipping foam just for this. This method really works. Since I started paying more attention to packaging, I have just about wiped out my issues with all three companies (Fedex, UPS, USPS). Yes, I hate doing it, but in the long run for us, it’s cheaper.
Bullet shipments are the worst — a shipment of 500+ bullets can destroy a cardboard box. I have ordered bullets from individuals who put them in baggies and filled the remainder of the box with foam peanuts. That is not going to work. Any piece of metal, including a die, will puncture a cardboard box, or destroy a padded envelope. Just look at the tracking information and imagine your package bouncing around in the back of the shipping truck, probably under many other packages. My advice is to NEVER use padded envelopes. Barrel nuts or recoil lugs will most likely never make it.
ORM-D items are required to be shipped in heavily-reinforced, double-walled containers. The packages still get a little damage, but the contents usually survive.
How do shipments get damaged? Consider this — one of the shipping companies this year flipped (overturned) one of our new CNC machines (which rendered it useless). Maybe your small packages were in the same delivery truck as my CNC machine. I wonder how many little boxes were crushed underneath it.
As for USPS flat rate boxes — you would not believe what people try to stuff in these boxes. USPS finally put a weight limit on the boxes — they had to. I sometimes take my delicate items packed in an envelope or small box. I spray foam in a larger flat rate box and insert the smaller package, then fill the remainder of the void with foam. It works, and part usually arrives undamaged.”
Shipping Rifle Barrels (PVC Tube and Tennis Ball Method)
A new match-grade barrel can cost $350 or more, and it might take six months (or more) to replace it, given the current wait time with top barrel-makers. So, you don’t want your nice new tube to get damaged in transit. Forum Member Chuck L. (aka “M-61″) offers these tips for shipping rifle barrels:
“Packing a barrel can be a problem. Here’s a shipping method that won’t stop lost shipments but so far has stopped damage. Get a PVC pipe (of size appropriate to your barrel) with fitted caps for each end. Attach a cap to one end. Tape the barrel threads and tape over the muzzle. Then drop one standard tennis ball into the pipe. Place barrel in pipe. Next add whatever peanuts or foam you can jam in to support the barrel on the sides. Then place a second tennis ball into the opposite end of the PVC pipe. (So now you have a tennis ball on either end of your barrel.) With everything secure inside, attach the upper cap and tape it down securely. With this packing procedure, when the carrier launches the pipe like a javelin, at least the barrel will not come through like a spear and be gone. Label the pipe with very large address labels so no one suspects it’s just garbage laying around. This procedure may seem ridiculous but it has worked for me. Oh and definitely get insurance. If your item is insured, the shippers will look harder to find it.”
Editor’s Note: Fedex also makes a triangular-profile cardboard shipping box. This 38″ x 6″ x 6″ x 6″ Fedex Tube (designed for blueprints and posters) is free for the asking. For most barrels, there should be enough clearance to hold your PVC tube (with barrel packed inside tube). However, don’t ship the barrel inside the cardboard box by itself. Cap and pad the ends and bubble wrap it heavily, or better yet, use the PVC tube method described above, with the PVC tube inside the box.
The anvil is the tripod-shaped thin metal piece protruding above the bottom of the primer cup. Getting the primer sitting fully flush on the bottom of the case primer pocket, without crunching it too much, requires some keen feel for the progress of primer seating.
In two informative Midsouth Blog articles, Glen Zediker offers helpful advice on priming. First he examines what happens to the primer itself as it is seated in the cup. Glen explains why some “crush” is important, and why you never want to leave a high primer. Glen also reviews a variety of priming tools, including his favorite — the Forster Co-Ax Bench Primer Seater. Then he offers some key safety tips. Glen provides some “rock-solid” advice about the priming operation. You’ll find more great reloading tips in Glen’s newest book, Top-Grade Ammo, which we recommend.
Priming Precision vs. Speed
Glen writes: “The better priming tools have less leverage. That is so we can feel the progress of that relatively very small span of depth between start and finish. There is also a balance between precision and speed in tool choices, as there so often is.”
Benchtop Priming Tools — The Forster Co-Ax
Glen thinks that the best choice among priming options, considering both “feel” and productivity, may be the benchtop stand-alone priming stations: “They are faster than hand tools, and can be had with more or less leverage engineered into them. I like the one shown below the best because its feeding is reliable and its feel is more than good enough to do a ‘perfect’ primer seat. It’s the best balance I’ve found between speed and precision.”
Load Tuning and Primers
Glen cautions that you should always reduce your load when you switch to a new, not-yet-tested primer type: “The primer is, in my experience, the greatest variable that can change the performance of a load combination, which is mostly to say ‘pressure’. Never (never ever) switch primer brands without backing off the propellant charge and proving to yourself how far to take it back up, or to even back it off more. I back off one full grain of propellant [when I] try a different primer brand.”
Priming Safety Tips by Zediker
1. Get a good primer “flip” tray for use in filling the feeding magazine tubes associated with some systems. Make double-damn sure each primer is fed right side up (or down, depending on your perspective). A common cause of unintentional detonation is attempting to overfill a stuffed feeding tube magazine, so count and watch your progress.
2. Don’t attempt to seat a high primer more deeply on a finished round. The pressure needed to overcome the inertia to re-initiate movement may be enough to detonate it.
3. Don’t punch out a live primer! That can result in an impressive fright. To kill a primer, squirt or spray a little light oil into its open end. That renders the compound inert.
4. Keep the priming tool cup clean. That’s the little piece that the primer sits down into. Any little shard of brass can become a firing pin! It’s happened!
Video Podcast about Rimfire Testing June 10, 2020
Lapua’s Rimfire Performance Center East (Ohio) Manager Luke Johnson talks about rimfire ammunition testing on “The Shooter’s Mindset” Podcast this week. During this hour-long episode, Luke explains how rimfire ammo is tested in Lapua’s test tunnel facilities.
During this June 2020 podcast (see video below), The Shooter’s Mindset (TSM) hosts covered all aspects of rimfire performance testing with Johnson. Johnson explained the testing process, the importance of ammo testing, how to best identify good groups, and the benefit of having multiple lots of ammunition while shooting competitively.
“Many shooters are familiar with Lapua’s Rimfire Performance Centers, but have yet to take advantage of the service. Both of our facilities offer shooters the opportunity to test various styles and lots of Lapua ammunition under tightly controlled conditions”, stated Johnson. “Our goal is to help shooters match the perfect lot of ammunition with their rifle so they may hit the range with confidence knowing their ammunition will perform.”
About Luke Johnson — Smallbore Silhouette Champion
Luke Johnson is the manager of the Lapua Rimfire Performance Center housed at the Cardinal Shooting Range near Columbus, Ohio. Luke, a native of Marysville, PA, has a long background of competitive shooting and hunting.
Johnson was a four year letterman for the Univ. of Alaska-Fairbanks D1 Rifle Team. In addition to his 3P/Prone shooting pedigree, Luke is a High Master rifle silhouette competitor and past National Smallbore Silhouette champion.
NRA Smallbore Rifle Silhouette Champion
USA Junior National Champion (50 meter rifle)
NCAA – CRCA All-American
Patriot Conference – All-Conference
About Lapua
Lapua produces the highest-quality small caliber cartridges and components for civilian and professional use. Lapua is a part of the Capstone Precision Group, exclusive U.S. distributor for Berger, Lapua, Vihtavuori and SK-Rimfire products. For more information, visit Lapua.com.
One side of this gauge is the “go” side which quickly tells you the depth of a primer pocket, whether any crimp is properly removed, and whether the primer pocket is loose. If it feels loose on the “go” side, use the other end of the tool, the “no go” side, to test to see if the primer pocket is too loose to hold a primer. If the no-go slides into the pocket, then you know to junk that brass.
Primer Pocket Growth and Useful Case Life
Repeated firings at stout pressures can cause primer pockets to grow in diameter. This can create an unsafe condition if your primers are not seating properly. Are your primer pockets “good to go”, or have they been pushed to the point of no return? Do you really know? Many guys try to gauge primer pocket tightness by “feel”, as they seat the primer. But that method isn’t precise. Now there’s a better way…
The folks at Ballistictools.com have created a handy set of precision-machined gauges that let you quickly and accurately check your primer pockets. These gauges (aka “gages”) are offered in two sizes — for large and small primer pockets. A two-piece set of both large and small gauges costs just $19.99. These gauges let you quickly measure the depth of a primer pocket, and check if the crimp has been removed properly. Most importantly, the gauge tells you if the primer pocket has opened up too much. One side of the gauge has an enlarged diameter plug. If that “No-Go” side fits in the primer pocket, you should ditch the case — it’s toast.
Precision ground from O-1 tool steel, The Ballistic Tools primer pocket gauges serve multiple functions. The inventor of these tools explains: “I created the prototype of this tool for my own use in brass processing. I needed a way to quickly and easily measure primer pockets that was reliable and did not require wasting a primer. This tool has been indispensable for me and I would never go back to the old method of uncertainty and guessing.”
Product tip from Boyd Allen. We welcome reader submissions.
Day after day, one of AccurateShooter’s most-visited web pages is a reference guide featuring a comparative burn rate chart, ranking powders from fastest to slowest. Compiled by Hodgdon Powder Co., this Burn Rate Chart displays the relative burn rates of 163 different powders. Here is the latest table, released by Hodgdon in November of 2019.
You’ll want to download this Powder Burn Rate Table. This table shows the latest IMR powders including the Enduron series (IMR 4166, 4451, 4955, 7977), highlighted in green. This 163-entry comparison table provides vital information for hand-loaders. Note — this invaluable chart is not limited to Hodgdon and IMR propellants. This burn rate chart ranks powders from eight major powder-makers: Accurate, Alliant, Hodgdon, IMR, Norma, Ramshot (Western), Vihtavuori, and Winchester.
This chart provides useful information for all hand-loaders. When doing load development, and testing one powder versus another, it’s generally wise to choose propellants that share the same relative burn rate, as least for starters.
NOTE: Hodgdon powders are blue, IMR Enduron powders are green, IMR standard powders are yellow, and Winchester powders are red. DOWNLOAD Chart HERE.
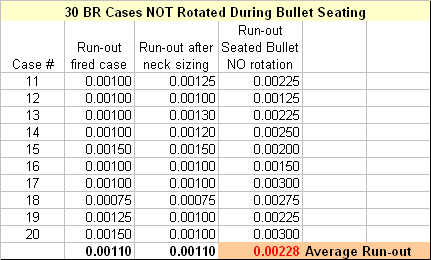
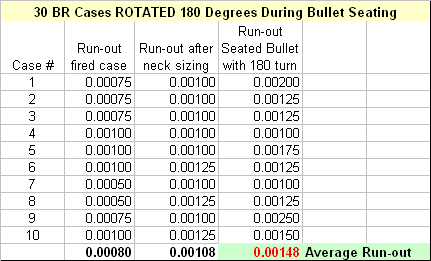
Here is a simple technique that can potentially help you load straighter ammo, with less run-out (as measured on the bullet). This procedure costs nothing and adds only a few seconds to the time needed to load a cartridge. Next time you’re loading ammo with a threaded (screw-in) seating die, try seating the bullet in two stages. Run the cartridge up in the seating die just enough to seat the bullet half way. Then lower the cartridge and rotate it 180° in the shell-holder. Now raise the cartridge up into the die again and finish seating the bullet.
Steve, aka “Short Range”, one of our Forum members, recently inquired about run-out apparently caused by his bullet-seating process. Steve’s 30BR cases were coming out of his neck-sizer with good concentricity, but the run-out nearly doubled after he seated the bullets. At the suggestion of other Forum members, Steve tried the process of rotating his cartridge while seating his bullet. Steve then measured run-out on his loaded rounds. To his surprise there was a noticeable reduction in run-out on the cases which had been rotated during seating. Steve explains: “For the rounds that I loaded yesterday, I seated the bullet half-way, and turned the round 180 degrees, and finished seating the bullet. That reduced the bullet runout by almost half on most rounds compared to the measurements from the first test.”
Steve recorded run-out measurements on his 30 BR brass using both the conventional (one-pass) seating procedure, as well as the two-stage (with 180° rotation) method. Steve’s measurements are collected in the two charts above. As you can see, the run-out was less for the rounds which were rotated during seating. Note, the change is pretty small (less than .001″ on average), but every little bit helps in the accuracy game. If you use a threaded (screw-in) seating die, you might try this two-stage bullet-seating method. Rotating your case in the middle of the seating process won’t cost you a penny, and it just might produce straighter ammo (nothing is guaranteed). If you do NOT see any improvement on the target, you can always go back to seating your bullets in one pass. READ Forum Thread..
For load development, some guys shoot 3-shot groups. Other guys shoot 5-shot groups, or even 10-shot strings. But for testing its projectiles, Sierra Bullets takes it to another level entirely. A while back Sierra was testing its .30-Caliber 175gr HPBT MatchKing in the Sierra underground tunnel. The results appear above — a FIVE HUNDRED Round group!
500 Shots Form 0.82 MOA Group at 300m (328 yards)
The photo above shows the result of 500 shots taken in a 300 meter test tunnel. Sierra’s trigger-pullers sent five full boxes of bullets down-range at a single target. The raw group size, edge to edge of the farthest shots, is about 3.13 inches, as shown on the calipers’ metal linear scale. Subtract a .308″ nominal bullet diameter* to get the 2.823″ on the digital readout. So you’re seeing a 2.823″ group at 300 meters (328 yards). One MOA at this distance is 3.435″ so this 500-round group is 2.823 divided by 3.435 or 0.82 MOA (0.8218 MOA to be precise).
This 500-round group was shoot as part of a pressure/velocity test for a commercial customer. The cartridge was .308 Winchester, loaded at 2.800″. The powder was Reloder 15. A 26″ barrel was shot from a return to battery rest. The gun was cleaned every 125 rounds and two foulers shot.
What do you think — could you beat this group from a bench for 500 rounds?
One Facebook poster joked: “500-round group? Everyone knows anything less than 1000-round groups are a waste of time and statistically irrelevant.”
Sierra’s 300 Meter Testing Tunnel
Ever wonder how (and where) Sierra tests its bullets? The answer is underground, in a 300-meter test tunnel located under Sierra’s factory in Sedalia, Missouri. The photo above shows the construction of the tunnel back in May, 1990. Like most bullet manufacturers, Sierra does live-fire bullet testing of its projectiles. Sierra’s 300-meter test range is the longest, manufacturer-owned underground bullet test facility in the world. Sierra offers free tours of the test tunnel as part of Sierra’s Factory Tour Program.
* Normally, to get an exact group size, you should subtract the TRUE bullet hole size, which is usually smaller than the nominal bullet diameter. E.g. a .308 bullet hole may show on paper as .298 or so. But here, for simplicity, we are subtracting .308″ because we do not have the original target to measure.
Real Avid sells a unique multi-tool designed expressly for rifles and shotguns. The $24.99 Gun Tool™ combines 18 of the most commonly used long gun tools in a compact package. The Gun Tool boasts three Torx wrenches (T20; T15; T10), two Allen hex drives (3/32″; 5/32″), and four screwdriver blades (1/8″ flat; 3/16″ flat; Phillips 1 & 2). In addition, there is a magnetic 3/16″ driver, a pin punch, and a stainless claw blade useful for opening shipping boxes or trimming target backers.
The most unique feature of the Gun Tool is a stepped, multi-size choke-tube wrench that fits six shotgun bores from .410 all the way up to 10 gauge (see photo below right). For active shotgunners, that provides great versatility in a small package.
Praise from Respected Reviewers
In 2012, the NRA’s American Hunter magazine awarded The Gun Tool their Golden Bullseye award in the “Gear of the Year” category. The Gun Tool has also been awarded an outstanding 100% approval rating and a full endorsement by the North American Hunting Club.
Noted gun journalist Jim Shepard wrote: “I’ve been playing with ‘The Gun Tool’… and I’ve found it to be a pretty promising device that really should find a place in lots of range bags. If you’re a long gun shooter, it has something you’ll eventually need in the way of a tightening/loosening/adjusting tool.” Jim cautions that the claw blade does not lock into place.
More Specialized Multi-Tools and Micro-Tools for Handguns and Rifles
Real Avid also produces a variety of multi-tools for specialized firearm applications. For example, Real Avid’s new AMP series are specially designed for AR15s, Pistols, or Model 1911s. There is also a 4-in-1 Glock Tool, Tactical Multi-Tools, and Micro-tools for AR15s, AK47s, and 1911s. See all these tools at RealAvid.com.
Many of our Forum members have expressed interest in a recoil-reduction system for prone F-Open competition rifles shooting heavy bullets from powerful cartridges. A .300 WSM shooing 200+ grain bullets can definitely take its toll over the course of a match. One system that has been used with considerable success is the hydraulic “Bump Buster” recoil system. This definitely reduces the pounding your shoulder gets during a long match. To illustrate this system, we’ve reprised an article on Bret Soloman’s F-Open rifle from a couple years back. Watch the Videos to see the Bump Buster in action.
On his Facebook page, Hall-of-Fame shooter and ace gunsmith Thomas “Speedy” Gonzalez unveiled an impressive new F-Open rifle built for Bret Solomon. The rifle features Speedy’s new low-profile F-Class stock.
Bret’s gun is chambered for his 300 Solomon wildcat, shooting heavy 210gr bullets, so it can can be a real shoulder-buster, without some kind of buffer. The stock is fitted with a Ken Rucker’s Bump Buster hydraulic recoil reduction system to tame the recoil. The Bump Buster was originally designed for shotguns and hard-hitting, big game rifles. It is interesting to see this hydraulic buffer adapted to an F-Open rig.
Here you can see Bret shooting the gun, coached by Nancy Tompkins and Michele Gallagher:
Bret’s gun features a stainless Viper (Stiller) action, barrel tuner, and an innovative Speedy-crafted wood stock. Speedy says this stock design is all-new: “It is a true, low Center-of-Gravity F-Class stock, not a morphed Palma stock merely cut out on the bottom”. See all the details in this short video:
Stock Features: Glue-in or Bolt-In and Optional Carbon Pillars and Cooling Ports
Speedy explained the features of the new stock design: “Terry Leonard and I started working on an F-Class version of his stocks last year during the F-Class Nationals and came up with what he and I consider the first true low-CG stock in the sport. As you can see by the videos, there is very little torquing of the stock during recoil. I add the carbon fiber tunnel underneath the forearms to save Terry some time. This bonds very well to his carbon fiber skeleton within the stock adding addition stiffness to the forearm to support the heavy barrels found on the F-Class rigs.
We are playing with both glue-ins like we benchresters use and bolt-ins as well. The rifles on the videos are glue-ins. Bret just took delivery today of his first bolt-in employing carbon fiber pillars and the first Leonard stock ever to have cooling ports.”
Need for Recoil Reduction Follows F-Class Trend to Bigger Calibers and Heavier Bullets
In recent years we have seen F-Open competitors move to bigger calibers and heavier bullets in pursuit of higher BC. There is no free lunch however. Shooting a 210gr .30-caliber bullet is going to produce much more recoil than a 140gr 6.5mm projectile (when they are shot at similar velocities). Does this mean that more F-Open shooters will add hydraulic buffers to their rigs? Will a recoil-reduction system become “de rigueur” on F-Open rifles shooting heavy bullets?
Our friend Boyd Allen observes: “You may imagine that shooting a short magnum, or even a .284 Win with heavy bullets, involves a fair amount of recoil, and in the prone position this can be more than a little wearing. It can in fact beat you up over the course of a match. Some time back, Lou Murdica told me about having a hydraulic recoil absorbing device installed on one of his F-Class rifles, chambered in .300 WSM. Lou is shooting heavy (210-215gr) bullets so the recoil is stout. According to Lou, the hydraulic recoil-reduction system made all the difference.”
Story tip from Boyd Allen. We welcome reader submissions.
The prone position demonstrated by two talented Service Rifle shooters. At top is SFC Brandon Green, multi-time High Power National Champion. Below is Tony Chow, a gifted match shooter. NOTE: Current Service Rifle rules allow the use of optics up to 4.5X.
Jay Christopherson, 2020 Berger SW Nationals F-Open Champion, is one of the nation’s best F-Class shooters. When shooting F-Class, Jay uses a Seb Mini front rest and a large rear sandbag to support his big 22-lb F-Open rifle. Though he loves F-Class, Jay is also interested in Service Rifle competition where no external supports are allowed. You hold the rifle with your arms and a sling. Some Service Rifle competitions involve three position (Standing, kneeling/sitting, and prone), while others are prone only. Even in the prone position, the sling is a vital accessory.
Jay dramatically improved his Service Rifle “hard-holding” technique by enlisting the help of Emil Praslick III, former USAMU rifle coach. Emil’s guidance and advice resulted in an immediate increase in Jay’s scores on target, as recorded by his ShotMarker electronic target system. Jay noted: “These targets show the difference between hacking it on your own, and spending an hour with someone who knows what they are doing and can tell you that you are doing it wrong.” These targets show Jay’s “before and after” Service Rifle results shooting slung up prone at 600 yards:
Service Rifle, Prone with Sling at 600 Yards
Here is Jay’s target BEFORE training with Emil Praslick — a 194-3X with lots of vertical.
And here is Jay’s improved target AFTER putting Praslick’s advice to work — impressive 199-8X with significantly less vertical.
You can see on this second target much improved vertical. All 20 shots were in a vertical range much smaller than the vertical height of the 10-Ring. Had shot 16 not gone wide left, this would have been a 200. Shot 16 was OUT of the 10-Ring to the left, but note that vertically it has almost perfect elevation.
Jay stated: “I was pretty amazed at not only the difference on the target, but how much difference the changes Emil suggested made to how my hold felt. The entire feel was different and a ton less stress in my neck and arms compared to what I was feeling before. I was actually feeling pretty good about that 194 yesterday, because I hadn’t slung up in two years and that was my highest score (by one point) after doing some load fixing. But having someone explain what you are doing wrong and why makes a world of difference.


 Gun guys are always shipping stuff around the country — whether it’s a barrel to be chambered, or a scope that needs to go back for warranty repair. Or maybe you’ve sold some bullets or reloading dies you no longer need. To ensure your precious packages get to their destination in one piece, it’s important to take precautions when boxing up your items. And by all means insure packages for full value — even if your packaging is perfect, there is always the possibility that your shipment might be lost altogether. Sadly, that can happen, no matter which carrier you choose: Fedex, UPS, or the U.S. Postal Service (USPS). Here are some tips for shipping gun stuff — we explain how to pack items properly and how to minimize the risk of loss.
 “First, I started double-packing the contents and in many cases double-boxing. I spend a fortune on heavy-reinforced shipping tape. If the contents are loosely packed, the package is going to get crushed. On real important items or delicate items, wrap the content in plastic and spray the inside void areas with non-expanding foam. They make shipping foam just for this. This method really works. Since I started paying more attention to packaging, I have just about wiped out my issues with all three companies (Fedex, UPS, USPS). Yes, I hate doing it, but in the long run for us, it’s cheaper.
 How do shipments get damaged? Consider this — one of the shipping companies this year flipped (overturned) one of our new CNC machines (which rendered it useless). Maybe your small packages were in the same delivery truck as my CNC machine. I wonder how many little boxes were crushed underneath it.
 “Packing a barrel can be a problem. Here’s a shipping method that won’t stop lost shipments but so far has stopped damage. Get a PVC pipe (of size appropriate to your barrel) with fitted caps for each end. Attach a cap to one end. Tape the barrel threads and tape over the muzzle. Then drop one standard tennis ball into the pipe. Place barrel in pipe. Next add whatever peanuts or foam you can jam in to support the barrel on the sides. Then place a second tennis ball into the opposite end of the PVC pipe. (So now you have a tennis ball on either end of your barrel.) With everything secure inside, attach the upper cap and tape it down securely. With this packing procedure, when the carrier launches the pipe like a javelin, at least the barrel will not come through like a spear and be gone. Label the pipe with very large address labels so no one suspects it’s just garbage laying around. This procedure may seem ridiculous but it has worked for me. Oh and definitely get insurance. If your item is insured, the shippers will look harder to find it.”


 The folks at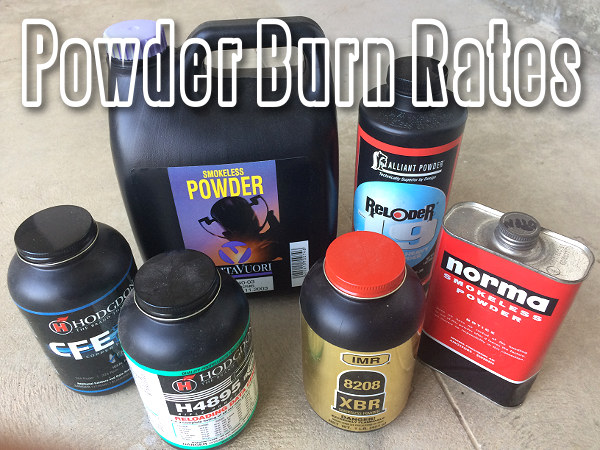




 On his


