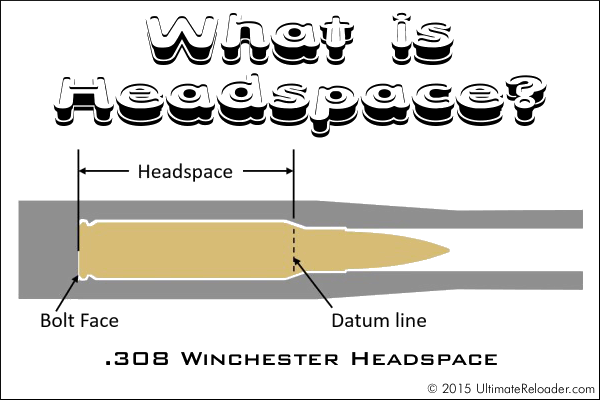
This illustration shows headspace measurement for the popular .308 Winchester cartridge, which headspaces on the shoulder. Image copyright 2015 Ultimate Reloader.
In this Brownells Tech Tip, Brownells gun tech Steve Ostrem explains what headspace is and why it’s one of the most critical measurements for nearly all firearms. Even if you’re an experienced rifle shooter, it’s worth watching this video to refresh your understanding of headspace measurements, and the correct use of “GO” and “NO-GO” gauges.
Headspace Definition
In firearms, headspace is the distance measured from the part of the chamber that stops forward motion of the cartridge (the datum reference) to the face of the bolt. Used as a verb, headspace refers to the interference created between this part of the chamber and the feature of the cartridge that achieves the correct positioning. Different cartridges have their datum lines in different positions in relation to the cartridge. For example, 5.56x45mm NATO ammunition headspaces off the shoulder of the cartridge, whereas .303 British headspaces off the forward rim of the cartridge.
If the headspace is too short, ammunition that is in specification may not chamber correctly. If headspace is too large, the ammunition may not fit as intended or designed and the cartridge case may rupture, possibly damaging the firearm and injuring the shooter. (Source: Wikipedia)
Headspace Gauges
Headspace is measured with a set of two headspace gauges: a “Go” gauge, and a “No-Go” gauge. Headspace gauges resemble the cartridges for the chambers they are designed to headspace, and are typically made of heat-treated tool steel. Both a “Go” and a “No-Go” gauge are required for a gunsmith to headspace a firearm properly. A third gauge, the “Field” gauge, is used (as the name implies) in the field to indicate the absolute maximum safe headspace. This gauge is used because, over time, the bolt and receiver will wear, the bolt and lugs compress, and the receiver may stretch, all causing the headspace to gradually increase from the “factory specs” measured by the “Go” and “No-Go” gauges. A bolt that closes on “No-Go” but not on “Field” is close to being unsafe to fire, and may malfunction on cartridges that are slightly out of spec. (Source: Wikipedia)
To learn more, read Brownell’s longer article Headspace Gauges and How to Use Them. Among other things, this explains the relative lengths of “Go”, “No-Go”, and “Field” gauges. The “Field” is actually the longest: “The GO gauge corresponds to the SAAMI (Sporting Arms & Ammunition Manufacturer’s Institute) minimum chamber length, while the FIELD gauge usually matches the maximum chamber depth, or slightly less. NO-GO gauges are an intermediate length between minimum and maximum, that, technically, is a voluntary dimension. A firearm that closes on a NO-GO gauge and does not close on a FIELD gauge may not give good accuracy and may have very short cartridge case life from the ammunition re-loader’s standpoint.”
A few years back, Our friend Grant Guess had a “close encounter” with a bad primer. An apparently defective primer caused part of the casehead on one of his rounds to blow out. This, in turn, allowed high pressure gas to vent through the damaged primer pocket. Take a good look, boys and girls. This is yet another very good reason to wear safety glasses. The cartridge was a 6.5-06, handloaded in necked-down Winchester-headstamp .270 Win brass. Grant reports:
“I had a blow through between the primer and the primer pocket today. The action was really smoking and I got a face full of gas. This was a reasonably light charge. Thank God for safety glasses.
I should also mention that it appears there is a 3/64 hole that is halfway between the primer and the primer pocket. Like it burned a small jet hole through both of them.”
Could this happen to you? It just might. On seeing this damaged case, one of Grant’s Facebook friends, Chris D., observed: “Search the internet, you will see a lot of these pin hole ‘in the corner’ failures. Obviously Winchester has some issues with the LR primers.”
Careful Examination Reveals Apparent Primer Defect
After this incident, Grant examined the damaged case: “I pinned the flash hole and it is not over-sized or under-sized. The primer clearly has an area where it had a defect. At [50,000 CUP], it doesn’t take much of a defect to cause issues. There was a slight bit of pucker-factor on the next shot….”
Everyone should have a 9mm Luger (9x19mm) pistol. The 9mm Luger round feeds/cycles great, recoil is moderate, and a vast array of excellent 9mm handguns are available. And, perhaps most importantly, quality factory ammo is affordable. In fact because 9x19mm ammo is produced in such quantity, it is some of the cheapest centerfire pistol ammo you can buy. Today we’ve found some great 9mm Luger ammo deals for you, with big-name factory stuff for under 18 cents per round.
At that price, it may not be worth reloading. Consider this — typical 9mm component costs easily approach fifteen cents per round even with free brass: Bullet ($0.08 – $0.10), Powder ($0.02), and Primer ($0.04). Given the costs of bullets, powder, and primers, it may not be worth reloading 9mm Luger, especially if you value your precious time!
Should You Reload 9mm Ammo? Run the Numbers, Then Decide…
While this Editor reloads almost all his .45 ACP and .44 Magnum ammo, I generally shoot factory ammo in my 9mm Luger pistols. Why? When you give some reasonable value to the time you spend setting-up and operating your reloading press, it is hard to beat factory ammo at around $10 per 50-count box (i.e. $0.20/round). While once-fired 9mm brass is plentiful (and cheap), you can easily spend 15-16 cents per round just on bullet, powder, and primer. So reloading may only save you 4 or 5 cents per round. Hence if you load 200 rounds per hour (including set-up time), you only recoup $8 to $10 per hour (at best) for all your effort. You may decide, as I did, that my time was worth more than that.
Great Deals on 9mm Luger (9x19mm) Factory Ammunition
Box to Bench Precision (B2B) has developed an oversize (23.5″ x 30″) precisely-scaled target designed for Load Development and Scope Testing. This waterproof target is very innovative. On the target you’ll find clusters of aim points for various tasks. Upper left are orange aiming spots for testing various powder charges. In the upper right quadrant are more red aim points to be used when testing bullet seating depth. Running down the center of the target is a vertical line with horizontal marks showing precise MOA and Mil heights at 100 yards — use this feature to verify your click values. ORDER HERE.
And there’s more. In the lower right quadrant (far right) are three black targets to be used for chrono work. With these you can record cold velocity, hot barrel velocity and a “Final Velocity”. Over in the lower left quadrant, in the left-most column, are three dot targets for zeroing and recording group size with load data. Finally, four more black/white targets can be used for a scope box test (aka “shooting the square”). With a box test, you move from target to target, clicking in sequence to each corner of the square in sequence, eventually returning to your original aim point. If your scope tracks correctly, the last box test shot should end up right on top of the first shot.
Record the Entire Load Development Process on One Target
For those used to shooting at conventional bulleyes or benchrest targets, this target may seem confusing, but it can really help organize and simplify the process of load development. We like the idea of having a single, durable target that performs double-duty — serving for load development as well as scope checking. And we like the fact that the target is pretty strong — the maker says: “The target is Tear-Resistant and Water-Proof”. We’d expect a maker based in the Pacific NW to design a target that can handle wet weather.
Previous version of target shown in photo. Current version has a larger and centered box test, and Tracking lines that are labeled in IPHY/MOA/MIL.
How to Order
So how much does all this target technology cost? A single, 23.5″ x 30″ target costs $5.00. A pack of three targets costs $14.25, while a five-target pack runs $22.50 (which works out to $4.50 per target). There is also a 100 meter version of this target for $4.25 each or $20 for five. Targets ship in a durable cardboard tube. To order these targets, visit the Box To Box Precision Online Store.
Folks who load at the range need to bring a lot of gear — reloading presses, powder dispensers, scales, funnels, sizing/seating dies, brass prep tools and more. And there may be other important items to transport — such as ammo caddies, LabRadar mounts, over-size rest feet, and even barrel fans.
A rifle case works fine for carrying your scoped rifle, but you still need to organize all your reloading tools and other gear, and transport them safely from home to range and back again. Some guys have built their own loading tool-boxes from wood. Other may stuff gear in a couple of plastic range boxes. But clever Chris Covell came up with an even better solution.
Chris sourced a handsome, sturdy metal Horse Grooming Box from eBay. Chris reports the multi-feature metal box “works perfectly for reloading. My ChargeMaster is now out of the wind.”
Bullets, Trickler, and Priming Tool on Top
On top, below the hinged metal lid, is a large compartment that holds Covell’s funnels, scales, priming tool, trickler and other vital gear (photo on right). This top compartment is deep enough to handle wide-mouth funnels with no problem.
Slide-Out Drawer with Dividers
Below the top level is a handy sliding drawer with multiple dividers. This is perfect for holding Covell’s inline seating dies, case-neck deburring and chamfering tools, among many other smaller bits and pieces.
In the bottom of the Horse Grooming box is a large compartment that holds bigger gear. In the bottom section, Covell places his RCBS Chargemaster Lite, along with a case-trimming tool, an arbor press, and various other bulky tools. Check it out:
Chris Covell’s Range Box was featured on the Benchrest Shooting and Gunsmithing Private Group Facebook Page. You may want to sign up for this Group — with membership you can access a wealth of information for accuracy-oriented shooters.
Shown is the Redding Model 15-P Competition Piloted Inside Chamfering Tool with pilot rod that centers in the case flash hole. Also shown is a Forster 45° Rocket Tool.
There are a wide variety of reloading tools designed to cut a slight chamfer in case necks and deburr the edge of the case mouth. You don’t need to spend a lot of money for an effective tool. A basic “rocket-style” 45° chamfering tool, such as the Forster, actually does a pretty good job taking the sharp edge off case mouths, particularly if you use a little scotch-pad (or steel wool) to smooth the edge of the cut. The Forster chamfer tool, shown below, is a nicely-made product, with sharper cutting blades than you’ll find on most other 45° chamferers. It costs $20.99 at Brownells.com.
Redding sells a handy piloted chamfering tool with a 15° inside cutting angle and removable accessory handle. This Redding Model 15-P chamferer works really well, so long as you have consistent case OALs. The pilot rod (which indexes in the flash hole) is adjustable for different cartridge types (from very short to very long). This ensures the concentricity of the inside neck chamfer to the case mouth. This quality tool ($35.99 at Brownells) works with cases from .22 to .45 Caliber.
Sinclair International offers a 28° carbide chamferer with many handy features (and sharp blades). The $29.99 Sinclair Carbide VLD Case Mouth Chamfering Tool will chamfer cases from .14 through .45 caliber. This tool features a removable 28° carbide cutter mounted in the green plastic Sinclair handle. It is on sale right now for $24.99 at Brownells. NOTE: A hex-shaft cutter head power adapter can be purchased separately for $14.99 (Sinclair item 749-002-488WS). This can be chucked in a power screwdriver or used with the Sinclair Case Prep Power Center.
Many folks feel they can get smoother bullet seating by using a tool that cuts at a steeper angle. We like the 22° cutter sold by Lyman. It has a comfortable handle, and costs just $11.54 at Midsouth Shooters. The Lyman tool is an excellent value, though we’ve seen examples that needed sharpening even when new. Blade-sharpening is easily done, however.
K&M makes a depth-adjustable, inside-neck chamferer (“Controlled Depth Tapered Reaper”) with ultra-sharp cutting flutes. The latest version, which costs $51.70 at KMShooting.com, features a central pin that indexes via the flash hole to keep the cutter centered. In addition, the tool has a newly-designed handle, improved depth-stop fingers, plus a new set-screw adjustment for precise cutter depth control. We caution, even with all the depth-control features, if you are not careful, it is easy to over-cut, slicing away too much brass and basically ruining your neck. We think that most reloaders will get better results using a more conventional chamfer tool, such as the Forster or Redding 15-P.
One last thing to note — tools like the K&M and the Sinclair chamferer are often described as VLD chamferers. That is really a misnomer, as bullets with long boat-tails actually seat easily with very minimal chamfering. In reality, these high-angle chamferers may be most valuable when preparing brass for flat-base bullets and bullets with pressure rings. Using a 22° or 28° chamferer can reduce the risk of cutting a jacket when using VLD bullets though — so long as you make a smooth cut.
We are re-publishing this article at the request of Forum members who found the information very valuable. If you haven’t read this Safety Tip before, take a moment to learn how you can inspect your fired brass to determine if there may be a potential for case separation. A case separation can be dangerous, potentially causing serious injury.
On the respected Riflemans’ Journal blog there was an excellent article about Cartridge Case-Head Separation. In this important article, Journal Editor GS Arizona examined the causes of this serious problem and explained the ways you can inspect your brass to minimize the risk of a case-head separation. As cases get fired multiple times and then resized during reloading, the cases can stretch. Typically, there is a point in the lower section of the case where the case-walls thin out. This is your “danger zone” and you need to watch for tell-tale signs of weakening.
The photo below shows a case sectioned so that you can see where the case wall becomes thinner near the web. You can see a little arrow into the soot inside the case pointing to the thinned area. This case hadn’t split yet, but it most likely would do so after one or two more firings.
Paper Clip Hack for Detecting Problems
The article provided a great, easy tip for detecting potential problems. You can use a bent paper clip to detect potential case wall problems. Slide the paper clip inside your case to check for thin spots. GS Arizona explains: “This simple little tool (bent paper clip) will let you check the inside of cases before you reload them. The thin spot will be immediately apparent as you run the clip up the inside of the case. If you’re seeing a shiny line on the outside and the clip is really hitting a thin spot inside, it’s time to retire the case. If you do this every time you reload, on at least 15% of your cases, you’ll develop a good feel for what the thin spot feels like and how it gets worse as the case is reloaded more times. And if you’re loading the night before a match and feel pressured for time — don’t skip this step!”
If the battery on your safe’s electronic lock is more than a year old, or if it is not giving you the right voltage, replace it today!
This time of year, many of our readers are putting their guns away in a safe for the winter. It’s easy to just tuck the guns away and forget about them. But there’s something you should do before you shut the safe door. If you have a safe with an electronic keypad, you should replace the battery every year as a precautionary measure. Trust us, you don’t want to come back in a few months and find that the keypad memory is kaput, and you’re locked out. That can lead to frustration and an expensive locksmith visit.
Here’s a true story. I have one safe with a Sargent & Greenleaf (S&G) keypad. A couple years back, in early December, I went to get into the safe. I punched in the correct combination, but all I got was a rapid “beep, beep, beep, beep” after I finished the last combination entry. I tried again to ensure I entered the combination correctly (I did). But again, the locking system responded with multiple rapid beeps indicating something was wrong. And the safe would not open. Now I was worried….
I popped out the battery holder (which slides in from the bottom of the keypad housing on the door). I removed the battery and tested it with a volt-meter. The 12-month-old Duracell 9-volt battery only registered 6.1 volts.
Low voltage was the problem. I went down to the store and got a couple new 9V batteries. I tested the new batteries and both measured 9.4 volts output. I slipped one of the new 9V batteries into the keypad housing, punched in the combination and everything worked OK again. Eureka.
Most electronic locks for safes WILL “remember” the combination for a period of time even when the battery is low (and the keypad’s “brain” should retain the combination when you remove the battery for replacement). However, a dead battery, or extended periods of low voltage can give you problems. Don’t rely on wishful thinking…
Each Wednesday, the U.S. Army Marksmanship Unit (USAMU) publishes a reloading “how-to” article on the USAMU Facebook page. In this article, the USAMU’s reloading gurus help you avoid potentially disastrous mistakes with a progressive — such as double powder changes. The USAMU experts caution that: “beginners would be better served by starting on a single-stage press”. That said, owning a progressive makes sense if you shoot more than 100 centerfire rounds a week. If you own a progressive press, or are thinking of buying one, you should read this article.
For those interested in progressives, we’ll examine different key features among the types and relate them to handloading processes. The first, and simplest, type is the manually-advanced progressive. The shellplate holds the several cartridges being processed with each stroke of the handle. On these presses, the loader must manually advance the shellplate after each handle stroke.
While this obviously slows production vs. a press that cycles the shellplate automatically, this feature does have advantages though. (The disadvantages follow shortly.) No case is advanced to the next station until the operator deliberately does so – which is especially helpful for the new handloader.
Problems that arise during loading can be diagnosed and fixed without fears of some “extra” operation happening unnoticed with cartridges at the other stations. Beginners NOTE: one way to positively prevent this risk is to remove the cases from each press station when a problem emerges, before beginning diagnosis. Usually, however, experienced loaders omit this step as a time-saving measure, being confident in their understanding of the loading machine, process and the appropriate remedy.
If all cartridge cases are left in place, the operator must monitor what’s happening at each station. For example, raising the press ram twice may result in a double-charge of powder. With rifle cartridges, this usually results in a massive powder over-flow, alerting the loader to the problem. With pistol cases or small rifle charges in large cases, such an over-flow isn’t guaranteed. [Editor — one way to be sure you don’t have an overcharge or undercharge is to use a Lock-Out Die — see below.] The manually-advanced progressive keeps all operations under the loader’s control at all times. This is intuitively easier for the beginning loader to understand and to operate with confidence.
However, this same characteristic can be problematic if the loader isn’t paying 100% attention to what they are doing during routine operation. Some new handloaders apparently aspire to load progressively while daydreaming and paying little attention to the operation. Their plan is to feed components in, like feeding potato chips to a monkey, while good ammo drops out at the other end. Unfortunately, such an approach may likely result in something other than “good” ammo dropping out at the end…
Forgetting to cycle the shellplate when appropriate will cause problems. As with all handloading, distractions MUST be kept to a minimum for safety purposes. Never watch TV, talk with friends, or have other distractions (such as a rambunctious pet or child) in the room when loading. Avoiding distractions will do much to ensure that one produces consistent, high-quality ammunition, free of defects. For example, when a case doesn’t line up correctly with the case mouth expander or powder drop tube, a difference in “feel” often alerts the loader to correct the problem without ruining a case. If one is interrupted or becomes distracted, be certain to examine ALL cases in the shellplate before resuming loading.
Better Safe Than Sorry — the RCBS Lock-Out Die
RCBS Makes a “Lock-Out Die” that senses the powder charge. This will halt the Progressive press if you have a double charge, or an undercharge. Your Editor has the Lock-Out Die on his RCBS Pro 2000. It has “saved his bacon” a half-dozen times over the years. It can be used on Dillon and Hornady progressives as well as RCBS machines.
Other advantages of the typical manually-advanced progressives are that they are usually simpler in design, with fewer moving parts to get out of adjustment. This appeals to the mechanically dis-inclined! Caliber conversion kits are usually cheaper and take less time to install. This especially benefits the enthusiast who reloads for a wide variety of calibers.
However, many popular manually-advanced progressives have fewer die stations than the higher-end, auto-advancing machines. One item that is very useful when actually dispensing powder on a progressive press is a cartridge case powder-level sensor. This warns if powder levels in each case are too high or too low; however, it does require a die station of its own.
This condition (incorrect powder charges) often results from powder (especially extruded rifle powder) “bridging” in the powder measure. That is, one charge doesn’t fully empty into its cartridge case. This leaves some extra powder hanging up in the measure to join the normal charge in the next case. With some extruded powders, this can be quite obvious without a sensor. However, the sensor can detect small variations that would not be obvious to even an experienced, attentive operator. Considering the machine’s potential to use a powder sensor in addition to one’s other customary dies is a wise idea.
Similarly, pistol shooters are best served to seat bullets and crimp cartridges in separate operations. This should be taken into account when selecting a progressive press. Whenever loading fully-progressively, choosing powders that dispense very easily, e.g., ball/spherical or very fine-grain extruded powders, can help keep charges quite uniform.
“Shooting Chrony” is a product name. “Shooting Chrony” should not describe (post-mortem) what you have been doing to your chronograph. Sooner or later all of us may make a mistake, and ventilate our chronograph. With luck, the bullet just “wings” your chronograph, and the damage is minor. But if you hit the unit smack dab in the middle, you may have to retire your chrono for good.
A while back, Forum member Jeff M. (aka “JRM850″) experienced a “low blow” that put his Shooting Chrony out of commission. With tongue firmly in cheek, Jeff started a Forum thread entitled Chronograph Not Picking Up Shots in Bright Sunlight Anymore. Looking at the photo at top, the problem is obvious — he ventilated his Chrono.
This was Jeff’s first chrono kill in 23 years of use, so we shouldn’t be too critical. Jeff explained: “I didn’t realize a friend was shifting from a 300-yard target to 100 yards.” The agent of destruction was a low-traveling 58gr V-Max running at 3415 fps. What happened? Well, when one is shooting at 300 yards, the trajectory will be higher than at 100 yards. We should say, however, that this may have been a low shot, or the 100-yard aiming point may have been placed lower to the ground (closer to the bottom of the target frame), as compared to the 300-yard aiming point.
Other Forum members offered some sarcastic responses:
Try it on an overcast day – it might work again.
It looks like the V-Max performed just about as advertised.
Aww…a little duct tape and some Super Glue and you’re good to go.
If you are using a LabRadar or Magnetospeed, your chrono shouldn’t be in the line of fire, but for those will conventional chronos, here’s some good advice…
Double Check Your Aim Point and Trajectory BEFORE You Shoot
The lesson learned here is that you should never change targets (or aim points) without checking your bullet’s flight over the chronograph. We like to align the barrel so the bullet exits a good 6-8 inches above the electronics (check your manual for recommended shot height).
In addition, we always boresight the barrel so we can see the actual target through the bore. Then, with gun UNLOADED, bolt removed and action clear, we look back down the barrel so we can see daylight through the bore, with the gun set on solid rests. If you look through the middle of the “V” formed by the sky screen supports and you can’t see light shining through the barrel’s bore, you probably have a set-up problem and you should re-align the rifle.
Use a Test Backer to Confirm Your Bullet Trajectory
You can put tape on the support rods about 6″ up from the unit. This helps you judge the correct vertical height when setting up your rifle on the bags. Another trick is to hang a sheet of paper from the rear skyscreen and then use a laser boresighter to shine a dot on the paper (with the gun planted steady front and rear). This should give you a good idea (within an inch or so) of the bullet’s actual flight path through the “V” over the light sensors. Of course, when using a laser, never look directly at the laser! Instead shine the laser away from you and see where it appears on the paper.
After you have used the laser boresighter to get the rifle centered up in the chrono’s “sweet spot”, confirm with a test shot or two (see photo). Even when using an in-chamber laser boresighter, it is not uncommon for the bullet’s actual point of impact to be different than the laser’s dot location.



 Headspace Gauges


 Bullets, Trickler, and Priming Tool on Top


 On the respected Riflemans’ Journal blog there was an excellent article about Cartridge Case-Head Separation. In this important article, Journal Editor GS Arizona examined the causes of this serious problem and explained the ways you can inspect your brass to minimize the risk of a case-head separation. As cases get fired multiple times and then resized during reloading, the cases can stretch. Typically, there is a point in the lower section of the case where the case-walls thin out. This is your “danger zone” and you need to watch for tell-tale signs of weakening.

 This time of year, many of our readers are putting their guns away in a safe for the winter. It’s easy to just tuck the guns away and forget about them. But there’s something you should do before you shut the safe door. If you have a safe with an electronic keypad, you should replace the battery every year as a precautionary measure. Trust us, you don’t want to come back in a few months and find that the keypad memory is kaput, and you’re locked out. That can lead to frustration and an expensive locksmith visit.



