Now that you’ve spent thousands of dollars on the new benchrest, PRS, ELR, or hunting rifle (and thousands more on optics), how are you going to get it to the range and/or hunting grounds? It’s important to transport your valuable firearms in high-quality gun cases. Good padded soft cases can work, but for long-distance hauling (and all air transport), we recommend hard cases with quality foam inside.
Choosing a Rifle Transport Case
Before he retired, Forum member Ron D. served as a Police Officer at Chicago’s O’Hare airport. Ron offers some very important advice for shooters traveling with firearms and expensive optics: “Buy the best [rifle case] that you can afford. Don’t cry when your $3,000+ Benchrest rifle has a cracked stock or broken scope. Think about what it would be like to travel across the country and arrive with a damaged rifle. Remember the Samsonite commercial. (For you younger shooters, it shows a monkey throwing the suitcase around in his cage at the zoo.)
Baggage handling is NOT a fine art. There is no guarantee that your rifle case will be on top of all the other baggage. Then there is shifting of baggage in the belly of the plane. Ponder that for a while. Rifle and pistol cases must be locked. It doesn’t take a Rocket Scientist to figure out that a simple pry tool will open most case locks. There is not much that you can do to disguise a rifle case. It is what it is, and opportunists know this. Among thieves, it doesn’t take long for the word to get around about a NEW type of case.”
Customizing the Foam Interiors of Gun Carry Cases
For the best fit of your firearms and accessories in a foam-interior hard case, you should customize the foam to fit. Some cases have “pluckable” foam. With these you remove small squares one an a time until the stored items fit. With other cases with dense foam interiors, you’ll need to cut the foam to fit. Here are two videos that show the process of tailoring foam to a rifle using an electric cutting tool. Watch these videos carefully — they can really help create the best custom-fit for your firearms.
Pelican 1750 Waterproof Travel Vault Case
Guncases.com, an Optics Planet company, offers a wide selection of quality, durable gun cases. One of the best units offered is Pelican 1750 Waterproof Rifle Case – Travel Vault Protector. If you’re headed to a very rainy/snowy climate, or transporting your rifle on a boat, consider this option. The waterproof Pelican 1750 case measures 53.00″ x 16.00″ x 6.12″ outside and weighs 25.5 pounds unladen. It features an O-Ring Seal, Pressure Relief Valve, and a lifetime warranty. It is offered in three colors, OD Green, Black, and Desert Tan, starting at $284.49. This is pricey, but it is one of the highest-rated cases you can buy.
Pelican Vault Series Rifle Cases
Pelican Products, known for premium hard-shell transport cases also offers a more affordable VAULT series of cases. Pelican’s VAULT cases offer durability and security at a lower price point. VAULT cases range in price from $39.99 to $199.99 and are backed by a 1-year guarantee. The VAULT rifle cases all feature wheels, easy-to-use push-button latches, and four stainless steel lock hasps for security. There is also a brightly colored Hi-Viz strip on the front of Pelican’s VAULT cases. This will make it easier to spot your case at airport baggage areas. The model V800 double-rifle case features a 53″ x 16″ x 6″ interior. That’s long enough for F-Class rifles and tactical rigs with brakes. The model V770 single-rifle case is 50″ × 10″ × 6″ inside. That’s still big enough for most hunting, varmint, and benchrest rifles.
SKB Double Rifle Case
GunCases.com also offers SKB Gun Cases. The SKB model 2SKB5009 Double Rifle Case is an excellent choice carrying two rifles long distances. This has a very tough exterior with a metal middle frame for extra strength. Priced at $289.99, this case has exterior dimensions: 56″ L x 16.5″ W x 9.5″ H. This photo shows the case carrying both an M1A and an M1 Garand. NOTE: The foam is not really customizable. This is not the best choice if you plan to carry a single rifle and a spotting scope and a second barrel.
Plano Two-Gun Tactical Case
This Plano two-gun case is Amazon’s #1 Best Seller in wheeled, heavy-duty firearms cases. This is offered in three sizes: 36″, 42″, and 52″. We like the biggest 52″ version, ($96.21 on Amazon), as it is long enough inside to fit most scoped match rifles. Alternatively, if you have a really long F-Class, ELR, or Palma rig, you can detach the barreled action from the stock, and run the two sections in the shorter 42″ case. The big case lets you easily carry TWO scoped hunting rifles. That’s great because this case is strong enough for airline travel, meeting FAA requirements for checked baggage. This Plano case offers a good balance between strength and weight, all for a reasonable cost. Yes a Pelican 1750 is somewhat better, but that will cost about $285.00 — three times as much.
CaseCruzer Handgun Cases
A California company, CaseCruzer, makes the nicest multi-pistol hard cases we’ve ever seen. With capacities from 3 pistols to 6 pistols, these lockable range cases hold handguns securely in angled “quick-draw” slots. In addition to the molded pistol carriers, there are slots for magazines together with a separate compartment for muffs, ammo, and other accessories. Starting at $240.00 MSRP for the Quick Draw 3-Pack, these boxes are expensive, but they offer great protection with great usability. Water-tight and dust-proof, CaseCruzer cases are airline approved (ATA 300).Now that you’ve spent thousands of dollars on the new benchrest, PRS, ELR, or hunting rifle (and thousands more on optics), how are you going to get it to the range or hunting grounds? It’s important to transport your valuable firearms in very high quality gun cases. Good padded soft cases can work, but for long-distance hauling (and all air transport), we recommend hard cases with quality foam inside.
Video Tip from Boyd Allen. We welcome reader submissions.
Along with these popular cartridge types, DJ’s Brass can hydro-form 6 PPC, 30 PPC, 6 BRA, 30 BR, .260 AI, .284 Shehane and other wildcats.
Do you shoot a popular wildcat (such as the 6 BRA), but hate the hassle of fire-forming all your own cartridge brass? That takes time, costs money (in bullets and powder), and consumes precious barrel life. Well there IS a better solution — you can have your new brass hydro-formed to your exact specifications for a reasonable cost.
DJ’s Brass Service now offers custom case hydro-forming to your exact specs. Darrell Jones offers this service for a variety of popular cartridges: 6 PPC, 30 PPC, 30 BR, 6 BRA (BR Ackley), 6mm Grinch, 6 BRDX, 6 BRX, .260 Ackley, .284 Shehane and of course the very popular 6mm Dasher. After hydro-forming your brass, Darrell can also neck-up or neck-down the cases to meet your needs. For example, if you shoot a 22 Dasher, Darrell can hydro-form the cases to a 6 Dasher and then neck them down to .22 caliber. He can also turn the necks to your specs (for an additional charge).
Darrell is a hydro-forming wizard who has perfected the process over the last couple of years. He has learned a few special techniques along the way to ensure uniform case-forming.
Without revealing any trade secrets, we can say the Darrell has very special dies and Darrell doesn’t use a mallet or hammer — he has a system that is much more consistent. Darrell tells us: “Many of my customers take this brass and load it ‘as is’ and go straight to a match and shoot some very nice groups.”
With Darrell’s hydro-forming service you don’t have to buy any special dies or other equipment. Darrell says: “Simply send me the brass you need or have it dropped-shipped to me along with a fired case that has not been sized. If you need formed brass for a new build (gun not yet fired), let me know and I will size the brass to fit within .001 of a PT&G GO gauge.”
Hydro-forming by Darrell costs $0.60 (sixty cents) per case with a minimum order of $60. Neck-turning is an additional $0.60 (sixty cents) per case (or $0.75 for magnums) plus actual return shipping. The turnaround is usually less than five days.
NOTE: After cases are hydro-formed by Darrell, every case is washed, cleaned and re-annealed. This cleaning and annealing process is included in the $0.60 (sixty cents) per case price — that’s all part of the Hydro-forming service.
For more information, visit DJsBrass.com, or call Darrell at (205) 461-4680. IMPORTANT: Contact Darrell for shipping instructions BEFORE sending brass for processing. In a hurry, don’t have time? Just call Darrell and he’ll make something work for you.
Hydro-Forming Customer Reports
Here are testimonials from recent customers.
“Recently had Darrell Jones of DJ’s Brass Service hydro-form 6 BRX brass for me. The turn around time was very fast and the brass was to the exact specification I ask for. I actually shot the hydro-formed brass in a match [without further fire-forming]. It shot a 3.597″ — pretty amazing. Let DJ do the work for you!” — Mike Wilson (3 Time IBS Record Holder; 2013 and 2014 1000-yard IBS Shooter of the Year.)
“Darrell Jones of DJ’s Brass Service went far beyond the call of duty, to assist me [with my first] IBS match. I have had an interest in 1000-yard competition for many years and finally got the opportunity to try it. After researching the winning competitors, rifles, and rounds I ordered a Panda action with Krieger barrel in 6mm Dasher from Kelby’s. It was one week before the match and I had a rifle and no rounds. I contacted Darrell to hydraulically form 6mm Dasher from Lapua 6mm BR brass. He formed the brass and had it in the mail the next day[.] Since I have only reloaded for hunting or magazine fed rifles I was not familiar with proper seating to allow land engagement of the bullets for 1000-yard accuracy. Darrell took the time to advised me every step of the way to allow me to shoot a 3.158″ (5) shot group to win my first round of my first competitive match ever.” — Mike Youngblood
Headed to SHOT Show in Las Vegas next month? Then you should download the FREE SHOT Show Mobile App. Available for all mobile devices, this App really makes it easier to plan your SHOT Show schedule, and navigate the floor of the Sands Convention Center. The 2020 SHOT Show Mobile App is now available for download on Apple, Android, and Windows smartphones and devices. Apple users will find the app in the App Store, Android users will find their version in the Google Play Store. Windows users can access via the WEB Dashboard. Learn more at SHOTmobile.com.
NOTE: We are somewhat skeptical about the 2020 SHOT Show App. The 2018 SHOT Show App worked very well. The 2019 SHOT Show App crashed early and often and the mapping feature was frustrating. Hopefully the software will be better in 2020 than in 2019.
Handy Interactive Map
The App includes an interactive map that can direct you from your current location to your next destination. Arrange your meetings with a handy scheduling calendar. And you can search for any SHOT exhibitor by name or product category. In addition, the App lists major show events as well as important new products.
SHOT SHOW 2020 APP FEATURES
— Locate Exhibitor Booths with searchable Vendor Database/Floor Map
— Build a personalized Schedule and bookmark Exhibitors
— Visit bookmarked Exhibitors with Quick Route Feature
— Multi-Device Sync for smartphones, tablets, laptops
— Up-to-date Exhibitor, Speaker, and Event information
The 2020 SHOT Show takes place January 21-24 at the Sands EXPO in Las Vegas, Nevada. Media Day at the Range takes place Monday the 20th in Boulder City. To learn more about SHOT Show, including how to register, educational resources, event listings and hotel/travel information, visit SHOTShow.org.
Effective hearing protection is a must whenever you are shooting firearms or when you are in the vicinity of gun-shots. For ultimate protection, we recommend a good set of tapered foam earplugs, topped by ear-muffs. However, there are situations when you may prefer lighter-weight hearing protection that can be quickly removed. For example, if you are standing well behind the firing line as an observer, or if you are working as a rangemaster or waddie some distance away from the shooters.
In addition to traditional ear plugs and ear-muffs, new band-style protectors provide a third sound-blocking option. Howard Leight, a top name in the sound-protection business, now offers the “Quiet Band”, a device with soft foam plugs attached to a plastic band worn around the neck. This “Quiet Band” product is comfortable, easy to deploy, and surprisingly effective.
We do NOT recommend these for normal use when shooting firearms. However, they work very well if you are spotting for a fellow shooter, or are near the firing line. These also work great when running noisy machinery such as leaf-blowers.
Three Quiet Band Models
There are three (3) types of Leight Quiet Band® sound protectors. We prefer the QB2 Supra-aural model (item QB2HYG, NRR 25). As shown in the photos, the NRR 25-rated QB2 positions cone-shaped foam pads next to the ear openings and holds them there with light pressure from the orange-colored band. There is also an Inner-aural version (item QB1HYG, yellow band, NRR 27), and a Semi-aural model (item QB3HYG, red band, NRR 21).
Our preferred QB2 Supra-aural (orange band) model is just as comfortable as the QB3 (red band) version, and offers much better protection. The QB1 Inner-aural (yellow band) model requires that you place the ear buds in the ear canal, so it’s not really any easier to use than conventional earplugs. That’s why we like the QB2 Supra-aural model best of all. Other users agree. Here’s what two QB2 owners had to say:
“I first saw these used by Hickok45 on YouTube and he talked positively about them. I got two and gave them a try. At first, I didn’t think they were going to work very well. After some fiddling, I found they work pretty darn good. With my ears, they fit the best if the band starts on top of my head, I insert the plugs then rotate the band behind my head. PRESTO, perfect fit. Shooting the 9mm and 12 gauge out back was comfortable with no ringing afterward. [They are] small and easy to transport — just throw in the range bag. Yet, they are big enough to keep around your neck out of the way[.] I highly recommend them to anybody needing banded hearing protection.” — Tom W.
“Great for woodworkers — These are lightweight AND very effective at reducing noise. When not in use the band hangs loosely around your neck, out of your way completely. Very cost effective for a great product!” — Sheri D.
Quiet Bands Are Much Less Expensive Than Earmuffs
Quiet Band® sound protectors can be purchased from many online vendors for under $6.00 per set, which includes a spare pair of ear buds. We like the QB2 Version which are easy to put in blace. These currently cost $5.90 at Amazon for one unit or $17.00 for three QB2 bands with 3 extra sets of plugs. Alternatively, you can get the Leight QB3 Supra-Aural for $6.64 or the Leight QB1 Inner-Aural for just $3.59. The QB3 features a flatter ear pad while the QB1 is designed the insert in the ear canal like conventional plugs. We think the QB2 is the best choice for most users.
For QB1, QB2, and QB3 ear bands, replacement ear buds are available and sold by the pair. You can also buy a Ten-Unit Bulk Pack of QB2 Quiet Bands for $41.70 with free shipping. If you run shooting matches or training programs, you can buy these in bulk for your Range Officers and pit workers.
Wintertime is here, the season of cold and damp… and RUST. There’s snow on the ground in many parts of the country. If you want your fine firearms to remain pristine and rust-free through the winter months, it’s wise to protect then while they are stored in a safe. You should protect blued surfaces with a rust-blocker. In addition, we recommend storing guns in protective sleeves. Our take on Bore-Store Gun sleeves is simple: They work great, so buy them and use them — for ALL your valuable firearms.
These thick, synthetic-fleece sacks cushion your guns, preventing nicks and scratches. The breathable fabric wicks away moisture, and the fibers are coating with corrosion inhibitors. I personally use Bore-Stores for in-safe storage with all my guns, and I have never had one of my guns rust inside a Bore-Store, even when I lived a stone’s throw from the ocean.
Bore-Stores are offered in a wide range of sizes, so you can find something to fit everything from a Snub-nosed revolver to a 32″-barrelled 50 BMG. Rifle-size Bore Stores can be purchased for $13.00 – $22.00 from Brownells. For long F-Class or tactical rifles, we recommend the 10″x52″ Scoped Shotgun Bag, Brownells item 132-000-003WB. You can also order direct from the Bore-Store manufacturer, Big Spring Enterprises, www.BoreStores.com. Big Spring will also craft custom sizes on request.
Consider Military-Style, Triple-Layer Bags for Long-Term Storage
While we prefer Bore-Stores for regularly-used guns, if you have heirloom firearms that will be kept in storage for very long periods without seeing any use, you may want to grease them up and place them in the thin, but rugged three-layer storage bags sold by Brownells. The bags are made from a three-layer laminate of polyester, aluminum, and polyethylene film, with a shiny silver exterior. Though the laminate is thin, the Brownells storage bags are puncture-resistant, and have a 0% moisture transmission rating so moisture can’t get inside. These bags are also resistant to petroleum-based chemicals and they won’t break down even in contact with soil or moisture.
Here’s one VITAL bit of advice for using these bags. Be absolutely sure, before you seal up the bags, that your guns are DRY and that all metal surfaces have been coated with an effective anti-corrosive, such as BoeShield T9 or Eezox. Brownells’ storage bags are inexpensive. A three-pak of 12″x 60″ rifle sacks (item 083-055-003WB) costs just $22.99 — under eight bucks a gun. That’s cheap insurance for rifles and shotguns that may cost thousands of dollars.
Get Your Guns Out of Foam-lined Cases — They Are Rust Magnets
Just about the worst thing you can do in the winter (short of leaving your rifle outside in the rain) is to store firearms in tight, foam-padded cases. The foam in these cases actually collects and retains moisture from the air, acting as the perfect breeding ground for rust.
Remember, those plastic-shelled cases with foam interiors are for transport, not for long-term storage. Don’t repeat the mistake of a wealthy gun collector I know. He stored four valuable Colt Single Action Army (SAA) revolvers in individual foam-padded cases, and locked these away in his gun safe. A year later, every one of his precious SAAs had rusted, some badly.
Emil Kovan is one of the top F-Class shooters in the world. He won the 2014 United States F-Open Championship, and finished second in F-Open Division at the 2016 Canadian National F-Class Championship in Ontario. He is a great shooter and a great gun-builder as well.
“What are the best components for an F-Open class rifle, and why?” That’s a question that I get asked all the time and will try to answer in this article. Two months ago, I was contacted by Duane, a gentleman I met at the 2015 F-Class Nationals. He was interested in building a rifle with the new Master Class Low Profile F-Open Stock, created by Carl Bernosky and Alex Sitman of Master Class Stocks.
I have known Alex Sitman for many years, and use his stocks exclusively, but was not very familiar with his new Low Profile F-Open stock. After a brief conversation with Alex, I placed an order, and had the stock inletted and bedded at my shop in a month. My first impression was “Wow that’s a long stock” — the forearm is significantly longer than on the original Master Class F-Class prone stock. I bolted the barreled action in, and squeezed the end of the forearm and barrel together, the stock flexed a little bit, but not as much as other designs that I have tested. I think that’s due to having “more meat” in the receiver area. The full stock depth continues farther forward that on some other “low profile” designs. That makes the stock stiffer in the vertical plane, reducing the hinging effect forward of the action. The stock was finished in gloss black per the customer’s request. Interestingly, I found that the multiple layers of paint and clearcoat stiffened the stock up quite a bit.
CLICK IMAGE below for full-screen version
Low Center of Gravity Tames Torque
Compared to the original Master Class F-Open stock, the barrel sits about an inch lower. Lower center of gravity equals less torque, and that is very important when shooting heavy bullets in fast twist barrels. Another significant improvement is that the toe of the stock is flat and parallel to the forearm. I added a 3/4″ track rail in the rear, and milled the underside of the fore-end to create two parallel “rails” in the front to help the stock track better.
One of the biggest reasons why I like Master Class stocks, is the pistol grip. I don’t shoot “free recoil” and a comfortable pistol grip is super important to me when selecting a stock. The new Master Class Low Profile stock shares the same grip as the old model. This allows the stock to accommodate either a “hard hold” style or a more free-recoil style of shooting — whatever the rifle’s owner prefers. This design versatility is one reason I recommend Master Class stocks. Shooters may experiment with either shooting style to find what suits them best.
Cartridge Choice — A 40° .284 Win Improved
Duane decided to have the barrel chambered for my 284 KMR IMP (Improved) wildcat. What is .284 KMR IMP and why choose it over the straight .284 Winchester? Improved by definition means “made better”, I took a great cartridge, and modified it to increase capacity, reduce pressure, and increase brass life.
There are many “improved” variants of the original .284 Winchester: 7mm Walker, .284 Shehane, .284 Ackley and so on. My version, the 284 KMR IMP, shares the .010″ blown-out sidewalls of the .284 Shehane, but I have further increased the case capacity by changing the shoulder angle from 35 to 40 degrees. The 284 KMR IMP allows you to almost match magnum cartridge velocity in a standard-bolt-face action. If you want to run 180gr-class 7mm bullets over 2900 FPS, it is cheaper and more convenient to have a barrel chambered in 284 KMR IMP than to spend $650 for a magnum bolt.
Tuning Loads for the .284 Win Improved Cartridges
The 284 KMR IMP seems to have two nodes, one around 2820 fps and other at 2940 fps. My match load clocks at 2935 fps with single-digit ES. Note –I selected that load based on accuracy, NOT raw speed. A lot of novice (or hard-headed) shooters make the mistake to push their cartridges to the max, and disregard more accurate loads at lower velocity.
The sport of F-Class is rapidly growing, and the equipment used is improving constantly. I remember that only few years ago, an F-Open rifle that could shoot sub-one-inch of vertical at 300 yards was considered competitive. Now, we are pursuing sub-one-inch vertical at 600 yards! It takes a great rifle to approach that goal, but it is also up to the shooter to learn and experiment as much as possible in order to achieve success.
Dies for an Improved .284 Win Cartridge
One of the biggest challenges in campaigning a wildcat cartridge has been obtaining great dies. When searching for custom dies, it almost seems like that the odds are stacked against us. The most common problem is wait-time — custom die orders can take months to be completed. Also, most custom die makers want you to send them two or three cases, each fire-formed three times. I find that funny because if could somehow properly size the cases for three fire-forming cycles, I would not need a sizing die.
Custom-made dies should size the case just right, but sometimes the die’s internal dimensions are slightly off, and this leads to problem number two: dies sizing too much (or even worse) too little. I had a one “custom” die that would not size the bottom of the case enough. This made the extraction of fired cases very difficult. I feel that the best option (if available) for shooters interested in wildcat chambers is to have their gunsmiths make the dies. I offer that die-making service in addition to barrel chambering.
BAT Machine “M” Action
Duane decided to use a BAT M action for this rifle, and I think that he could not have made a better choice. We are blessed with many good match-quality receivers: Barnard, BAT, Borden, Kelbly, Nesika, and Stiller just to mention a few. These are all very well-made and suitable for F-Class. Among BAT Machine Co.actions, I like BAT models M, MB, and 3LL best. I prefer these because because of their size (large bedding footprint) smoothness, timing, options available, and last but not least visual appearance.
Trigger: I recommend and use Jewell triggers. Other good options are: Kelbly, CG Jackson (good 2-Stage) Anschutz (best 2-Stage for Bat and Kelbly actions), Bix’N Andy, and David Tubb.
Barrel: Duane made another good choice here. He decided to go with a Brux 1:8.5″-twist, 4-groove cut-rifled barrel. If you look at the F-Class and Long Range benchrest equipment lists, you will see that cut-rifled barrels are currently dominating. Many records have been shot with both button-rifled, and cut-rifled barrels. I have shot both, and prefer cut-rifled barrels. I am not saying that button-rifled barrels are not capable of shooting as well as cut-rifled barrels, but on average, in my experience, four out of five cut-rifled barrels (from top makers) will shoot well, vs. three out of five buttoned barrels. YMMV, but this is what I’ve observed.
Scope: Duane’s rifle was fitted with a Nightforce 15-55x52mm Competition scope with DDR-2 reticle. This optic is ultra clear, reasonably lightweight (28 oz.), super reliable, and has 1/8 MOA clicks — what you want for long range F-Class competition. In this 15-55X NF model, I like the DDR-2 reticle best, because fine cross hairs (FCH) are hard to see in heavy mirage. The DDR-2 has a heavier horizontal line, with a center dot. March scopes are also very popular and very well-made.
Thanks for reading, and keep ‘em in the middle…
Emil Kovan Competition History:
– 2014 F-Class Open National Champion
– 2016 F-Class Open Canadian Championship, Silver Medal (tied for first on score)
– 2015 F-Class Open National Championship, Silver Medal
– F-Class Open National Championship Teams, 2015, 2014, 2013, Shooting Team Member
– Over 15 wins in Regional and State Championships in Palma, F-TR, F-Open
Here’s an early Christmas present to our readers — a selection of FREE printable precision and fun targets. You can download these targets as PDF files and then print them out on 8.5×11″ heavy paper.
AccurateShooter.com offers a cool page with over 50 FREE downloadable targets. You’ll find all types or FREE targets — sight-in targets, varmint targets, rimfire targets, bullseye targets, tactical targets, load development targets and more. CLICK HERE for all our free targets, including our LOAD DEV target.
We created the above target a decade ago. Since then it has been used by tens of thousands of shooters. It has proven very popular as a load development target, since all your load data fits neatly in the boxes under each target. In fact this target is being employed by both rifle-makers and barrel-makers (including Criterion) to test their products. The target was designed for aiming efficiency. The diamonds have 1/2″ sides and you can align your cross-hairs on the horizontal and vertical lines. It is a clean design that is easy to see even at 200 yards with a 20X scope. When we test, we usually crank in a little elevation, setting the point-of-impact higher, so that our shots fall in the gray circles. That way you leave the squares intact for precise aiming.
Versatile Targets with Multiple Aiming Points
We use the two targets below for load development and precision practice. For the left target, use the corners of the diamonds to align your cross-hairs precisely. The circle dot target (on the right) can also be used for informal rimfire competition at 50 yards. Right-Click Each Target to Download Printable PDFs.
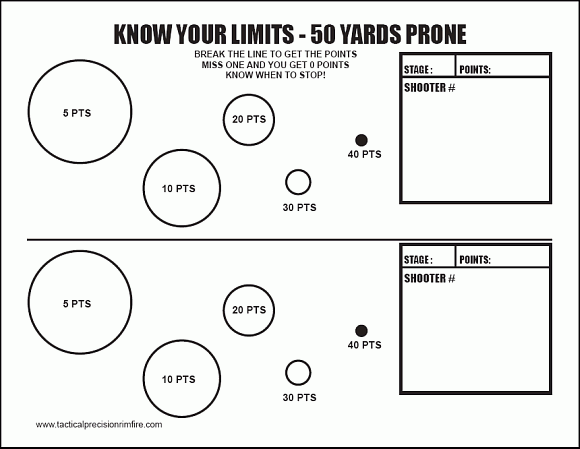
Know-Your-Limits Target for Rimfire Training & Fun Matches
Here’s a rimfire training target with “big to small” target circles. Start with the largest circles, then move to the smaller ones in sequence. This systematic drill provides increasing challenge shot-by-shot. Novices often are quite surprised to see their accuracy improve as they move from bigger to smaller aiming points. That provides positive feedback — always a good thing.
Right Click and “Save as” to download printable PDF versions of target.
FREE NSSF Fun Targets — Dartboard, Golf, Billiards, Bowling Etc.
To help our readers have more fun during National Shooting Sports Month, here are a dozen FREE Targets from the NSSF. Along with Bullseye targets, there are some very cool specialty targets here, including a Golf Course Target, Baseball Diamond Target, Billiards Target, Light Bulb Target, Bowling Pin Target, and even a Windmill Target. Enjoy the myriad possibilities with these 12 fun targets.
Quality Paper Stock Is Important
If you want your self-printed targets to show shots cleanly (and not rip when it gets windy), you should use quality paper stock. We recommend card stock — the kind of thick paper used for business cards. Card stock is available in both 65-lb and 110-lb weights in a variety of colors. We generally print black on white. But you might experiment with bright orange or yellow sheets. Forum Member ShootDots report: “They sell cardstock at Fed-Ex Kinko! I use either Orange or Yellow. That makes it easy to see bullet holes clearly.”
Here are some Target-Printing Tips from our Forum members:
“Staples sells a 67-lb heavy stock that I have settled on. I use the light grey or light blue, either of these are easy on the eyes on bright days. I have used the 110-lb card stock as well and it works fine. It’s just a little easier to print the lighter stuff.” (JBarnwell)
“Cardstock, as mentioned, works great for showing bullet holes as it doesn’t tear or rip like the thin, lightweight 20-lb paper. I’ve never had a problem with cardstock feeding in the printer, just don’t stick too many sheets in there. If I need three targets, I load only three card stock sheets”. (MEMilanuk)
“20-lb bond works pretty well for me if I use a spray adhesive and stick the entire back of the paper’s surface to the backer board.” (Lapua40X)
Curious about suppressors (aka “silencers”, “moderators”, or “cans”)? Below you’ll find an informative NSSF Infographic that covers the history, legal status, design, and operation of modern-day suppressors.
Here’s a cool video showing how suppressors work. This video features see-through rifle suppressors filmed with ultra-high-speed (110,000 frame per second) cameras. When played back in super-slow-motion, you can see the flame propagate through the suppressor and the bullet move through each baffle before it exists the muzzle. Check it out!
See Through Suppressor in Super Slow Motion (110,000 fps) — Click Arrow to Watch:
Suppressor Facts — What You Need to Know
In this infographic, the NSSF provides the history, specifications, benefits and uses of firearm suppressors. Don’t suppress your knowledge!
Suppressors reduce gunfire sound levels by using baffles that contain expanding gasses exiting a firearm’s muzzle when ammo is discharged. Suppressors are similar to car mufflers that were, in fact, developed in parallel by the same inventor in the early 1900s. Well-designed suppressors typically reduce the gun sound levels by 30-35 decibels (dB). Suppressors are becoming more popular even though it still takes many months to get approved. In fact, the number of suppressors registered with the ATF grew by over 1 million from 2011 to 2017. That’s a 355% increase.
Image Courtesy NSSF. This story is based on an NSSF Article.
‘Tis the season of gift-giving — Christmas is just 3 weeks away. Perhaps you’re considering giving a a first rifle to your grandson or perhaps a carry pistol to a spouse. When making a gun gift to a friend or family member, however, there are some very important legal considerations. Also the rules on firearms gift transfers vary from state to state. Bottom line here — you need to know the law BEFORE you deliver that shiny new firearm to a family member, close friend, or relative.
The first thing to remember if you’re thinking about giving someone a gun is that … it’s a gun! You already know that ownership of a firearm brings with it some serious legal and ethical obligations that other consumer products don’t. So let’s look at some questions you may have about giving a firearm as a gift.
Image Courtesy NSSF
The first question you have to ask is whether the intended recipient can legally own the firearm where he or she lives. With more than 20,000 different gun laws on the books, even the kinds of firearms that law-abiding citizens can own vary from place to place. For example, juveniles (under age 18) generally speaking are precluded by law from possessing a handgun. Check out the Bureau of Alcohol, Tobacco, Firearms and Explosives (ATF) website for an overview of local laws and, whatever you do, don’t forget that you can never under any circumstances transfer a firearm to someone you know — or have reasonable cause to believe — legally can’t own one. That’s a federal felony, so be careful.
There’s no federal law that prohibits a gift of a firearm to a relative or friend who lives in your home state. Abramski v. United States, a recent Supreme Court decision involving a “straw purchase” of a firearm did not change the law regarding firearms as gifts. The following states (California, Colorado, Connecticut, Delaware, New York, Oregon, Rhode Island, Washington State) and the District of Columbia require you to transfer a firearm through a local firearms retailer so an instant background check will be performed to make sure the recipient is not legally prohibited from owning the gun. Maryland and Pennsylvania require a background check for private party transfer of a handgun. There are exceptions, so it’s important to check the law of your state or ask your local firearms retailer.
Consider a Gift Card Instead of Direct Gift
The ATF recommends that if you want to give someone a new firearm, rather than going to a gun store and buying the gun on your own, consider instead purchasing a gift certificate/card from your favorite gun retailer. Then give that gift card as the present. That way the recipient can choose the exact gun he or she wants, and there’s no question about who is “the actual buyer of the firearm,” which is a question any purchaser must certify on the Federal Form 4473 at the time of purchase. The Gift Card option avoids any “straw purchaser” issues.
Intra-Family Transfers and Antique Arms
What if you want to give “Old Betsy,” your favorite old deer rifle, to your son or daughter as a college graduation gift? Again, in most states, there’s no law that says you can’t, but some states require even intra-family transfers to go through a licensed dealer. Remember, you can never transfer a firearm directly to another person who is a resident of a different state. In that case, you must transfer the firearm through a licensed dealer in the state where the person receiving the gift resides. Using a gift certificate from a firearms retailer near where the recipient lives might be a good solution. Pre-1898 antique firearms are generally exempt from the dealer requirement. [But check with the laws in your jurisdiction]. Be safe and check with your dealer or local law enforcement before you hand over your prized possession.
Regulations on Firearms Shipping to Third Parties
When you intend to transfer a gun, there are important rules on interstate shipping*. Generally speaking, you can only ship a handgun by common carrier (but not U.S. Mail) and a long gun by U.S. Mail or common carrier to a federally licensed dealer, but not to a non-licensed individual. With all carriers, federal law requires you to declare that your package contains an unloaded firearm. To be safe, always consult your carrier in advance about its regulations for shipping firearms. Also check your state laws on transfers.
*Different rules may apply to shipping to parties IN-STATE or shipping firearms to yourself in temporary care of others. Always consult your own state laws, but here are some FAQs copied directly from the ATF.GOV website:
Many of the best videos on reloading products and methods have been produced by Gavin Gear of UltimateReloader.com. Over the last 12 years, Gavin has released 465 videos showcasing reloading products, gunsmithing techniques, and gun testing. Thanks to Gavin’s movie-making skills and hard work, his GavinToobe YouTube Channel recently achieved the 100,000 subscriber milestone. Over the years Gavin’s videos have received over 17.7 million views. Gavin’s videos have benefited shooting enthusiasts and hand-loaders around the globe, and we congratulate Gavin and UltimateReloader.com!
Gavin posted: “Twelve years ago I started my YouTube channel. Shortly thereafter I started publishing ammunition, reloading and shooting sports content. In 2017 I quit Microsoft to work on Ultimate Reloader full time, and on 11/26/2019 I surpassed the 100,000 subscriber mark. WOW, it’s been sooooo much work, but sooooo much fun. Special thanks to my family for putting up with all of the times I’ve worked on this project ‘after hours’. I feel totally blessed. Very much appreciate my community, and also Jonathan Patton for helping me to understand online communities better. I also really appreciate Hornady for their help in getting me started (my first partner). Neil Davies — that’s you. Thanks everyone!”
To mark this major milestone, we’re featuring five of Gavin’s popular videos. The first is his 2019 Black Friday video covering bargains from Midsouth, Starline, KMS Squared, and Inline Fabrication.
Black Friday 2019 Special Bargains
Epic Reloading Hardware Test — 14 Single-Stage Presses
In this remarkable video, Gavin review fourteen (14) single-stage reloading presses. This is the most comprehensive reloading press comparison test ever done by anyone:
Most Popular Video — .223 Rem vs. 5.56×45
This is Gavin’s #1 Video of all time. His .223 Rem vs. 5.56×45 video has been viewed over 1.9 million times. It provides key facts about the similarities (and a few differences) between the .223 Remington cartridge and the 5.56x45mm NATO round.
1000 Yards with .224 Valkyrie
With 50,000+ views, this is one of Gavin’s most popular field shooting videos. Shooting on his scenic “home range” in the Washington mountains, Gavin developed a tack-driving load using Berger 80.5 gr bullets. See 100-yard results and Gavin’s remarkable first-round hit on steel at 1000 yards!
Buck Fever — Right in the Back Yard!
In this video, Gavin uses his new 300 PRC rifle to bag an impressive buck just 100 yards from his shop. For those of you who have hiked miles on a hunt, only to return home empty-handed, this will seem amazing. And yes, Gavin’s 300 PRC cartridge dropped the animal like a stone.


 Darrell is a hydro-forming wizard who has perfected the process over the last couple of years. He has learned a few special techniques along the way to ensure uniform case-forming.


 Effective hearing protection is a must whenever you are shooting firearms or when you are in the vicinity of gun-shots. For ultimate protection, we recommend a good set of tapered foam earplugs, topped by ear-muffs. However, there are situations when you may prefer lighter-weight hearing protection that can be quickly removed. For example, if you are standing well behind the firing line as an observer, or if you are working as a rangemaster or waddie some distance away from the shooters.
 Three Quiet Band Models
 “I first saw these used by Hickok45 on YouTube and he talked positively about them. I got two and gave them a try. At first, I didn’t think they were going to work very well. After some fiddling, I found they work pretty darn good. With my ears, they fit the best if the band starts on top of my head, I insert the plugs then rotate the band behind my head. PRESTO, perfect fit. Shooting the 9mm and 12 gauge out back was comfortable with no ringing afterward. [They are] small and easy to transport — just throw in the range bag. Yet, they are big enough to keep around your neck out of the way[.] I highly recommend them to anybody needing banded hearing protection.” — Tom W.


 Here’s one VITAL bit of advice for using these bags. Be absolutely sure, before you seal up the bags, that your guns are DRY and that all metal surfaces have been coated with an effective anti-corrosive, such as BoeShield T9 or Eezox. Brownells’ storage bags are inexpensive. A three-pak of 12″x 60″ rifle sacks (item 083-055-003WB) costs just $22.99 — under eight bucks a gun. That’s cheap insurance for rifles and shotguns that may cost thousands of dollars.
 Remember, those plastic-shelled cases with foam interiors are for transport, not for long-term storage. Don’t repeat the mistake of a wealthy gun collector I know. He stored four valuable Colt Single Action Army (SAA) revolvers in individual foam-padded cases, and locked these away in his gun safe. A year later, every one of his precious SAAs had rusted, some badly.


 Emil Kovan Competition History:




 The first question you have to ask is whether the intended recipient can legally own the firearm where he or she lives. With more than 20,000 different gun laws on the books, even the kinds of firearms that law-abiding citizens can own vary from place to place. For example, juveniles (under age 18) generally speaking are precluded by law from possessing a handgun. Check out the
  Consider a Gift Card Instead of Direct Gift


