Many shooters these days clean their cartridge brass ultrasonically, or wet-tumble their cases with stainless media (above). Both methods get brass clean and shiny, inside and out. However, when those wet-cleaning processes are completed, you’re left with a pile of soaking wet brass. How do you dry your brass quickly and efficiently, without unsightly water spots? Read on for some great answers…
In our Shooters’ Forum, Forum Gold Member Terry asked: “How do you dry your brass after Ultrasonic cleaning?” In an interesting Reloading Forum Thread, many smart suggestions were posted. A dozen fellow members outlined a variety of effective case-drying procedures, which work equally well for both wet-tumbled brass and ultrasonically-cleaned cases. Here are the Top 10 brass-drying suggestions from our Forum members.
TOP TEN Ways to Dry Cartridge Brass After Wet Cleaning
1. Food Dehydrator — Shake the brass in towel to get the bulk of water off. Next leave in the food dehydrator for 45 minutes or until there are no signs of moisture inside the cases. — Lawrence97
2. Lyman 5-Level Case Dryer — Rinse off cleaning solution(s), then load brass by type into racks in Lyman Cyclone Case Dryer. This is easier to load/unload than food dehydrators and holds more cases.
3. Hot Water + Compressed Air — Rinse all your cases as a batch using scalding hot water from the kitchen sink. Hot water evaporates off of brass very very quickly. Then hit them with compressed air. Takes 10 minutes. Simple. — SG4247
4. Oven Dry in Pre-Heated Oven — After pre-heating to 200° or so, turn off oven and put brass inside on a tray. Most important! Tell your wife what you are doing so she doesn’t crank it up to 425 to heat pizza! — MClark
NOTE: Many other members suggested oven drying at 150-200°. We recommend turning OFF the oven so you don’t cook your brass if you forget to remove the cases.
5. Towel Dry then Warm with Heat Gun — Roll brass in a towel until no more water shakes out. Lay out on cardboard box top and blow off with Harbor Freight heat gun. $9.99 on coupon. Two minutes of heated air and about half hour of wait and they are good to go. This is with primers removed. — Shaggy357
6. Compressed Air, then Sun Dry Outside – I rinse the brass, then blow them out with compressed air. Then, dependent on the time of year, lay them on a towel in the sun. — HogPatrol
7. Dishwasher on Dry Cycle – In the winter, I drop my wet brass cases neck-down on the rack pegs in the dishwasher, then turn on the dry cycle. In the summer…well, I’m in Texas. They go to the porch for a bit. — Toolbreaker
8. Alcohol Rinse then Air or Oven Dry — Rinse in 90% Isopropyl alcohol and either let air dry or stick in 175° oven for half an hour. Alternatively, use a dehydrator. — Zipollini
9. Slow Air-Dry in Loading Blocks — I have a reloading block with holes drilled in it. I simply load the block up and let it air-dry in the cupboard for a couple of days. — JCS
10. Wipe with Towel Then Anneal Normally — This thread is stirring my OCD side. Seems complicated for just drying — my brass dries just fine when I anneal it. This entire process can’t take an hour per batch. When finished, the brass is cleaned, annealed, and ready to size. — CHLuke
Deprime, then tumble brass with stainless media, water, Lemishine, and dish detergent.
Shake them easily in a strainer to knock out most media then grab 4-5 pieces, shake them over the bucket for the last of the media then inside a towel.
Finally blow out the primer pockets and wipe with a towel, load in the Annealeez.
OK, admit it — you’ve always wondered how they get those color swirls and camo patterns in McMillan stocks. (You’ll be surprised at the answer). And how does McMillan manage to inlet stocks so precisely for so many different action types?
McMillan Stocks is one of the leading fiberglass stock producers, cranking out 8,000-10,000 stocks every year for hunters, target shooters, and members of the military. McMillan employs state-of-the-art, high-tech machinery. At the same time, many processes are still done by hand — such as applying colors to the stocks.
In the videos below, Kelly McMillan hosts Bob Beck of Extreme Outer Limits TV in a tour of the McMillan stock-making facility. We think all avid “gun guys” will be fascinated by these high-quality videos.
McMillan Custom Stock Production
The first video shows the stock-building operation from start to finish — You’ll see the lay-up, color application, molding, and “stuffing”. Watch carefully at 0:16 to see colors being applied.
How and Why to Create a Dummy Round
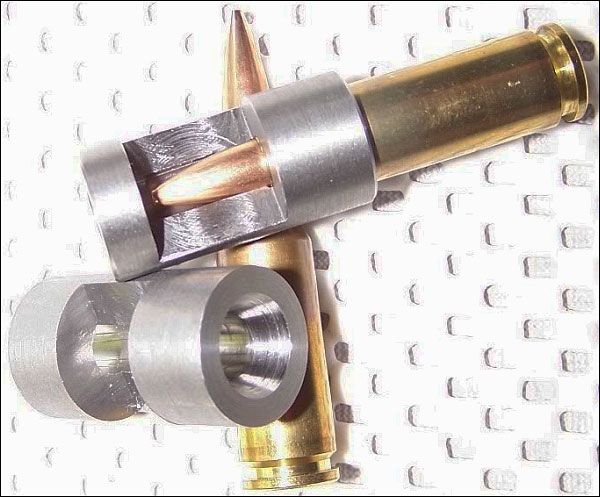
When you have a new custom rifle built, or a new barrel fitted to an existing rifle, it makes sense to create a dummy round. This should have your preferred brass and bullet types, with the bullet positioned at optimal seating depth. A proper dummy round helps the gunsmith set the freebore correctly for your cartridge, and also ensure the proper chamber dimensions.
Respected machinist, tool-maker, and gunsmith Greg Tannel of Gre-Tan Rifles explains: “I use the dummy round as a gauge to finish cut the neck diameter and throat length and diameter so you have [optimal] clearance on the loaded neck and the ogive of the bullet just touches the rifling.” He recommends setting bullet so the full diameter is just forward of the case’s neck-shoulder junction. “From there”, Greg says, “I can build you the chamber you want… with all the proper clearances”.
Greg Tannel has created a very helpful video showing how to create a dummy round. Greg explains how to measure and assemble the dummy and how it will be used during the barrel chambering process. Greg notes — the dummy round should have NO Primer and No powder. We strongly recommend that every rifle shooter watch this video. Even if you won’t need a new barrel any time soon, you can learn important things about freebore, leade and chamber geometry.
This has been a very popular video, with 244,000 views. Here are actual YouTube comments:
That is the best explanation I’ve ever seen. Thank you sir. — P. Pablo
Nice video. You do a very good job of making this easy for new reloaders to understand. I sure wish things like this were available when I started reloading and having custom rifles built. Once again, great job, and your work speaks for itself. — Brandon K.
Beautiful job explaining chambering clearances. — D. Giorgi
Another Cool Tool — The Stub Gauge
When you have your gunsmith chamber your barrel, you can also have him create a Stub Gauge, i.e. a cast-off barrel section chambered like your actual barrel. The stub gauge lets you measure the original length to lands and freebore when your barrel was new. This gives you a baseline to accurately assess how far your throat erodes with use. Of course, as the throat wears, to get true length-to-lands dimension, you need take your measurement using your actual barrel. The barrel stub gauge helps you set the initial bullet seating depth. Seating depth is then adjusted accordingly, based on observed throat erosion, or your preferred seating depth.
This barrel’s shoulder was 0.025″ off the action because Red Locktite had been used on the threads.
Gunsmith Thomas ‘Speedy’ Gonzales offered this interesting report about how NOT to headspace a barrel. Hopefully you never discover something like this…
“A good friend and customer sent this rig in for repair after FedEx damaged the rifle during inbound transport from another smith. After repairing the stock and rebedding it, I decided to re-polish the barrel to make the repair perfect. Well this just added insult to injury as the barrel did not want to come off. After a few choice words, the barrel finally broke free only to reveal something very disturbing. It seems the barrel had been ‘headspaced’ by using RED Loctite to hold it in place.” [Editor: That’s definitely NOT how barrels should be fitted.]
Speedy was not happy: “I hope the smith that did this sees the photos and realized what jeopardy he put my customer in or anyone who shot the rifle for that matter. When cleaned up, the shoulder on the barrel was over 0.0250″ (25 thousandths) away from the face of the receiver.” [Editor: That’s a lot in this business]. Check out the images below to see how much the barrel rotated further inward when cleaned up. The barrel spun in nearly another eighth-turn or more. Not good.
If you’re using a body die or a full-length sizing die, try using Ballistol (in the aerosol can) as a lube. It works GREAT without the tacky or gooey residue left by most case lubes. It will also clean off carbon residues on the neck as you lube the case. Just spray a little on a cotton patch (or your fingertips) and wipe each case before you run it up into the die. If you are using a steel neck bushing, be sure to wipe the neck as well. You can usually do a half-dozen BR-sized cases before you need to re-apply Ballistol on the patch. Ballistol is non-toxic, bio-degradeable, and will not harm your skin. It is very slippery, but can easily be removed with a rag or paper towel. Try it–you may retire your One-Shot. Ballistol can also be used to protect wood stocks.
Note, for heavy case-forming or necking up case necks, we still recommend a thicker lubricant, such as Imperial Die Wax. But for normal case sizing, after your neck has been expanded, Ballistol will do the job, and you won’t need to tumble the brass afterwards. All you need is a very thin layer of Ballistol, and this easily wipes off with a paper towel.
For Neck-Turning, Try STP Blend or Assembly Lube
For lubing the neck-turning tool mandrel while turning case necks, many folks use a blend of STP® Oil Treatment and Mobil 1 lube. Chuckw2 reports: “Try STP and Mobile 1 Synthetic oil in a 50/50 mixture. Very slick, you will need to tumble your cases after turning.” STP is a very thick lubricant, that flows and clings almost like honey. Jason reports the STP blend comes off easily in an ultra-sound bath, using a bit of detergent. STP is also now available in a convenient 7-ounce tube, so you don’t have to buy a large bottle.
Another even cheaper option is assembly lubricant. For turning his case necks, RStreich uses assembly lube from an auto parts store. He notes: “The brand I have is reddish in color and kind of sticky like honey. It’s far better than the Imperial die wax I was using before.” There are a variety of types, both with and without moly additive, and you can select the viscosity you prefer if you sample a few brands. Be sure to clean out any lube residue from the inside of your necks when you have completed your neck-turning.
Velocity vs. barrel length — How much speed will I sacrifice with a shorter barrel? Hunters and competition shooters often ask that. Today we DO have solid answers to that question for many cartridge types thanks to Rifleshooter.com.
Bill, Rifleshooter.com’s Editor, explained his test procedure:
“I gathered four different types of factory Federal 224 Valkyrie ammunition, the 90gr Sierra MatchKing (SMK), 90gr Fusion soft point (SP) (referred to a Fusion MSR), 75gr Total Metal Jacket (TMJ) and 60gr Nosler Ballistic Tip Varmint (NBT). After a brief barrel break in and zero, I fired 5 rounds of each cartridge at each barrel length (except the 75 TMJ, I fired 4 rounds at each barrel length due to limited resources). I recorded the average muzzle velocity and standard deviation for each ammunition and barrel length combination and cut the barrel back 1 inch and repeated the process. I recorded barrel lengths from 28″ to 16.5″ (I try to save these barrels as finished 16″ tubes so they don’t go to waste).”
The Heavy Bullet 90gr Ammo Lost about 21 FPS per Inch
How did the test turn out? You’ll find all the results summarized in helpful tables with inch-by-inch velocity and SD numbers. For the two, 90gr ammo samples, results were similar. The 90gr SMK ammo started at 2782 fps (28″), finishing at 2541 fps (16.5″). That’s a loss of 241 fps, or 20.96 fps average per inch of length. The ammo loaded with 90gr Fusion SPs started at 2797 fps (28″) and ended at 2561 fps (16.5″), a drop of 236 fps. That’s 20.5 fps loss per inch. NOTE: Ambient temperature during the test was 45° F. You could expect the overall velocities to be a bit higher during hotter summer months.
With a the smaller bullets, the effect was even more dramatic. As you’d expect they started out faster. The ammo with 60gr Nosler Ballistic Tips (NBT), a good choice for varminters, started at 3395 fps (28″), and declined to 3065 fps (16.5), a total velocity drop of 330 fps. Average velocity loss was 28.7 fps per inch of barrel length. Rifleshooter.com also tested Federal 75gr TMJ ammo.
About the .224 Valkyrie Cartridge
The new .224 Valkyrie was introduced late last year as a Hot Rod cartridge that will work in AR15s. Designed to rival the .22 Nosler while still running well in ARs, the new .224 Valkyrie offers excellent long-range performance when loaded with modern, high-BC bullets. We expect some bolt-action PRS shooters might adopt the .224 Valkyrie. Why? Reduced recoil. With the 90gr SMK, the .224 Valkyrie offers ballistics similar to the 6.5 Creedmoor but with significantly less felt recoil. Check out this chart from Federal showing comparative recoil levels:
.224 Valkyrie vs. .22-250 Remington
The Social Regressive explains: “There are two key reasons why the 224 Valkyrie is unique and desirable. First, it is specifically designed to fit the limitations of the AR-15 platform. It does so even when loaded with gigantic bullets, like the 90-grain SMK that Federal announced. .22-250 Rem is too long and too fat to work in the AR-15 platform; it needs an AR-10 bolt and magazine.”
The new .224 Valkyrie is basically a 6.8 SPC case necked down to .22-caliber. You can use your existing AR15 lower, but you will need a dedicated .224-Valkyrie upper, or at the minimum a new barrel, modified bolt with proper bolt face, and 6.8-compliant mags.
Scary stuff — AK-74 after firing corrosive ammo and not being cleaned for a week.
Image courtesy ADCOFirearms.com.
No doubt you’ve heard the term “corrosive” used with respect to ammunition. But what exactly is “corrosive ammunition” (and how does it different from non-corrosive ammo)? What is the chemistry that leads to corrosion, and what cleaning procedures should you follow if you shoot corrosive ammunition? Brownells has come up with answers to these and other questions in a helpful TECH TIP video about corrosive ammo.
In this informative video, Brownells gun tech Steve Ostrem explains the primer-related chemistry that makes some ammo corrosive. The video then reviews suggested cleaning procedures you should follow after you have fired corrosive ammo through any firearms.
What Is “Corrosive” Ammunition?
What makes ammo “corrosive”? Generally speaking, primers are the problem. When corrosive ammunition is fired, the ignited primers leave a residue of corrosive salts. Typically these primers contain potassium chlorate, or sodium petrochlorate which, when burned, change into potassium chloride or sodium chloride. Sodium chloride is also known as common table salt.
Potassium chloride and sodium chloride are both very hygroscopic (i.e. they attract water). Because of that, these alkalis are rust generators. When exposed to the hydrogen and oxygen in the air (and moisture) potassium chloride and sodium chloride can form an acid that quickly causes metal rifle parts to rust and pit.
Given a choice, you may wish to avoid corrosive ammo altogether. However, for some types of fire-arms, particularly older military-style rifles, the most affordable ammunition may be corrosive. If you choose to use corrosive ammo, it is important to clean the gun thoroughly after use. After firing, you want to use an element that will neutralize the primer salts. Brownells suggests a water soak (see video above). Alternatively, Windex with ammonia can help neutralize the salts, but that doesn’t finish the job. After the salts have been neutralized and flushed away, basic anti-corrosion protectant (such as Eezox or other gun oil) should be applied to all metal parts.
This video ahows the effects of Corrosive Ammo after one month without cleaning:
To learn more about the proper procedures for cleaning rifles exposed to corrosive ammo, we suggest an article by Paul Markel on Ammoland.com. Markel, host of the popular Student of the Gun TV series, states that: “Windex (with ammonia) is the Corrosive Ammo shooter’s best friend. After you are done shooting your corrosive ammunition for the day, squirt the window cleaner liberally from the chamber down the barrel. Pull the bolt / bolt carrier / op rod if there is one and douse them as well. A couple of old cotton t-shirts will come in handy. A cotton barrel swab is a nice accessory but you can make do with patches. Some folks will rinse all of the ammonia and loosened corrosive salts off with hot water. Others prefer to wipe it all down and let the ammonia evaporate. Either way, once the corrosive salts have been tackled with the window cleaner, it is time for an all-purpose brush (old toothbrush) and some gun oil.” READ Full Article by Paul Markel.
Video Tip from EdLongrange. We welcome reader submissions.
This safe has a simple, combination dial lock. While slower to open, mechanical dial locks are more trouble-free than battery-powered keypad locking systems.
This is the best deal we’ve seen in a long time on a medium-sized, fire-resistant gun safe. If you don’t have a decent safe yet, this is a very good value. You get a 24-gun, fire-rated safe delivered to your doorstep for $459.00. No extra shipping charge. Hard to beat that. This safe usually costs over $675.00. It measures 55″ tall x 29.25″ wide x 20.25″ deep. Weight is 418 pounds. While that’s heavy enough to deter a “smash and grab”, we strongly recommend you bolt the safe in place.
Word to Wise about Rated Capacity
While this safe is rated for 24 long guns up to 54″ tall, realistically you can store 10-12 scoped rifles comfortably. You can also split the interior, using the provided shelves. Put rifles on one side and other valuables (cameras, jewelry, electronics, photo albums) on the other side.
Stack-On 24 Gun Fire Resistant Safe — Product Description
With a combination lock that is reinforced with a steel plate, this hunter green gun security safe ensures that your guns will stay securely locked up. The gun safe with combination lock has been tested and is verified to be fire-resistant for 30 minutes up to 1400 degrees Fahrenheit. The door stripping on the safe expands when exposed to high temperatures, sealing the contents inside from harm during a fire. The Stack-On 24 Gun Fire Resistant Safe has reinforced steel doors that are filled with fire retardant material, creating a protective firewall. This gun security safe has 2-way locking 1″ steel live action locking bolts and up to 5 locking points. Inside, the gun security safe is fully carpeted with 4 adjustable shelves to give you ample storage space. This durable Stack-On Gun Fire Resistant Safe is especially designed to resist deterioration and compression over time.
Delivery Information
This item is shipped via a freight trucking service. The company will call you to schedule a delivery appointment, so ensure someone is home at the scheduled delivery time. Please note that this item is available for curbside delivery only, and will not be moved into your home or garage. We recommend you have help available to move the item to its final location. Safe Weight is 418 pounds. That requires a pretty sturdy dolly.
Lyman Products is voluntarily recalling Lyman black powder rifles and pistols made in 2017. If you purchased one of these items, stop using it, check the serial number, and follow Lyman’s Recall Directions.
This recall includes black powder rifles and pistols regardless of caliber (including Deerstalker, Great Plains, Great Plains Hunter, Trade Rifle, Plains Pistol, Black Powder Kits, and replacement barrels; excluding Percussion Left Hand Great Plains and Left Hand Great Plains Hunter models) manufactured from March 1, 2017 to December 22, 2017. Barrels with the serial number in the range of A595960–A599026 are subject to this recall. If you bought one of the affected arms last year (2017), do not load and/or shoot it — you need to contact Lyman Products.
Check Your Serial Number
Owners of Lyman black powder rifles and/or pistols acquired at any time in 2017 or 2018 should immediately check the serial number:
What To Do Next — Instructions from Lyman
If you have a muzzle-loader that is involved in this recall, as confirmed by the serial number, do NOT use the gun. Instead, contact the Lyman Customer Service Department by emailing customerservice@lymanproducts.com or by calling 800-225-9626 Monday through Friday, 9 a.m. to 4:15 p.m. EST. You will be asked to provide your contact information, serial number, and either the part number or model to process the return. CLICK HERE for Lyman Recall INFO Page.
Upon receipt of the information provided to customer service, Lyman will send instructions and packaging to ship the product to Lyman for replacement at no cost to the customer. Lyman will provide a replacement barrel and tang with instructions or will replace the barrel and tang at Lyman and return the firearm. Please only return your rifle, pistol, or barrel and tang with the provided shipping tags and boxes. NOTE: Anyone outside the U.S.A. who is in possession of a black powder rifle or pistol within the recall range should contact your local distributor immediately.
Safety Recall Tip from EdLongrange. We welcome reader submissions.
Sinclair International has created a series of instructional videos illustrating the basics of metallic cartridge reloading. The 8-part series starts with reloading basics and provides step-by-step, how-to instructions that will help new reloaders get started. Detailed, animated illustrations show you what happens inside the chamber when shooting, and inside the dies during each step of reloading. The videos can be viewed on Sinclair Int’l’s YouTube page. Shown below is the first video in the series:
Each of the eight videos is hosted by Sinclair Int’l President Bill Gravatt. Bill doesn’t just show you “how”, he tells you “why”. The how-to segments cover case inspection, proper die set up, case sizing, primer installation, powder measuring, bullet seating, crimping, and even goes into the record keeping needed for the handloader. “We wanted to give shooters who haven’t reloaded a look at all the advantages of creating your own ammo and how easy it is to get started,” said Gravatt, “without telling them they had to have any certain brand or type of equipment to do the job.” The eight videos are:
Part 1 — Intro to Video Series
Part 2 — Intro to Reloading Safety
Part 3 — Metallic Cartridge Components
Part 4 — The Firing Sequence
Part 5 — Tools for Reloading
Part 6 — Loading Bottle-Neck Cartridges
Part 7 — Loading Straight Wall Cartridges
Part 8 — Reloading Series Conclusion
Reloading Tools
Shown below is Part 5 of the video series, covering the tools used for precision reloading.


 5. Towel Dry then Warm with Heat Gun — Roll brass in a towel until no more water shakes out. Lay out on cardboard box top and blow off with Harbor Freight heat gun. $9.99 on coupon. Two minutes of heated air and about half hour of wait and they are good to go. This is with primers removed. — Shaggy357
 OK, admit it — you’ve always wondered how they get those color swirls and camo patterns in McMillan stocks. (You’ll be surprised at the answer). And how does McMillan manage to inlet stocks so precisely for so many different action types?


 If you’re using a body die or a full-length sizing die, try using Ballistol (in the aerosol can) as a lube. It works GREAT without the tacky or gooey residue left by most case lubes. It will also clean off carbon residues on the neck as you lube the case. Just spray a little on a cotton patch (or your fingertips) and wipe each case before you run it up into the die. If you are using a steel neck bushing, be sure to wipe the neck as well. You can usually do a half-dozen BR-sized cases before you need to re-apply Ballistol on the patch. Ballistol is non-toxic, bio-degradeable, and will not harm your skin. It is very slippery, but can easily be removed with a rag or paper towel. Try it–you may retire your One-Shot. Ballistol can also be used to protect wood stocks.
 For Neck-Turning, Try STP Blend or Assembly Lube
 Another even cheaper option is assembly lubricant. For turning his case necks, RStreich uses assembly lube from an auto parts store. He notes: “The brand I have is reddish in color and kind of sticky like honey. It’s far better than the Imperial die wax I was using before.” There are a variety of types, both with and without moly additive, and you can select the viscosity you prefer if you sample a few brands. Be sure to clean out any lube residue from the inside of your necks when you have completed your neck-turning.
 Velocity vs. barrel length — How much speed will I sacrifice with a shorter barrel? Hunters and competition shooters often ask that. Today we DO have solid answers to that question for many cartridge types thanks to


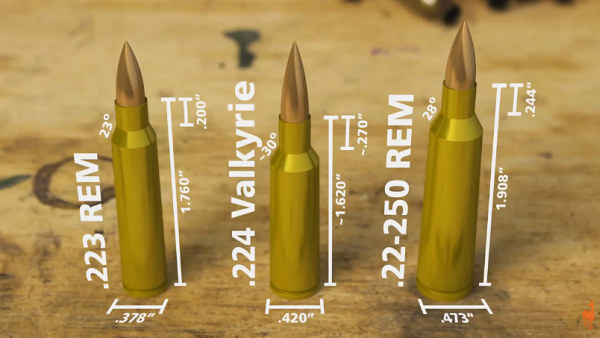 Image from Social Regressive
 No doubt you’ve heard the term “corrosive” used with respect to ammunition. But what exactly is “corrosive ammunition” (and how does it different from non-corrosive ammo)? What is the chemistry that leads to corrosion, and what cleaning procedures should you follow if you shoot corrosive ammunition? Brownells has come up with answers to these and other questions in a helpful TECH TIP video about corrosive ammo.


