Need a simple, easy-to-use drop chart for your rifle? Something you can tape right to the buttstock? Then check out Hornady’s handy Online Ballistics Calculator. This user-friendly calculator will compute your drops accurately, and output a handy “Cheat Sheet” you can print and attach to your rifle. Simply input G1 or G7 BC values, muzzle velocity, bullet weight, zero range, and a few other variables. Click “Calculate” and you’ll see the full chart (shown below). Then if you click “View Cheatsheet”, you can generate the simpler, 4-line Drop Chart (shown above).
The online ballistics caculator is easy to use. You can select the basic version, or an advanced version with more data fields for environmental variables (altitude, temperature, air pressure, and humidity). You can also get wind drift numbers by inputing wind speed and wind angle.
Conveniently, on the trajectory output, come-ups are listed in both MOA and Mils — so this will work with either MOA clicks or Mil-based clicks. There are more sophisticated ballistics solvers available on the web (such as the outstanding Applied Ballistics Online Calculator), but the Hornady Calculator is very simple and easy to use. If you just want a basic drop chart, you may want to check this out.
For years, many shooters have coated bullets with Moly (molybdenum disulfide) or Danzac (tungsten disulfide or “WS2″). The idea was to reduce friction between bullets and barrel. In theory, this could lengthen barrel life and extend the number of rounds a shooter can fire between cleanings.
Moly and WS2 both have their fans, but in recent years, many guys have switched to Hexagonal Boron Nitride (HBN), another dry lubricant. The advantage of HBN is that it won’t combine with moisture to create harmful acids. HBN is very slippery and it goes on clear, so it doesn’t leave a dirty mess on your hands or loading bench. Typically, HBN is applied via impact plating (tumbling), just as with Moly.
Good Source for Hexagonal Boron Nitride (HBN)
Paul Becigneul (aka PBike in our Forum) has been using HBN for many years with good results. He obtains his HBN from Momentive Performance Materials:
Sales Contact: Robert Bell
Sales Email: robert.bell [at] momentive.com
Sales Phone: Robert Bell, (980) 231-5404
HBN Results — Both on Bullets and Barrel Bores
Many folks have asked, “Does Hexagonal Boron Nitride really work?” You’ll find answers to that and many other questions on gunsmith Stan Ware’s popular Bench-Talk.com Blog. There Paul Becigneul (aka Pbike) gives a detailed run-down on HBN use, comparing it to other friction-reducers. Paul also discusses the use of HBN in suspension to pre-coat the inside of barrels. Paul observes:
We coated our bullets … how we had been coating with WS2. Now our bullets have a slightly white sheen to them with kind of like a pearl coat. They are so slippery it takes a little practice to pick them up and not drop them on the trailer floor. What have we noticed down range? Nothing different from WS2 other than the black ring on your target around the bullet hole is now white or nonexistent. Our barrels clean just as clean as with WS2. Your hands aren’t black at the end of the day of shooting and that might be the most important part.
Interestingly, Becigneul decided to try a solution of HBN in alcohol, to pre-coat the inside of barrels. Paul had previously used a compound called Penephite to coat the inside of his barrels after cleaning. Paul explains:
If Penephite was used because it was slippery wouldn’t HBN be better? … We called Momentive again [our source for HBN], and talked about mixing HBN and 90% alcohol for a suspension agent to pre-lube our barrels. He though it sounded great but that the AC6111 Grade HBN would be better for this use. It would stand up in the alcohol suspension and cling to the barrel when passed through on a patch. We got some and mixed it in alcohol 90%. We use about one teaspoon in 16 ounces of alcohol.
We started using it this fall and what we have noticed is that now that first shot fired out of a clean and pre-lubed barrel can be trusted as the true impact point. We use tuners so now I got to the line, fire two shots judge my group for vertical, adjust the tuner as needed or not, and after tune has been achieved go to my record targets. This use has saved us in time at the bench and bullets in the backstop.
You really should read the whole article by Becigneul. He discusses the use of barrel lubes such as Penephite and “Lock-Ease” in some detail. Paul also provides links to HBN vendors and to the Material Safety Data Sheets (MSDS) for the various compounds he tested.
So what does a “worn-out” barrel really look like? Tom Myers answered that question when he removed a 6.5-284 barrel and cut it down the middle to reveal throat wear. As you can see, there is a gap of about 5mm before the lands begin and you can see how the lands have thinned at the ends. (Note: even in a new barrel, there would be a section of freebore, so not all the 5mm gap represents wear.) There is actually just about 2mm of lands worn away. Tom notes: “Since I started out, I’ve chased the lands, moving out the seating depth .086″ (2.18 mm). I always seat to touch. My final touch dimension was 2.440″ with a Stoney Point .26 cal collet.”
Except for the 2mm of wear, the rifling otherwise looks decent, suggesting that setting back and rechambering this barrel could extend its useful life. Tom reports: “This was something I just thought I’d share if anyone was interested. I recently had to re-barrel my favorite prone rifle after its scores at 1,000 started to slip. I only ever shot Sierra 142gr MatchKings with VV N165 out of this barrel. It is a Hart and of course is button-rifled. I documented every round through the gun and got 2,300 over four years. Since I have the facilities, I used wire EDM (Electro Discharge Machining) to section the shot-out barrel in half. It was in amazingly good shape upon close inspection.”
Tom could have had this barrel set back, but he observed, “Lately I have had to increase powder charge to maintain 2,950 fps muzzle velocity. So to set it back would have only increased that problem. [And] I had a brand new 30″ Krieger all ready to screw on. I figured it was unlikely I’d get another full season on the old barrel, so I took it off.”
The Coriolis Effect comes into play with extreme long-range shots like this (2100 yards at Raton, NM). The rotation of the earth actually moves the target a small distance (in space) during the long duration of the bullet’s flight.
When you’re out at the range, the Earth seems very stable. But it is actually a big sphere zooming through space while spinning around its axis, one complete turn every 24 hours. The rotation of the earth can create problems for extreme long-range shooters. During extended bullet flight times, the rotation of the planet causes an apparent deflection of the bullet path over very long distances. This is the ballistics manifestation of the Coriolis Effect.
Bryan Litz of Applied Ballistics discusses explains the Coriolis Effect in his Ballistics Books and Seminars. Bryan notes that Coriolis is “a very subtle effect. People like to make more of it than it is because it seems mysterious.” In most common shooting situations inside 1K, Coriolis is not important. At 1000 yards, the Effect represents less than one click (for most cartridge types). Even well past 1000 yards, in windy conditions, the Coriolis Effect may well be “lost in the noise”. But in very calm conditions, when shooting at extreme ranges, Bryan says you can benefit from adjusting your ballistics solution for Coriolis.
Bryan explains: “The Coriolis Effect… has to do with the spin of the earth. You are basically shooting from one point to another on a rotating sphere, in an inertial reference frame. The consequence of that is that, if the flight time of the bullet gets significantly long, the bullet can have an apparent drift from its intended target. The amount [of apparent drift] is very small — it depends on your latitude and azimuth of fire on the planet.”
Coriolis is a very subtle effect. With typical bullet BCs and velocities, you must get to at least 1000 yards before Coriolis amounts to even one click. Accordingly, Bryan advises: “Coriolis Effect is NOT something to think about on moving targets, it is NOT something to think about in high, uncertain wind environments because there are variables that are dominating your uncertainty picture, and the Coriolis will distract you more than the correction is worth.”
“Where you could think about Coriolis, and have it be a major impact on your hit percentage, is if you are shooting at extended range, at relatively small targets, in low-wind conditions. Where you know your muzzle velocity and BC very well, [and there are] pristine conditions, that’s where you’re going to see Coriolis creep in. You’ll receive more refinement and accuracy in your ballistics solutions if you account for Coriolis on those types of shots. But in most practical long-range shooting situations, Coriolis is NOT important. What IS important is to understand is when you should think about it and when you shouldn’t, i.e. when applying it will matter and when it won’t.”
The Coriolis Effect — General Physics
The Coriolis Effect is the apparent deflection of moving objects when the motion is described relative to a rotating reference frame. The Coriolis force acts in a direction perpendicular to the rotation axis and to the velocity of the body in the rotating frame and is proportional to the object’s speed in the rotating frame.
A commonly encountered rotating reference frame is the Earth. The Coriolis effect is caused by the rotation of the Earth and the inertia of the mass experiencing the effect. Because the Earth completes only one rotation per day, the Coriolis force is quite small, and its effects generally become noticeable only for motions occurring over large distances and long periods of time. This force causes moving objects on the surface of the Earth to be deflected to the right (with respect to the direction of travel) in the Northern Hemisphere and to the left in the Southern Hemisphere. The horizontal deflection effect is greater near the poles and smallest at the equator, since the rate of change in the diameter of the circles of latitude when travelling north or south, increases the closer the object is to the poles. (Source: Wikipedia)
Bart Sauter of Barts Custom Bullets owns a LabRadar chronograph. He was curious to see how his loads performed in actual match conditions, so he brought his LabRadar to a match and set it up right on his benchtop. What he learned was quite surprising. For one thing, Bart found that tuning for the best accuracy (in the conditions), was NOT simply a matter of maintaining velocity. Read all about Bart’s experience in this AccurateShooter Forum Thread.
Bart has competed in short range Benchrest matches with the LabRadar on the bench! Bart observed: “The benches were quite close, but the LabRadar was able to pick up my shots even with the other guns going off very close to it. This is a pretty impressive piece of gear.” Bart’s LabRadar unit had no trouble picking up shots when set on the bench, a bit behind the muzzle. Bart noted: “Yes it can go a long way back. You can be a lot farther behind the muzzle then advertised. At home I could get back up to around 8 feet and pick up the bullet. It’s more sensitive about the side distance. I had mine on level 4. You can also point it at your buddy’s target and get his velocity.” Bart set his LabRadar to be triggered by the sound of the gun.
Long-Life Battery Power
Powering the LabRadar at the range is not a problem. Bart used a portable battery pack that can power the LabRadar for a long time: “I bought a RavPower battery pack from Amazon.com. It was the most powerful compact cell phone charger they had and [it costs about $30.00]. It was able to run the LabRadar for two full days without recharging and still had juice.”
The LabRadar is a pretty expensive piece of kit, but there’s nothing else like it on the market. Bart notes: “The LabRadar itself is about $560.00. The stand is $29.95 for the bench mount and the padded carry case is $39.95. So you’re around $630.00 plus shipping.”
High-Quality Portable Base for LabRadar
If you want to use your LabRadar when shooting prone, there’s a smart new accessory you should consider buying. Matt Owens, one of our Forum members, has created a new, compact base for the LabRadar that works better than the flat, orange baseplate offered by the manufacturer. This $75 folding base is especially useful when shooting prone (see photo above). Matt, aka “Arkcomatt”, explains: “The folding base will fit in the LabRadar case with the unit. No more having to take apart! Just fold the legs. It takes up less room on the bench and allows you to get it closer to the rifle. It is very stable and holds up very well in high winds.” Forum member Peterson1 agrees: “This is more stable than the Labradar base for my use–off a concrete BR bench, yet takes up less space. Also easier/quicker to set unit up and aimed at target. Never take the unit off for transport in LabRadar case.” ORDER BASE HERE.
Forum Member SkiUtah02 uses the base with optional spiked feet: “I bought my base with spikes for the feet to put into the ground. I removed the rubber feet, and screwed in the four spiked feet, [and mounted] an old photography lighting stand swivel head to the base! Worked perfectly. Thanks Matt!”
Full LabRadar Field Test/Review by Ray Gross
If you are considering purchasing a LabRadar Chronograph system, we strongly suggest you read the very thorough and informative LabRadar Review by Ray Gross, past Captain of the USA F-TR team.
Riflescopes are mechanical contraptions. One of the sad realities about precision shooting is that, sooner or later, you will experience a scope failure. If you’re lucky it won’t happen in the middle of a National-level competition. And hopefully the failure will be dramatic and unmistakable so you won’t spend months trying to isolate the issue. Unfortunately, scope problems can be erratic or hard to diagnose. You may find yourself with unexplained flyers or a slight degradation of accuracy and you won’t know how to diagnose the problem. And when a 1/8th-MOA-click scope starts failing, it may be hard to recognize the fault immediately, because the POI change may be slight.
When An Expensive Scope Goes Bad
A few seasons back, this editor had a major-brand 8-25x50mm scope go bad. How did I know I had a problem? Well the first sign was a wild “drop-down” flyer at a 600-yard match. After shooting a two-target relay, I took a look at my targets. My first 5-shot group had five shots, fairly well centered, in about 2.2″. Pretty good. Everything was operating fine. Then I looked at the second target. My eye was drawn to four shots, all centered in the 10 Ring, measuring about 2.4″. But then I saw the fifth shot. It was a good 18″ low, straight down from the X. And I really mean straight down — if you drew a plumb line down from the center of the X, it would pass almost through the fifth shot.
Is My Scope Actually Malfunctioning or Is This Driver Error?
That was disconcerting, but since I had never had any trouble with this scope before, I assumed it was a load problem (too little powder?), or simple driver error (maybe I flinched or yanked the trigger?). Accordingly, I didn’t do anything about the scope, figuring the problem was me or the load.
Even expensive scopes can fail, or start to perform erratically — and that can happen without warning, or for no apparent reason. Here are some signs that you may be having scope issues.
1. Click count has changed signficantly from established zero at known range.
2. Noticeably different click “feel” as you rotate turrets, or turrets feel wobbly.
3. Inability to set Adjustable Objective or side focus to get sharp target image.
4. Shot Point of Impact is completely different than click value after elevation/windage change. For example, when you dial 2 MOA “up” but you observe a 6 MOA rise in POI.
Problems Reappear — Huge POI Swings Affirm This Scope is Toast
But, at the next range session, things went downhill fast. In three shots, I did manage to get on steel at 600, with my normal come-up for that distance. Everything seemed fine. So then I switched to paper. We had a buddy in the pits with a walkie-talkie and he radioed that he couldn’t see any bullet holes in the paper after five shots. My spotter said he thought the bullets were impacting in the dirt, just below the paper. OK, I thought, we’ll add 3 MOA up (12 clicks), and that should raise POI 18″ and I should be on paper, near center. That didn’t work — now the bullets were impacting in the berm ABOVE the target frame. The POI had changed over 48″ (8 MOA). (And no I didn’t click too far — I clicked slowly, counting each click out loud as I adjusted the elevation.) OK, to compensate now I took off 8 clicks which should be 2 MOA or 12″. No joy. The POI dropped about 24″ (4 MOA) and the POI also moved moved 18″ right, to the edge of the target.
For the next 20 shots, we kept “chasing center” trying to get the gun zeroed at 600 yards. We never did. After burning a lot of ammo, we gave up. Before stowing the gun for the trip home, I dialed back to my 100-yard zero, which is my normal practice (it’s 47 clicks down from 600-yard zero). I immediately noticed that the “feel” of the elevation knob didn’t seem right. Even though I was pretty much in the center of my elevation (I have a +20 MOA scope mount), the clicks felt really tight — as they do when you’re at the very limit of travel. There was a lot of resistance in the clicks and they didn’t seem to move the right amount. And it seemed that I’d have four or five clicks that were “bunched up” with a lot of resistance, and then the next click would have almost no resistance and seem to jump. It’s hard to describe, but it was like winding a spring that erratically moved from tight to very loose.
At this point I announced to my shooting buddies: “I think the scope has taken a dump.” I let one buddy work the elevation knob a bit. “That feels weird,” he said: “the clicks aren’t consistent… first it doesn’t want to move, then the clicks jump too easily.”
Convinced that I had a real problem, the scope was packed up and shipped to the manufacturer. So, was I hallucinating? Was my problem really just driver error? I’ve heard plenty of stories about guys who sent scopes in for repair, only to receive their optics back with a terse note saying: “Scope passed inspection and function test 100%. No repairs needed”. So, was my scope really FUBAR? You bet it was. When the scope came back from the factory, the Repair Record stated that nearly all the internal mechanicals had been replaced or fixed: “Replaced Adjustment Elevation; Replaced Adjustment Windage; Reworked Erector System; Reworked Selector; Reworked Parallax Control.”
How to Diagnose Scope Problems
When you see your groups open up, there’s a very good chance this is due to poor wind-reading, or other “driver error”. But my experience showed me that sometimes scopes do go bad. When your accuracy degrades without any other reasonable explanation, the cause of the problem may well be your optics. Here are some of the “symptoms” of scope troubles:
1. Large shot-to-shot variance in Point of Impact with known accurate loads.
2. Uneven tracking (either vertical or horizontal).
3. Change of Point of Impact does not correspond to click inputs.
4. Inability to zero in reasonable number of shots.
5. Unexpected changes in needed click values (compared to previous come-ups).
6. Visible shift in reticle from center of view.
7. Changed “feel” or resistance when clicking; or uneven click-to-click “feel”.
8. Inability to set parallax to achieve sharpness.
9. Turrets or other controls feel wobbly or loose.
10. Internal scope components rattle when gun is moved.
Source of Problem Unknown, but I Have a Theory
Although my scope came with a slightly canted reticle from the factory, it had otherwise functioned without a hitch for many years. I was able to go back and forth between 100-yard zero and 600-yard zero with perfect repeatability for over five years. I had confidence in that scope. Why did it fail when it did? My theory is side-loading on the turrets. I used to carry the gun in a thick soft case. I recently switched to an aluminum-sided hard case that has pretty dense egg-crate foam inside. I noticed it took some effort to close the case, though it was more than big enough, width-wise, to hold the gun. My thinking is that the foam wasn’t compressing enough, resulting in a side-load on the windage turret when the case was clamped shut. This is just my best guess; it may not be the real source of the problem. Remember, as I explained in the beginning of this story, sometimes scopes — just like any mechanical system — simply stop working for no apparent reason.
Sometimes simpler is better when it comes to targets for fun shooting and load testing. While we normally use test targets from our Downloadable Target Page, it’s sometimes easier to just use brightly-colored “Hi-Viz” adhesive target dots.
Hi-Viz Stick-On Dots in Assorted Colors and Diameters
You can order 1″ target dots in bulk from Labeloutfitters.com. Many colors are available including fluorescent (hi-viz) Red, Green, Orange, and Yellow. These are bright and easy to see even in fading afternoon light. A pack of twenty (20) sheets (1260 dots total) costs just $5.97 (that works out to $4.74 per thousand). For the 1″-diameter stick-on dots you get 63 dots per sheet. Larger, 1.5″-diameter fluorescent dots are also available in 20-sheet packs for $5.97, with 24 large dots per sheet (480 dots total). If you want even bigger, 2″-diameter dots, sheets with 20 Hi-Viz dots per sheet are on sale for $5.97 per 20-pack(400 dots total).
Our friend Danny Reever really likes the bright dots from Label-Outfitters: “Ordered some of the 1″ dots from LabelOutfitters.com and recieved them in two days Priority Mail! Bought the flourescent red,green, and yellow and they are really nice — especially for the price.”
If you prefer smaller, 3/4″-diameter circles, Amazon.com sells Avery packs with 1008 adhesive dots for $2.69 to $6.75 per pack. Colors include Orange ($2.69, item 5465), Neon Red/Orange (item 5467), Neon Yellow (item 5470), Neon Green (item 5468), and Bright Blue (item 5461). We recommend the Neon Red/Orange for most uses, or the Neon Yellow dots for use on a black background. There is even a dispenser-box option with 1000 3/4″ dots on a roll in a box for $9.99. Amazon.com also offers 1″, 1.25″, and 2″-diameter target pasters in 500-dot and 1000-dot rolls. The best deal is a dispenser of 1000 1″ dots for $11.99.
Half-Inch Fluorescent Dots for 100-200 Yards
For close-range work, you may prefer 1/2″-diameter dots. Forum member Steve found a source for very small 1/2″ dots: Uline.com. The 1/2″ dots are available in a wide variety of colors including fluorescent Red, Pink, Yellow, and Green. Price is $12.00 for a roll of 1000 dots (item S-2063). Steve notes: “A 1/2″ circle at 300 yards is not quite entirely covered by Nightforce crosshairs at 42-power (I’d say 70% coverage). I.e., it seems easier to line up repeatedly than with the bigger (3/4″) circles, which I used to use. Note that, for me, neon green and neon orange work best on brown cardboard targets. Neon orange works well on white paper.”
Gun-makers and barrel builders have adopted aerospace technology, using carbon fiber in their stocks and composite barrels. At SHOT Show 2018, we saw carbon applications on dozens of rifle brands. Some rifles sported full carbon stocks AND carbon-wrapped barrels. Others sported a carbon stock with steel barrel, or a carbon-wrapped barrel in a conventional stock. Carbon is definitely here to stay. This advanced material allows rifles to be lighter yet stronger. The advantages for the hunter in the field are real — a carbon-wrapped barrel can save quite a few pounds. Here are some of the most notable carbon applications we saw at SHOT Show.
Sako 85 Carbon Wolf
Possibly the best-looking carbon-stocked rifle at SHOT Show was the Sako 85 Carbon Wolf, featured in our Top Photo. New for 2018, this rifle features a full carbon composite stock, with the signature carbon fiber weave visible throughout. We found this new-for-2018 rig very ergonomic and nice to handle. The advanced-design RTW carbon fiber stock offers quick, push-button adjustments for comb height and LOP. Though not carbon-wrapped, the conventional 24″ blued steel barrel is fluted, reducing the overall weight of the rifle. Without optics, this rifle weighs well under 8 pounds. We were impressed by the Carbon Wolf, but choked on the steep $3600.00 MSRP. Street price will be lower — EuroOptic.com is listing a $3148.00 price for the Sako 85 Carbon Wolf.
The Firearm Blog says: “The stock features Soft Touch coating. Is is not at all slippery or loud like some carbon stocks can be. The barrels are factory threaded as well. Both the weight and the balance of the Carbon Wolf rifle felt perfect. I may have to add one to my Finnish rifle collection.” This is offered in 6.5 Creedmoor, .308 Win, .30-06 Sprg, 7mm Mag, and .300 Win Mag.
Nosler M48 Long-Range Carbon Rifle
Nosler recently introduced the M48 Long-Range Carbon rifle with the addition of a PROOF Research, carbon fiber-wrapped, match-grade barrel that significantly reduces the overall weight of the rifle. The carbon-wrapped Proof barrel is mated to a trued M48 receiver and bedded in a Manners MCS-T carbon fiber-strengthened stock. Nosler says: “The Model 48 Long-Range Carbon is an excellent choice for mountain hunting, backcountry excursions and long range competition where weight is a concern.” Initially, this rifle will be offered for 6.5 Creedmoor, 26 Nosler, 28 Nosler, 30 Nosler, .300 Win Mag, and 33 Nosler.
Christensen Arms TFM — Carbon Galore for 7.3-lb Rifle
As you can see there’s a whole lot of carbon fiber in the Christensen Arms TFM rifle. With a carbon-wrapped barrel and full carbon-fiber stock, this handsome rig weighs just 7.3 pounds (short action) or 7.8 pounds (long action). The carbon-wrapped stainless barrel and fully-adjustable Aerograde carbon-fiber stock are mated to a precision-machined action via integrated carbon fiber pillars. In addition, the TFM includes an integrated, 20-MOA optics rail, detachable magazine, and a titanium side-port brake. Impressively, Christensen Arms guarantees 0.5 MOA (half-MOA) accuracy.
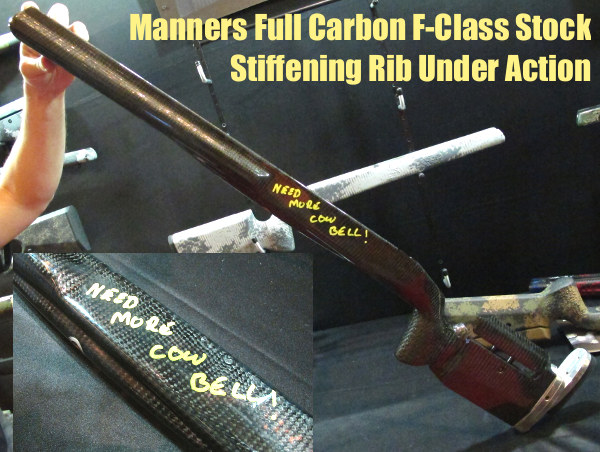
Manners Full-Carbon F-Class Stock
For many years now, Manners Composite Stocks has offered an ultra-stiff, Low-Profile ‘Fish Belly’ F-Class Stock. The shell is 100% carbon fiber with a very long, stiff fore-end. From the back of the action to the tip of the fore-end the stock measures 27″ long which is around 7 1/2″ longer than the Manners T4 stock. The idea is to provide a longer wheelbase to better balance the long, 30-32″ barrels favored by many F-Class competitors. The front half of the fore-end is very thin (from top to bottom) to achieve a low profile on the bags. Much thought has gone into controlling fore-end flex. The stock achieves greater vertical rigidity (less deflection under load) through an innovative “fish belly” design. The rounded undersection, like a canoe hull, strengthens the fore-end considerably.
Weatherby Mark V with Carbon-Wrapped Barrel
Weatherby now offers rifles with Proof Research carbon fiber-wrapped barrels. The aerospace-grade carbon fiber in the Mark V Carbon barrel makes the barrel up to 64% lighter than traditional steel barrels of the same contour. Weatherby claims the carbon-fiber technology improves heat dissipation — so the barrel does not heat up as quickly with extended strings of fire. The 26” #4 contour carbon-wrapped barrel has a cut-rifled, hand-lapped 416R grade stainless steel core with a flush thread cap and 5/8-24 muzzle threads. It’s finished in tactical grey Cerakote. The Mark V Carbon carries Weatherby’s SUB-MOA (at 100 yards) accuracy guarantee when used with Weatherby factory or premium ammunition.
Carbon Edge from Fierce Firearms
Fierce Firearms also offers a long-range hunting rig with a carbon-wrapped barrel. This is an extremely light rig. Without scope or optional muzzle brake, the short-action version weighs just 6.4 pounds. It is available in Black/gray, Green/black and a variety of Camo finishes including Kryptec Highlander and Typhon patterns. All this lightweight tech doesn’t come cheap. The Carbon Edge retails for $3250.00 and a left-hand version is $250.00 more. Fierce does offer a 0.5 MOA (half-MOA) accuracy guarantee, which is something.
How Good Are Proof Research Barrels? — Commentary by Mike Davis
Over the past 15 years Davis Custom Rifle has installed barrels from most major barrel manufacturers. We are very fortunate to have such quality barrel makers. I think Proof Research falls into that top-of-the-line category. Proof Research carbon-wrapped steel barrels are super light-weight, yet offer rigidity and superb accuracy. I have used them for 22-250, 6mm/6.5mm Creedmoor, .308 Win builds and multiple long range hunting rifles in .280, .280 AI, .300 WSM, .300 Win Mag, 28 Nosler, and 30 Nosler. These builds with Proof Research barrels typically deliver quarter-MOA accuracy or better.
The Proof Research technology allows us to build lighter rifles with outstanding accuracy, easy cleaning, and the ability to shoot long strings without point of impact shift. It’s not hard to understand why hunting rifles with these capabilities are in high demand. Combined with other light-weight components (such as Titanium actions), it’s not difficult to get these rifles down to 6.25 to 7 pounds total weight before optics.
There is an excellent article about primers on the Shooting Times website. We strongly recommend you read Mysteries And Misconceptions Of The All-Important Primer, written by Allan Jones. Mr. Jones is a bona fide expert — he served as the manager of technical publications for CCI Ammunition and Speer Bullets and Jones authored three editions of the Speer Reloading Manual.
This authoritative Shooting Times article explains the fine points of primer design and construction. Jones also reveals some little-known facts about primers and he corrects common misconceptions. Here are some highlights from the article:
Size Matters
Useful Trivia — even though Small Rifle and Small Pistol primer pockets share the same depth specification, Large Rifle and Large Pistol primers do not. The standard pocket for a Large Pistol primer is somewhat shallower than its Large Rifle counterpart, specifically, 0.008 to 0.009 inch less.
Magnum Primers
There are two ways to make a Magnum primer — either use more of the standard chemical mix to provide a longer-burning flame or change the mix to one with more aggressive burn characteristics. Prior to 1989, CCI used the first option in Magnum Rifle primers. After that, we switched to a mix optimized for spherical propellants that produced a 24% increase in flame temperature and a 16% boost in gas volume.
Foiled Again
Most component primers have a little disk of paper between the anvil and the priming mix. It is called “foil paper” not because it’s made of foil but because it replaces the true metal foil used to seal early percussion caps. The reason this little disk exists is strictly a manufacturing convenience. Wet primer pellets are smaller than the inside diameter of the cup when inserted and must be compacted to achieve their proper diameter and height. Without the foil paper, the wet mix would stick to the compaction pins and jam up the assembly process.
Hey guys, you’ll probably want to download this new Powder Burn Rate Chart issued by Hodgdon/IMR. This recently-released table includes the latest IMR powders including the Enduron series (IMR 4166, 4451, 4955, 7977), shown in green below. Please note, the chart is not limited to Hodgdon and IMR propellants. It also includes popular powders from Accurate, Alliant, Norma, Ramshot (Western), Vihtavuori, and Winchester.
This chart provides useful information for all hand-loaders. When doing load development, and testing one powder versus another, it’s generally wise to choose propellants that share the same relative burn rate, as least for starters.
NOTE: Hodgdon powders are shown in blue, IMR standard powders are shown in yellow, IMR Enduron powders are shown in green, and Winchester powder are shown in red. DOWNLOAD Chart HERE.


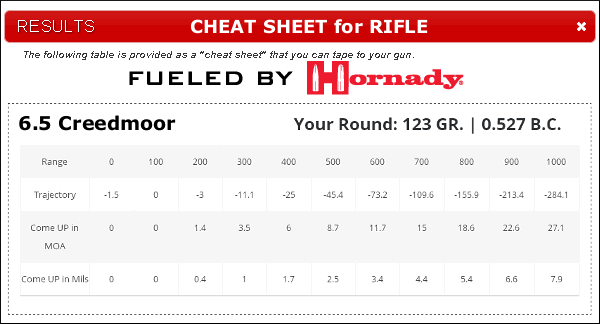
 Need a simple, easy-to-use drop chart for your rifle? Something you can tape right to the buttstock? Then check out Hornady’s handy Online Ballistics Calculator. This user-friendly calculator will compute your drops accurately, and output a handy “Cheat Sheet” you can print and attach to your rifle. Simply input G1 or G7 BC values, muzzle velocity, bullet weight, zero range, and a few other variables. Click “Calculate” and you’ll see the full chart (shown below). Then if you click “View Cheatsheet”, you can generate the simpler, 4-line Drop Chart (shown above).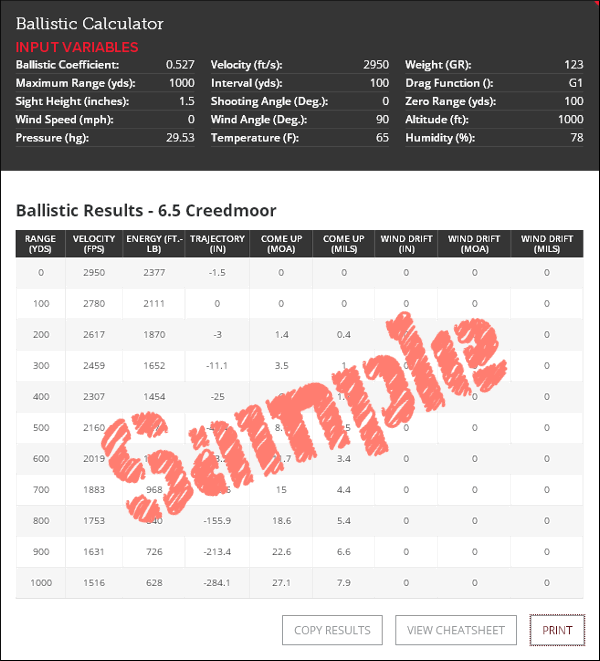


 Momentive Performance Materials
 So what does a “worn-out” barrel really look like? Tom Myers answered that question when he removed a 6.5-284 barrel and cut it down the middle to reveal throat wear. As you can see, there is a gap of about 5mm before the lands begin and you can see how the lands have thinned at the ends. (Note: even in a new barrel, there would be a section of freebore, so not all the 5mm gap represents wear.) There is actually just about 2mm of lands worn away. Tom notes: “Since I started out, I’ve chased the lands, moving out the seating depth .086″ (2.18 mm). I always seat to touch. My final touch dimension was 2.440″ with a Stoney Point .26 cal collet.”

 When you’re out at the range, the Earth seems very stable. But it is actually a big sphere zooming through space while spinning around its axis, one complete turn every 24 hours. The rotation of the earth can create problems for extreme long-range shooters. During extended bullet flight times, the rotation of the planet causes an apparent deflection of the bullet path over very long distances. This is the ballistics manifestation of the


 For the next 20 shots, we kept “chasing center” trying to get the gun zeroed at 600 yards. We never did. After burning a lot of ammo, we gave up. Before stowing the gun for the trip home, I dialed back to my 100-yard zero, which is my normal practice (it’s 47 clicks down from 600-yard zero). I immediately noticed that the “feel” of the elevation knob didn’t seem right. Even though I was pretty much in the center of my elevation (I have a +20 MOA scope mount), the clicks felt really tight — as they do when you’re at the very limit of travel. There was a lot of resistance in the clicks and they didn’t seem to move the right amount. And it seemed that I’d have four or five clicks that were “bunched up” with a lot of resistance, and then the next click would have almost no resistance and seem to jump. It’s hard to describe, but it was like winding a spring that erratically moved from tight to very loose.
 Hi-Viz Stick-On Dots in Assorted Colors and Diameters