When you make a reloading mistake, you may need to “pull down” assembled ammo. The embedded UltimateReloader.com video demonstrates how to use the Hornady Cam-Lock bullet pulling system.
When Reloading Goes Bad — The Danger of Over-Charging
Our friend Gavin Gear of UltimateReloader.com was recently reloading some 9mm pistol ammo with his Hornady progressive press. As part of his reloading procedure, he visually checks the cases — and he noticed that the charges seemed high. Sure enough, his most recently-produced rounds were about two grains over spec. He diagnosed the issue: “I was using a powder measure without a baffle. What happened was, over the course of the loading session, things settled in, and the charge level increased.”
Not knowing just when his powder measure started delivering too much powder, Gavin decided, for safety’s sake, to pull down all the ammo he had just reloaded. Yes that’s time-consuming, but it’s better than the alternative — having a dangerous Kaboom while shooting. With fast-burning pistol powders, a two-grain over-charge could cause a blown case, damaged firearm, and/or serious injury.
Watch Cam-Lock Bullet Puller Used to Remove Bullets from Loaded Ammo:
Use of Bullet Puller starts 4:00 minutes into video.
Gavin says it is vitally important to perform safety checks during the reloading process: “You’ve got to do it — check every single round to make sure there IS powder, and that there’s not too MUCH powder. Double, Triple, Quadruple check your components… and your powder charges. You can’t be too careful.”
To pull down a loaded round, first place the cartridge in the shellholder on your press ram. Then raise the round up into the bullet puller device installed where a die would go. The Hornady Cam-lock bullet puller works by clamping the bullet in a collet when you flip down the red-coated lever. Then, with the case held by the rim in the shell-holder, the bullet exits the cartridge as the press ram is lowered. It takes time, but it’s pretty fool-proof once you get the hang of it. This entire process is illustrated in Gavin’s video, starting near the four-minute mark.
The Hornady Cam Lock Bullet Puller has four (4) key components: 1. Cam-Lock die body; 2. Cam-Lock lever; 3. Stem; and 4. Collet (Caliber-specific).
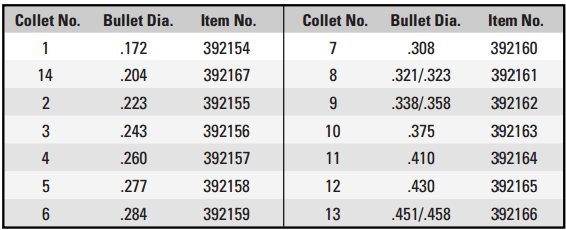
NOTE: In order to use this tool, you’ll need the appropriate collet for each diameter range of bullets you intend to pull. For example use collet #3 for 6mm, collect #6 for 7mm, and collet #7 for .308 Caliber.
Need a portable, light-weight target stand? Here’s a clever, minimalist alternative to big, bulky wood-framed or PVC pipe target stands. Those big frames will work, but they take up lots of space in your vehicle and, unless you build a very solid base, they tend to rock back and forth, or even blow over in high winds. With a commercial sign frame (the kind used for real estate signs) you can easily mount cardboard shooting targets.
For under $20.00 you can get a metal sign frame that can be staked directly in the ground. These sign frames, commonly used for real estate signs, are secure in high winds, and they are just about ideal if you need a simple target for zeroing during a varmint hunt. With most of these frames you can secure a cardboard target backer with zip ties or threaded fasteners. With some frames you just slide the cardboard backer into slots, so no fasteners are required. The most common “Empire-style” sign frame has a rectangular section at the top with two pointed ends about 10″ apart at the bottom. Put your foot on the crossbar to drive the frame into the ground. An angle-iron, Empire-style frame (no fasteners required) is offered by the fastrealestatesigns.com for $19.99.
Inexpensive Reinforced-Plastic Sign Frames
Shown at right is a plastic sign frame that requires no fasteners. Simply cut your cardboard target backer to 24″ (w) x 18″ (h) and slide it in from the top. Then stick the frame into the ground using the foot-slot near the bottom. These fiberglass-reinforced plastic sign frames are light yet surprisingly strong. They are also very inexpensive. The sign-holder at right costs $11.95 from Yardsigns.org. There is also an open top model ($10.95). And for $25.70 your can even get FIVE larger 25″-wide polyethylene sign frames that have hammer posts and foot-push tabs. Available in black or white, these are shown below. Buy a set of five, keep a couple, and give the other three to your buddies.
TIP: Sign Frames Are Not Ideal For All Terrain
If you shoot where the ground is very hard or rocky, these stake-in-the-ground frames may not work so well. They need to be seated firmly in the soil. But if you shoot in an area with soft soil or grassy turf, these frames can be a handy solution. Simple, light-weight and easy to set-up, they make a nice “field expedient” target holder.
To err is human… Sooner or later you’ll probably get a case stuck in a die. This “fix-it” article, which originally appeared in the Western Powders Blog, explains the procedure for removing a firmly stuck cartridge case using an RCBS kit. This isn’t rocket science, but you do want to follow the directions carefully, step-by-step. Visit the Western Powders Blog for other helpful Tech Tips.
Curing the Stuck Case Blues
Sticking a case in the sizer die is a rite of passage for the beginning handloader. If you haven’t done it yet, that’s great, but it probably will eventually happen. When it does, fixing the problem requires a bit of ingenuity or a nice little kit like the one we got from RCBS.
The first step is to clear the de-capping pin from the flash hole. Just unscrew the de-capping assembly to move it as far as possible from the primer pocket and flash hole (photo at right). Don’t try to pull it all the way out. It won’t come. Just unscrew it and open as much space as possible inside the case.
Place the die upside down in the padded jaws of a vise and clamp it firmly into place. Using the supplied #7 bit, drill through the primer pocket. Be careful not to go too deeply inside the cartridge once the hole has opened up. It is important to be aware that the de-capping pin and expander ball are still in there and can be damaged by the bit.
Drill and Tap the Stuck Case
Once the cartridge head has been drilled, a ¼ – 20 is tap is used to cut threads into the pocket. Brass is relatively soft compared to a hardened tap, so no lube is needed for the tapping process. RCBS says that a drill can be used for this step, but it seems like a bit of overkill in a project of this nature. A wrench (photo above right) makes short work of the project.
RCBS supplies a part they call the “Stuck Case Remover Body” for the next step. If you are a do-it-yourselfer and have the bit and tap, this piece is easily replicated by a length of electrical conduit of the proper diameter and some washers. In either case, this tool provides a standoff for the screw that will do the actual pulling.
With an Allen Wrench, Finish the Job
Run the screw through the standoff and into the tapped case head. With a wrench, tighten the screw which hopefully pulls the case free. Once the case is free, clamp the case in a vice and pull it free of the de-capping pin. There is tension here because the sizing ball is oversized to the neck dimension as part of the sizing process. It doesn’t take much force, but be aware there is still this last little hurdle to clear before you get back to loading. Don’t feel bad, everyone does this. Just use more lube next time!
Article find by EdLongrange. We welcome reader submissions.
Written by Sierra Bullets Ballistic Technician Duane Siercks
One of the first things new reloaders notice is that load data varies between reloading manuals. The Sierra Bullets Technicians frequently get inquiries asking us to explain why the load data appears to be inconsistent. This article explains five key factors that can influence published load data.
Example of load data variances for two 168 grain bullets:
Here are five reasons why the load data varies:
The Bullet
Basically, the similarities in the .30 caliber 168 grain Match bullets (for example) end with weight and diameter. The bullets likely have dimensional differences such as bearing surface length. Bearing surface has a large effect on pressure and velocity. There are also differences in boat tail, flat base, ogive and over-all lengths, which each help determine the cartridge over-all-length (COAL). With different COAL’s, we can expect changes in pressure and velocity also. In some calibers there are differences in bullet diameter with different bullet manufacturers.
It is also worth noting that bullet manufacturers do not all use the same copper alloy for their jackets. This produces more or less friction that results in load pressures and velocities. The solid copper bullets also vary quite a bit in comparison to a lead core and copper jacketed bullet.
The Gun
Each gun is unique, even if you are using the same make, model, and caliber. Special consideration should be used to consider that not all firearm chambers are the same either, creating more variables that need consideration. There can be drastic differences in the throat length. This controls the amount of “jump” that a bullet experiences when the cartridge is fired.
The Powder
Within normal manufacturing tolerances, you can see some variation in a given powders burn rate between different lots of the same powder. So naturally when two different Manuals are produced, it would be doubtful that the same lots would be tested.
The Cartridge Cases
New cases are almost always near minimum specs in dimension. A load fired in a new case would likely have slightly more pressure that when fired in a re-sized case. This would certainly be true if we were loading into fire-formed cases that have had minimal re-sizing done. Fired cases that are full length resized most of the time be slightly larger than the new unfired cases. This gives you differences in case capacity. The same powder charge placed within a new case and a full length resized case will produce different pressure levels and probably different velocities.
Conditions
Temperature can cause pressure increases or decreases. Hot temperatures tend to cause pressures to increase, while cold temperatures will usually do the opposite. Humidity and altitude can impact pressures and velocities likewise.
Conclusion
As you can see, an amazing number of variables effect any load combination. With the differences in the manuals, you’re just seeing firsthand examples of what took place when the data was collected with that particular set of components and firearm. Think of a reloading manual as a report. In essence, a reloading manual says, “We tried this particular component combination, and these are the results we obtained.”
Remember that you may or may not reach the same maximum load safely. There is no “one load fits all bullets.” The minimum load data offers a safe place to start. The maximum load data listed should always be regarded as a safety guideline and not necessarily a goal! Your gun should shoot accurately without breaching the maximum load data. The best advice is: always start low and work your load up!
If you have questions about variances in load data or other reloading questions, please call our ballistic technicians at 1-800-223-8799 or send us an email at sierra [at] sierrabullets.com.
A lot of claims are made about accuracy for AR-platform rifles, but much of that is just “sales talk”. But if you want a truly accurate black rifle, there are some key upgrades that, collectively, can transform a plain jane AR into a true tack-driver. Here’s an article by a genuine AR expert that will help you identify those components that really make a difference — the parts that can deliver true “match-grade” accuracy. Built right, a modern AR can deliver half-MOA accuracy with handloads. In this article, Robert Whitley of AR-X Enterprises explains how that’s done.
In our Shooters’ Forum, one member recently asked: “What makes an AR accurate? What parts on an AR can really affect accuracy — such as free-floating handguards, barrels, bolts, bolt carriers?” Robert Whitley posted a very comprehensive answer to this question, based on his experience building and testing dozens of AR-platform rifles. Robert runs AR-X Enterprises, which produces match-grade uppers for High Power competitors, tactical shooters, and varminters.
Building an Accurate AR — What is Most Important
by Robert Whitley
There are a lot of things that can be done to an AR to enhance consistent accuracy, and I use the words “consistent accuracy” because consistency is a part of it (i.e. plenty of guns will give a couple great 5-shot groups, but won’t do a very good 10- or 20-shot groups, and some guns will shoot great one day and not so good on others).
Here are 14 key things we think are important to accuracy.
1. Great Barrel: You’ll want a premium match-grade barrel, well-machined with a good crown and a match-type chambering, true to the bore and well cut. The extension threads must also be cut true to the bore, with everything true and in proper alignment.
2. Rigid Upper: A rigid, heavy-walled upper receiver aids accuracy. The typical AR upper receiver was made for a lightweight carry rifle and they stripped all the metal they could off it to make it light to carry (which is advantageous for the military). The net result are upper receivers that are so thin you can flex them with your bare hands. These flexible uppers are “strong enough” for general use, but they are not ideal for accuracy. Accuracy improves with a more rigid upper receiver.
3. True Receiver Face: We’ve found that truing the receiver face is valuable. Some may argue this point but it is always best to keep everything related to the barrel and the bore in complete alignment with the bore (i.e. barrel extension, bolt, upper receiver, carrier, etc.).
4. Barrel Extension: You should Loctite or glue the barrel extension into the upper receiver. This holds it in place all the way front to back in the upper receiver. Otherwise if there is any play (and there typically is) it just hangs on the face of the upper receiver completely dependent on the face of the upper receiver as the sole source of support for the barrel as opposed to being made more an integral part of the upper receiver by being glued-in.
5. Gas Block: You want a gas block that does not impose pointed stress on the barrel. Clamp-on types that grab all the way around the barrel are excellent. The blocks that are pinned on with tapered pins that wedge against the barrel or the slip on type of block with set screws that push up from underneath (or directly on the barrel) can deform the bore inside of the barrel and can wreck the accuracy of an otherwise great barrel.
6. Free-Float Handguard: A rigid, free-float handguard (and I emphasize the word rigid) really makes a difference. There are many types of free-float handguards and a free-float handguard is, in and of itself, a huge improvement over a non-free-float set up, but best is a rigid set-up. Some of the ones on the market are small diameter, thin and/or flexible and if you are shooting off any type of rest, bipod, front bag, etc., a rigid fore-end is best since ARs want to jump, bounce and twist when you let a shot go, as the carrier starts to begin its cycle before the bullet exits the bore.
7. Barrel Contour: You want some meat on the barrel. Between the upper receiver and the gas block don’t go real thin with a barrel (we like 1″ diameter if it’s workable weight-wise). When you touch off a round and the bullet passes the gas port, the gas system immediately starts pressuring up with a gas impulse that provides vibrations and stress on the barrel, especially between the gas block back to the receiver. A heavier barrel here dampens that. Staying a little heavier with barrel contour through the gas block area and out to the muzzle is good for the same reasons. ARs have a lot going on when you touch off a round and the gas system pressures up and the carrier starts moving (all before the bullet exits the bore) so the more things are made heavier and rigid to counteract that the better — within reason (I’m not advocating a 12-lb barrel).
8. Gas Tube Routing Clearance: You want a gas tube that runs freely through the barrel nut, through the front of the upper receiver, and through the gas key in the carrier. Ensure the gas tube is not impinged by any of them, so that it does not load the carrier in a stressed orientation. You don’t want the gas tube bound up so that when the gas tube pressures up it immediately wants to transmit more force and impulse to the barrel than would normally occur. We sometimes spend a lot of time moving the gas block with gas tube on and off new build uppers and tweaking gas tubes to get proper clearance and alignment. Most gas tubes do need a little “tweaking” to get them right — factory tubes may work OK but they typically do not function optimally without hand-fitting.
9. Gas Port Tuning: You want to avoid over-porting the gas port. Being over-gassed makes the gas system pressure up earlier and more aggressively. This causes more impulse, and increases forces and vibration affecting the top end and the barrel. Tune the gas port to give the amount of pressure needed to function properly and adequately but no more.
10. Front/Back Bolt Play: If accuracy is the game, don’t leave a lot of front/back bolt play (keep it .003″ but no more than .005″). We’ve seen factory rifles run .012″ to .015″ play, which is OK if you need to leave room for dirt and grime in a military application. However, that amount of play is not ideal for a high-accuracy AR build. A lot of front/back bolt play allows rounds to be hammered into the chamber and actually re-formed in a non-consistent way, as they are loaded into the chamber.
11. Component Quality: Use good parts from a reputable source and be wary of “gun show specials”. All parts are NOT the same. Some are good, some are not so good, and some aftermarket parts are simply bad. Don’t be afraid to use mil-spec-type carriers; by and large they are excellent for an accuracy build. Also, remember that just because a carrier says “National Match” or something else on it does not necessarily mean it’s any better. Be wary of chrome-plated parts as the chrome plating can change the parts dimensionally and can also make it hard to do hand-fitting for fit and function.
12. Upper to Lower Fit: A good upper/lower fit is helpful. For quick and dirty fit enhancement, an Accu-Wedge in the rear helps a lot. The ultimate solution is to bed the upper to a specific lower so that the upper and lower, when together, are more like one integral unit. For the upper receivers we produce, we try to get the specs as close as we can, but still fit the various lowers in the market place.
13. Muzzle Attachments: Don’t screw up the muzzle (literally). Leave as much metal on the barrel at the muzzle as you can. People like to thread the muzzle for a flash hider, suppressor, muzzle brake, or some other attachment, but if you really want accuracy, leave as much metal as you can there. And, if you have something that screws on, set it up so that it can be put on and have it stay there without putting a lot of torque and stress on it right where the bullet exits the bore. If you are going to thread the end of the barrel, make it concentric with the bore and make sure what you screw on there is as well. For all muzzle attachments, also ensure that the holes through which the bullet passes through are dead true to the bore. Many aftermarket screw-on things are not so good that way. Anything that vents gas should vent symmetrically (i.e. if it vents left, it should vent equally right, and likewise, if it vents up, it should vent down equally). Uneven venting of gas can wreck accuracy.
14. Quality Ammunition: Ammo is a whole story by itself, but loads that are too hot typically shoot poorly in an AR-15. If you want accuracy out of an AR-15, avoid overly hot loads. Shown below are test groups shot with four (4) different uppers, all with moderate loads. These four uppers all pretty much had the same features and things done to them as explained in this article, and they all shot great.
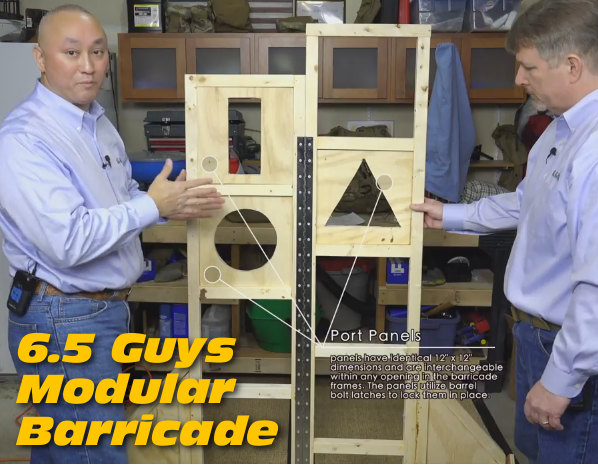
Here’s a great Do-It-Yourself project for tactical shooters. Ed and Steve of the 65Guys.com have created a versatile wooden barricade designed for easy transport. The goal with this design was to create a stable barricade that offers a variety of shooting positions, but can also fit in the bed of a pick-up or the back of an SUV. The 69″ tall barricade is hinged in the middle, so it’s just 27″ wide. To deploy the Barricade you simply fold it open and then nest the lower wings in ground-level stands.
We call this the BYOB Project — Build Your Own Barricade. Anyone with basic wood-working skills should find the Barricade prettyeasy to make. The only tricky part is cutting the side Dado joints for the left and right lower wings. But when you’ve got it completed, you have a low-cost unit that is versatile and sturdy yet easy to pack in a truck and carry out on the range. In the video below the 6.5 Guys showcase their Gen 2 barricade and explain how to build one just like it.
Looking at the 6.5 Guys Modular Barricade
The Modular Barricade was drawn up by Steve in PowerPoint and then dimensions added. Once the entire plan was created, Steve cut components to size and then used ordinary wood screws and wood glue to assemble the barricade frame. This was done to ensure maximum rigidity due to the light weight construction using 2″ x 2″ frame members. A long piano hinge was used to allow the Barricade to fold in half, while still having high torsional rigidity. Each of the Barricade openings are 12″ x 12″ square. This consistent ‘window’ spacing allows interchangeable panels with different cut-out shapes to be placed at varies heights/locations in the Barricade.
Modular Barricade Key Features
— Lightweight construction using low-cost 2×2 wood beams.
— Collapsible frame with center hinges for easy transport and deployment.
— Multiple Support levels at 6″ vertical intervals (6″ variance R to L).
— Modular port design allows ports to be changed and moved as desired.
6.5 Guys’ Modular Barricade — Construction Tips
The Modular Barricade can be constructed over a weekend with the proper materials and basic shop tools such as a power saw and electric screwdriver. Steve used a router for the side panel dado joints but a table saw could also be used for that task. Steve’s only real issue with the build involved the port panels — getting them to fit right. The 2″ x 2″ frame wood wasn’t always straight; even a small variation in the wood could cause a port panel to be too tight or too loose. Steve had to do a lot of extra sanding and planing to get the port panels to fit just right.
Where and How to Use the Barricade for Training
Because the 6.5 Guys’ Modular Barricade is so easy to move, you can simply pack it up and deploy it at your local range for practice. (Do ensure club/range rules allow shooting from barricades.) While the Barricade is designed to sit on the natural ground, the base stands can also be placed on concrete if your range does not allow deployment forward of the normal firing line. While you can use the Barricade for training on your own, Ed and Steve say novice shooters can benefit from a formal clinic.
In the video below, the 6.5 Guys discuss precision rifle training with Scott Satterlee, an instructor with Core Shooting Solutions. This video explains why new shooters should consider enrolling in a formal training clinic. Topics covered are: typical course format and “curriculum”, the gear needed to participate in a precision rifle clinic, and skills shooters should practice before attending the clinic.
“Science tells us that exposure to continuous noise of 85 dB for eight hours is enough to cause permanent hearing loss, and worse, spikes of 130 dB and more can result in permanent hearing damage instantly.” Source: NRA Blog.
The Risk of Hearing Loss
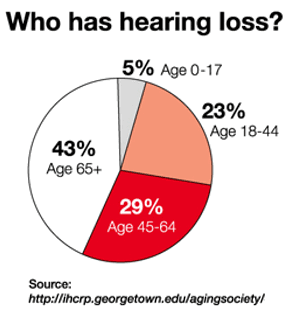
Hearing loss can be progressive and irreversible. If you are a shooter, this is serious business. As the NRA Blog cautions: “You may not even realize you’re harming your hearing. Hearing loss occurs gradually, and can go effectively unnoticed until symptoms become severe. By then, the damage is done.”
Nobody wants to go deaf. But we often see shooters without effective hearing protection when they are walking around a few yards behind the firing line. That’s bad — even if you are away from the firing line, gunshot noises can damage your hearing. You MUST use effective hearing protection every time you go to the range. Good foam earplugs costs mere pennies but they can prevent deafness in your later years. Many folks also wear muffs over plugs.
Sound Levels for Common Noises:
9mm Luger pistol: 160 dB
Jet aircraft engine (near): 140 dB
.22 LR pistol: 134 dB
Normal human pain threshold: 120 dB
Noisy Nightclub: 110 db
Riding Motorcycle at 65 mph: 103 db
Power Lawnmower: 95 dB
Hearing damage possible: 85 dB (sustained for 8+ hours)
Ringing Telephone: 80 dB
Normal conversation: 60 dB
The Myth of the “Quiet” .22 LR
The NRA Blog notes that “many rimfire shooters, particularly those using the beloved .22 Long Rifle cartridge, argue that the small .22 LR caliber doesn’t produce enough sound to damage your hearing”. So, is that really true … or is it a myth?
In fact, a .22 LR can be much louder than you think — a .22 LR pistol can produce sound levels of 134 dB. That’s well above the normal human pain threshhold.
Highest Protection NRR 34dB-Rated Ear Muffs
For under $20.00 you can buy quality ANSI-approved muffs with a 34dB Noise Reduction Rating — the best you can get. Chose the Bright Yellow TR Industrial Muffs at $18.37, or the dark green Walker EXT Range Muffs for $12.11. Both products have padded head-bands which retract. Another dual-shell design with a 34dB NRR rating is the new FNova Muffs priced at just $12.99.
Howard Leight MAX NRR33 Earplugs, Just $7.50 for 50 Pairs.
20 Pairs
50 Pairs
These Howard Leight NRR33 Max plugs are your Editor’s favorite foam earplugs. Between shooting, motorcycling and mowing lawns, I probably have Max plugs in my ears 2-3 days a week. This is a very good price for a bulk pack of 50 pairs. And if you act soon, you can get free shipping to boot.
Erik Cortina is one of the nation’s top F-Class shooters. A member of Team Lapua-Brux-Borden, Erik has been a top performer at National and World F-Class Championships. Erik is also a very smart guy and a skilled toolsmith who has upgraded his shooting equipment in interesting ways. Today we feature three “How-To” videos from Erik. These show how to upgrade a SEB Coaxial Rest, how to improve the performance of an RCBS Chargemaster, and how to create your own Modified Case for measuring length to lands.
1. How to Upgrade your SEB Co-Axial Joystick Rest
Joystick (coaxial) rests are used by top shooters in benchrest and F-Open disciplines. With coaxial rests, you can adjust both vertical and horizontal aim instantly in one fluid movement — there are no mariner wheels to spin or knobs to turn. Just gently stir the joystick to move up, down, or sideways. Erik Cortina explains: “If you want to get into F-Class (Open) and want to win, you should get a SEB rest. SEB makes an excellent product, but the one thing we upgrade automatically … is adding the F-Class feet. These have a bigger footprint and a spike on the bottom [so you can] dig the feet into the ground and make your rest a lot more stable.” In this video Erik installs a set of Blake Machine Co. F-Class feet. These feature a set-screw, so they are easy to attach and then remove for travel (no Loctite!). “Simple yet effective” declares Erik.
In the second half of the video (starting at 5:30), Erik installs a Dan Bramley Joystick Holder. This features two clamp-on cradles that hold the joystick crosswise below the top (see photo). This handy accessory ensures your handle always remains with the rest (and doesn’t get left at home when you travel to a big match). This joystick holder has been popular with competitors. Erik says, “The Bramley Joystick holder is $60.00 — money well spent.” To order, email Dan at dbramley [at] yahoo.com.
2. How to Make a Modified Case for the Hornady OAL Tool
In this video, Forum member Erik Cortina shows how to create a custom modified case for use with the Hornady Lock-N-Load Overall Length Gauge (formerly the Stoney Point Tool). While Hornady sells modified cases for many standard cartridges, if you shoot a wildcat such as the 6mm Dasher or .284 Shehane, you’ll need to create a custom modified case. And even if you shoot a standard cartridge such as the .308 Win, you can get more consistent measurements if you make a custom modified case from a piece of brass fired in your chamber.
MORE INFORMATION: Want to learn more? We published a much longer story in which Erik explains in greater detail how to made the Modified Case. That article illustrates the 5/16″ – 36 RH HSS Tap required and shows how to set up the lathe to drill and tap your case. If you are serious about making your own Modified Cases, you should Read the Full Article.
3. How to Make the RCBS ChargeMaster 1500 Work Better
Erik Cortina has been fiddling around with his RCBS ChargeMaster and he discovered something interesting. Through a series of tests he determined that the ChargeMaster dispensed slightly more precise charges when he trickled the last few 10ths of a grain on to the RCBS pan. Erik wasn’t expecting this result, but he confirmed there may be a slight benefit to this trickling method (as opposed to allowing the ChargeMaster to dispense the full charge). You can see Erik’s test procedure in this video:
We should note that Erik’s preferred method of weighing powder is to first dispense a slightly lower charge with the RCBS, transfer the pan to a laboratory-class Sartorius magnetic force restoration scale, then trickle up with his Omega (Dandy Products) Powder Trickler. However, if you don’t have a $800+ laboratory-grade scale, you might just try trickling on to the ChargeMaster pan.
MORE INFORMATION: We have published a more lengthy Bulletin Article that covers Erik’s Chargemaster Performance Findings in greater detail. That article has more photos plus a clever, bonus “Beep Defeat Tip”. If you own a Chargemaster, we recommend you READ the Full Article.
Headed to SHOT Show in Las Vegas next month? Then you should download the FREE SHOT Show Mobile App. Available for all mobile devices, this App really makes it easier to plan your SHOT Show schedule, and navigate the floor of the Sands Convention Center. The 2018 SHOT Show Mobile App is now available for download on Apple, Android, and Windows smartphones and devices. Apple users will find the app in the App Store, Android users will find their version in the Google Play Store. Windows users can access via the WEB Dashboard. Learn more at SHOTmobile.com.
Handy Interactive Map
The App includes an interactive map that can direct you from your current location to your next destination. Arrange your meetings with a handy scheduling calendar. And you can search for any SHOT exhibitor by name or product category. In addition, the App lists major show events as well as important new products.
GREAT APP FEATURES
— Locate Exhibitor Booths with searchable Vendor Database/Floor Map
— Build a personalized Schedule and bookmark Exhibitors
— Visit bookmarked Exhibitors with Quick Route Feature
— Multi-Device Sync for smartphones, tablets, laptops — all your devices
— Up-to-the-minute Exhibitor, Speaker, and Event information
The Free SHOT Show App lets you do some very cool things with your smartphone. You can contact exhibitors directly through the App to request appointments or callbacks. You can take notes while visiting a vendor’s booth or attending a seminar. Of course you can schedule your agenda, and see an entire day’s events in a glance. But perhaps the best function of all is the “Quick Route”. This allows you to create the most efficient point-to-point route from one booth location to another.
Dual-Lock Technology: Cannon offers an innovative combined digital/mechanical lock system. This dual-access lock provides the rapid access of an electronic lock backed up by the assurance of a manual (rotary dial) combination lock.
Electronic (Keypad) Lock vs. Manual (Rotary) Lock
Smart gun owners know they need a good, solid gun safe. But when choosing a gun safe, what kind of lock should you select — electronic or mechanical? Both types have their advantages and disadvantages. This article will help you make the right choice for your needs and also get the most reliable performance from either type.
Gunsafes can be fitted with either an electronic keypad-style lock, or a conventional dial lock. In our Gunsafe Buyer’s Guide, we explain the important features of both dial and electronic lock systems. Many safe-makers will tell you that consumers prefer electronic locks for convenience. On the other hand, most of the locksmiths we’ve polled believe that the “old-fashioned” dial locks, such as the Sargent & Greenleaf model 6730, will be more reliable in the long run.
Here is the opinion of RFB from Michigan. He is a professional locksmith with over two decades of experience servicing locks and safes of all brands and types:
What a Professional Locksmith Says:
For the convenience of quick opening, the electronic locks can’t be beat. However, for endurance and years of trouble-free use, the electronics can’t compare with the dial lock.
I’ve earned my living, the past 22 years, servicing locks of all types. This includes opening safes that can’t otherwise be opened. I do warranty work for several safe manufacturers (including Liberty). What I’ve learned in all those years is that manual dial locks have very few problems. The most common is a loose dial ring which can shift either left or right, which will result in the index point being in the wrong place for proper tumbler alignment. This is simple to fix.
Electronic locks, however, can have all kinds of issues, and none (except bad key-pad) are easy to fix, and when one goes bad, it must be drilled into to open it. IMO, it’s not a matter of ‘if’ an electronic lock will ultimately fail, but a matter of ‘when’ it will fail. Over the past 10 years or so, since electronics have become more and more prevalent, I’ve had to drill open bad electronic locks vs. bad manual dial locks on a ratio of about 20-1.
My professional opinion is to get the manual dial lock, unless you’ve got a good friend who is a locksmith/safecracker.
How Secure is Your Lock?
RFB tells us that both dial and electronic locks offer good security, provided it’s a good quality lock made by LaGard, Sargent & Greenleaf, Amsec, or Kaba/Ilco. However, RFB warns that “Some of the ‘cheaper’ locks (both manual and electronic) however, are very simple to bypass.
An electronic lock that’s glued or ‘stuck’ to the door with double-sided tape, and has its ‘brain’ on the outside of the lock in the same housing as the keypad, and merely sends power to an inner solenoid via a pair of wires through the door, is a thief’s best friend. The good ones have the brain inside the safe, inaccessible from the outside.
No amateur can ‘manipulate’ either a good manual or electronic lock. Both give you a theoretical one million possible combinations. I say ‘theoretical’ because there are many combinations that cannot, or should not, be used. You wouldn’t set your combo on a dial lock to 01-01-01 etc., nor would you set an electronic to 1-1-1-1-1-1, or 1-2-3-4-5-6.”
Tips for Dial Locks
RFB notes that “The speed, and ease of use, of a manual dial lock can be improved upon, simply by having your combo reset using certain guidelines. Avoid high numbers above 50. Having a 1st number in the 40s, 2nd number anywhere from 0-25, and 3rd number between 25 and 35 will cut dialing time in half, without compromisuing security. (For mechanical reasons I won’t get into here, the 3rd number of a good manual dial lock cannot — or should not — be set to any number between 95 & 20).”
Tips for Electronic Locks
Electronic locks can have the combination changed by the user much more easily than dial locks. But, RFB explains: “That can be a double-edged sword. More than a few times I’ve had to drill open a safe with an electronic lock that has had the combo changed incorrectly by the user, resulting in an unknown number that nobody can determine. Also, don’t forget that electronic locks have a ‘wrong-number lock-out’. I would NOT rely on the normal quickness of an electronic 6-number combo in an emergency situation. If for any reason (panic etc.) you punch in the wrong number several times, the lock will shut down for a 5-minute ‘penalty’.
Replace Electronic Lock Batteries Every Year
To get the most life out of any electronic (keypad Lock), you should change the battery at least once a year, whether it needs it or not. Low voltage won’t necessarily shut down the lock, but using it in a low voltage situation is bad for the electronics, and eventually will cause lock failure. So, If you do nothing else to maintain your digital-lock safe, replace the battery every year. And get a fresh battery (with a release date) from the store — don’t just pull a battery out of a storage bin, even if it’s never been used. Old batteries can degrade, even when in storage.




 Inexpensive Reinforced-Plastic Sign Frames


 Sticking a case in the sizer die is a rite of passage for the beginning handloader. If you haven’t done it yet, that’s great, but it probably will eventually happen. When it does, fixing the problem requires a bit of ingenuity or a nice little kit like the one we got from RCBS.


 5. Gas Block: You want a gas block that does not impose pointed stress on the barrel. Clamp-on types that grab all the way around the barrel are excellent. The blocks that are pinned on with tapered pins that wedge against the barrel or the slip on type of block with set screws that push up from underneath (or directly on the barrel) can deform the bore inside of the barrel and can wreck the accuracy of an otherwise great barrel.




 The Risk of Hearing Loss


 Gunsafes can be fitted with either an electronic keypad-style lock, or a conventional dial lock. In our
  Tips for Dial Locks
 Replace Electronic Lock Batteries Every Year


