Since 2010, Lapua has shipped its quality cartridge brass in sturdy blue plastic boxes. Here’s a handy tip for you — don’t toss the plastic boxes when you load up your brass! These are double-duty containers. If you’re not familiar with “Blue Box” Lapua brass, you may not realize that the boxes are designed to serve as 50-round carriers for your loaded ammo and fired cases. (Yes we know some folks who’ve been tossing out their blue boxes without knowing how the boxes work as caddies.)
Snapped in place under the box lid is a rectangular plastic grid that fits in the bottom of the box. Pop the grid loose and slide it into the box with the smooth side facing up. Side supports molded into the lower section hold the grid in place.
Voilà, instant Ammo Box! Each grid contains holes for fifty (50) loaded rounds or empty cases. The convertible plastic container/ammo box is a great idea that Lapua executed very nicely. Now you have even more motivation to purchase your cartridge brass from Lapua.
USER TIPS: When transporting ammo you may want to put some foam over the loaded rounds. That will protect the bullet tips. Also, with shorter cartridges, this will help keep your loaded ammo and fired cases from moving around. You can also tape the FREE Redding Ammo Box Labels on the underside of the lids to list your load information.
Rifleshooter.com built this tactical rifle (top image) with a Howa 1500 action, Shilen barrel, and MDT chassis. Below is a factory Howa 1500 Multi-Cam rifle.
Many of our readers are thinking of purchasing a Howa rifle or barreled action. These feature smooth-running actions with a good two-stage HACT trigger. But some folks have heard that it may be difficult to find stocks, or to fit an after-market barrel. That’s not true. There are many stock options available, and in this article, Bill of RifleShooter.com shows that it is easy to remove the factory-installed barrel with the right tools. We think a Howa makes a fine basis for a varmint rig or field rifle. Or you can build a tactical as Bill did. You can start with the factory barrel and when you want/need more accuracy, then have a gunsmith install a custom barrel from Krieger, Shilen, or other quality brand.
What You Need to Know About Howa 1500-series Rifles
Tech Feature by RifleShooter.com
Consider this article the “Howa 1500 Overview”. AccurateShooter.com’s editor mentioned there’s been a lot of interest in Howa rifles and barreled actions imported by Legacy Sports International. In addition to being able to buy a complete rifle from a dealer, Brownells sells barreled actions in a wide variety of calibers and configurations. In this post we are going to take a look at the Howa 1500 series.
Howa Rifles — General Background
Howa is a Japanese heavy machinery company. One of its product lines are firearms, which, are imported into the United States of America by two different companies, Legacy Sports International and Weatherby. Legacy sells the 1500 under the manufacturers name while Weatherby re-brands the guns as the Weatherby Vanguard. In general, the finishes on the Weatherby rifles are more refined than the LSI-imported 1500s.
General Evaluation of Howa 1500 Rifles
I’ve found Howa 1500s to be solid, entry-level rifles that are capable of sub-MOA accuracy out of the box. I’ve actually purchased two Howa rifles I’ve tested because I like them so much. The gun below, a Howa Mini-Action in 7.62×39 Russian, is one of my favorite factory guns to shoot. I’m running a Tract Optics Toric on it, these are solid little rifle scopes that offer great performance for the money.
Check out this three-shot group I drilled at 100 yards with the rifle above and 125-grain Sierras. It took a lot of work and load development to get there, but when it did, it worked well.
Howa 1500 HACT 2-Stage Trigger
Howa 1500s feature the very nice Howa HACT trigger. This is an adjustable, two-stage trigger, set for about 3 pounds (combined stages). Crisp and repeatable, this is an excellent trigger for a factory gun. There is no annoying Glock-style safety lever in the middle of the trigger blade. The 2-stage design and pull weight range works well for a hunting rifle or a rig for PRS competition. Rifleshooter.com says the Howa trigger is “one of the best factory triggers, along with Tikka. I’ve found the Howa trigger superior to a Remington 700 — the Howas doesn’t need to be replaced.
Writing for the Western Outdoor News, WONews.com, Steve Comus has field-tested the new HACT Trigger. Steve writes: “I always liked two-stage triggers, because of the way I could take-up the slack and then actually know when the rifle was going to go off. The take-up on the [HACT] trigger was fast and easy. The crisp, positive release when pressure was put on during the second stage [reminded me] of some of the target rifles I shot through the years.”
Howa Actions — Three Options
Howa offers three action lengths: Mini, Short, and Long. You can see the bolts for the three action lengths in the image below. The Mini-Action has similar external dimensions to the Remington Model Seven, however, the Mini-Action’s bolt does not travel as far to the rear. This is a mixed bag. The upside is you have a quicker action (shorter bolt throw). The downside is you are limited to shorter rounds such as the .223 Remington, 7.62×39mm Russian, and 6.5 Grendel. But if you need a bigger cartridge, just choose the standard or long action Howa variant.
Howa 1500 vs. Remington 700 — Important Differences
Is the Howa 1500 a Remington 700 clone, or some kind of improved Remington 700? No, not really. While the top radius of the Howa 1500 does match the Model 700, and they can both use the same two-piece scope bases, there area number of differences.
If you look at the Howa 1500 alongside the Remington 700 you’ll note the M700 is a round action, while the Howa is a flat-bottom action. In many ways the Howa’s bottom half reminds me of a push-feed Winchester. This means the chassis and stocks that support a Howa 1500 are not V-block based like you’ll find on a 700, instead they have a flat bottom. While the bolt of the Howa is similar in external appearance to the Model 700, it does offer some improvements, notably an M16-style extractor and a firing pin assembly that can be easily removed without tools.
Howa 1500 action screws are metric and are in a different location from the 700. The Howa 1500 has an integral recoil lug that accepts the front action screw, this means you have more of the front action screw engaging the action. WARNING: If you install it into a poorly-fitted stock or action you may bind it.
Can a Howa Action Be Used for a Custom Rifle Project?
Absolutely! You can either buy a barreled action from Brownells and throw it in a chassis system/stock of your choice or you can use a stripped action to build a custom rifle. If you are in the chassis market, MDT offers a wide variety of chassis in different price ranges. All have worked well for me.
How to Remove Howa Factory Barrel from Action
You may have heard internet grumblings about removing Howa barrels. Some keyboard commandos say they are extremely difficult to remove without a relief cut. Well Bill at Rifleshooter.com demonstrates that Howa barrels can be removed without trouble, provided you have the right tools. Watch this video:
Watch Howa Barrel Removal Video — Quick and Easy (Click Speaker Icon for Audio)
Q: Is it difficult to remove a barrel from a Howa 1500?
A: Not very. I’ve heard from some smiths that worked on Howas (years ago) that the factory barrels are difficult to remove. However of the half dozen or so Howa barrels that I’ve pulled, they’ve been very easy. I use a Brownells action wrench with the top piece for a Rem Model 700 and the flat bottom resting against the flat on the wrench.
Howa Actions Require Metric Barrel Threads
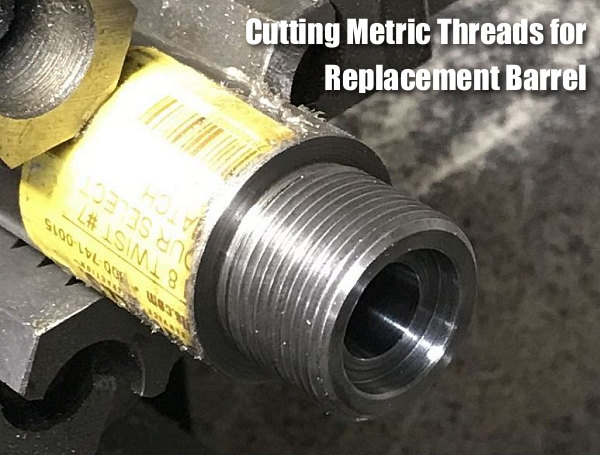
It’s easy to thread a barrel for a Howa Action. You just have to cut metric threads — most lathes out there can cut them. I cut the threads below on a manual lathe using change gears. [Editor: John Whidden cuts metric tenon threads with a CNC lathe. “It’s easy,” John tells us, “No issue whatsoever.”]
If the battery on your safe’s electronic lock is more than a year old, or if it is not giving you the right voltage, replace it today!
This time of year, many readers are putting their guns away in a safe for the winter. It’s easy to just tuck the guns away and forget about them. But there’s something you should do before you shut the safe door. If you have a safe with an electronic keypad, you should replace the battery every year as a precautionary measure. Trust us, you don’t want to come back in a few months and find that the keypad memory is kaput, and you’re locked out. That can lead to an expensive locksmith visit.
Low Voltage Battery? You May Be Locked Out…
Here’s a true story. I have one safe with a Sargent & Greenleaf (S&G) keypad. A couple years back, in early December, I went to get into the safe. I punched in the correct combination, but all I got was a rapid “beep, beep, beep, beep” after I finished the last combination entry. I tried again to ensure I entered the combination correctly (I did). But again, the locking system responded with multiple rapid beeps indicating something was wrong. And the safe would not open. Now I was worried….
I popped out the battery holder (which slides in from the bottom of the keypad housing on the door). I removed the battery and tested it with a volt-meter. The 12-month-old Duracell 9-volt battery only registered 6.1 volts.
Low voltage was the problem. I went down to the store and got a couple new 9V batteries. I tested the new batteries and both measured 9.4 volts output. I slipped one of the new 9V batteries into the keypad housing, punched in the combination and everything worked OK again. Eureka.
Most electronic locks for safes WILL “remember” the combination for a period of time even when the battery is low (and the keypad’s “brain” should retain the combination when you remove the battery for replacement). However, a dead battery, or extended periods of low voltage can give you problems. Don’t rely on wishful thinking…
The anvil is the tripod-shaped thin metal piece protruding above the bottom of the primer cup. Getting the primer sitting fully flush on the bottom of the case primer pocket, without crunching it too much, requires some keen feel for the progress of primer seating.
In two recent Midsouth Blog articles, Glen Zediker offers helpful advice on priming. First he examines what happens to the primer itself as it is seated in the cup. Glen explains why some “crush” is important, and why you never want to leave a high primer. Glen also reviews a variety of priming tools, including his favorite — the Forster Co-Ax Bench Primer Seater. Then he offers some key safety tips. Glen provides some “rock-solid” advice about the priming operation. You’ll find more great reloading tips in Glen’s newest book, Top-Grade Ammo, which we recommend.
Priming Precision vs. Speed
Glen writes: “The better priming tools have less leverage. That is so we can feel the progress of that relatively very small span of depth between start and finish. There is also a balance between precision and speed in tool choices, as there so often is.”
Benchtop Priming Tools — The Forster Co-Ax
Glen thinks that the best choice among priming options, considering both “feel” and productivity, may be the benchtop stand-alone priming stations: “They are faster than hand tools, and can be had with more or less leverage engineered into them. I like the one shown below the best because its feeding is reliable and its feel is more than good enough to do a ‘perfect’ primer seat. It’s the best balance I’ve found between speed and precision.”
Load Tuning and Primers
Glen cautions that you should always reduce your load when you switch to a new, not-yet-tested primer type: “The primer is, in my experience, the greatest variable that can change the performance of a load combination, which is mostly to say ‘pressure’. Never (never ever) switch primer brands without backing off the propellant charge and proving to yourself how far to take it back up, or to even back it off more. I back off one full grain of propellant [when I] try a different primer brand.”
Priming Safety Tips by Zediker
1. Get a good primer “flip” tray for use in filling the feeding magazine tubes associated with some systems. Make double-damn sure each primer is fed right side up (or down, depending on your perspective). A common cause of unintentional detonation is attempting to overfill a stuffed feeding tube magazine, so count and watch your progress.
2. Don’t attempt to seat a high primer more deeply on a finished round. The pressure needed to overcome the inertia to re-initiate movement may be enough to detonate it.
3. Don’t punch out a live primer! That can result in an impressive fright. To kill a primer, squirt or spray a little light oil into its open end. That renders the compound inert.
4. Keep the priming tool cup clean. That’s the little piece that the primer sits down into. Any little shard of brass can become a firing pin! It’s happened!
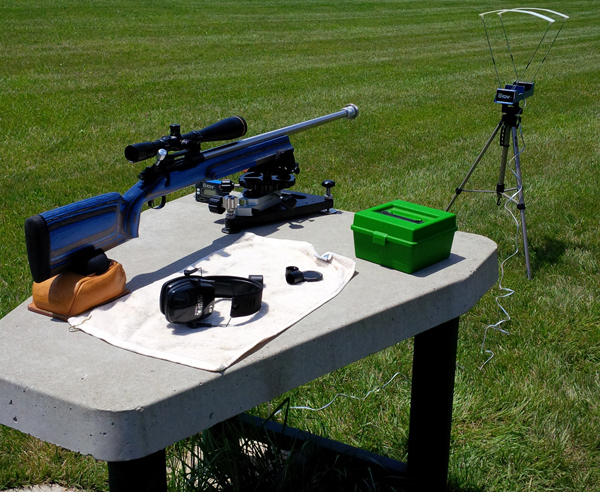
The high-tech orange LabRadar represents the state-of-the-art in personal chronographs. It is extremely accurate, versatile, and you don’t need to go down-range to set it up. Some shooters have even used one during a benchrest shooting match (see below). LabRadars are used by many top shooting champions and the LabRadar chronograph has earned very positive reviews from respected testers such as Ray Gross, USA F-TR Team Captain.
Lab-Radar Discounted for First-Time Ever — Save $60.00
Since its introduction a couple years ago, the LabRadar has been in high demand. And the manufacturer has enforced a “no-discount” policy. Now, for the first-time ever, you can get a LabRadar unit for a reduced price: $499.95. This reduced price, $60 off normal retail, is available now through December 3, 2017. Many vendors are offering the LabRadar at this discounted price including Bruno Shooters Supply, MidwayUSA, and TCK LLC. Other vendors Applied Ballistics and Midsouth don’t show the discount yet, but you can call and ask.
New High-Quality Portable Base for LabRadar Chronograph
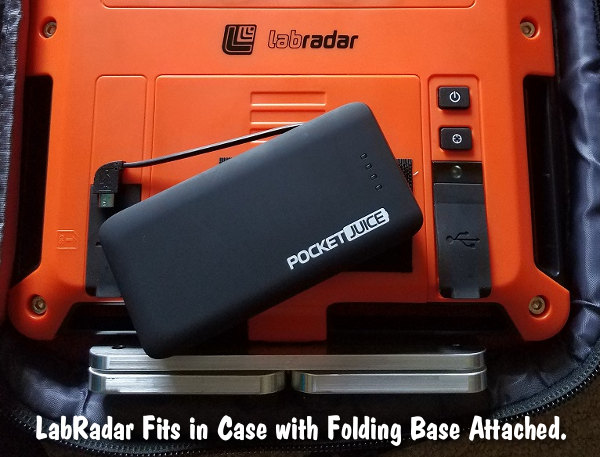
If you currently own a LabRadar, or plan to buy one soon, there’s a smart new accessory you should consider buying. Matt Owens, one of our Forum members, has created a new, compact base for the LabRadar that works better than the flat, orange baseplate offered by the manufacturer.
Matt, aka “Arkcomatt”, explains: “These are machined from aluminum and put together with stainless steel screws. The rubber feet are held on with screws also. No more coming off. The legs have nylon washers between them and the base for smooth operation. The screws are torqued and thread locker applied. One of the best things is, with the standard attachment, it will fit in the case with the unit. No more having to take apart! Just fold the legs. It takes up less room on the bench and allows you to get it closer to the rifle. It is very stable and holds up very well in high winds.” ORDER BASE HERE.
This folding base unit costs $75.00 + $7.50 for shipping (USPS). In addition, Arkcomatt now offers a swivel (ball) mount and stainless spike feet (for ground use). The swivel unit costs $10 and spikes are $20 per set. The 1.4″-long spikes screw in the sames holes as the rubber feet.
Forum Member Praise Arkcomatt’s LabRadar Folding Base:
You can read user reviews of the Matt’s LabRadar base in this Forum Thread.
Bullet-maker Bart Sauter has one of these bases now and he endorses it: “These bases are great for the LabRadar. Stable and compact — completely grab and go!”
Forum member Peterson1 agrees: “This is more stable than the Labradar base for my use–off a concrete BR bench, yet takes up less space. Also easier/quicker to set unit up and aimed at target. Never take the unit off for transport in LabRadar case. Only negative — you can’t trade in the factory LabRadar base toward purchase of this base. So buy smart the first time!”
Forum Member SkiUtah02 uses the base with optional spiked feet: “Met up with Matt at the Sierra Cup and bought my base with … spikes for the feet to put into the ground. Just had a chance to test it today and it worked great. I removed the rubber feet, and screwed in the four spiked feet, added a threaded-rod-coupling nut onto the bolt so that I could mount an old photography lighting stand swivel head to the base! Worked perfectly. Thanks Matt!”
Craters may look interesting on the moon, but you don’t want to see them on your primers. Certain mechanical issues that cause primer craters can also cause primer piercing — a serious safety problem that needs to be addressed. If you have a gun that is cratering primers (even at moderate pressure levels), there is a solution that works with many rifles — send your bolt to Greg Tannel to have the firing pin hole bushed. CLICK HERE.
Shooters who convert factory actions to run 6BRs, 6PPCs or other high-pressure cartridges should consider having the firing pin bushed. These modern cartridges like to run at high pressures. When running stout loads, you can get cratering caused by primer flow around the firing pin hole in the bolt face. The reason is a little complicated, but basically the larger the hole, the less hydraulic pressure is required to crater the primer. A limited amount of cratering is normally not a big issue, but you can reduce the problem significantly by having a smith fit a bushing in the firing pin hole. In addition to reduced cratering, bushing the firing pin often produces more consistent ignition.
This is a highly recommended procedure that our editors have had done to their own rifles. Greg Tannel (Gre-Tan Rifles) is an expert at this procedure, and he does excellent work on a wide variety of bolts. Current price for a bushing job, which includes turning the firing pin to .062″, is $80.00, or $88.00 with USPS Priority Mail return shipping.
If you have a factory rifle, a bushed firing pin is the way to go if you are shooting the high-pressure cartridges such as 6PPC, 6BR, 6-6.5×47 and 6.5×47. This is one of the most cost-effective and beneficial upgrades you can do to your factory rifle. For more info on the Firing Pin Bushing process, visit GreTanRifles.com, or email greg [at] gretanrifles.com. (After clicking the link for GreTanRifles.com, Click on “Services” > “Shop Services” > “Bolt Work”, and you’ll see, in the lower left, a listing for “Bush Firing Pin Hole & Turn Pin”. Click on that box.)
Firing Pin Hole Bushing by Greg Tannel
Work Done: Bush firing pin hole and turn pin.
Functions: Fixes your cratering and piercing problems.
Price: $80.00 + $8.00 return shipping Total Price: $88.00
Actions for which Bushing is Offered: Remington, Winchester, Savage multi-piece pin, Sako, Kimber, Nesika, Stiller, BAT Machine, Kelbly, Lawton, Surgeon, Borden, Wichita, Hall, Ruger, Howa, Weatherby, Dakota, Pacific Tool, Phoenix, and Defiant bolt action rifle or pistol.
Actions for which Bushing is NOT Available: Case hardened receivers, ARs, Accuracy International (AI), Barnard, Big Horn, Cooper, Desert Tactical Arms, Kimber, Rosenthal, New Savage single piece pin, Rim fires, Falling block, Break open, Lever, Pump rifles, 1903-A3, CZ, Mauser.
How to send your bolt in to be bushed:
You can send your bolt snail mail, priority mail, or UPS (Please do not use FEDEX as it sometimes has delivery delays). Pack your bolt carefully and ship to: Gre’-Tan Rifles, 24005 Hwy. 13, Rifle CO 81650. Please include your name, phone number, and return shipping address.
Due to the high volume of work, turn around is 5 to 8 weeks on bushing a bolt. Three or more bolts will be sent back to you UPS and we will have to calculate shipping. We can overnight them at your expense. You can pay by check, money order, or credit card. For more information visit GretanRifles.com.
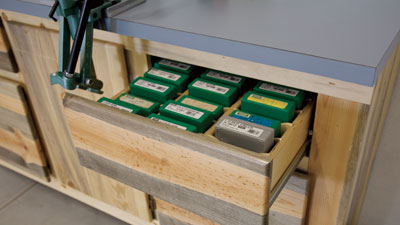
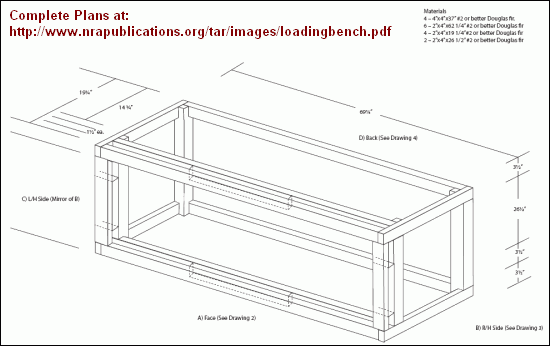
A while back, the American Rifleman magazine published an excellent article showing how to construct a rock-solid Reloading Bench. This bench is very well-designed, with many deluxe features, such as an upper drawer with fitted slots for die boxes, and large lower drawers with 100-lb rated slides to store heavy materials or tools. If you have good wood-working skills this would be an excellent project. You can download a detailed set of Bench Blueprints showing all dimensions and listing all needed materials.
The author, Dave Campbell, offers good advice on building the bench top: “I ripped a sheet of 3/4″ AC plywood into two 24″ wide pieces and cut them to 72″ long. Then I glued them together to form a 72″ long, 1 1/24″ thick top. The trick here is to keep the edges smooth and flat so that the laminate will adhere properly and without voids. I chose a light grey laminate finish for the top because it’s easier to see what I am working on and keep clean. If you have never worked with laminate, remember it’s prudent to glue and rout the edges flush before gluing on the top. The top was attached to the carcass with eight steel L-shaped angle brackets and No. 10×1 1/4″ wood screws.”
This article was written in 2014 for the Sierra Bullets Blog. It describes one method of load development that is commonly used. There are other methods that can work also. Some guys first isolate seating depth and then fine-tune velocity with charge weights. Other guys may aim for a known velocity node (speed range) and then optimize accuracy by adjusting seating depth. Still others look for smallest ES and tightest vertical to minimize 1000-yard vertical dispersion. There are many ways to skin a cat. Different rifles (and even different barrels) can demand different styles of load development.
In this instance the writer achieved desired results seating his bullets .007″ back from max “jam” length. For other applications (and other barrels) you may get the best, most consistent results seating off the rifling by .020″ or more. In disciplines with quick-fire such as PRS, it may be wise to develop loads that “jump” the bullet.
F-Class Long Range Load Development Methodology
by Mark Walker, Sierra Bullets Product Development Manager
Since I just put a new barrel on my F-class rifle… I figured it might be a good time to discuss load tuning for long range shooting. Getting the most accuracy out of your rifle is one of the most important aspects of load tuning. For long range shooting in particular, using a load that produces the least amount of vertical variation is vital. There are several steps to the process that I use, so I will go through the basics of each.
When I first get a new barrel installed, I like to determine what the loaded cartridge “jam” length is. I do this by taking an empty case (no powder or primer) that has been neck sized with the proper bushing (I like to shoot for 0.002 smaller than the loaded cartridge neck diameter) and seat a bullet long in it so that the throat of the rifle will move the bullet back into the case when I close the bolt. I close the bolt several times until the bullet stops moving back into the case at which point I use a comparator with my calipers and get a length measurement on the cartridge. This is what I consider to be the “jam length” for this barrel and chamber. I came up with 3.477″ as the “jam length” for this particular barrel. [Editor: In this instance, Mark is using “Jam length” to mean max seating depth he can achieve without bullet set-back.]
Next, I will fire-form some brass using a starting load of powder and bullets seated to “jam” while breaking in the barrel. My barrel break in process is not very technical; it’s mostly just to get the brass formed and the rifle sighted in. I do clean every 5 rounds or so just because I feel like I have to.
Once I have the brass formed, I use them to load for a “ladder test” to see what powder charge the rifle likes. With a ladder test, you take your starting load and load one round each with a slightly increasing amount of powder until you reach your max load for that cartridge. You then fire each round using the same aiming point to see where the bullets start to form a group. For this barrel and cartridge, I started at 53.3 grains of H4831SC powder and increased the load by 0.3 grains until I reached 55.7 grains. I always seat my bullets to “jam” when doing a ladder test. We will determine the final seating depth in another test later. It’s usually best to shoot this test at a minimum of 200 yards because at closer ranges the bullets will impact too close together making it hard to determine which load works best. I shot this test at 300 yards.
As you can see from the target, the lightest load #1 had the lowest velocity and impacted lowest on the target. Shots #2 and #3 were a little higher and in the same hole. Shots #4 thru #6 were slightly higher yet and all had the same elevation. Shots #7 and #8 were the highest on the target however pressure signs were starting to show. For some reason shot #9 went back into the group and the chronograph didn’t get a reading so I ignored that shot.
When picking a load, I am looking for the most shots at the same vertical location on the target. As you can see that would be shots #4 through #6 so I would pick a powder charge from those shots which would be 54.2 grains to 54.8 grains. As a side note, shots #2 and #3 are only 0.851 lower so I wouldn’t be afraid of using one of those loads either. I settled on 54.5 grains as the load I wanted to use. It’s right in the middle of the group so if the velocity goes up or down slightly, the bullet should still hit in the same place on the target.
Now that we’ve settled on a powder charge, I want to find the seating depth the rifle likes. I usually start at jam length and [shorten the COAL] in 0.003 increments until I get to 0.015 deeper than jam. [Editor: By this he means he is seating the BULLET deeper in the case, NOT deeper into the lands. He ended up at .007″ shorter than his hard jam length of 3.477″.]
I load 3 rounds at each depth using the 54.5 grain powder charge and shoot a group with each depth at 150 yards. As you can see from the target, the first two groups are not good at all. Next one looks good and is the smallest group on the target. The next three are not quite as small but the vertical location on the target is almost the same which indicates a sweet spot which will help keep the vertical stringing to a minimum on target. I went with 3.470″ which is right in the middle once again and should give some flexibility with the seating depth.
So after all of that, my load is 54.5 grains of H4831SC and a cartridge length of 3.470. I plan on loading up enough ammo to shoot five groups of five shots and see exactly how this load works on target as well as what the extreme velocity spreads are over several groups.
I sincerely hope some of this information helps you to get the best accuracy out of your rifle. I do not take credit for coming up with any of this, a whole lot of good shooters use this same method or a variant of it when working up their loads.
For more information about load development, please contact the Sierra Bullets technical support team at 1-800-223-8799 or by email at sierra [at] sierrabullets.com.
Disclaimer: Load data represented here may not be safe in your rifle. Always start low and work up, watching for pressure signs.
Here’s a handy invention by Forum member RayJay from Georgia. It’s a simple wire clip that will hold the lid of your plastic ammo box fully open during use. RayJay explains: “Everybody probably uses the cheap plastic cartridge cases. The only problem I have with them is the lid is always in the way and sometimes when trying to open the lid farther the cartridge box tips and you can dump out the cases. I did some cogitating and came up with these .061″ music wire clips. They work great and the unexpected benefit is that the cases are more stable while sitting at the bench.”
RayJay adds: “The round wire is ideal because it still allows a cartridge to fit in the hole where the clip is placed. Now all I need to do is make another 15 or 20 so I can have one in every case I own.”
Do you have a hankering to shoot Extreme Long Range (ELR)? Then you’ll want a large-caliber cartridge with plenty of boiler room. Some of the most successful ELR cartridges have been based on the CheyTac family, including the .375 CheyTac (9.5×77) and .408 CheyTac (10.36 x 77). Now brass for both these jumbo cartridges is offered by Peterson Cartridge. This Peterson Cheytac brass has proven to be tough and long-lived. And it is capable of winning — Derek Rodgers won the 2017 King of 2 Miles (K02M) event shooting a .375 Cheytac with Peterson brass. Here’s a report on how Peterson developed and tested its tough CheyTac cartridge brass.
Developing and Testing CheyTac Brass
Report by Peterson Cartridge Co.
Recently, our president, Derek Peterson, was live-testing our most recent iteration of the .375 CheyTac (aka 9.5 X 77). He started with five casings, and did a full-body resizing after each firing. He got 17 firings out of each before he started to notice the early signs of case head separation. [Editor: Theses were with extremely high pressure loads.] He then took another set of casings and after each firing he just bumped the shoulder back, like a typical reloader would. He got 20 firings out of those casings.
Note: CheyTac® is a registered trademark of CheyTac USA, LLC. Peterson Cartridge has no affiliation.
Low MV Extreme Spread
On the first two shots the muzzle velocities were within 12 feet per second of each other. On the 3rd and 4th shots the muzzle velocities were within 6 feet per second of each other. By the 5th shot the muzzle velocities were within 1 foot per second of each other. Now that is how you can put two bullets in the same hole down range.
No SAAMI Spec for CheyTac Cartridges
As many of you probably already know there is no SAAMI spec on these calibers. So, without a SAAMI spec there is no stated maximum pressure for a service load. However, there IS an international spec on the .408 [promulgated by the] CIP (Commission International Permanente). And the CIP max pressure for this round is extremely high. Our partner in Europe tells us it is probably unnecessarily high. Our partner loads these rounds and they have a standard load for the .375s which is also quite high. So that is the pressure we did our testing at. To even achieve that pressure, we had to use a compressed load. We are explaining all this to say that you [should not use] a load that hot, and therefor you will most likely get more reloads than we did[.]
Peterson Brass Goes Through 11 Dimensional Tests
With all the casings we make in any caliber, we perform a battery of in-process, real-time dimensional checks. [We test] 11 different dimensions continuously throughout each shift. Some of these are tube cylindricity, mouth to body concentricity, primer pocket diameter, length to shoulder, overall length, and more. These measurements are automatically fed into Statistical Process Control software. If a dimension begins to drift from nominal we can catch it immediately and correct it.
Peterson is Fully Committed to CheyTac Brass Production
Peterson Cartridge purchased additional manufacturing equipment designed specifically to produce these large casings. Our capacity is 5-million casings a year. We are committed to there not being a shortage of these calibers ever again.
Derek Rodgers is the 2017 King of 2 Miles. He is also the only human to ever hit the maximum distance target target at 3368 yards (1.91 miles). His cartridge choice? The .375 CheyTac. Derek ran Cutting Edge Bullets in Peterson brass with Hodgdon H50BMG powder.
Q: Why did you choose the .375 CheyTac cartridge?
Derek: When I was asked to join the Applied Ballistics Team, I needed to get an ELR rifle built in a short period of time. I was under a very tight time schedule to get the project complete. In an effort to eliminate variables, I decided to keep things standard and as simple as possible. I chose the .375 CheyTac for the ease of getting components. The larger rifles are more difficult to get components quickly and I felt like the .375 CheyTac had enough attributes to be competitive at ELR distances.
Product Tip from EdLongrange. We welcome reader submissions.


 Howa 1500 HACT 2-Stage Trigger




 This time of year, many readers are putting their guns away in a safe for the winter. It’s easy to just tuck the guns away and forget about them. But there’s something you should do before you shut the safe door. If you have a safe with an electronic keypad, you should replace the battery every year as a precautionary measure. Trust us, you don’t want to come back in a few months and find that the keypad memory is kaput, and you’re locked out. That can lead to an expensive locksmith visit.




 Craters may look interesting on the moon, but you don’t want to see them on your primers. Certain mechanical issues that cause primer craters can also cause primer piercing — a serious safety problem that needs to be addressed. If you have a gun that is cratering primers (even at moderate pressure levels), there is a solution that works with many rifles — send your bolt to
  Firing Pin Hole Bushing by Greg Tannel