Ask 10 shooters about barrel cleaning and you’ll get 10 different opinions. This reflects that fact that different fouling problems demand different solutions. For example, solvents that work well for copper may not be the best for hard carbon (and vice-versa). To come up with the right solution, first you must understand the nature of the fouling in your barrel.
John Krieger Interview with AccurateShooter at SHOT Show:
The debate about the proper care of a match barrel is a hot one, spiked with folklore and old wives’ tales, Lohman said. He and his staff set out to set the record straight: “We tried to interject some science into the discussion of cleaning a match barrel,” he explained. In his article, Lohman writes:
Why worry about a little barrel fouling when the throat is subjected to a brutal 5,600° F volcano at 55,000 PSI? To investigate these and other questions about taking care of a match barrel, we spoke with a dozen experts and share their knowledge in this first of a series of articles.
After listening to folks who shoot, build barrels or manufacture cleaning solvents for a living, we concluded that even the experts each have their own unique recommendations on how to care for a match barrel. But they all agree on one thing — the gun will tell you what it likes best. Because the life expectancy of a match barrel is about 1,500 to 2,500 rounds, the objectives of cleaning one should include: preserve accuracy, slow the erosion, and remove fouling — all without damaging the gun. This article doesn’t claim that one cleaning method is better than the next. Rather, we set out to interject a little science into the discussion and to share some lessons learned from experts in the field.
For more Shooting Sports USA articles, visit www.ssusa.org.
Looking for authentic U.S. Military Specification Standards (MIL-STD) for gun parts, safety products, or other hardware? Log on to EverySpec.com. This website provides FREE access to the complete archive of U.S. Government spec sheets and technical manuals. You can quickly access and download thousands of public domain U.S. Government documents. For example, we searched for “Picatinny” and came up with MIL-STD-1913 “Dimensioning of Accessory Mounting Rail for Small Arms Weapons”. With one click we downloaded the file as a PDF. Then a search for “M118″ yielded the engineering drawing for 7.62×51 M118 LR Match ammo. Pretty cool.
Using EverySpec.com is fast and easy. And everything you find and save is FREE. Search as often as you like — there are no limits on search requests or downloads. You can either search by keyword, or Federal Supply Class Code (FSC). CLICK HERE for a complete list of FSCs for all products.
Here are FSCs for a few common product types. Keep in mind that there are hundreds of other FSCs — for everything from Office Supplies (FSC 7510) to Nuclear Projectiles (FSC 1110).
1095 — Miscellaneous Weapons (incl. Knives) 1240 — Optical Sighting and Ranging Equipment 1395 — Miscellaneous Ammunition (incl. Small Arms) 3455 — Cutting Tools for Machine Tools 6140 — Batteries, Rechargeable 6230 — Electric Portable Lighting Equipment 7640 — Maps, Atlases, Charts and Globes 8340 — Tents and Tarpaulins 8405 — Outerwear, Mens
Credit Gunsmith Thomas ‘Speedy’ Gonzales for finding this resource. Thanks Speedy!
Popular YouTube Channel Smarter Every Day recently released a fascinating video featuring rifle suppressors with see-through acrylic sleeves. The team filmed shots through the suppressors using ultra-high-speed (110,000 frame per second) cameras. When played back in super-slow-motion, you can see the flame propagate through the suppressor and the bullet move through each baffle before it exists the muzzle. Notably, you can see different internal flame effects depending on the baffle design. Watch the results in the video below — it’s mesmerizing:
See Through Suppressor in Super Slow Motion (110,000 fps) — Click Arrow to Watch:
The high speed transparent silencer video is pretty neat. It certainly demonstrates, to some extent, the violence that happens inside centerfire rifle suppressor when firing.
At Thunder Beast Arms Corp. we have carefully studied the forces/pressures operating inside suppressors. The “uncorking” pressure when the bullet exits the muzzle is typically in the 8,000 to 15,000 psi range, but some combinations of cartridge and barrel length can extend this up to the 25,000 psi range. Job #1 of a suppressor designer is to build a suppressor that won’t explode. Job #2 is to build one that quiets down the muzzle report significantly. Doing that well, with the minimum amount of material, is the tricky part.
Suppressor design is both art and science, and we approach our R&D from three sides: experience, experimental testing, and computation.
There are a lot of opinions about how to design a quiet suppressor. Many of these are based on preconceived notions of how suppression “should work”. These theories may or may not work when built and tested in the real world. Where the rubber hits the road is experimental testing. I would say that a majority of knowledge about “How to design a quiet suppressor” comes from building hundreds or thousands of prototypes and testing them with good equipment in a cogent experimental process. Some of those theories pan out, but many of them do not.
Thunder Beast Arms Tests its Suppressors in the Lab and in the Field.
Scientific Software Aids Design
We have also made a large investment in computation fluid dynamics (CFD) and finite-element analysis (FEA) software and use it in addition to other computer-model analysis to look at the physics that occurs inside the suppressor. This type of analysis gives information about material effects that is pretty much impossible to get any other way. Even so, the computer cannot tell you how to design a
suppressor, and the results must always be checked and compared to reality.
Thunder Beast Arms Corporation was started ten years ago with the goal of producing the best precision rifle suppressors. Our current ULTRA series in .223, 6.5 mm, .308, and .338 calibers provides industry-leading suppression performance with very light weight.
Want to improve your understanding of Ballistics, Bullet Design, Bullet Pointing, and other shooting-related tech topics? Well here’s a treasure trove of gun expertise. Applied Ballistics offers dozens of FREE tech articles on its website. Curious about Coriolis? — You’ll find answers. Want to understand the difference between G1 and G7 BC? — There’s an article about that.
“Doc” Beech, technical support specialist at Applied Ballistics says these articles can help shooters working with ballistics programs: “One of the biggest issues I have seen is the misunderstanding… about a bullet’s ballistic coefficient (BC) and what it really means. Several papers on ballistic coefficient are available for shooters to review on the website.”
Credit Shooting Sports USA Editor John Parker for finding this great resource. John writes: “Our friends at Applied Ballistics have a real gold mine of articles on the science of accurate shooting on their website. This is a fantastic source for precision shooting information[.] Topics presented are wide-ranging — from ballistic coefficients to bullet analysis.”
Here are six (6) of our favorite Applied Ballistics articles, available for FREE to read online. There are dozens more, all available on the Applied Ballistics Education Webpage. After clicking link, select Plus (+) Symbol for “White Papers”, then navigate to particular articles with Left/Right arrows.
The science behind annealing during the manufacture of new cases is well-established. What happens after that, when we repeatedly reload and anneal those same cases, has always been somewhat of a “dark art”. To help separate scientific fact from fiction, the creators of the Annealing Made Perfect (AMP) Annealer machine have conducted detailed studies of cartridge brass. The AMP Team’s studies offer some remarkable insights, while disproving a number of myths about annealing. Will annealing tighten your groups? The evidence of these studies shows it could.
The test results are fascinating. The team compared brands of brass, sectioning brass to examine both alloy composition and thickness from case mouth to case-head (bottom). They also examined how carbon build-up affects next tension. And they determined how brass changes over multiple loading cycles. They even did a series of bullet-pull tests to analyze factors affecting neck tension. Here are some of the key subjects in the reports:
Brand by Brand Analysis — How the cartridge brass alloy varies among different manufacturers. Bullet Release and Neck Tension — Tensile Bullet-Pull tests show factors affecting neck tension. Neck Tension and Carbon — How carbon build-up inside the neck affects “neck tension”. SS Tumbling and Hardness – How tumbling with stainless media affects brass hardness. Case Cleaning (Ultrasound and Tumbling) — How case cleaning affects annealing. Multiple Loadings — How brass performs when annealed every reload over 10+ cycles.
You really should read the reports — there are some fascinating revelations. The AMP team made longitudinal sections of various cases to show different case wall thicknesses and head geometry. These examples also show how the hardness of the case varies from the case mouth to the case-head. Both virgin and used, annealed cases were examined.
Bullet-Pull Tests — Using advanced tensile test equipment, AMP experimented with different combinations of dies, reloading sequences, and neck hardness to ascertain the best practice.
Carbon Inside Your Case-Necks May Be a GOOD Thing
AMP’s testers found carbon in necks can be beneficial: “Even with identical interference fit and neck hardness, as the carbon layer increased (microscopically), the force to draw the bullet decreased. It would appear the carbon acted as a lubricant. Interestingly, the [pull force] standard deviation also improved, i.e. the case to case variation in the force required to draw the bullets decreased.”*
Read the Full Test Reports
The AMP team’s objectives were to clarify some misconceptions on just what annealing does and does not do, and also to establish the best practices for consistent results. They have consulted with three independent certified metallurgy laboratories to produce some definitive information. So far, the Stage 1 and Stage 2 reports have been released. The studies include a report on the general physical properties of cartridge brass, including grain structures, hardness scales, time/temperature annealing information, and what can cause de-zincification.
The FULL REPORTS, including comprehensive appendices, are found here:
Examining Different Brands of Brass — What the Tests Revealed
Is Lapua brass harder than Norma? Is Lake City better than Remington? You’ll find answers to these and other questions in AMP’s annealing studies. One of the key findings in Stage 2 of Amp’s research is that brass from different manufacturers does vary in the distribution of material in the walls of the case.
Stage Two Conclusions:
— Different brands of the same cartridge cases can require different annealing power settings due to differing case wall thickness in the neck and shoulder region. The greater the mass of brass to be annealed, the greater the power requirement. Lot to lot variation within the same brand can occur for the same reason.
— The bushing die used in this set of tensile bullet pull tests gave significantly more consistent results than the standard neck die with expander ball.
— Cases should be annealed every reload in order to get the best repeatability.
Case Variations: Brand to Brand, and Lot to Lot
Here is a sample from AMP’s test report:
Analyzing Different Brands of Brass
In our Stage One report, we demonstrated that there is insufficient variation in alloy composition between brands to account for the variations we experience when annealing different brands of the same cartridge case. We therefore sought to confirm that it is the mass of brass to be annealed which accounts for the difference. Below are sectioned samples of four different brands of .223 Remington cases.
Both the Lapua and Norma neck walls are 314* microns (0.01236”) at the mouth. The Lapua neck wall thickens to 348 microns at the junction of the neck and shoulder, and the Norma neck thickens to 325 microns. Through the shoulder, however, the walls of both cases thicken to 370 – 380 microns. Once past the shoulder, they both taper back to 314 microns, before starting to thicken again, moving towards the case head.
The Lapua case requires AMP Program 47 to anneal correctly. It is the heaviest of the four cases tested through the shoulder region. The Norma case, which is only slightly lighter through the same region, needs Program 43.
The Remington case is very similar to the Lapua and Norma cases in the neck region, but it actually thins fractionally through the shoulder and front section of the body. The AMP program setting for Remington 223R is P32.
The Lake City case is the thinnest throughout of all four samples. It only requires Program 28.
The above samples clearly demonstrate that the mass of brass to be annealed is critical to the power requirement for correct annealing.
To see how the AMP Induction Annealing Machine works, watch this video:
* However, in Stage Two of AMP testing, the testers experimented with clean, carbon-free necks with dry lube. There was some indication of greater tensile pull consistency with dry-lube, but AMP plans to do more testing.
While attending the CA Long Range Championship a few seasons back, we had the opportunity to test the performance of a high-magnification (63X) spotting scope in near-ideal conditions (maybe the best I’ve ever witnessed). On the event’s last day we arrived at 5:45 am, literally as the sun was cresting the horizon. I quickly deployed our Pentax PF-100ED spotting scope, fitted with a Pentax SMC-XW 10mm fixed-power eyepiece. When used with the 100mm Pentax scope, this 10mm eyepiece yields 63X magnification. Befitting its $359.00 price, this eyepiece is extremely clear and sharp.
At the crack of dawn, viewing conditions were ideal. No mist, no mirage, no wind. The first thing this Editor noticed was that I could see metal nail heads on the target boards. That was astonishing. As soon as the first practice targets went up, to my surprise, I could see 6.5mm, 7mm, and 30-caliber bullet holes in the white at 1000 yards. No lie…
That’s right, I could see bullet holes at 1000. I know many of you folks may not believe that, but there was no mistaking when I saw a 7mm bullet cut the white line separating the Nine Ring and Eight Ring on the target in view. (I was watching that target as the shot was fired and saw the shot-hole form). And when I looked at the 30-cal targets, the bullet holes in the white were quite visible. In these perfect conditions I could also make out 3/8″ bolt heads on the target frames.
The Human Factor
When viewing the bullet holes, I was using my left naked eye (no safety glasses or magnification). I also had a contact lens in my right eye (needed for distance vision). To my surprise, while I could see the bullet holes without much difficulty with my left eye, things were fuzzier and slightly more blurry with the right eye, even when I re-focused the scope.
Then I invited 3 or 4 shooters to look through the scope. One younger guy, with good eyes, said immediately: “Yeah, I can see the holes — right there at 4 o’clock and seven o’clock. Wow.” Some older guys, who were wearing glasses, could not see the holes at all, no matter what we did to the scope’s main focus and diopter adjustment.
The lesson here — if you have to wear glasses or corrective contact lenses, just that extra bit of optical interference may make a difference in what you can see through the scope. Basically anything that goes between the scope eyepiece and your eyeball can degrade the image somewhat. So… you may be better off removing your glasses if you can still obtain good focus sharpness using the diopter adjustment and focus ring. I did the left vs. right eye test a half dozen times, and I could definitely see small features at 1000 yards with my naked eye that I could not see with my right eye fitted with a contact lens. (I did have to re-focus the scope for each eye, since one had a corrective lens while the other did not.)
Mirage Degrades Image Sharpness and Resolution
The “magic light” prevailed for only an hour or so, and then we started to get some mirage. As soon as the mirage appeared I was no longer able to see raw bullet holes, though I could still easily see black pasters on the black bulls. When the mirage started, the sharpness of the visible image degraded a huge amount. Where I could see bullet holes at dawn, by mid-morning I could barely read the numbers on the scoring rings. Lesson: If you want to test the ulimate resolution of your optics, you need perfect conditions.
Chromatic Aberration Revealed
As the light got brighter and the mirage increased I started to see blue and red fringing at the edges of the spotting disk and the large numerals. This was quite noticeable. On one side of the bright, white spotting disc you could see a dark red edge, while on the other side there was a blue edge (harder to see but still present).
The photo below was taken through the Pentax spotter lens using a point and shoot camera held up to the eyepiece. The sharpness of the Pentax was actually much better than this photo shows, but the through-the-lens image does clearly reveal the red and blue fringing. This fringing is caused by chromatic aberration — the failure of a lens to focus all colors to the same point. Chromatic aberration, most visible at high magnification, causes different wavelengths of light to have differing focal lengths (see diagram). Chromatic aberration manifests itself as “fringes” of color along boundaries that separate dark and bright parts of the image, because each color in the optical spectrum cannot be focused at a single common point on the optical axis. Keep in mind that the Pentax does have “ED” or low-dispersion glass, so the effect would be even more dramatic with a cheaper spotting scope.
If you wonder why top-of-the-line spotting scopes (such as the $3900 Leica APO-Televid 82) cost so much, the answer is that they will deliver even LESS chromatic aberration at long range and high magnification. With their exotic apochromatic (APO), ultra-low-dispersion glass, a few ultra-high-end spotting scopes can deliver an image without the color edging you see in the photo above.
The Pentax PF-100ED is a heck of a spotting scope. Any scope that can resolve bullet holes at 1000 yards is impressive. But if you want the ultimate in optical performance, with minimal chromatic aberration, you may need to step up to something like the 88mm Kowa Prominar TSN-883 with Flourite Crystal lenses ($2450.00 body only), or the 82mm Leica APO ($3899.00 with 25-50X eyepiece).
EDITOR’s NOTE: The purpose of this report is to show what is possible… in IDEAL conditions. With this Pentax 100mm, as well as a Swarovski 80mm, we have often been able to resolve 6mm bullet holes at 600 yards. But again, that performance requires really good viewing conditions. By 10:00 am at my range, even with the 100mm Pentax at 75 power, seeing 6mm bullet holes is “iffy” at best. So don’t go out and mortgage the house to buy a $4000 optic with the hope that you’ll be able to spot your shots at 1000 yards. If conditions are anything less than perfect, you’ll be lucky to see bullet holes at 500 yards. The real solution for very long-range spotting is to set up a remote target cam that broadcasts a video picture to a screen at your shooting station.
NOAA photo of flooding after Hurricane Floyd in 1999. The Colt Python Revolver once belonged to Elvis Presley (Rock Island Auction).
Firearms owners who have seen their guns and stored ammunition submerged by flood waters in storm-wracked areas are probably wondering if their firearms and ammunition can be salvaged and safely used. To answer these questions, the NSSF and the Sporting Arms and Ammunition Manufacturers’ Institute (SAAMI®) created two documents outlining the proper response to submersion of guns and ammo. If you’ve got wet guns and/or ammo, download these two PDF files and read them carefully.
The SAAMI document “Guidance on Firearms That Have Been Submerged or Exposed to Extensive Amounts of Water” points out two major concerns about firearms that have been exposed to water: parts susceptible to moisture and rust damage such as metal parts, wood stocks and grips, and optics; and, secondly, infiltration of the action, barrel and safety systems by grit, silt and other foreign debris.
#1 Always unload firearms before beginning any treatment process.
It’s important to limit moisture and corrosion damage to the component parts of the firearm. This can be accomplished by disassembling the component parts and using up to two coats of a moisture-displacing lubricant such as Hoppes #9 MDL or WD-40 to clean and stabilize the parts while, importantly, following the product’s directions so as not to damage, for instance, plastic or synthetic parts. Another tip is to allow wood stocks and grips to air-dry and not be force dried by exposure to heat.
The document emphasizes that once the firearm has been thoroughly dried, consideration must be given to having the firearm inspected and serviced by the manufacturer, an authorized service center, or a qualified gunsmith before putting the firearm back in service.
Dealing with Ammunition That Was Submerged
Bottom Line, if your ammo has been submerged — DON’T USE IT. SAAMI explains why…
To help firearms owners determine what to do with ammunition that has been affected by water and moisture, SAAMI offers another helpful document, “Guidance on Ammunition That Has Been Submerged in Water.” This document covers differences in moisture resistance between centerfire, rimfire and shotshell ammunition, and potential hazards associated with “drying out” cartridges, including possible deterioration and damage to cartridges due to drying methods.
Another serious hazard that could result from using compromised ammunition is the potential for a bore obstruction due to partial ignition of either the priming compound or the propellant powder charge, or both. Firing a subsequent round through an obstructed barrel can result in bodily injury, death and property damage.
SAAMI provides the following cautionary conclusion: “It would be impossible to ascertain for certain the extent of the deteriorating affect, if any, the water may have had on each individual cartridge. Therefore, the safe answer is that no attempt be made to salvage or use submerged ammunition. The ammunition should be disposed of in a safe and responsible manner. Contact your local law enforcement agency for disposal instructions in your area.”
Burris Signature Rings with polymer inserts are an excellent product. The inserts allow you to clamp your scope securely without ring marks. Moreover, using the matched offset inserts you can “pre-load” your scope to add additional elevation. This helps keep the scope centered in its elevation range while shooting at long range. Additionally, with a -20 insert set in the front and a +20 insert set in the rear, you may be able to zero at very long ranges without using an angled scope base — and that can save money. (To move your point of impact upwards, you lower the front of the scope relative to the bore axis, while raising the rear of the scope.)
Insert Elevation Values and Ring Spacing
People are sometimes confused when they employ the Burris inserts. The inset numbers (-10, +10, -20, +20 etc.) refer to hundredths of inch shim values, rather than to MOA. And you need the correct, matched top/bottom pair of inserts to give you the marked thousandth value. Importantly, the actual amount of elevation you get with Burris inserts will depend BOTH on the insert value AND the spacing between ring centers.
Forum member Gunamonth has explained this in our Shooters’ Forum:
Working with Burris Signature Rings
Burris inserts are [marked] in thousandths of an inch, not MOA. To know how many MOA you gain you also need to know the ring spacing. For example, with a -20 thou insert set in the front and a +20 thou insert set in the rear, if the ring spacing is 6″, the elevation change will be approximately +24 MOA upwards.
Here’s how we calculate that. If you have a 2 X 0.020″ “lift” over a distance of 6 inches (i.e. 0.040″ total offset at 0.5 feet) that’s equivalent to 0.080″ “lift” over 12 inches (one foot). There are 300 feet in 100 yards so we multiply 0.080″ X 300 and get 24″ for the total elevation increase at 100 yard. (Note: One inch at 100 yards isn’t exactly a MOA but it’s fairly close.)
Here’s a formula, with all units in inches:
Total Ring Offset
——————– X 3600 = Change @ 100 yards
Ring Spacing
(.020 + .020)
—————– X 3600 = 24 inches at 100 yards
6
NOTE: Using the above formula, the only time the marked insert offset will equal the actual MOA shift is when the center to center ring spacing is 3.60″. Of course, you are not required to use 3.60″ spacing, but if you have a different spacing your elevation “lift” will be more or less than the values on the inserts.
IBS Scoring Reticle Updated with Brighter Circles
In an ongoing effort to improve the two-piece IBS scoring reticle, a material change has been made to the plate showing bullet diameters. The new material displays white circles that are brighter than the previous version and does not require the circles to be colored.
The complete scoring reticle continues to have two components: 1) the Plate, and 2) the Domed Magnifier. The reverse laser-etched Plate displays 12 bullet diameters: .224, .243, .257, .264, .277, .284, .308, .323, .338, .358, .375 and .408. The etched circles are in direct contact with the target. The 4X domed magnifier provides a clear visual image that aids in accurate scoring.
New Laser-Etched Scoring Plate (12 Bullet Diameters):
UPGRADE Your Scoring Reticle
Plate Only Upgrade for $15.00
The new “plate only” is available to customers who have purchased the complete reticle package in the past. This is an upgrade for past customers. The price for the “plate only” is $15.00 which includes shipping within the USA.
Complete Scoring Reticle for $40.00
The complete reticle package is being shipped with the improved plate. The price for the complete reticle package is $40 which includes shipping within the USA.
If you have questions, contact Frank at: (603) 878-1474 or by e-mail at frank30br@comcast.net
Send your payment to:
Frank Danisienka
P.O. Box 97
New Ipswich, NH 03071
HOW to USE IBS SCORING RETICLE — INSTRUCTIONS
1. Depending on the condition of the hole, it may be necessary to turn the target onto its face and fold the torn pieces of the target back toward the center of the hole.
2. Lay the target face up and place the plate on the target centering the proper circle (bullet diameter) over the bullet hole.
3. At times the scribed hole will be larger than the bullet hole making the positioning of the scribed circle critical for accurate measurement.
4. Place the plate and magnifier on the target over the hole to be scored.
5. With the magnifier remaining on the plate and the scribed circle of the correct diameter PERFECTLY CENTERED over the bullet hole — score the target using the OUTSIDE EDGE of the scribed circle to determine the results.
Scoring Reticle Maintenance
When not in use, place the scoring plate on the magnifier carton to keep it clean and away from abrasive or dirty surfaces. Fine scratch remover, such as Novus #2, can be used with a paper towel to remove scratches.
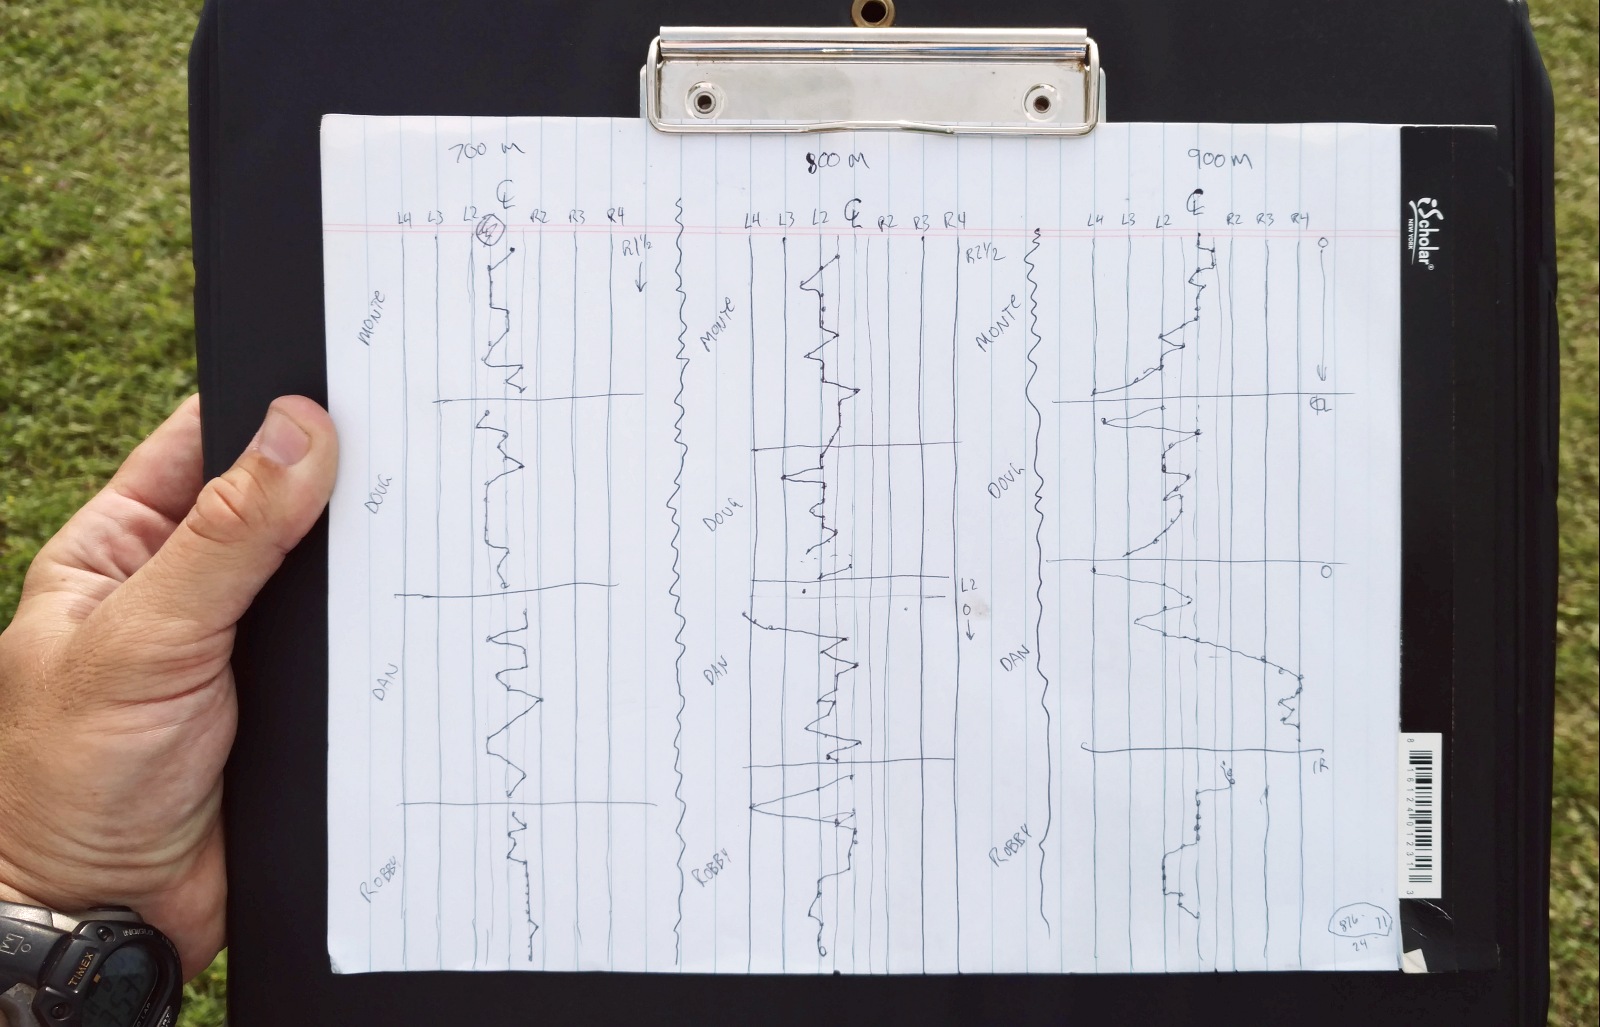
CLICK HERE to see full-screen version of Wind Plot.
The Battle of Nations begins. Today is Day 1 of international team competition at the 2017 F-Class World Championships (FCWC) in Ottawa, ON, Canada. Talented teams, in their nation’s colors, will be competing for glory and national pride.
Team shooting is very different than individual competition. Typically a team coach makes the wind calls for the shooters. In some cases (where the rules allow), the wind coach even dials elevation and windage changes for the active shooter. For the wind coach to do his job effectively, he must follow the changes in the wind and determine what the correct wind call should have been for each shot. (In other words — what was the “right call”)
Past F-TR USA Nat’l Champ Bryan Litz was wind coach for the winning 4-man LUM F-TR Team at the 2017 Canadian F-Class Championships, which preceded the FCWC Worlds. Here Bryan explains how he uses a Wind Plot to make better wind calls, helping his team-mates maximize their scores.
Wind Plot Methodology by Bryan Litz
The wind plot I use is a running history of what the correct wind call was for every shot fired. The more you shoot, the more history you have in a condition, and I find that very useful information. This kind of plot IS NOT showing where the bullet hit, and is NOT showing what you held. It’s showing what you should have held to center each shot. IMO, this is the most valuable information to have when guessing where to hold next for each shot. Here are some key points:
1. I always look for blocks of stable conditions to shoot in and wait out the rest.
2. If the wind plot shows drastic changes, either I’m not picking the right time to shoot or it’s just a really unstable wind condition.
3. When you see many shots using the same hold (e.g. Robby’s 700m and 900m strings on plot), it can indicate very fast shooting and fast pit service.
Q. What are the numbers and Markings on this Wind Plot?
Litz: The wind plot represents the rings on the target. Left 2 for example, is the 5 line on the international target, while Left 2 is the 10 line on the USA target. F-Class shooters and coaches talk about wind holds in relation to these rings. A Left 2 hold isn’t left 2 MOA or 2 MILS, it’s the second ring from center. The vertical lines on the plot represent the rings going out from center, 4 or 5 in each direction. A left or right 5 hold is edge of black on the int’l target.
Q: What Does this Specific Plot Reveal?
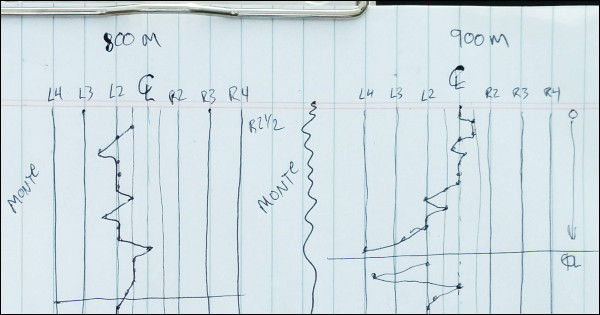
Litz: Looking at the plot, from left to right is 700m, 800m, and 900m that we shot progressively through the day. Top to bottom shows each shooter in sequence (shooters names are shown by their blocks). To the right I note what was on the gun for that shooter, and note when it changes. Often times we run the same wind on the gun for several shooters but if it changes, I note what the new windage is and continue on. For example if we’re settled into a condition where we’re shooting Vs with a right 3 hold, I might adjust the scope 1 MOA right because a right 3 hold is equal to 1 MOA. So we can move the scope and start shooting with a center hold.
Q. Are you Plotting Where the Bullet Hits?
Litz: Not exactly. This kind of plot IS NOT specifically showing where the bullet hit, and IS NOT showing what the shooter held. It’s showing what the shooter should have held to center each shot. IMO, this is the most valuable information to have when guessing where to hold next for each shot.
On each shot, the shooter or coach takes a guess about where to hold, and fires the shot. If the bullet hits the center, you plot the point right where you held because it was the correct hold. However, if you miss the call, you plot what hold was required to put that shot in the center. For example if you shoot a right 3 and hit where you held, the correct call would have been “center”. In this way, you’re building a history of what you should have done, which may or may not be what you actually did. This shows you the trends, and brackets which can be used to make future decisions.
Q: Is this Type of Wind Plot Something New?
Litz: I didn’t invent this method, it’s been around a long time. Vertical can be plotted the same way. In team matches, we have a plotter who is advising on elevation trends and suggesting corrections. But, as wind coach, my job is the horizontal so I only keep the wind plot. I have learned lots of strategies from my coaches Emil Praslick and Steve Hardin.
There are many ways to plot and many standard work sheets for this. They’re all tools and the key is to find something that works for you in different situations. I don’t keep a plot when I am personally behind the trigger string firing because I lose more points when I take the time to do it vs. just shooting fast. When pair firing or coaching, I can keep the wind plot without compromising the shooting.
Team Australia used plots and comms linking coaches to help win the 2013 F-Open Team World Championship. We expect other teams will follow suit in Canada in 2017.
Know Your Goal — Keep It Simple
Know your goal of plotting. The simplest plot is where you write the shot number where it hit on a target face. This kind of plotting is useful for evaluating shooter performance because it shows how big the group is (in particular the vertical dispersion). However keeping a plot like this does little to help you figure out the wind. It just shows you what shots you messed up on. It does nothing to help you find the center. [Editor: That’s a whole different matter with many variables.] The wind plot I use is a running history of what the correct wind call was for every shot fired. The more you shoot, the more history you have in a condition, and I find that very useful information.


 The high speed transparent silencer video is pretty neat. It certainly demonstrates, to some extent, the violence that happens inside centerfire rifle suppressor when firing.


 While attending the CA Long Range Championship a few seasons back, we had the opportunity to test the performance of a high-magnification (63X) spotting scope in near-ideal conditions (maybe the best I’ve ever witnessed). On the event’s last day we arrived at 5:45 am, literally as the sun was cresting the horizon. I quickly deployed our Pentax PF-100ED spotting scope, fitted with a Pentax SMC-XW 10mm fixed-power eyepiece. When used with the 100mm Pentax scope, this 10mm eyepiece yields 63X magnification. Befitting its $359.00 price, this eyepiece is extremely clear and sharp.
 Then I invited 3 or 4 shooters to look through the scope. One younger guy, with good eyes, said immediately: “Yeah, I can see the holes — right there at 4 o’clock and seven o’clock. Wow.” Some older guys, who were wearing glasses, could not see the holes at all, no matter what we did to the scope’s main focus and diopter adjustment.
 Chromatic Aberration Revealed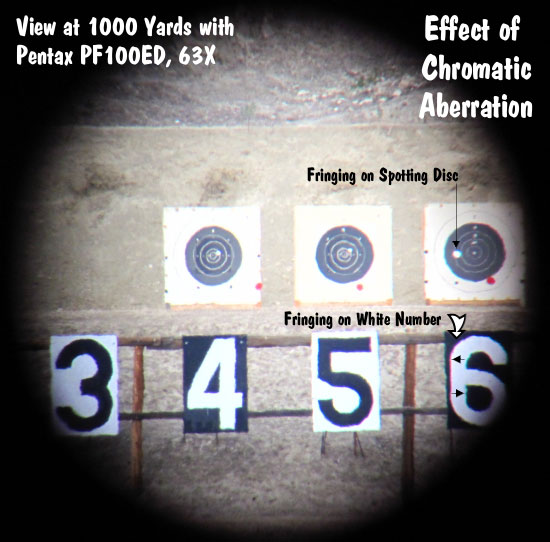


 IBS Scoring Reticle Updated with Brighter Circles