If you haven’t visited the Norma website recently, you should click over to www.norma.cc/us. There you will find Norma’s Ammo Academy, a technical resource that provides information on Ballistics, Powder Storage, Barrel Wear, and Bullet Expansion. In addition, the Ammo Academy now links to Norma’s Reloading Data Center, where you’ll find loads for nearly 70 cartridge types including: .223 Rem, .22-250, 6mmBR Norma, 6XC, 260 Rem, 6.5-284, 6.5×55, 7mm-08, .270 Win, .284 Win, .308 Win, .30-06, 300 Win Mag, .338 Lapua Mag and dozens more.
The Ammo Academy’s Ballistics section contains some fascinating technical facts:
After the trigger is pulled, it takes around 0.005 seconds before the firing pin reaches the primer.
From the firing of the primer it takes 0.0015-0.002 seconds until the bullet exits the muzzle.
When the bullet leaves the muzzle, the hot gases surround and overtake the bullet, continuing the acceleration for a few centimeters.
Because the barrel is always angled slightly upwards, the bullet’s flight starts about 3-5 cm below the line of sight.
Norma also offers some good advice about Powder Storage:
To maintain the product quality for as long as possible, you have to keep the powder in a suitable place under suitable conditions. Where possible, store the powder at a constant temperature, ideally between 12 and 15°C (54°F to 59°F), and a relative humidity of 40–50%. If the air is too dry, it will dry out the powder, which will cause the pressure to be higher, thus affecting performance. Also make sure that you close the powder container properly afterwards. Cartridges should be stored under the same ambient conditions to maintain their quality.
Helpful “How-To” Maintenance Videos from BAT
BAT Machine’s website features an extensive Video Archive with a selection of helpful videos for custom action owners. Among BAT’s collection of videos, you’ll find informative clips covering about bolts, ejectors, action maintenance, and other technical matters. Here are two examples:
How to Grease and Maintain Your BAT Action and Bolt:
”
How to Remove (and Re-Install) Firing Pin Assembly:
More Helpful Information on the New BAT Website
One thing that people might easily miss is the large spreadsheet that details the specs of all BAT Machine actions. To download that .xlsx spreadsheet to your hard drive, Right Click (and “Save As”) this link: ACTION CONFIGURATION PART LIST. After opening the spreadsheet, on the “ACTION” worksheet, you’ll find action model, body shape, weight, bolt faces available, and tenon spec among several other items. Note that there are two worksheet tabs (look down at the bottom left). Use these spreadsheet tabs to switch between “Action” and “Accessories”.
Also, on the BAT website FAQ page, you’ll find prints for barrel tenon machining, firing pin sizes, torque specs, and tons of other very helpful info. This is well worth a look. — ELR Researcher.
Story Tip from Boyd Allen and EdLongrange. We welcome reader submissions.
“Science tells us that exposure to continuous noise of 85 dB for eight hours is enough to cause permanent hearing loss, and worse, spikes of 130 dB and more can result in permanent hearing damage instantly.” Source: NRA Blog.
The Risk of Hearing Loss
Hearing loss can be progressive and irreversible. If you are a shooter, this is serious business. As the NRA Blog cautions: “You may not even realize you’re harming your hearing. Hearing loss occurs gradually, and can go effectively unnoticed until symptoms become severe. By then, the damage is done.”
Nobody wants to go deaf. But we often see shooters without effective hearing protection when they are walking around a few yards behind the firing line. That’s bad — even if you are away from the firing line, gunshot noises can damage your hearing. You MUST use effective hearing protection every time you go to the range. Good foam earplugs costs mere pennies but they can prevent deafness in your later years. Many folks also wear muffs over plugs.
Sound Levels for Common Noises:
9mm Luger pistol: 160 dB
Jet aircraft engine (near): 140 dB
.22 LR pistol: 134 dB
Normal human pain threshold: 120 dB
Noisy Nightclub: 110 db
Riding Motorcycle at 65 mph: 103 db
Power Lawnmower: 95 dB
Hearing damage possible: 85 dB (sustained for 8+ hours)
Ringing Telephone: 80 dB
Normal conversation: 60 dB
The Myth of the “Quiet” .22 LR
The NRA Blog notes that “many rimfire shooters, particularly those using the beloved .22 Long Rifle cartridge, argue that the small .22 LR caliber doesn’t produce enough sound to damage your hearing”. So, is that really true … or is it a myth?
In fact, a .22 LR can be much louder than you think — a .22 LR pistol can produce sound levels of 134 dB. That’s well above the normal human pain threshhold.
Highest Protection NRR 34dB-Rated Ear Muffs
For under $20.00 you can buy quality ANSI-approved muffs with a 34dB Noise Reduction Rating — the best you can get. Chose the Bright Yellow TR Industrial Muffs at $13.48, or the dark green Walker EXT Range Muffs for $13.99. Both products have padded head-bands which retract. If you prefer “basic black”, consider the $14.85 ClearArmor Muffs, Amazon’s #1 Best Seller among safety earmuffs.
Howard Leight MAX NRR33 Earplugs, Just $7.39 for 50 Pairs.
20 Pairs
50 Pairs
These Howard Leight NRR33 Max plugs are your Editor’s favorite foam earplugs. Between shooting, motorcycling and mowing lawns, I probably have Max plugs in my ears 2-3 days a week. This is a very good price for a bulk pack of 50 pairs. And if you act soon, you can get free shipping to boot.
Even with high-quality brass from Lapua, Norma, and RWS, occasionally you may find one or two cases per box which have a small flake or obstruction in the flash-hole. This will appear like a thin crescent on one side of the flash hole (see photo). You should inspect ALL new brass before loading to identify any pieces with a partially-obstructed flash hole. It’s a good idea to remove any flake or thin crescent left as an artifact of the flash-hole forming process. Because the flash-hole itself is normally centered and of the correct diameter, it is not necessary to ream the flash-hole to a larger diameter. All you really need to do is remove the small obstruction(s). This can be done quickly with inexpensive tools.
Use a Small Pin Vise to Remove Flash-Hole Obstructions
Folks have asked if there is a tool that can remove obstructions from a Lapua small, BR-sized flash hole without opening the hole size. The Lapua PPC/BR flash hole is spec’d at 1.5mm, which works out to 0.059055″. Most of the PPC/BR flash-hole uniforming tools on the market use a 1/16″ bit which is nominally 0.0625″, but these often run oversize — up to 0.066″.
If you want to just clear out any obstructions in the flash hole, without increasing the flash hole diameter, you can use an inexpensive “pin vise” with an appropriate drill bit. For $0.99, eHobbyTools.com sells a 1.5mm drill bit, item 79186, that matches the Lapua flash hole exactly. Other vendors offer a #53 pin vise drill bit that measures .0595″ or .060″ (depending or source). An 0.0595″ bit is close enough. You can find pin vises and these small-diameter drill bits at hobby stores.
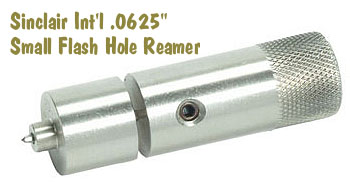
For quite some time, Sinclair Int’l has sold a similar device for small (PPC and BR-size) flash holes. Like the 07-3081 unit for large flash holes, the 073000 Reamer for small flash holes works from the outside, so it can index off the primer pocket. It reams to .0625″, and also costs $39.99. The standard dimension for Lapua 220 Russian and 6mmBR flash holes is 1.5mm or .0590″. This tool will permit standard-size decapping rods with .0625″ tips to work without binding. However, note that both Forster and Redding normally supply .057″ decapping pins with their PPC and BR dies. So, it is NOT necessary to ream your Lapua BR/PPC flashholes, unless you prefer to do so for uniformity. It IS, however, a good idea to check BR/PPC flash holes for burrs before loading the first time.
NOTE: If you purchase either the 073081 or 073000 Sinclair Flash Hole Reamer tools, we recommend you mic the cutter tip before you process a bunch of cases. Sometimes a tip comes through that is oversize. This will ream the flash holes larger than you may intend.
Do you shoot a popular wildcat (such as the 6mm Dasher), but hate the hassle of fire-forming all your own cartridge brass? That takes time, costs money (in bullets and powder), and consumes precious barrel life. Well there IS a better solution — you can have your new brass hydro-formed to your exact specifications for a reasonable cost.
DJ’s Brass Service now offers custom case hydro-forming to your exact specs. Darrell Jones offers this service for a variety of popular cartridges: 6mm Dasher, 6mm BRX, 6mm BRDX, and 6mm Shehane. After hydro-forming your brass, Darrell can also neck-up or neck-down the cases to meet your needs. For example, if you shoot a 22 Dasher, Darrell can hydro-form the cases and then neck them down to .22 caliber. He can also turn the necks to your specs (for an additional charge).
Darrell is a hydro-forming wizard who has perfected the process over the last couple of years. He has learned a few special techniques along the way to ensure uniform case-forming. Without revealing any trade secrets, we can say the Darrell has very special dies and Darrell doesn’t use a mallet or hammer — he has a system that is much more consistent. Darrell tells us: “Many of my customers take this brass and load it ‘as is’ and go straight to a match and shoot some very nice groups.”
Hydro-forming by Darrell costs $0.60 (sixty cents) per case with a minimum order of $60. Neck-turning is an additional $0.50 (fifty cents) per case plus actual return shipping. The turnaround is usually less than five days.
With Darrell’s hydro-forming service you don’t have to buy any special dies or other equipment. Darrell says: “Simply send me the brass you need or have it dropped-shipped to me along with a fired case that has not been sized. If you need formed brass for a new build (gun not yet fired), let me know and I will size the brass to fit within .001 of a PT&G GO gauge.”
For more information, visit DJsBrass.com, or call Darrell at (205) 461-4680. IMPORTANT: Contact Darrell for shipping instructions BEFORE sending brass for processing. In a hurry, don’t have time? Just call Darrell and he’ll make something work for you.
Hydro-Forming Customer Reports
Here are testimonials from recent customers.
“Recently had Darrell Jones of DJ’s Brass Service hydro-form 6 BRX brass for me. The turn around time was very fast and the brass was to the exact specification I ask for. I actually shot the hydro-formed brass in a match [without further fire-forming]. It shot a 3.597″ — pretty amazing. Let DJ do the work for you!” — Mike Wilson (3 Time IBS Record Holder; 2013 and 2014 1000-yard IBS Shooter of the Year.)
“Darrell Jones of DJ’s Brass Service went far beyond the call of duty, to assist me in preparation to shoot for my first time in an IBS match. I have had an interest in 1000-yard competition for many years and finally got the opportunity to try it. After researching the winning competitors, rifles, and rounds I ordered a Panda action with Krieger barrel in 6mm Dasher from Kelby’s. It was one week before the match and I had a rifle and no rounds. I contacted Darrell to hydraulically form 6mm dasher from Lapua 6mm BR brass. He formed the brass and had it in the mail the next day[.] Since I have only reloaded for hunting or magazine fed rifles I was not familiar with proper seating to allow land engagement of the bullets for 1000-yard accuracy. Darrell took the time to advised me every step of the way to allow me to shoot a 3.158″ (5) shot group to win my first round of my first competitive match ever.” — Mike Youngblood
We have all been there…..you place a piece of tumbled brass in the shell-holder of your press, raise it into the die, and suddenly it is like somebody hit the brakes. The case is stuck in the die. Your first instinct is to reverse it out. You crank on the handle, and BANG! The rim rips off the case head and you are looking at a piece of brass stuck in the die.
A stuck case is one of the boo-boos that all of us reloaders have faced from time to time. If proper lubrication is applied, then it should not be a problem. No matter if you are a seasoned reloader or new to it, this situation can happen. Take your time, use the proper procedures, and you will be back in business in no time! This article explains how to avoid stuck cases (through proper lubrication) and how to use a stuck case removal system.
What Causes Stuck Cases
One of the first common mistakes reloaders face is the stuck case. It can be caused by too much or too little lube. Too much and a vacuum can be formed causing the case to become suctioned into the die. Too little lube and friction is the culprit. So what is the cure? There is no exact cure, but the best lube that we have found so far is just a dab of Imperial Sizing Die Wax on your fingers and applied in a thin coat on the body of the case, not the shoulder or neck. Too much of this wax can cause the vacuum effect, or can eventually load your die up with gobs of residue. If it is applied to the shoulder area, or the leftover wax moves up into the shoulder region of the die, you will see dents or dimples in the shoulder. [AccurateShooter.com Editor’s Note: For normal full-length sizing of small cases such as 220 Russian/PPC, 6mmBR, 6.5 Grendel, or 6.5×47 Lapua we recommend Ballistol (aerosol) lube. It is very slippery, goes on very thin, and does not gum up the die.]
A great way to ensure that your dies are clean is to use a simple chamber mop with a dab of your favorite solvent on it and clean out the die. Be sure all of the solvent is out after cleaning by spraying the die out with Quickscrub III or use a clean chamber mop. If you are storing your dies, you can apply a thin coat of a good oil to protect the steel such as TM oil or Starrett M1 Spray.
Using a Stuck Case Removal Kit
If you do stick a case in your die there are a few good stuck case removal kits available. Each one works in a similar fashion. I have found the Hornady kit very effective and easy to use.
Basically what you do is remove the die from the press. Unscrew the decapping assembly and pull it out as far as you can. You then need to drill/tap threads into the stuck case head (this is why it is suggested to unscrew the decapping assembly as far as you can to get it clear of the drill bits). Once this is done screw the die back into the press. You then install the included shellholder attachment on the shellholder ram, and thread it into the case via a small wrench. With some elbow grease you can reverse the stuck case out of the die with the leverage of the press, and not damage the die.
However if the case is stuck….REALLY stuck, you may pull out the threads on the case and you are still left with a stuck case in the die without any way to pull it out. If the case is really difficult to remove even with the use of a stuck case removal kit, do not try to be Hercules with the press ram. Here is a trick that may work. Take the die with the stuck case and place it in your freezer for a couple of hours. Then repeat the removal with the cold die. The freezing temperatures may cause the brass to contract, and make removal easier. If this does not work it is recommended to send it to the die manufacturer. They will be able to remove the case without damaging the die.
Another fix if you can remove the decapping assembly completely is to use a tap hammer and a punch or small wooden dowel to knock the stuck case out. This isn’t the best way since it is very possible that you will damage the die internally or externally on the threads, or both. Send the die to the manufacturer to have this done properly. You will be happier in the long run.
In this video, Bryan Litz of Applied Ballistics focuses on training. Bryan says that training is key for success in Long Range shooting: “Training in the sense that you want to want to refine your fundamentals of marksmanship — your sight alignment, your trigger control. You should practice those things enough that they become second nature and you don’t have to think about them. Keep in mind, it’s not just good enough to train, you have to learn how to train. You need to learn how to practice effectively, to get the most out of everything you do.”
Bryan says that success in Long Range shooting is not just about the hardware. It’s what’s between your ears that really counts: “The most important element in Long Range shooting is your knowledge — your understanding and practice of fundamentals of marksmanship, as well as your understanding of ballistics. You have to be able to fire the rifle, execute good shots that will put your rounds on target, but you also need to make intelligent sight corrections that will accurately account for the effects of gravity drop, and wind deflection, to center your group on those targets”.
Litz Competition Shooting Tips
Competition TIP ONE. Improving your scores in long range competition is a constant process of self-assessment. After each match, carefully analyze how you lost points and make a plan to improve. Beginning shooters will lose a lot of points to fundamental things like sight alignment and trigger control. Veteran shooters will lose far fewer points to a smaller list of mistakes. At every step along the way, always ask yourself why you’re losing points and address the issues. Sometimes the weak links that you need to work on aren’t your favorite thing to do, and success will take work in these areas as well.
Competition TIP TWO. Select your wind shooting strategy carefully. For beginners and veterans, most points are typically lost to wind. Successful shooters put a lot of thought into their approach to wind shooting. Sometimes it’s best to shoot fast and minimize the changes you’ll have to navigate. Other times it’s best to wait out a condition which may take several minutes. Develop a comfortable rest position so you have an easier time waiting when you should be waiting.
Competition TIP THREE. Actively avoid major train wrecks. Sounds obvious but it happens a lot. Select equipment that is reliable, get comfortable with it and have back-ups for important things. Don’t load on the verge of max pressure, don’t go to an important match with a barrel that’s near shot out, physically check tightness of all important screws prior to shooting each string. Observe what train wrecks you and others experience, and put measures in place to avoid them.
This article originally appeared in the Rifleman’s Journal website.
Many of you have doubtlessly read Bryan Litz’s articles in our Daily Bulletin and on his Applied Ballistics website about various current long-range bullets. Bryan’s work carries a great deal of weight in the world of ballistics, so his comments (and mathematical proofs) regarding the benefits of bullet pointing certainly caught my attention. Bullet pointing, like meplat trimming, is an effort to reduce the ballistic inconsistency created by the somewhat jagged tip of the jacket where the bullet forming dies bring it to a point in the manufacturing process. Of course, we could eliminate this problem altogether by shooting closed-tip, open-base bullets like the Lapua D46, but that merely shifts the jacket problem to the other end of the bullet.
In any event, hollow point bullets rule the accuracy world today, so John Whidden, multi-time National Long Range Champion and a talented gunsmith to boot, came up with a very handy tool to let us make those hollow points pointier. Let’s have a look at John’s tool and see how it works.
The Whidden Bullet Pointing Die System uses a Forster bullet seating die body as its basic structure and that’s a good choice given the quality machining Forster does on these. The real heart of the tool comes in two parts: the caliber sleeve and the pointing die that fits inside the sleeve. In fact, to point up different caliber bullets, you only need to change the caliber sleeve, everything else remains the same. The last item is the bullet base that slips into a standard .308 shellholder and supports the bullet as it goes into the die body.
It took me less than five minutes to get everything set up, including changing the caliber sleeve from 6mm to .30 caliber. John’s instruction sheets are well illustrated and clearly written; you should have no problem getting up and running.
Pointing the bullets is as easy as sizing a piece of brass. You can see in the second photo above the difference between a few pointed bullets and a few un-pointed ones. The innermost pointed bullet in the picture was my first attempt and I adjusted the die a little after that, you can see that the others are closed a little more. John even includes a couple of sample bullets so that you can see one done right and one done wrong. That is a nice addition that can help you achieve the desired results.
This YouTube Video Shows the Whidden Bullet Pointing Die in Action
I think Bryan’s work supports the validity of this concept and John’s tool puts it into practice in a simple-to-use manner that makes it just about impossible to do any damage to the bullet. I have shot pointed bullets in various calibers at many matches now. Pointing is not a “miracle cure”, but I believe that pointing bullet tips can produce long-range accuracy gains, through reduced vertical dispersion, for many popular types of match bullets. The Whidden Bullet Pointing Die System retails for $220.00 (with one insert). Additional die inserts are $42.00 each. Extra caliber sleeves are also $42.00. You can purchase directly from Whidden Gunworks, or from Sinclair International.
In recent months, Creedmoor Sports has expanded its selection of reloading tools and gear, under the guidance of Bill Gravatt, former President of Sinclair International. And Creedmoor recently launched the Creedmoor InfoZone, an online source for Shooting News, Reloading Tips, Gear Reviews and basic gunsmithing information. Visit CreedmoorInfoZone.com.
Bill Gravatt is an expert on reloading processes and gear. He developed many of the popular tools marketed by Sinclair Int’l, and now he’s lending that expertise to Creedmoor Sports. Bill is hosting a series of “how-to” videos produced for the Creedmoor InfoZone.
Here Creedmoor’s Bill Gravatt demonstrates several methods to clean your cases. Bill tells us: “Powder residue should be removed before you insert your cases into your reloading dies. There are several ways to clean your cases. Many shooters use a combination of various methods…”
1. Manual Cleaning — You can use 0000 Steel wool for the outside of the case and a Case Neck brush for the inside. A paper towel can remove any remaining residue. This is a handy way to clean if you load at the range.
2. Vibratory Tumbling — This traditional method works well, particularly for pistol brass. Experiment with both Corn Cob and Walnut media. You can get a brighter shine by putting a small amount of liquid brass polish in the media.
3. Wet Tumbling with Stainless Media — This process can get your brass clean inside and out. Do check to ensure no pins are stuck in the flash-holes. Watch for peening of case mouths that can occur over time.
4. Ultrasonic Cleaning — Ultrasonic cleaning works great for small parts as well as brass. The ultrasonic process removes all carbon and traces of lube, which can leave the inside of case necks too dry. To smooth bullet seating, try putting a tablespoon of Ballistol in the cleaning solution.
Cleaning Reloading Dies
Cleaning your reloading dies is something that many hand-loaders neglect. In this 60-second Tech Tip, Bill Gravatt provides some smart advice on cleaning your dies. Bill notes: “After heavy use, case lube and carbon can build up in your reloading dies. It’s important to keep them clean. Also, with new dies, give them a good cleaning before first use, because they ship with a corrosion inhibitor.”
1. Step 1 — Prior to cleaning, disassemble the die and spray it with a good degreaser. Do this with brand new dies too.
2. Step 2 – Take a patch and run it in the die to remove old lube and gunk. Don’t forget the decapping assembly and other internal parts.
3. Step 3 — After cleaning the die, but before reassembly, spray the die with a good corrosion inhibitor, such as Corrosion-X or Starrett M1.
Well folks, it’s July 1st already — the means we’re moving into “peak heat” summer conditions. It’s vitally important to keep your ammo at “normal” temps during the hot summer months. Even if you use “temp-insensitive” powders, studies suggest that pressures can still rise dramatically when the entire cartridge gets hot, possibly because of primer heating. It’s smart to keep your loaded ammo in an insulated storage unit, possibly with a Blue Ice Cool Pak if you expect it to get quite hot. Don’t leave your ammo in the car or truck — temps can exceed 140° in a vehicle parked in the sun.
To learn more about how ambient temperature (and primer choice) affect pressures (and hence velocities) you should read the article Pressure Factors: How Temperature, Powder, and Primer Affect Pressure by Denton Bramwell. In that article, the author uses a pressure trace instrument to analyze how temperature affects ammo performance. Bramwell’s tests yielded some fascinating results.
For example, barrel temperature was a key factor: “Both barrel temperature and powder temperature are important variables, and they are not the same variable. If you fail to take barrel temperature into account while doing pressure testing, your test results will be very significantly affected. The effect of barrel temperature is around 204 PSI per F° for the Varget load. If you’re not controlling barrel temperature, you about as well might not bother controlling powder temperature, either. In the cases investigated, barrel temperature is a much stronger variable than powder temperature.”
Powder Heat Sensitivity Comparison Test
Cal Zant of the Precision Rifle Blog has published a fascinating temp-stability comparison test of four powders: Hodgdon H4350, Hodgdon Varget, IMR 4451, and IMR 4166. The first two are Hodgdon Extreme powders, while the latter two are part of IMR’s new Enduron line of propellants.
The testers measured the velocity of the powders over a wide temperature range, from 25° F to 140° F. Hodgdon H4350 proved to be the most temp stable of the four powders tested.


 The Risk of Hearing Loss




 A stuck case is one of the boo-boos that all of us reloaders have faced from time to time. If proper lubrication is applied, then it should not be a problem. No matter if you are a seasoned reloader or new to it, this situation can happen. Take your time, use the proper procedures, and you will be back in business in no time! This article explains how to avoid stuck cases (through proper lubrication) and how to use a stuck case removal system.


 To learn more about how ambient temperature (and primer choice) affect pressures (and hence velocities) you should read the article