Monitor Barrel Heat with Pocket Infrared Gauges
You never want to run the barrel of a precision rifle too hot. Excessive barrel heat kills accuracy, increases copper fouling, and can cause rapid barrel throat wear. Over the years people have devised various means to cool their barrels — from electric fans to dunking in tubs of ice water.
But how do you know if your barrel is too hot? Consider a “non-contact” thermometer that reads your barrel’s “infrared signature”. The RadioShack or Kintrex pocket-sized, non-contact IR thermometers are ideal for shooters at the range or in the prairie dog fields. Both are handy and inexpensive — costing roughly twenty-five bucks ($25.00) for each device.
Pen-Sized Thermometers
Just 3.2″ long, and weighing a mere 1.3 ounces, the waterproof RadioShack and Kintrex thermometers are small enough to carry in your pocket, and will easily stow in any range bag/box. The Kintrex unit measures from -67 to 428 °F (-55 to 220 °C), while the cheaper RadioShack model measures from -27 to 230º F (-33º to 110º C). Kintrex is a respected manufacturer that also makes larger hand-held IR thermometers for industrial and shop applications. A little infrared thermometer like this is a gadget that every serious shooter should have. Given the cost of replacing barrels these days, can you afford NOT to have a temp gauge for your match or varmint barrel?
TECH TIP — How to Get More Consistent Readings
When using IR Thermometers on shiny steel barrels, sometimes the polished surface throws off the beam, causing inconsistent readings. You can solve this problem by simply putting a piece of masking tape on the area where you take your reading. Some other folks use a grease pencil to create a non-reflective spot to read. Forum Member Jon B. says: “I used an Exergen infrared in the HVAC industry. Without the grease crayon they sold, you couldn’t get an accurate reading with shiny metals.”
Jonathan Ocab, a High Power shooter from California, had gunsmith Doan Trevor install a Sako-style extractor in the Rem 700 bolt in Ocab’s 6mmBR Eliseo R5 tubegun. Jonathan produced an excellent video showing how the Sako extractor improves the ejection of the short, fat 6mmBR cartridges in his rifle. Jonathan’s video demonstrates 6mmBR case ejection with an unmodified Rem 700 factory bolt versus a factory bolt fitted with a Sako-style extractor.
Johnathan explains: “Note how even when slowly operating the bolt, the bolt with the Sako extractor easily ‘kicks’ out the brass on ejection with minimal chance of operator error resulting in a failure to extract. While the unmodified bolt has issues ejecting brass on slow operation, it will eject if the operator pulls the bolt back quickly (fast and with some force).
While a Sako-style extractor isn’t an absolute necessity, this video shows the definite improvement this modification provides. For short cartridges like the 6mmBR, this is very useful. This modification is highly recommended for competition shooters, especially High Power competitors who seek improved function in rapid-fire stages. This modification is fairly inexpensive and any competent gunsmith should be able to perform the work (usually under $100 with parts and labor).”
EDITOR’s NOTE: In his video, Jonathan deliberately worked the unmodified Remington bolt slowly to show how the standard Rem extractor can struggle with short fat cases like the 6mmBR. In fact, when you work a standard, unmodified bolt more quickly, the extraction can be much more positive. Cycling the bolt with more “snap” provides more energy to eject the cases. We have run an R5 Tubegun chambered in 6mmBR with an unmodified Rem 700 bolt (no SAKO extractor), and the extraction was reliable, provided the bolt was worked quickly.
As you read this, your Editor is NOT sitting at a keyboard writing fun new stories for you. Instead, I will be strapped to an operating table getting a chunk of my face removed. This will be my fourth Mohs skin cancer surgery in two years. It ain’t fun. The last Mohs micrographic procedure left me with a 3.5″ scar on my face.
I hope this story shakes you guys up a little. I want every guy reading this to get serious about sun exposure. Those UV rays can be deadly…
SKIN CANCER Statistics
More than 3.5 million cases of skin cancer are diagnosed annually in the USA, making skin cancer America’s most common form of cancer. One in five Americans will develop skin cancer at some point in their lives. Globally, skin cancer will kill 80,000+ people this year.
This is a message to my friends in the shooting community — be careful with your skin. I wasn’t careful enough and now I have skin cancers. When the Doctor says the “C” word, trust me, it’s a scary thing. I have band-aids on my cheek and my chest in the photo above (from two years ago) after being diagnosed with multiple basal cell carcinomas (the band-aids cover biopsy sites).
So far I’ve had one basal removed on my face, one on my arm, and another on my ear. Today I will have another basal cancer removed from my face. At least they are just basal cell cancers. The worst kind of skin cancers, melanomas, can be fatal if not detected very early.
An Ounce of Prevention — How to Protect Your Skin
Fellow shooters, my message to you is: Protect your skin… and see a dermatologist regularly. If you are over 40 and have spent a lot of time outdoors, I suggest you see a skin doctor every year.
As gun guys (and gals) we spend a lot of time outdoors, much of it in bright sunlight. When working and playing outdoors, you should always try to minimize the risk of skin damage and possible skin cancers. Here are some practical tips:
1. Wear effective sunscreen. Get the kind that still works even if you sweat.
2. Wear a wide-brimmed hat and quality sunglasses with side protection.
3. Protect your arms and neck. It’s smart to wear long-sleeve shirts with high collars. There are “breathable” fabrics that still offer good sun protection.
4. Stay in the shade when you can. Direct sunlight is more damaging to your skin.
5. When testing loads or practicing you can make your own shade with an umbrella fixed to a tripod or scope stand. This has the added benefit of keeping you (and your ammo) cool.
6. Do a “field survey” of your skin every few weeks. Have your spouse or “significant other” inspect your back and the backside of your legs.
What to Look For — How to Spot Possible Skin Cancers
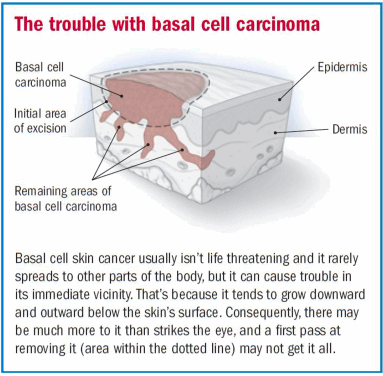
Here is an illustration that shows various types of skin cancers. But understand that an early basal cell carcinoma can be much, more subtle — it may just look like a small, pale pink spot. Also, if you have a scab that flakes off and re-appears, that might be a cancer. In the case of the first basal cell cancer on my face, I initially thought it was just a shaving abrasion. The skin was just slightly pinkish, with a little scab that would form and come back. But after a couple months, it never got any better. That’s what prompted me to see the doctor. And I’m glad I did….
We created this custom target in 5 minutes using PrintTargets.net. If you like it, DOWNLOAD HERE.
AccurateShooter.com has a HUGE collection of FREE downloadable PDF targets. We offer a very wide range of target designs: Load Development Grids, NRA Bullseye targets, Official-Size BR targets, Realistic Varmint Targets, Silhouette Shapes, Fun Plinking Targets, and even specialized tactical training targets. If our collection of free targets isn’t enough, or if you want to create a new kind of target — you’re in luck. There’s an Australian-based interactive website, PrintTargets.net, that allows you to create your own customized, printable PDF targets. Shown below are just a few of the target designs you can create in minutes:
Just follow the step-by-step instructions to set paper size, layout, bullseye color, line thickness, number of rings and diameter. You can even add Score Numbers to your target rings. PrintTargets.net is easy and fun to use. It’s much faster to create targets this way than to try to draw a series of circles with PowerPoint or MS Paint.
Power-User Tip: PrintTargets.net even offers a handy diamond-grid calibration diagram that you can add to your custom target designs. You’ll find the calibration grid as option #15 when you design your target — just scroll all the way down the PrintTargets.com home page.
Here’s a new product we like — Creedmoor’s extra-long, fitted Cleaning Rod Guides (aka Bore Guides) that offer a port for adding solvent. We like the distinctive bright orange color. That helps you quickly identify your rifle on crowded cleaning bench.
Why a Rod Guide Is Needed for Proper Bore Cleaning
A good Cleaning Rod Guide ensures that your brushes and jags are centered in your bore, so you don’t get uneven wear in your throat. Moreover the guides protect the action raceways, blocking liquids and debris from entering the trigger group. The port helps you add solvent without making a mess or spilling on a fine stock finish.
The orange Creedmoor Cleaning Rod Guides have some nice features. They are long enough so that you can avoid removing larger optics and include a port to apply solvent. The O-ring at the front provides an additional seal for the chamber. These Rod Guides are designed for specific action types and chamberings for proper alignment. Creedmoor’s Bore guides cost $24.95. That’s quite a bit less than some other vendors’ fitted cleaning rod guides. Current offering are:
TIP: When using any cleaning rod guide, you should cover the rear of the stock with a towel to prevent any solvent from touching the stock. Solvents can harm find wood, painted, and hydro-dipped finishes.
Wipe-Out foam bore cleaner is a product we’ve used with great success on many rifles. With sufficient dwell time, it removes both carbon and copper fouling. You can combine it with Wipe-Out Accelerator or Patch-Out liquid to speed up cleaning time. Many shooters, including this editor, find that bore-brushing has been virtually eliminated with the regular use of Wipe-Out. (With some barrels however, you may still have to brush or use a bore paste if you notice stubborn carbon build-up in the throat area.)
Method One: Apply Through Muzzle
Out standard procedure with Wipe-Out is to insert an O-ring-sealed cleaning rod guide into the chamber and then squirt through the muzzle in short puffs. Put a towel or rag on the comb of your stock and watch for a little bit of foam to exit the rod guide. We usually wait 30 minutes for the bubbles to dissipate, then do a second foam application. Be sure to clean off any excess foam before it drips on your stock. It is important to keep the foam off fine wood or paint finishes.
Our actual routine normally starts with 3-4 wet patches with Carb-Out (to get the loose black stuff out), followed by the two foam cycles as explained above. Then we plug both ends of the barrel, drive home from the range and dry-patch out on arrival at the house. If the gun is going to be used again soon, that’s all we do. If there will be long-term storage we’ll run some Eezox down the bore.
Method Two: Apply Wipe-Out from Breech
You can also apply Wipe-Out from the breech. To allow breech-first application, Wipe-Out cans now come with a short plastic tube and a plastic tip that fits in your chamber. These can also be purchased separately for $2.50. However, we’ve found the plastic tip is too big for some chambers and it is not always easy to get a good, secure seal even if it does fit. Jason Baney has come up with a solution. READ Jason’s Wipe-Out Article.
Use Fitted Tubing for Breech-First Applications of Wipe-Out
You can apply Wipe-Out through the breech very effectively if you use fitted, plastic tubing. While this works well for bolt-actions, breech application is particularly handy for the Garand, M1A and other semi-autos. Jason Baney has written a short article describing this process. In a nutshell, you need one piece of tubing that fits the chamber tightly and then connects with a second, smaller diameter tube that attaches to the Wipe-Out can. This avoids any “over-spray” of foam in the action area, providing a clean, simple solution. Just squirt for a second or so, and wait for white foam to come out of the muzzle. Be sure to keep Wipe-Out off fine wood stocks.
Small patches are not very efficient at distributing bore cleaning liquids inside your bore. The problem with a tight-fitting patch is that the solvent gets squeezed off in the first few inches. You can switch to a smaller jag, or a bore mop, but there is an even better way to get an ample amount of solvent in your bore. Just spray directly into the bore with a wash bottle, an inexpensive plastic bottle with an L-shaped dispensing neck, tapered at the end.
When using the wash bottle, you can either just plug the breech and spray from the muzzle end (where most copper fouling is), or, alternately, put the wash bottle neck directly in the chamber and spray forward. When spraying from the chamber forward, you may need to use a rubber O-Ring to seal off the action… depending on the bore size and the particular wash bottle’s neck spout diameter. We prefer to plug the breech ans squirt from the muzzle.
Bottle Solvent Application Great for Smaller Bores
Using wet patches or wet brushes is an inefficient way to really saturate the tight bores of 17s, 20s, and 22s. Even with a cotton bore mop, most of the solvent will be squeezed out before it gets to the end of the bore, where most copper fouling occurs. For these smaller 17, 20, and 22-caliber bores, you can just take the wash bottle and stick the tapered nozzle right in the chamber. The tapered end will press fit in the throat, sealing off the chamber. With the barrel slightly nose-down, give the bottle a couple good squirts until the solvent mists out the muzzle. In just a few seconds, this will put more solvent in the bore than a half-dozen wet patches.
A solvent-filled wash bottle is also handy for wetting your brushes. It’s much easier to saturate a bore brush (without spilling solvent on your stock), by using the wash bottle. You can get wash bottles from USPlastic.com, Amazon.com, or lab supply stores.
Those of us over-50 types can use some help when shooting iron sights. As one gets older, your eyes lose the ability to rapidly adjust to different points of focus. In practice, when shooting a rifle, this means the target image may be sharp but the sights are blurry, or vice-versa. Or you may be able to see the target and front sight reasonably well, but the rear sight is a complete blur. (That is this Editor’s problem when shooting a rifle, such as a Swedish Mauser, with a notched blade rear sight.) Even if you are using a rear peep sight, you may see a blurry rear circle (or two circles if you have astigmatism). Placing a diopter sight (sighting disc) on your shooting glasses can help many people see open sights better, when shooting both handguns and rifles.
Merit Corp. in Schenectady, NY, offers an adjustable optical disc that attaches to shooting glasses with a rubber cup. Though primarily intended for pistol shooters, the Merit optical attachment can also be helpful when shooting rifles with open sights, such as military bolt actions. Priced at $65.00, the Merit device features a shutter-style, adjustable aperture iris.
Merit explains: “The human eye, whether or not prescription glasses are required, cannot focus on both sights and the target at the same time. The eye will constantly shift focus from the sights to the target trying to ensure proper alignment. Unfortunately, as we age, the eye loses the flexibility which allows it to do this; thus, sights and target begin to grow fuzzy. There is a simple way to combat this by increasing your eyes’ depth of field (range of focus). If you look through an aperture or pinhole of the correct size, you will be able to see both sights clearly, and the target will be clearly defined as well.”
In addition to optical attachments for eyeglasses, Merit produces a variety of adjustable iris sight products for rifles, including the Variable Iris Aperature for AR15s. Visit MeritCorporation.com or call (518) 346-1420.
What can happen when the bottom-most primer in a primer feed tube goes off? A big bang, that’s what. Some or all of the primers in the vertical feeding tube can go off in a chain detonation. That’s exactly what happened to Dustin Ellermann, Top Shot Season 3 Champion. Scary experience, but thankfully Dustin was not injured. He writes: “Super thankful that I was wearing my Wiley X eye protection this weekend when I was reloading some .223 rounds. My press detonated nearly 100 small rifle primers. Shown here is the magazine feed tube. Not fun but it could have been much worse. Stay safe!”
When working with progressive reloading presses, you should definitely wear eye protection. Dustin’s chain detonation experience proves that — without a doubt. Remember you only have one set of eyes!
RCBS APS Strips — Alternative to Primer Tubes When you stack a column of primers in a single metal tube, you’re asking for trouble. As Dustin Ellermann learned, when one primer fires, the entire column can follow suit in a chain detonation. Thankfully, you do have options when it comes to primer feeding on a progressive press. RCBS developed an innovative primer system for its Pro-2000 progressive press. Instead of being stored in a vertical tube, primers are placed in flat, plastic “APS” strips, with a ring of plastic separating each primer. Moving horizontally, primers are never stacked, so the chance of a chain detonation is reduced dramatically. The re-usable APS strips are color-coded for different primer types. You can buy CCI “pre-loaded” primer strips, or you can insert any brand of primers into strips using an RCBS strip-loader tool.
RCBS Pro-2000 with APS Strip Priming System
AccurateShooter.com Editor Uses Strip Primers
This Editor owns an RCBS Pro-2000 progressive press. The RCBS strip-priming system was one key reason I selected the RCBS Pro-2000 over similar-priced progressives from Dillon and Hornady. I believe the strip primer system is safer, more positive, and easier to use. Before I purchased my RCBS progressive, I “road-tested” the competition. I loaded hundreds of rounds on each of four different progressives: Dillon 550B, Dillon 650, Hornady Lock-N-Load, and RCBS 2000. I was concerned about the primer feed tubes on the Dillons, and I found the RCBS rotary powder measure was much more precise (and easier to adjust) than the sliding bar system on the Dillon machines. The RCBS priming system was definitely more fool-proof than the system on the Hornady press (a first-generation L-N-L that had issues with primer feeding). After “test-driving” blue, red, and green brand progressives extensively, I settled on the RCBS Pro-2000. A decade later, I still think I made the right choice. I like the APS strips for big jobs, and I can also use them in the RCBS hand-priming tool (shown below). With the strips, it’s easy to prime 20 or 40 cases at a time, and then switch to another type of primer for comparison testing.
The APS priming system also works with press-mounted priming tool, bench-mounted tool, and APS hand-tool. EdLongRange uses the press-mounted tool: “I also like the APS approach but use the press-mounted unit (saves your hands/wrists — and I haven’t had a need for a progressive press in over 20 years). Loading the primers in the strips is a bit of a PITA but very manageable. As with all tools there is a learning curve.” CLICK HERE for video showing strip-loading tool and press-mounted APS tool. The press-mounted tool is no longer in production, but you can still BUY IT HERE.
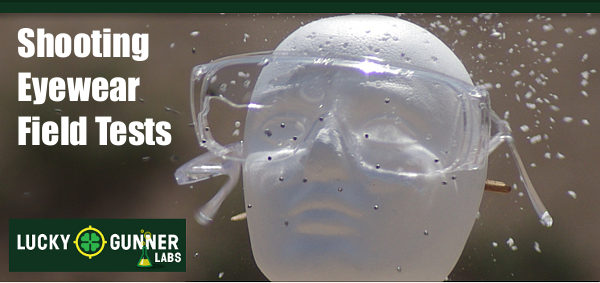
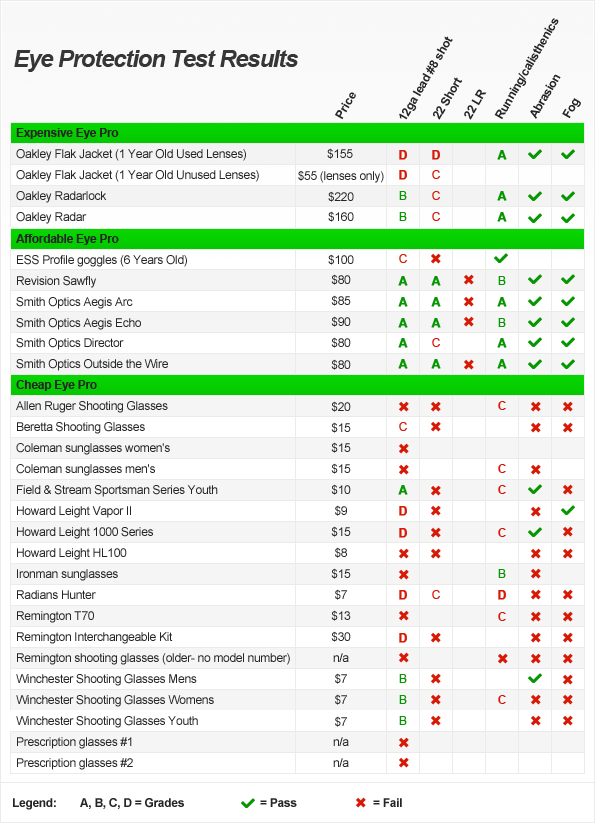
If you’re one of those folks who doesn’t wear eye protection, you need to check out the LuckyGunner Labs Eye Protection Test. For those who DO wear safety glasses — don’t assume that everything is OK. Just because you purchased name-brand “safety glasses” doesn’t mean that you are getting truly effective protection. In fact, many forms of protective eyewear sold today are flimsy, or poorly made. Consequently, they won’t stop even low-energy, slow-velocity fragments.
Two years ago, LuckyGunner Labs conducted very extensive field tests of 28 types of eyewear, ranging in price from $7 to $220. Remarkably, some of the most expensive safety eyewear performed no better than $10 items. Many of the products failed shockingly — with the lenses coming right out of the frames when hit with pellets. LuckyGunner recorded these kind of failures even with ANSI Z87-“approved” eyewear. The reason is that the Z87 test is not tough enough: “The basic ANSI standard is referred to as Z87, and you’ll see this marked in a number of locations on most eye protection marketed to shooters. However, the Z87 impact standard involves a .25″ steel ball traveling at 150 fps — this is fine for protecting eyes from debris that might fall or be thrown, but is not extremely relevant to shooters, who are dealing with objects traveling at much higher velocities.”
Standard
Impact speed
Caliber/Size
ANSI Z87.1-2003
High Velocity
150 feet/second
45 meters/second
0.25″ diameter steel ball
(25 caliber)
Mil-PRF-31013
Vo ballistic test
640-660 feet/second
195 meters/second
0.15 inch diameter steel projectile (15 caliber)
The testers recommend you select eyewear that meets military specification (above and beyond ANSI Z87). The MIL-PRF-31013 Standard covers projectiles up to 650 feet per second. This is much more stringent. Additionally, you want to replace often-used protective eyewear every year or so. Long-term exposure to UV radiation can weaken polycarbonate and lessen its ability to withstand impacts.
SUMMARY — What to Look for in Protective Eyewear
THE GOOD — Eyewear Protects Against Direct Hit with .22 Short Bullet
APEL Revision Sawfly eyewear was shot with a .22 Short, pushing a 29 grain bullet at 710 fps. That’s not powerful by modern firearm standards, but this might be fairly representative of a ricochet bullet fragment. The Sawfly lens stopped this 29gr bullet with minimal damage to the cheek area.
THE BAD — Remington Eyewear Lenses Separate. Right Lens Enters Eye Socket
The most gruesome example was the cheap Remington eyewear which shed both lenses back towards the eyes, one of which embedded itself into the eye socket. The real-world implications of this action are disturbing to say the least.
THE UGLY — Prescription Glasses Failed Miserably
Many ranges don’t see any need for protective eyewear beyond prescription glasses. However, most prescription lenses offer little if any protection. If the prescription lenses are glass, this can create more problems. As shown below, these prescription glasses offered no ballistic protection, and, in fact, proved more dangerous to the eyes due to the flying glass shards.
Results Chart, Video Clips, and Photos copyrightLuckygunner.com.
Summary and Conclusions:
For faster-moving projectiles such as ricochet fragments, you need high quality, tested eye protection. LuckyGunner recommends eyewear with a single (one-piece) lens for any activity where your face might be struck by small, fast-moving objects. Individual lenses detach from the frames once a certain level of force is reached, and they are driven back into the eye sockets, where considerable damage may be done. There are good examples of protective eyewear with two separate lenses, but a broad, one-piece lens distributes force much better.
A wide, comfortable, and preferably soft rubber nosepiece is critical. Along with good “arms”, this will serve to keep the eye protection in place and will also reduce the chances of the lens being driven down or back into the face with enough force to damage the orbital bones.
A frame that connects across the top of the lens, not individual arms which attach to the outside corners of the lens, is recommended. This will reduce the chances of the lens detaching from the frame under impact (it’s still possible, just less likely). Some types of eye protection actually use the frame to absorb impact and distribute force.
NOTE: Andrew, the author of the LuckyGunner Eyewear report, was a former Navy Corpsman. Accordingly, he is familiar with health and safety matters.


 This is a message to my friends in the shooting community — be careful with your skin. I wasn’t careful enough and now I have skin cancers. When the Doctor says the “C” word, trust me, it’s a scary thing. I have band-aids on my cheek and my chest in the photo above (from two years ago) after being diagnosed with multiple basal cell carcinomas (the band-aids cover biopsy sites).


 Method Two: Apply Wipe-Out from Breech


 Merit Corp. in Schenectady, NY, offers an
  Merit explains: “The human eye, whether or not prescription glasses are required, cannot focus on both sights and the target at the same time. The eye will constantly shift focus from the sights to the target trying to ensure proper alignment. Unfortunately, as we age, the eye loses the flexibility which allows it to do this; thus, sights and target begin to grow fuzzy. There is a simple way to combat this by increasing your eyes’ depth of field (range of focus). If you look through an aperture or pinhole of the correct size, you will be able to see both sights clearly, and the target will be clearly defined as well.”
 When you stack a column of primers in a single metal tube, you’re asking for trouble. As Dustin Ellermann learned, when one primer fires, the entire column can follow suit in a chain detonation. Thankfully, you do have options when it comes to primer feeding on a progressive press. RCBS developed an innovative primer system for its Pro-2000 progressive press. Instead of being stored in a vertical tube, primers are placed in flat, plastic “APS” strips, with a ring of plastic separating each primer. Moving horizontally, primers are never stacked, so the chance of a chain detonation is reduced dramatically. The re-usable APS strips are color-coded for different primer types. You can buy CCI “pre-loaded” primer strips, or you can insert any brand of primers into strips using an RCBS strip-loader tool.