Can sustained rapid-fire shooting with no cool-down period wear out a quality barrel more quickly? The answer is “Yes” according to Forum member LCazador, who did an interesting comparison test with two .243 Winchester barrels. He started off with two, identical, match-grade HV taper stainless barrels. Both were NEW at the start of testing, and LCazador shot the same load through each: 95gr match bullets with 38 grains of Hodgdon Varget. After giving both barrels the same, gentle 20-round break-in, 300 rounds were then fired through each barrel — in very different ways. Barrel condition and wear were monitored with a borescope.
Barrel One — Slow Fire, Cool Down Periods, Cleaning Every 50 Rounds
At the end of the 300-round test, Barrel One looked brand new. There was none of the severe fire cracking found in Barrel Two. This barrel was shot no more than 10 times without a cool down and firing was done at a much slower pace. Cleaning for this barrel was done every 50 shots.
Barrel Two — Fast Firing, No Waiting, Cleaning Every 100 Rounds
The second barrel, which received hard use and minimal cleaning, was severely damaged with severe fire cracking at the leade and throat. As a result, the barrel had to be re-chambered. This barrel was shot 100 rounds at time without cleaning and was shot up to 20 times in succession without a cool down.
LESSON LEARNED — Heat Kills Barrel Life
Don’t let your barrel get too hot, and keep it clean. One afternoon can ruin a barrel!
Monitoring Barrel Wear with Borescope
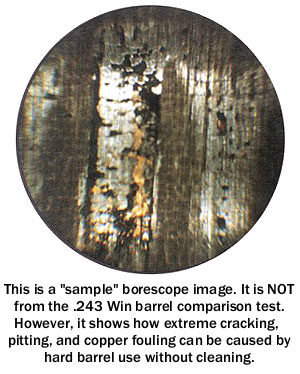
Some folks worry too much about what their borescopes reveal — many barrels do not have to be “squeaky clean” to perform well. In fact some barrels run better after ten or more fouling shots. However, a borescope can be very helpful when your barrel starts losing accuracy for no apparent reason. Forum member FdShuster writes:
“A borescope is a positive way of backing up your suspicions when the rifle starts to throw an occasional (soon followed by more frequent) wild shot. Using the scope is also an excellent way to determine that the cause is barrel wear and not simply a need for a concentrated cleaning session to remove built up copper and more importantly, carbon fouling.
I’ve had a few barrels that gave every indication of being shot out. But I ‘scoped them out and found the cause to be nothing more than requiring a good cleaning. They then returned to their usual performance. There’s no guessing involved when you are able to get ‘up close and personal’ using the scope. The borescope also provides an excellent view of the all-important condition of the crown. My borescope is one of the most valuable investments I’ve ever made.”
Some custom barrel makers are now honing barrels (after drilling) to improve bore diameter uniformity, smooth the interior finish, and reduce barrel lapping times. For years, large-scale manufacturers of hammer-forged barrels have employed honing. Now the process is being used by smaller, “boutique” barrel-makers. This article explains how and why barrel honing is done. Take the time to watch the video. For anyone with an interest in barrel-making, this video is an eye-opener…
Barrel Honing Process Demonstrated (Worth Watching!):
For custom barrel makers, honing is a time-saver and cost cutter. A few minutes on a honing machine can cut lapping times in half, leaving a cross-hatched surface finish in single or low double-digit Ra. Honing is the same process used to make diesel fuel injectors with bore roundness and straightness controlled to fractions of a micron (<0.000040″), with surface finish Ra ≤0.15 µm (6 µin).
A key manufacturing process used for hammer-forged barrels is now getting attention from the makers of custom button-rifled barrels. This process is precision bore-honing. Honing produces a high-quality bore surface fast, which is critical to hammer forging. (Why is honing so important with hammer forging? Surface finish is the one feature of the barrel that cannot be controlled in hammer forging. Surface imperfections in a barrel blank tend to be amplified as the blank is formed on the rifling mandrel. And if the bore is chromed afterwards, imperfections in the surface finish become even more obvious.)
Honing dramatically improves bore diameter size uniformity and accuracy, surface finish and roundness throughout the length of the barrel. It can certainly be used in place of a pre-rifling lap. The chief difference between a lapped and honed bore is the direction of the finish lines in the bore. Honing leaves fine spiraling crosshatch lines, while a lap leaves lines going longitudinally in the bore. After rifling the manufacturer can remove the crosshatch finish with a quick lap if desired. Honing is fast, accurate, and can be automated. Its surface quality and geometry can duplicate lapping, except for the longitudinal lines of the lapped finish.
Frank Green of Bartlein Barrels told us: “We worked with Sunnen and we did all the initial testing on the prototype machine for them. The machine works great! We ordered and received last year a new manufactured machine with the changes we wanted on it and we just ordered a second one a month or so ago. Should be here next month.”
We first ran this story a couple years back. We’re republishing it today as a reminder to our readers that safety should be their paramount concern at the range. Avoid distractions and always check your barrel for obstructions before you chamber a round or pull the trigger. A moment of inattention can result in a catastrophic kaboom …
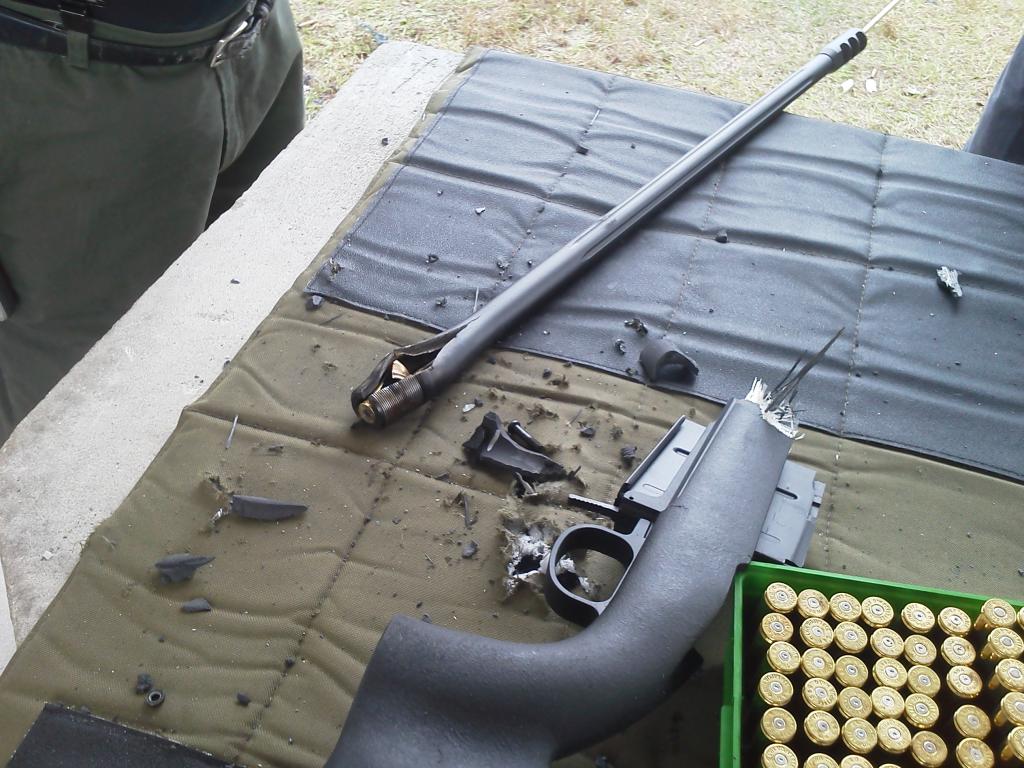
Discharging a .338 Lapua Magnum round with a cleaning rod in the barrel — that’s a recipe for disaster. What happens when a fired .338 caliber bullet and a cleaning rod try to occupy the same place at the same time? Well you get a catastrophic kaboom, with metal pieces flying all over the place, and a shooter very lucky to escape without serious injury. This incident occurred recently in Manatee, Florida, as reported by Sniper’s Hide member Queequeg. We thank SnipersHide.com for granting permission to publish these revealing images in the Daily Bulletin. CLICK HERE for more Kaboom info on the ‘Hide.
This story should serve as a chilling reminder to follow proper safety practices whenever you are at the range. Always check to make sure there is no obstruction in the bore BEFORE loading a live round.
.338 Lapua Magnum + Cleaning Rod + Inattention = Kaboom!
Kaboom at Manatee!
Sniper’s Hide member Queequeg recently published shocking photos of a catastrophic kaboom involving a .338 Lapua Magnum (Savage action). The action was blown off the rifle, shrapnel went through the roof, and the barrel split at the tenon before taking an excursion downrange. The action did crack in the front but the lugs remained engaged so the bolt did not slam to the rear (luckily for the shooter).
Here’s the report: “This happened [January 20, 2014] at the Manatee Gun and Archery Club. Al, Ren and myself were there with a couple other folks. Ren was at bench 12, I was at 13. The fellow at 11 was running a Savage .338 Lapua. He had a very bad day! He damn sure could have killed himself and quite likely Ren as well.”
Queeqeg added: “After the boom, I heard Ren ask ‘Are you alright’ and then turned to look in time to see the fellow reacting in total shock — literally stunned. Ren and I went over to him and could not see any major injuries. Ren was uninjured as well but had a lot of fiberglass splinters on him. The barrel nut is what I presume punched the two holes in the roof. The shooter is a regular there[.] He had been having a problem with sticky cases though he said he was certain the loads were mild. That’s why he was content to knock the sticky ones out with the rod. He simply forgot to remove the rod after knocking out the last stuck case. You can see what happened next.”
To learn more about this incident, go to the original Snipers Hide Forum Thread. There you’ll find more details and over four pages of related discussions.
The Important Lesson Here
What did the .338 LM shooter do wrong here? You will say — “Well that’s obvious, he left a cleaning rod in the barrel and then shot a round.” Yes, that was a potentially fatal error. But that was his second mistake — one that occurred only because he made a more fundamental judgment error first.
The FIRST mistake was not acknowledging the problem with his ammo. Had he heeded the warning signs, he would still have a rifle (and an unsoiled pair of trousers). When he first observed that he was having problems with extracting cases, a warning light should have gone off in his head. Presuming his extractor was not broken (and that the chamber was cut properly) he should have been able to extract his brass if he was running safe loads. The lesson here we all need to learn is that if you observe a serious ammo-related issue, it is time to stop shooting. Don’t try to invent work-arounds just to extend your range session, when there are clear signs that something is wrong, very wrong.
How good is .22 LR rimfire ammo you just bought? Well, until now, you had to just cross your fingers and do your own testing (unless you could make the journey to the Eley or Lapua test centers). Now that’s changed. In a matter of seconds, you can access tons of test data for Eley rimfire ammo, seeing how any given lot has performed, and how consistent it has proven. You can view a wealth of data, including group size, percentage of shots within tenths of inches from center, velocity and more. There’s even a 50-shot consolidated group display that conveniently reveals large sample accuracy in a glance. With ELEY’s new web-based Lot Analyzer, you can easily compare various lot numbers, choosing the one that shows the best test results.
With the ELEY Lot Analyzer, simply enter any ELEY lot number into the online database. You’ll then see a heap of information including 10-Shot Groups, 50-Shot Groups, Average Velocity, Ballistics Coefficient, Shot Distribution graphs, and even the Eley Coin Test — the percentage of this lot capable of hitting a dime at 54.7 yards (50m). We believe the ELEY Lot Analyzer delivers the most comprehensive lot-specific ammo performance information ever provided by any ammunition manufacturer.
ELEY is to be commended for making this information available. Shown below are some of the data views available for ELEY Force ammo Lot 3H16-30356:
Try It Yourself with Lot Number 1016-02107
To see how the ELEY Lot Analyzer works first-hand, CLICK HERE and enter this lot number 1016-02107 (be sure to include the dash).
Lot Analyzer Data Available from 2015 Forward
We think the ELEY Lot Analzyer is great for the consumer. It is now possible to select a box of ammo from a store shelf, enter the ELEY lot number, and instantly see the performance of the ammunition. Get together with fellow shooters and compare your ELEY ammo. This service will be available for all ELEY lot numbers in the USA from 2015 forward. You can find the year of your ammunition by the third and fourth numbers in the lot. For example, if your lot number is 3016-30xxx, it is from the year 2016.
EDITOR’s NOTE — Test Center Performance vs. the Real World:
Our staff has tested rimfire ammo in both the ELEY and Lapua Test Centers, and then shot that same ammo later in competition at outdoor ranges. We learned something in the process. First, ammo can do well in a test tunnel, with a clamped test fixture, yet perform very differently outdoors on a real range. Likewise, ammo may shoot superbly in one rifle, yet perform so-so in another rifle, even when the barrels are from the same manufacturer.
We commend ELEY for providing the Lot Analyzer — this really does offer invaluable information to the consumer. This represents a big step forward. That said, you need to understand that factory test results cannot necessarily be duplicated in the real world. And we can confirm that some ammo which was less than stellar in the test tunnel actually shot superbly in real rimfire benchrest competition. LESSON: Even with the ELEY Lot Analyzer, you still need to do your own testing, with your own rifle, to verify .22 LR ammo performance.
Here’s a great Do-It-Yourself (DIY) project from Martin Tardif. Build your own height-adjustable ammo caddy for under ten bucks. This is a great project for F-Open competitors as well as anyone who shoots with a pedestal front rest, either on the ground or from a bench. The ammo caddy attaches, via a flexible arm, to your front rest. The flexy arm allows you to position your ammunition close to your rifle’s feeding port. That makes it easy to grab cartridges and load them into the chamber without shifting your shooting position. Nice job Martin!
Martin Explains How to Build the Ammo Caddy
Here are some pics of my DIY P.L.A.B. (Port Level Ammo Block). I cannibalized the goose neck from a Craftsman bendy-style utility light and bought a 3.5″x 1″ Acetal disk on eBay. I then drilled out the disk to accept twenty .284 Winchester rounds and screwed the disk to the bendy arm. The arm, by itself, wasn’t sturdy enough to support my fully loaded ammo block, so I inserted a 1/8″-diameter steel rod cut to length into the arm before I screwed it to the disk. On this Bald Eagle rest, I wasn’t using the windage adjustment cable. That allowed me to secure the bottom end of the arm to the unused 5/16″ x 18 bolt hole for the cable. [Editor’s Note: For other pedestal rest types/brands you may need to drill a hole for the base of the flexy arm.]
Kudos to Martin Tardif for his clever use of inexpensive materials. The total cost of the whole project, according to Martin, was just $8.00!
Estimating Actual Cost per Round by Caliber
This article comes from the USAMU, which provide shooting and reloading tips on its Facebook Page. This week’s USAMU TECH TIP outlines a ballpark-estimate method of calculating the actual cost per round of different calibers. Some applications, and some shooters, by virtue of their high level of competition, require the very best ballistic performance available — “Darn the cost, full speed ahead!
If you are in serious contention to win a major competition, then losing even a single point to inferior ballistic performance could cost you a national title or record. However, this “horsepower” does come at a cost! Some calibers are barrel-burners, and some offer much longer barrel life. Look at this comparison chart:
Estimated Cost Per Round by Cartridge Type
Below are some estimated total expense per round (practice and competition) based on component costs, type used, expected barrel life and a standard, chambered barrel cost of $520.00 across calibers.
5.56x45mm: $0.46/round (barrel life 6,000 rounds)*
6mmBR: $0.81/round (barrel life 2800 rounds)
6XC: $0.97/round (barrel life 2200 rounds)
.308 Win: $0.80/round (barrel life 4500 rounds)
6.5-284: $1.24/round (barrel life 1100 rounds)
*Note the high round count estimate for 5.56x45mm. This is a bit deceptive, as it assumes a period of “lesser accuracy” use. The USAMU says: “Much of the difference you see here between 5.56 and .308 is due to using the 5.56 barrel for 100-200 yard training with less-expensive, 55gr Varmint bullets after its long-range utility is spent”.
Moreover, while some applications require specialized, high-cost components, others do not. And, if the shooter is still relatively new to the sport and hasn’t refined his skill to within the top few percentile of marksmen, a more economical caliber choice can help stretch a limited budget. Translation: More skill per dollar!
In this post, the prices for all items mentioned here were taken from a major component supplier’s current advertisements, and all brass was of top quality, except in the case of 5.56mm. There, 200 top-quality, imported cases were reserved for 600-yard shooting, and the other brass used was once-fired Lake City surplus.
Cartridge cases were assumed to be loaded 10 times each. [Your mileage may vary…] Bullet prices assumed the use of less-expensive, but good-quality match bullets for the bulk of shooting as appropriate.
The cost of top-tier, highly-expensive match bullets was also calculated for a realistic percentage of the shots fired, based on ones’ application. Barrel life by caliber was taken from likely estimates based on experience and good barrel maintenance.
Brass Costs Based on 10 Loads Per Case
Often, handloaders may calculate ammunition cost per round by adding the individual costs of primers, powder charges and projectiles. Many don’t consider the cost of brass, as it is reloaded several times. Here, we’ll consider the cost of enough top-quality brass to wear out a barrel in our given caliber, at 10 loads per case, except as noted above.
Don’t Forget Amortized Barrel Costs
Few shooters factor in the full, true cost of barrel life. Depending on caliber, that can dramatically increase the cost per round. For example, consider a long-range rifle in 6.5/284 caliber. This cartridge performs amazingly well, but at a cost. Ballpark estimated barrel life [in a top-quality barrel] is 1100 rounds. Some wear out faster, some last longer, but this gives a rough idea of what to expect.
Accurate barrels are a joy to use, but they are an expendable resource!
A top-quality barrel plus installation was estimated at about $520.00. At 1100 rounds, barrel life adds $0.47 per round to our total cost. Thus, what had started out as an [components-only estimate, with brass cost] of $0.76/round now totals $1.24 per shot!
Cost Considerations When Choosing a Catridge Type
Some shooters might ask themselves if they could meet their present needs with a more economical caliber. If so, that equates to more practice and matches per available dollar, and more potential skill increase on the available budget.
Each shooter knows his skill level, practice needs, and shooting discipline’s requirements. Some might shoot NRA Service Rifle or Match Rifle using a 5.56mm with a long barrel life. Others might be Match Rifle shooters faced with choosing between, say, a 6mm BR vs. 6XC. A realistic assessment of ones needs, performance-wise, may help guide the shooter toward a caliber that’s most optimized to their needs at the moment.
Admittedly, the factors affecting cost for any individuals circumstances can vary significantly. However, hopefully this will provide one useful method of evaluating one’s training and competition choices, based on their skill, goals and needs.
The shooting season is now in full swing. When you head to the range you’ll want to be prepared. That means collecting all the gear you’ll need at the range. It’s easy to forget small, critical items, so we’ve provided a checklist of the small “extras” you should pack before you head out to the range. In addition to rifle, rests, ammo, targets, and cleaning gear, here are a dozen essentials you should include in your range bag.
• Shell-Holder — If you don’t have calipers, you can use a shell-holder to check for excessive case expansion from hot loads. If a fired case doesn’t slip into the shell-holder easily, your load is definitely TOO HOT.
• Extra Earplugs — Always use ear protection when shooting. We bring a 35mm film canister with extra sets of foam earplugs.
• Hex Wrench or Screwdriver for action screws — Action screws can work loose with time. Always bring the appropriate hex wrench or screwdriver whenever you go to the range.
• Small Wrench for Scope Rings — Check the tension of your scope base and ring fasteners before you go. Bring along a small Torx wrench for the ring screws (or other tool that fits your fasteners).
• Normal and Under-sized Jags — It is often wise to use one-caliber undersize jags when applying solvent with cotton patches. You should have a couple sizes in your range kit.
• Extra Batteries — Bring extra batteries for all your electronic gear — which can include chronograph, windmeter, digital camera, GPS etc.
• Small Notebook and Pen or Pencil — Use the notebook to record chron data, log group sizes, and make notes about wind and weather conditions.
• Adhesive dots — Bring a few sheets of adhesive dots (sold at office supply stores). Use small white or black dots as target pasters. Use larger red or orange dots as aiming points (target centers).
• Folding Chair or Camp Stool — This comes in handy if you’re spotting for another shooter, or if you reload away from the firing line.
• Water Bottle — You can’t shoot well if you’re dehydrated. Bring at least two quarts of water with you and keep a bottle at the bench.
• Surveyors’ Tape and Wood Stakes — You can make inexpensive wind indicators using surveyors’ tape attached to the top of wood stakes.
• Small Plastic Ruler — Use this to measure your group sizes. A transparent (see-through) ruler works best. Rulers are also useful for drawing lines on targets.
This list is not intended to be exclusive. There are many other items you may wish to include. Obviously bring safety glasses, and Sharpie-type pens are always handy to mark targets. We invite our readers to add other “essentials” to the list. The important thing is to plan ahead, packing your key items before you drive to the range.
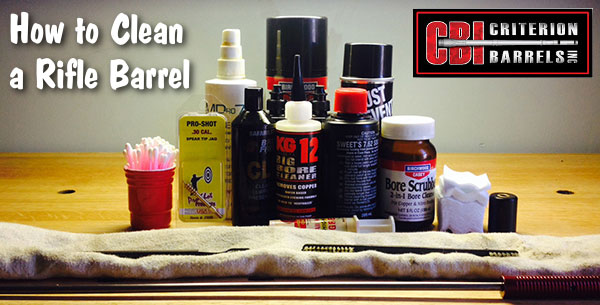
This article comes from the Criterion Barrels website. It provides good, conservative advice about barrel cleaning. Understand that cleaning methods may need to be adapted to fit the amount and type of fouling (and the particular barrel). In general, we do try to minimize brushing, and we follow the procedures Criterion recommends respecting the crown/muzzle. We have also had very good success using wet patches followed by Wipe-Out bore foam. Along with the practices outlined by Criterion below, you may want to try Wipe-Out foam. Just be sure to use a fitted cleaning rod bore guide, to keep foam out of the action recesses and trigger assembly.
The above video shows how to apply Wipe-Out or other bore-cleaning foam. We use a slightly different method. First, we use 3-4 wet patches to remove loose carbon fouling. Then we apply the foam as shown, but usually from the muzzle end (with bore guide in chamber). Here’s the important point — after 20-30 minutes, once the bubbles have dissipated, we apply the foam a second time, getting more of the active ingredients into the barrel. We then patch out, as shown, after 3-4 hours.
What is the Best Way to Clean a Rifle Barrel?
We are asked this question quite frequently alongside requests for recommended break-in procedures. Improper barrel cleaning methods can damage or destroy a barrel, leading to diminished accuracy or even cause a catastrophic failure. When it comes to barrel maintenance, there are a number of useful techniques that we have not listed. Some techniques may work better with different barrel types. This series of recommendations is designed to incorporate a number of methods that the Criterion Barrels staff has used successfully both in the shop and on their personal rifles. Please feel free to to list your own recommendations in the below comments section.
We recommend the use of the following components during rifle cleaning:
• Cloth patches (sized for the appropriate caliber)
• Brass jag sized properly for your bore
• One-piece coated cleaning rod
• General bore cleaner/solvent (Example: Hoppes #9)
• Copper solvent of your choosing (Example: Sweets/KG 12)
• Fitted cleaning rod bore guide
• Plastic AP brush or toothbrush
• Q-Tips
• Plastic dental picks
• CLP or rust preventative type cleaner
There are a number of schools of thought relating to the frequency in which a barrel should be cleaned. At minimum we recommend cleaning a barrel after each shooting session to remove condensation, copper, and carbon build-up. Condensation is the greatest immediate threat, as it can cause the barrel to rust while the rifle sits in storage. Copper and carbon build-up may negatively impact future barrel performance, increasing the possibility of a failure in feed or function. Fouling should be removed whenever possible.
The below tips will help limit the wear of different parts of your barrel during routine maintenance, helping extend the life of the barrel and improving its performance.
The Crown
The crown is the portion of the barrel where the bullet loses contact with the lands and grooves and proceeds to exit the firearm. The area most critical to accuracy potential is the angle where the bullet last touches the bore of the barrel.
Avoid damage to this area by using a plastic toothbrush and CLP type cleaner to scrub the crown from the exterior of the barrel. Even the most minimal variation in wear to the crown will negatively impact barrel performance, so be careful to avoid nicking or wearing away this part of the barrel.
Reducing Cleaning Rod Wear to the Crown
When running a patch through the barrel, place the muzzle about a ¼” from a hard surface that runs flat at a perpendicular angle to the cleaning rod’s direction of travel, like a wall or the edge of a work bench (pictured). When the jag impacts the hard surface, retract the cleaning rod and remove the patch.
By withdrawing the jag prior to its exit from the barrel, you are limiting the possibility of the brass dragging upon the crown if the rod is at all bent or misaligned. The soft cloth patch will continue to serve as the point of contact between the jag and the barrel, minimizing potential wear.
If possible, insert the rod through the chamber, pushing it forward toward the muzzle. Some rifles, such as the M1 Garand or M14, will require you to insert the cleaning rod through the muzzle. In these situations the use of a cleaning rod guide is recommended to limit the friction placed upon the crown.
Avoid using cleaning rod segments for scraping carbon from the recessed muzzle of an AR-15 barrel. We used this trick in the Marine Corps to impress the armorers and NCO’s with the cleanliness of our muzzles, but it likely played a significant role in reducing the service life of the rifle barrel in question.
Use a Q-Tip soaked in solvent to remove any copper or carbon residue from the recessed muzzle of an AR-15 barrel. A little bit of remaining carbon on the face of the muzzle will not negatively affect bullet travel so long as the crown edge remains consistent around the circumference of the bore.
The Lands and Grooves
This portion of the barrel may experience reduced efficiency due to copper fouling and cleaning rod damage. If copper fouling takes place during the initial break-in of the rifle, make sure to check our barrel break-in article.
For regular maintenance we suggest using a single piece coated cleaning rod rather than the traditional segmented rod or bore snake. While segmented rods and bore snakes may be convenient for field use, the corners between the segments may bow out and catch on the lands, scraping along the length of the rifling. Residual grit and particles from expended cartridges may also get caught between segments, resulting in an abrasive surface working its way down the length of the barrel. Most bore snakes will remove significant amounts of carbon fouling, but may fall short in the removal residual carbon buildup and copper fouling during deep cleaning. Good rods can be sourced from multiple manufacturers, but we have found good results using both Pro-Shot and Dewey brand products.
General cleaning requires the use of patches rather than nylon or brass bore brushes. Brass brushes may be required when aggressive cleaning is required, but can lead to unnecessary wear on the barrel if used frequently. This is not due to the nature of the soft brushes themselves, but from the abrasive particles of grit that become embedded in the material that is being run repeatedly through the bore. We recommend the use of bore guides when cleaning from both the muzzle and breech. These bore guides will help serve to protect the crown and throat from cleaning rod damage.
If significant resistance develops while running the cleaning rod through the bore, no attempt should be made to force it in further. Back the rod out and inspect the barrel to determine the cause of the resistance. The jag may be pushing between a bore obstruction and the rifling, digging a divot into the barrel before pushing the obstruction back through the muzzle. One way to minimize the risk of a stuck rod is by utilizing a slightly smaller patch during the initial push.
The process of cleaning the length of the rifling is relatively straightforward:
1. Check to make sure the rifle is safely unloaded.
2. Carry out any necessary disassembly procedures prior to cleaning.
3. Remove bolt (if possible) and insert fitted cleaning rod bore guide in action.
4. Soak a patch in bore solvent (similar to Hoppes #9).
5. Center and affix the patch on the brass jag, inserting it into the chamber end of the barrel. A misaligned patch may cause the jag to damage the lands of the rifling, so make sure the patch is centered on the jag.
6. Run the patch the full length of the barrel, retracting it upon reaching the end of the muzzle.
7. Let the solvent sit for a minute.
8. Continue to run patches through the bore until carbon residue is minimized.
9. Run a dry patch through the bore to ensure carbon residue has been removed.
10. Soak a patch in copper solvent (Sweet’s or KG-12).
11. Run the patch through the bore, leaving it to sit for 3-5 minutes (do not let solvent sit for more than 15 minutes.*)
12. Repeat this process until no blue residue remains on the patches.
13. Run a patch of Hoppes #9 and a dry patch through the bore to neutralize the copper solvent.
14. Inspect the barrel prior to reassembling the rifle, verifying that no bore obstructions remain.
*Please note that some ammonia-based copper solvents may prove to be corrosive if left sitting in the barrel for an extended period of time. It is essential that these solvents be removed within 15 minutes to avoid ruining the bore.
The Chamber
Proper cleaning of the chamber is a critical component of a general cleaning procedure. Carbon rings can build up near the neck and throat of the chamber wall, leading to feeding malfunctions and pressure spikes inside the chamber.
The chamber can be the trickiest part of the barrel to effectively clean, due to its fluctuation in size and the awkward ergonomics often required to remove carbon residue. Numerous chamber specific devices have been created to address this problem, and while some should be avoided (steel chamber brushes), others can be used to great effect (cleaning stars and plastic dental picks). The simplest approach to cleaning a chamber is to apply solvent to a couple patches, and use the cleaning rod to spin the wadded up patches inside the confines of the chamber. This should aid in removing any excess carbon. A Q-Tip can be used to reach portions of the chamber unreached by patches.
The Barrel Exterior
While the condition of the crown, rifling, and chamber are essential to firearm performance, the finish of the exterior should also be cleaned after handling. Condensation, humidity, direct water contact, and salt residue from skin contact can cause rust or corrosion. An application of anti-corrosion products is recommended when placing a firearm into deep storage for an extended period of time. [Editor: AccurateShooter.com recommends Corrosion-X or Eezox, but other products work well too.]
Finding Cleaning Components
While most cleaning components can be found at your local gun shop, some specialty items may need to be sourced through online retailers such as Brownell’s. Criterion utilizes both Dewey and Pro-Shot brand cleaning components during our day-to-day operations.
Do you have any rifle cleaning tips or tricks not mentioned in the above article? We’d love to hear about them. You can post your comments below.
You may not realize it… but to get the optimum BC from your bullets (i.e. the lowest aerodynamic drag), you must spin the bullets fast enough. Bullet drag increases (as expressed by lower BC) if the bullet spins too slowly. Bryan Litz of Applied Ballistics explains how BC changes with twist rates…
More Spin, Less Drag
In this article, we look at how twist rate and stability affect the Ballistic Coefficient (BC) of a bullet. Again, this topic is covered in detail in the Modern Advancements book. Through our testing, we’ve learned that adequate spin-stabilization is important to achieving the best BC (and lowest drag). In other words, if you don’t spin your bullets fast enough (with sufficient twist rate), the BC of your bullets may be less than optimal. That means, in practical terms, that your bullets drop more quickly and deflect more in the wind (other factors being equal). Spin your bullets faster, and you can optimize your BC for best performance.
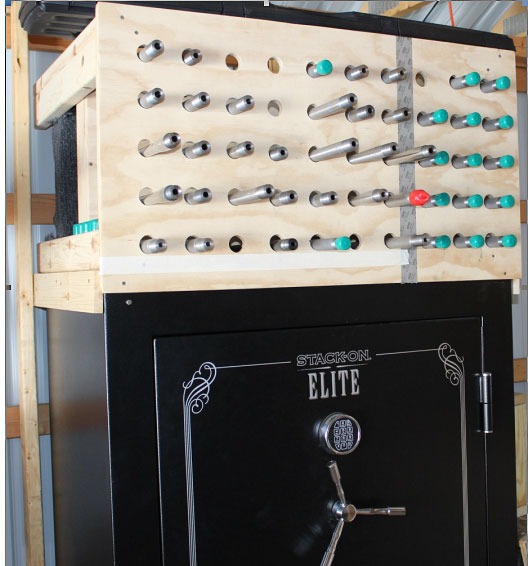
Any test that’s designed to study BC effects has to be carefully controlled in the sense that the variables are isolated. To this end, barrels were ordered from a single barrel smith, chambered and headspaced to the same rifle, with the only difference being the twist rate of the barrels. In this test, 3 pairs of barrels were used. In .224 caliber, 1:9” and 1:7” twist. In .243 caliber it was 1:10” and 1:8”, and in .30 caliber it was 1:12” and 1:10”. Other than the twist rates, each pair of barrels was identical in length, contour, and had similar round counts. Here is a barrel rack at the Applied Ballistics Lab:
Applied Ballistics used multiple barrels to study how twist rate affects BC.
“The Modern Advancements series is basically a journal of the ongoing R&D efforts of the Applied Ballistics Laboratory. The goal of the series is to share what we’re learning about ballistics so others can benefit.” –Bryan Litz
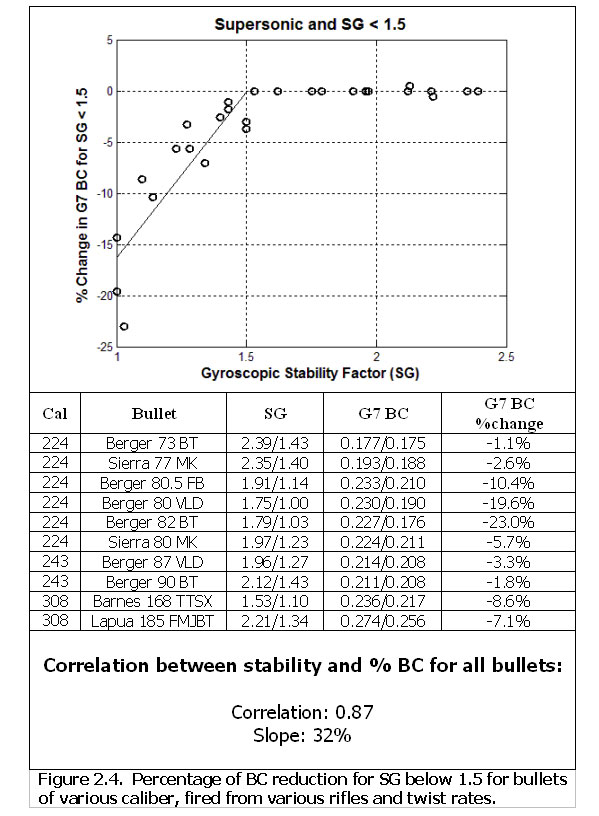
Barrel twist rate along with velocity, atmospherics, and bullet design all combine to result in a Gyroscopic Stability Factor (SG). It’s the SG that actually correlates to BC. The testing revealed that if you get SG above 1.5, the BC may improve slightly with faster twist (higher SG), but it’s very difficult to see. However, BC drops off very quickly for SGs below 1.5. This can be seen in the figure below from Modern Advancements in Long Range Shooting.
The chart shows that when the Gyroscopic Stability Factor (SG) is above 1.5, BC is mostly constant. But if SG falls below 1.5, BC drops off dramatically.
Note that the BC drops by about 3% for every 0.1 that SG falls below 1.5. The data supports a correlation coefficient of 0.87 for this relationship. That means the 3% per 0.1 unit of SG is an accurate trend, but isn’t necessarily exact for every scenario.
It’s a common assumption that if a shooter is seeing great groups and round holes, that he’s seeing the full potential BC of the bullets. These tests did not support that assumption. It’s quite common to shoot very tight groups and have round bullet holes while your BC is compromised by as much as 10% or more. This is probably the most practical and important take-away from this test.
To calculate the SG of your bullets in your rifle, visit the Berger Bullets online stability calculator. This FREE calculator will show you the SG of your bullets, as well as indicate if your BC will be compromised (and by how much) if the SG is below 1.5. With the stated twist rate of your barrel, if your selected bullet shows an SG of 1.5 (or less), the calculator will suggest alternate bullets that will fully stabilize in your rifle. This valuable online resource is based directly on live fire testing. You can use the SG Calculator for free on the web — you don’t need to download software.
Learn More About SG and BC This article is just a brief overview of the interrelated subjects of twist rate, Gyroscopic Stability, and BC. The coverage of twist rates in Modern Advancements in Long-Range Shooting is more detailed, with multiple live fire tests.
Other chapters in the book’s twist rate section include: · Stability and Drag – Supersonic
· Stability and Drag – Transonic
· Spin Rate Decay
· Effect of Twist rate on Precision
Other sections of the book include: Modern Rifles, Scopes, and Bullets as well as Advancements in Predictive Modeling. This book is sold through the Applied Ballistics online store. Modern Advancements in Long Range Shooting is also available in eBook format in the Amazon Kindle store.
Here’s a cool product that can help you level your front rest and rear bag, level your scope, align your target frame, and perform a myriad of tasks around the house. The Digital AngleCube (aka Electronic Level and Protractor Gauge) is basically a high-tech level that gives you exact angular read-outs to within 0.2 degrees. That’s a lot more precise than any bubble level.
Numerous Shooting-Related Applications
For you position shooters who like to run angled sights, this tool will help you set the rear sight and front tower to exactly the same angle. For High Power guys with 3-way and 4-way adjustable buttstocks, this digital angle gauge can help you quickly and precisely set buttstock angle and cast-off. Even tactical shooters and long-range hunters can use this device to confirm exact shot angle, with greater precision than a plastic protractor or even an expensive Angle Degree Indicator (ADI). Heck you can even use the thing as an anti-cant device (if you don’t mind the extra weight). We’re sure that our clever readers can find even more uses for a digital angle read-out tool.
The AngleCube Digital Level sells on Amazon.com for $29.95. It comes with magnets on the sides so you can attach the tool to any ferrous metal surface for a “hands-free” reading. You can find similar devices in hardware and home improvement stores. One of these square, magnet-equipped electronic protractor/levels is made by INSIZE. The illustration below shows how the INSIZE gauge can be used in the field.


 Monitoring Barrel Wear with Borescope





 The shooting season is now in full swing. When you head to the range you’ll want to be prepared. That means collecting all the gear you’ll need at the range. It’s easy to forget small, critical items, so we’ve provided a checklist of the small “extras” you should pack before you head out to the range. In addition to rifle, rests, ammo, targets, and cleaning gear, here are a dozen essentials you should include in your range bag.
 • Shell-Holder — If you don’t have calipers, you can use a shell-holder to check for excessive case expansion from hot loads. If a fired case doesn’t slip into the shell-holder easily, your load is definitely TOO HOT.
 • Hex Wrench or Screwdriver for action screws — Action screws can work loose with time. Always bring the appropriate hex wrench or screwdriver whenever you go to the range.
 • Extra Batteries — Bring extra batteries for all your electronic gear — which can include chronograph, windmeter, digital camera, GPS etc.
 • Folding Chair or Camp Stool — This comes in handy if you’re spotting for another shooter, or if you reload away from the firing line.
 • Small Plastic Ruler — Use this to measure your group sizes. A transparent (see-through) ruler works best. Rulers are also useful for drawing lines on targets.