A friend of ours recently took delivery of a new barrel which was chambered by a smith who had done the original build on the rifle, but who had not headspaced the barrel on the action itself this time. The smith headspaced based on his old records. Our friend happily screwed on his nice, new barrel and headed to the range. After the first few rounds, with known, safe loads, he was seeing deep craters on his primers, and then he even pierced a few primers with loads that should never have done that. Interestingly, the brass was not showing any of the other pressure signs. This was with bullets seated .015″ out of the rifling.
We were thinking maybe too much firing pin extrusion or maybe he got a hot lot of powder. Then I asked him to email me dimensions off his fired cases compared to new, Lapua brass. He emailed me that his shoulder moved 0.0105″ forward. I sent an email back saying, “hey, that must be a typo, you meant 0.0015″ right — so your shoulder moved one and a half thousandths correct?” The answer was “No, the shoulder moved over TEN thousandths forward”. Ahah. This explained some of the cratering problem in his brass. His cases were able to bounce forward enough in the chamber so that the primer material was smearing over the firing pin. And now he has brass that is “semi-improved”.
The point of the story is always check your headspace when you receive a “pre-fit” barrel, even from the smith who built the rifle. Purchase Go/No Go gauges for all your calibers. Headspace is not just an accuracy issue, it can be a safety issue. Pierced primers are bad news. The debris from the primer cup can blow into the firing pin hole or ejector recess causing a myriad of problems.
In this video Bryan Litz of Applied Ballistics offers tips on Big Bore shooting (i.e. .338 caliber and above). Bryan offers advice on bullet selection and he explains the challenge of handling the blast, noise, concussion, and recoil of big boomers such as the .416 Barrett and .50 BMG.
Bryan goes big … very big, shooting a monster .50 BMG bullpup.
Watch the recoil pulse shove Bryan backwards at 1:40 time-mark:
Big Bore Basics — Tips for Shooting Big Boomersby Bryan Litz
There are some unique things to consider with big-bore shooting. One is bullet design. For long-range shooting you want high-BC bullets. You get high BC from heavy bullets and bullets that have low drag. The interesting trade-off in big calibers is that there are a lot more lathe-turned solid bullets in copper and brass available than there are in the smaller calibers. You’ve got bullets that have slightly lower drag profiles but they are made of materials that are slightly less dense (than lead) so they are relatively light for their caliber. With that trade-off, the BCs might not be as high as you think for big calibers, although the bullets are heavy enough that they carry a lot of energy.
Energy really has a lot to do with shooting these big-caliber rifles. As with any kind of shooting, the fundamentals of marksmanship are the most important thing. However, it can be hard to maintain good fundamentals (e.g. trigger control and sight alignment) when you’re burning 100 grains of powder. There’s a lot of concussion (you want a muzzle brake no matter what your cartridge is above .338). It certainly can be challenging with all the muzzle blast and all the energy coming out of the barrel.
For long-range shooting with big bore rifles, you are still looking for the same things that you want with smaller-caliber rigs. You want a high-performance bullet, you want consistent ammunition, and you want a good fire solution to be able to center your group at long range. Basically you’re just dealing with the challenges that the high energy brings, and being smart about your bullet selection.
In the video above, Bryan is shooting the DesertTech HTI bullpup. This rifle can shoot four (4) big bore chamberings, with barrel conversion kits for: .375 CheyTac, .408 CheyTac, .416 Barrett, and .50 BMG. These can be quickly swapped in the HTI chassis, which employs an internal barrel-clamp system.
Can you form a wildcat cartridge such as the 6 Dasher without expending primer, powders, and bullets? Absolutely. Using the hydro-forming method you can form improved cases in your workshop with no firing whatsoever, so there is no wear on your precious barrel. Watch this video to see how it’s done:
6 Dasher Case Hydro-Forming Demonstration:
Forum member Wes J. (aka P1ZombieKiller) has produced a helpful video showing how to form Dasher cases use the Hornady Hydraulic forming die kit. This includes a two-part die (body and piston), and a special shell holder. To form the case, you insert a primer in your virgin brass, top the case off with with a fluid (water or alcohol), then run the case up into the Hydro-forming die. A few stout whacks with a hammer and your case is 95% formed.
Hydro-Forming Procedure Step-by-Step:
1. Insert spent primer in new 6mmBR brass case.
2. Fill with water or alcohol (Wes prefers alcohol).
3. Wipe excess fluid off case.
4. Place case in special Hornady shell-holder (no primer hole).
5. Run case up into Hydraulic forming die.
6. Smack top piston of forming die 3-4 times with rubber mallet or dead-blow hammer.
7. Inspect case, re-fill and repeat if necessary.
8. Drain alcohol (or water) into container.
9. Remove primer (and save for re-use).
10. Blow-dry formed case. Inspect and measure formed case.
Wes achieves very uniform cartridge OALs with this method. He measured ten (10) hydro-formed 6 Dasher cases and got these results: two @ 1.536″; 2 @ 1.537″; and 6 @ 1.538″.
Three or Four Whacks Produces a 95%-Formed Case
With a Hornady hydro-forming die, hydraulic pressure does the job of blowing out the shoulders of your improved case. The process is relatively simple. Place a spent primer in the bottom of a new piece of brass. Fill the case with water, and then slip it into a special Hornady shell-holder with no hole in the middle. Then you run the case up into the forming die. Now comes the fun part. You gently insert a plunger (hydraulic ram) from the top, and give it three or four stiff whacks with a mallet (or better yet, a dead-blow hammer). Remove the plunger and you have a 95% formed case, ready to load.
Hornady supplies a shell holder made specifically for the hydro die; there’s no hole in the bottom of it. Just insert a spent primer into the primer pocket and you’re ready to go. The spent primer combined with the solid shell holder, keeps the water from seeping out of the primer pocket. The primer pushes out a little bit during this process, but it’s impossible for it to come out because of the way the shell holder is designed. The shell holder has a grove which allows the case to slide out of the shell holder even when the primer protrudes a bit.
Story tip from Boyd Allen. We welcome reader submissions.
Have you recently purchased a new scope? Then you should verify the actual click value of the turrets before you use the optic in competition (or on a long-range hunt). While a scope may have listed click values of 1/4-MOA, 1/8-MOA or 0.1 Mils, the reality may be slightly different. Many scopes have actual click values that are slightly higher or lower than the value claimed by the manufacturer. The small variance adds up when you click through a wide range of elevation.
In this video, Bryan Litz of Applied Ballistics shows how to verify your true click values using a “Tall Target Test”. The idea is to start at the bottom end of a vertical line, and then click up 30 MOA or so. Multiply the number of clicked MOA by 1.047 to get the claimed value in inches. For example, at 100 yards, 30 MOA is exactly 31.41 inches. Then measure the difference in your actual point of impact. If, for example, your point of impact is 33 inches, then you are getting more than the stated MOA with each click (assuming the target is positioned at exactly 100 yards).
How to Perform the Tall Target Test
The objective of the tall target test is to insure that your scope is giving you the proper amount of adjustment. For example, when you dial 30 MOA, are you really getting 30 MOA, or are you getting 28.5 or 31.2 MOA? The only way to be sure is to verify, don’t take it for granted! Knowing your scopes true click values insures that you can accurately apply a ballistic solution. In fact, many perceived inaccuracies of long range ballistics solutions are actually caused by the scopes not applying the intended adjustment. In order to verify your scope’s true movement and calculate a correction factor, follow the steps in the Tall Target Worksheet. This worksheet takes you thru the ‘calibration process’ including measuring true range to target and actual POI shift for a given scope adjustment. The goal is to calculate a correction factor that you can apply to a ballistic solution which accounts for the tracking error of your scope. For example, if you find your scope moves 7% more than it should, then you have to apply 7% less than the ballistic solution calls for to hit your target.
NOTE: When doing this test, don’t go for the maximum possible elevation. You don’t want to max out the elevation knob, running it to the top stop. Bryan Litz explains: “It’s good to avoid the extremes of adjustment when doing the tall target test.I don’t know how much different the clicks would be at the edges, but they’re not the same.”
Should You Perform a WIDE Target Test Too?
What about testing your windage clicks the same way, with a WIDE target test? Bryan Litz says that’s not really necessary: “The wide target test isn’t as important for a couple reasons. First, you typically don’t dial nearly as much wind as you do elevation. Second, your dialed windage is a guess to begin with; a moving average that’s different for every shot. Whereas you stand to gain a lot by nailing vertical down to the click, the same is not true of windage. If there’s a 5% error in your scope’s windage tracking, you’d never know it.”
Verifying Scope Level With Tall Target Test
Bryan says: “While setting up your Tall Target Test, you should also verify that your scope level is mounted and aligned properly. This is critical to insuring that you’ll have a long range horizontal zero when you dial on a bunch of elevation for long range shots. This is a requirement for all kinds of long range shooting. Without a properly-mounted scope level (verified on a Tall Target), you really can’t guarantee your horizontal zero at long range.”
NOTE: For ‘known-distance’ competition, this is the only mandatory part of the tall target test, since slight variations in elevation click-values are not that important once you’re centered “on target” at a known distance.
Each Wednesday, the U.S. Army Marksmanship Unit publishes a reloading “how-to” article on the USAMU Facebook page. This past week’s “Handloading Hump Day” article, the latest in a 7-part series, relates to chronograph testing and statistical samples. We highly recommend you read this article, which offers some important tips that can benefit any hand-loader. Visit the USAMU Facebook page next Wednesday for the next installment.
Chronograph Testing — Set-Up, Sample Sizes, and Velocity Factors
Initial Chronograph Setup
A chronograph is an instrument designed to measure bullet velocity. Typically, the bullet casts a shadow as it passes over two electronic sensors placed a given distance apart. The first screen is the “start” screen, and it triggers an internal, high-speed counter. As the bullet passes the second, or “stop” screen, the counter is stopped. Then, appropriate math of time vs. distance traveled reveals the bullet’s velocity. Most home chronographs use either 2- or 4-foot spacing between sensors. Longer spacing can add some accuracy to the system, but with high-quality chronographs, 4-foot spacing is certainly adequate.
Laboratory chronographs usually have six feet or more between sensors. Depending upon the make and model of ones chronograph, it should come with instructions on how far the “start” screen should be placed from one’s muzzle. Other details include adequate light (indoors or outdoors), light diffusers over the sensors as needed, and protecting the start screen from blast and debris such as shotgun wads, etc. When assembling a sky-screen system, the spacing between sensors must be extremely accurate to allow correct velocity readings.
Statistics: Group Sizes, Distances and Sample Sizes
How many groups should we fire, and how many shots per group? These questions are matters of judgment, to a degree. First, to best assess how ones ammunition will perform in competition, it should be test-fired at the actual distance for which it will be used. [That means] 600-yard or 1000-yard ammo should be tested at 600 and 1000 yards, respectively, if possible. It is possible to work up very accurate ammunition at 100 or 200 yards that does not perform well as ranges increase. Sometimes, a change in powder type can correct this and produce a load that really shines at longer range.
The number of shots fired per group should be realistic for the course of fire. That is, if one will be firing 10-shot strings in competition then final accuracy testing, at least, should involve 10-shot strings. These will reflect the rifles’ true capability. Knowing this will help the shooter better decide in competition whether a shot requires a sight adjustment, or if it merely struck within the normal accuracy radius of his rifle.
How many groups are needed for a valid test? Here, much depends on the precision with which one can gather the accuracy data. If shooting from a machine rest in good weather conditions, two or three 10-shot groups at full distance may be very adequate. If it’s windy, the rifle or ammunition are marginal, or the shooter is not confident in his ability to consistently fire every shot accurately, then a few more groups may give a better picture of the rifle’s true average.
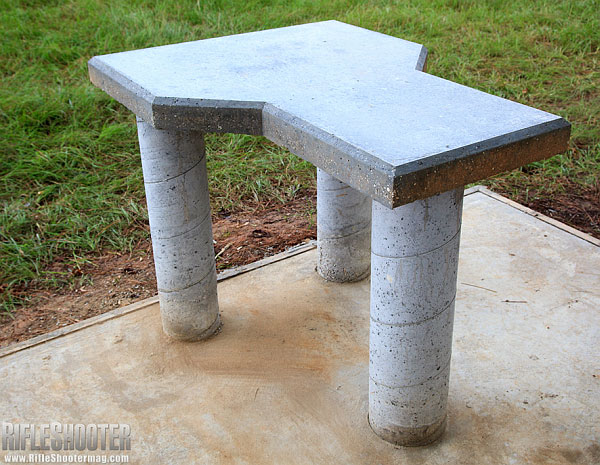
Who hasn’t dreamed of having a professional-quality, permanent shooting bench on their own property? Well here’s an article that can help you make that dream come true. This “how-to” feature from the archives of RifleShooter Magazine shows how to build a quality concrete shooting bench step-by-step.
All aspects of the construction process are illustrated and explained. The author, Keith Wood explains: “Construction happened in three phases — first creating the slab foundation, then the support pillars (legs), and finally the table.”
Click image below to load article with slide show.
Each step in the process is illustrated with a large photo and descriptive paragraph. Starting with framing the foundation (Step 1), the article illustrates and explains the 15 Steps that produce the finished, all-concrete bench (see top photo).
Flat-bottomed stocks are great for benchrest shooting, but their geometry is not ideal for mounting conventional Harris bipods, which were originally designed for stocks with a curved underbelly. Long-time Forum member Mark S. wanted to know if there is a way to make a stud-mounted bipod more secure on a flat-bottomed stock: “I have started shooting some steel matches that require shooting from bipods. My best gun for the job is a 6BRX in a MBR benchrest stock. I have installed a stud, but the bipod is still wanting to turn sometimes. What do you use?”
Here’s a solution for Mark and others using Harris bipods on flat-bottomed stocks with studs. Get the Harris-made #9 (HB9) adapter. Costing just $22.12 (at Midsouth), the HB9 adapter provides an extended contact surface with pads, so the bipod will fit securely on your flat fore-end.The HB9 adapter also has a center cut-out for the swivel stud so the bipod adapter aligns properly on the underside of your stock:
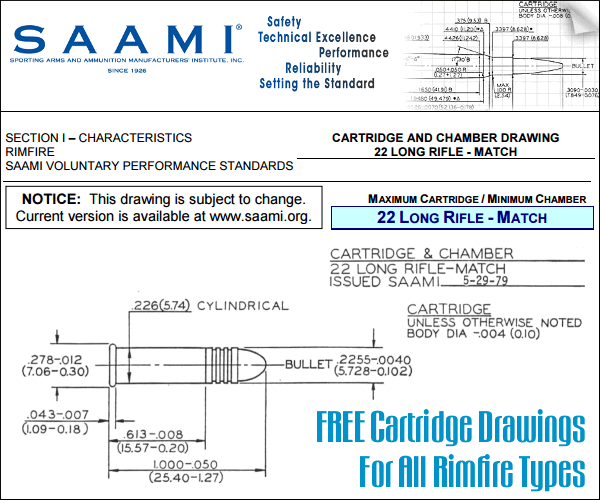
Planning a rimfire build in the future, or want to get the exact specifications for your 17 Mach 2, 17 HMR, 17 WSM, .22 LR, or .22 WMR rifle? Then we’ve got you covered. CLICK HERE to download an official SAAMI document with specs for all popular rimfire ammunition. This FREE 89-page PDF includes complete Cartridge and Chamber drawings and headspace specifications. The document even includes info on pressure terminology, headspace gauges, and test barrels.
SAAMI, the Sporting Arms and Ammunition Manufacturers’ Institute, is an association of the nation’s leading manufacturers of firearms, ammunition and components. Founded in 1926, SAAMI promulgates industry standards for firearms ammunition safety, interchangeability, reliability and quality.
SAAMI offers diagrams for ALL popular, modern rimfire cartridges:
Here’s the Official SAAMI Drawing for the 17 HMR Cartridge:
SAAMI Website Also Offers Centerfire Cartridge and Shotshell Diagrams
From the SAAMI website you can also access hundreds of FREE official cartridge diagrams and chamber drawings for all centerfire ammo types and Shotshells. Click on the Cartridge and Chamber Drawings link, then go to the SAAMI Standards Page. On the Standards Page, choose your ammo type: Rimfire (Z299.1), Shotshell (Z299.2), Pistol and Revolver (Z299.3), Rifle (Z299.4). This will then load large PDF files which include multiple cartridge diagrams.
Let’s face it, AR-platform rifles run dirty, at least compared to typical bolt-action rifles. The AR15 works by piping gas from the barrel back into the bolt carrier, causing the bolt to unlock and the carrier to move the bolt backward. The “exhaust gas” from the barrel contains soot and carbon. The carbon will form hard deposits on the bolt. In addition, the carbon can combine with lube on the bolt carrier to make a nasty, paste-like sludge. This can be particularly problematic when the black paste pollutes the ejector and extractor recess.
This Editor has inspected dozens of ARs over the years. Other than mag-related malfunctions, the most common cause of AR cycling problems I found was oily gunk in the extractor and ejector areas. Many AR owners overlook these critical areas. Look at an AR that hasn’t been cleaned properly and you’ll probably find black gunk (and small brass shavings) in the ejector and extractor recesses.
If you want to keep your black rifle running smoothly and reliably, you must clean it regularly and follow the correct maintenance procedures. Here are three videos that explain how to properly disassemble and clean AR-platform rifles.
Take-Down and Full Cleaning of AR15 by Jerry Miculek
Here ace shooter Jerry Miculek takes down and cleans an AR-platform rifle belonging to his daughter Lena. This is a good video because Lena’s rifle was “run hard and packed up dirty” so you can see where carbon and grease build up. This 35-minute video is very thorough. Jerry is one of the nation’s top action carbine shooters, so listen carefully to his advice on cleaning and lubrication.
How to Clean Your AR-Platform Rifle
This is a good basic video that shows the take-down and cleaning procedure for a typical AR15. It uses some fast-motion sequences to speed up the story. Check out this video if you don’t have the time to sit through the Miculek video above.
Cleaning and Lubricating AR15 Bolt Carrier Group
This video offers very specific advice on the bolt carrier group, which receives the dirty gas directly from the barrel. Be sure to check the extractor and ejector recesses. That’s where old lube, brass shavings, and carbon accumulate. Follow the directions in this video for lubrication, and don’t over-lubricate the bolt carrier — that will only capture more carbon.
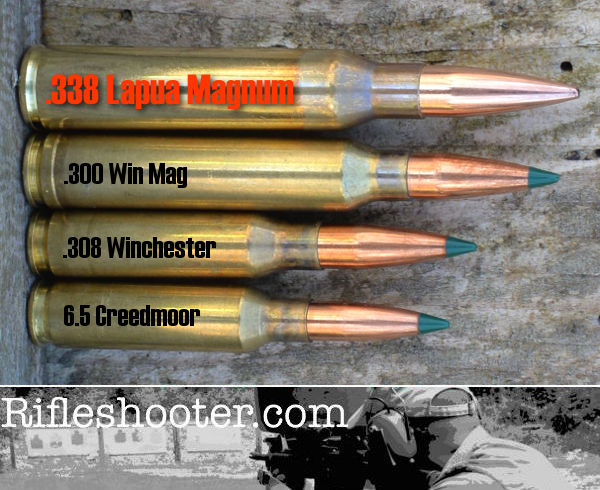
Shooters contemplating purchase of a .338 LM rifle often ask: “What length barrel should I get?” Rifleshooter.com recently performed a test that provides interesting answers…
Our friends at RifleShooter.com like to slice and dice — barrels that is. They have done barrel length cut-down tests for popular calibers like the .223 Rem, 6.5 Creedmoor, and .308 Winchester. But now they’ve tackled something way bigger — the .338 Lapua Magnum, a true “Big Boomer”. Starting with a beefy 30″-long Pac-Nor Barrel, RifleShooter.com chopped the tube down in one-inch increments all the way down to 17 inches (that’s 14 different lengths). At each new (shorter) barrel length, velocity was measured with a MagnetoSpeed chronograph using two different loads, 250gr SMKs with H4831sc and 300gr SMKs with Retumbo. Four shots were fired at each length with each load, a total of 112 rounds.
Load #1: 250gr Sierra MK, Lapua brass, CCI #250 primer, H4831SC, OAL 3.720″.
Load #2: 300gr Sierra MK, Lapua brass, Win WLRM primer, Retumbo, OAL 3.720″.
The .338 Lapua Magnum is a jumbo-sized cartridge, that’s for sure…
Donor Barrel Sacrificed for Science
Rifleshooter.com’s Editor explains: “Brandon from Precision Addiction offered to send us his .338 barrel for our .338 Lapua Mag test. I took him up on his offer and he sent me his used Pac-Nor chrome-moly barrel with about 600 rounds though it. This thing was a beast! A heavy 1.350″ shank that ran straight for 6″, until tapering to 1″ at 30″ in length.”
Results Summary
.338 Lapua Magnum with 250gr Sierra MatchKings
After shortening the barrel from 30″ to 17″, total velocity reduction for the 250-grainers was 395 FPS, an average loss of 30.4 FPS per 1″ cut. The amount of velocity loss per inch rose as the barrel got shorter, with the biggest speed reduction, a loss of 55 FPS, coming with the cut from 18″ to 17″.
Start Velocity: 2942 FPS | End Velocity: 2547 FPS | Average Loss Per Inch: 30.4 FPS
.338 Lapua Magnum with 300gr Sierra MatchKings
Shooting the 300-grainers, total velocity reduction was 341 fps, an average of 26.2 FPS loss per 1″ cut (30″ down to 17″). However, the speed actually increased with the first cut from 30 inches to 29 inches. The tester noted: “The 300 SMK load showed a slight increase from 30″ to 29″. I’ve recorded this in other tests and it seems to be more common with a heavier load. I suspect it is primarily due to the small sample sizes being used along with the relative proximity of muzzle velocities in adjacent lengths.”
Start Velocity: 2833 FPS | End Velocity: 2492 FPS | Average Loss Per Inch: 26.2 FPS*
*Velocity rose with first cut. Velocities ranged from 2,871 FPS (29″) to 2,492 FPS (17″) for a total velocity loss of 341 FPS.
RifleShooter.com crunched the velocity numbers in some interesting ways. For example they analyzed rate of velocity loss, concluding that: “after the initial rate change, the rate of the change in velocity is fairly consistent.” (View Rate of Change Graph)
How Velocity Loss Alters Long-Range Ballistics
The testers wanted to determine how the velocity reductions “affect our ability to hit targets downrange”. So, Rifleshooter.com plotted changes in elevation and wind drift at all barrel lengths. This revealed something interesting — drift increased significantly below 26″ barrel length: “Above 26″ things look pretty good, below 22″ they change quickly.”
We highly recommend you read the whole story. Rifleshooter.com put in serious time and effort, resulting in solid, thought-provoking results. The data is presented in multiple tables and graphs, revealing inch-by-inch velocities, change “deltas”, and SDs at each length.


 Hydro-Forming Procedure Step-by-Step:
 Hornady supplies a shell holder made specifically for the hydro die; there’s no hole in the bottom of it. Just insert a spent primer into the primer pocket and you’re ready to go. The spent primer combined with the solid shell holder, keeps the water from seeping out of the primer pocket. The primer pushes out a little bit during this process, but it’s impossible for it to come out because of the way the shell holder is designed. The shell holder has a grove which allows the case to slide out of the shell holder even when the primer protrudes a bit.

 Verifying Scope Level With Tall Target Test



 Flat-bottomed stocks are great for benchrest shooting, but their geometry is not ideal for mounting conventional Harris bipods, which were originally designed for stocks with a curved underbelly. Long-time Forum member Mark S. wanted to know if there is a way to make a stud-mounted bipod more secure on a flat-bottomed stock: “I have started shooting some steel matches that require shooting from bipods. My best gun for the job is a 6BRX in a MBR benchrest stock. I have installed a stud, but the bipod is still wanting to turn sometimes. What do you use?”