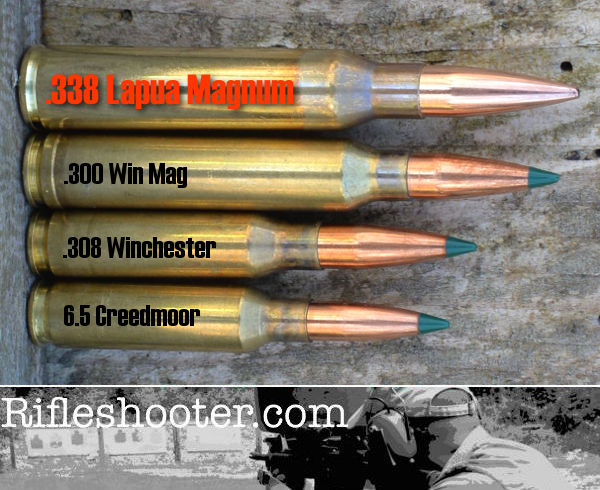
Shooters contemplating purchase of a .338 LM rifle often ask: “What length barrel should I get?” Rifleshooter.com recently performed a test that provides interesting answers…
Our friends at RifleShooter.com like to slice and dice — barrels that is. They have done barrel length cut-down tests for popular calibers like the .223 Rem, 6.5 Creedmoor, and .308 Winchester. But now they’ve tackled something way bigger — the .338 Lapua Magnum, a true “Big Boomer”. Starting with a beefy 30″-long Pac-Nor Barrel, RifleShooter.com chopped the tube down in one-inch increments all the way down to 17 inches (that’s 14 different lengths). At each new (shorter) barrel length, velocity was measured with a MagnetoSpeed chronograph using two different loads, 250gr SMKs with H4831sc and 300gr SMKs with Retumbo. Four shots were fired at each length with each load, a total of 112 rounds.
Load #1: 250gr Sierra MK, Lapua brass, CCI #250 primer, H4831SC, OAL 3.720″.
Load #2: 300gr Sierra MK, Lapua brass, Win WLRM primer, Retumbo, OAL 3.720″.
The .338 Lapua Magnum is a jumbo-sized cartridge, that’s for sure…
Donor Barrel Sacrificed for Science
Rifleshooter.com’s Editor explains: “Brandon from Precision Addiction offered to send us his .338 barrel for our .338 Lapua Mag test. I took him up on his offer and he sent me his used Pac-Nor chrome-moly barrel with about 600 rounds though it. This thing was a beast! A heavy 1.350″ shank that ran straight for 6″, until tapering to 1″ at 30″ in length.”
Results Summary
.338 Lapua Magnum with 250gr Sierra MatchKings
After shortening the barrel from 30″ to 17″, total velocity reduction for the 250-grainers was 395 FPS, an average loss of 30.4 FPS per 1″ cut. The amount of velocity loss per inch rose as the barrel got shorter, with the biggest speed reduction, a loss of 55 FPS, coming with the cut from 18″ to 17″.
Start Velocity: 2942 FPS | End Velocity: 2547 FPS | Average Loss Per Inch: 30.4 FPS
.338 Lapua Magnum with 300gr Sierra MatchKings
Shooting the 300-grainers, total velocity reduction was 341 fps, an average of 26.2 FPS loss per 1″ cut (30″ down to 17″). However, the speed actually increased with the first cut from 30 inches to 29 inches. The tester noted: “The 300 SMK load showed a slight increase from 30″ to 29″. I’ve recorded this in other tests and it seems to be more common with a heavier load. I suspect it is primarily due to the small sample sizes being used along with the relative proximity of muzzle velocities in adjacent lengths.”
Start Velocity: 2833 FPS | End Velocity: 2492 FPS | Average Loss Per Inch: 26.2 FPS*
*Velocity rose with first cut. Velocities ranged from 2,871 FPS (29″) to 2,492 FPS (17″) for a total velocity loss of 341 FPS.
RifleShooter.com crunched the velocity numbers in some interesting ways. For example they analyzed rate of velocity loss, concluding that: “after the initial rate change, the rate of the change in velocity is fairly consistent.” (View Rate of Change Graph)
How Velocity Loss Alters Long-Range Ballistics
The testers wanted to determine how the velocity reductions “affect our ability to hit targets downrange”. So, Rifleshooter.com plotted changes in elevation and wind drift at all barrel lengths. This revealed something interesting — drift increased significantly below 26″ barrel length: “Above 26″ things look pretty good, below 22″ they change quickly.”
We highly recommend you read the whole story. Rifleshooter.com put in serious time and effort, resulting in solid, thought-provoking results. The data is presented in multiple tables and graphs, revealing inch-by-inch velocities, change “deltas”, and SDs at each length.
Here’s a little known fact that may startle most readers, even experienced gunsmiths: your barrel wears out in a matter of seconds. The useful life of a typical match barrel, in terms of actual bullet-in-barrel time, is only a few seconds. How can that be, you ask? Well you need to look at the actual time that bullets spend traveling through the bore during the barrel’s useful life. (Hint: it’s not very long).
Bullet-Time-in-Barrel Calculations
If a bullet flies at 3000 fps, it will pass through a 24″ (two-foot) barrel in 1/1500th of a second. If you have a useful barrel life of 3000 rounds, that would translate to just two seconds of actual bullet-in-barrel operating time.
Ah, but it’s not that simple. Your bullet starts at zero velocity and then accelerates as it passes through the bore, so the projectile’s average velocity is not the same as the 3000 fps muzzle velocity. So how long does a centerfire bullet (with 3000 fps MV) typically stay in the bore? The answer is about .002 seconds. This number was calculated by Varmint Al, who is a really smart engineer dude who worked at the Lawrence Livermore Laboratory, a government think tank that develops neutron bombs, fusion reactors and other simple stuff.
On his Barrel Tuner page, Varmint Al figured out that the amount of time a bullet spends in a barrel during firing is under .002 seconds. Al writes: “The approximate time that it takes a 3300 fps muzzle velocity bullet to exit the barrel, assuming a constant acceleration, is 0.0011 seconds. Actual exit times would be longer since the bullet is not under constant acceleration.”
We’ll use the .002 number for our calculations here, knowing that the exact number depends on barrel length and muzzle velocity. But .002 is a good average that errs, if anything, on the side of more barrel operating life rather than less.
So, if a bullet spends .002 seconds in the barrel during each shot, and you get 3000 rounds of accurate barrel life, how much actual firing time does the barrel deliver before it loses accuracy? That’s simple math: 3000 x .002 seconds = 6 seconds.
Gone in Six Seconds. Want to Cry Now?
Six seconds. That’s how long your barrel actually functions (in terms of bullet-in-barrel shot time) before it “goes south”. Yes, we know some barrels last longer than 3000 rounds. On the other hand, plenty of .243 Win and 6.5-284 barrels lose accuracy in 1500 rounds or less. If your barrel loses accuracy at the 1500-round mark, then it only worked for three seconds! Of course, if you are shooting a “long-lived” .308 Win that goes 5000 rounds before losing accuracy, then you get a whopping TEN seconds of barrel life. Anyway you look at it, a rifle barrel has very little longevity, when you consider actual firing time.
People already lament the high cost of replacing barrels. Now that you know how short-lived barrels really are, you can complain even louder. Of course our analysis does give you even more of an excuse to buy a nice new Bartlein, Krieger, Shilen etc. barrel for that fine rifle of yours.
To err is human… Sooner or later you’ll probably get a case stuck in a die. This “fix-it” article, which originally appeared in the Western Powders Blog, explains the procedure for removing a firmly stuck cartridge case using an RCBS kit. This isn’t rocket science, but you do want to follow the directions carefully, step-by-step. Visit the Western Powders Blog for other helpful Tech Tips.
Curing the Stuck Case Blues
Sticking a case in the sizer die is a rite of passage for the beginning handloader. If you haven’t done it yet, that’s great, but it probably will eventually happen. When it does, fixing the problem requires a bit of ingenuity or a nice little kit like the one we got from RCBS.
The first step is to clear the de-capping pin from the flash hole. Just unscrew the de-capping assembly to move it as far as possible from the primer pocket and flash hole (photo at right). Don’t try to pull it all the way out. It won’t come. Just unscrew it and open as much space as possible inside the case.
Place the die upside down in the padded jaws of a vise and clamp it firmly into place. Using the supplied #7 bit, drill through the primer pocket. Be careful not to go too deeply inside the cartridge once the hole has opened up. It is important to be aware that the de-capping pin and expander ball are still in there and can be damaged by the bit.
Drill and Tap the Stuck Case
Once the cartridge head has been drilled, a ¼ – 20 is tap is used to cut threads into the pocket. Brass is relatively soft compared to a hardened tap, so no lube is needed for the tapping process. RCBS says that a drill can be used for this step, but it seems like a bit of overkill in a project of this nature. A wrench (photo above right) makes short work of the project.
RCBS supplies a part they call the “Stuck Case Remover Body” for the next step. If you are a do-it-yourselfer and have the bit and tap, this piece is easily replicated by a length of electrical conduit of the proper diameter and some washers. In either case, this tool provides a standoff for the screw that will do the actual pulling.
With an Allen Wrench, Finish the Job
Run the screw through the standoff and into the tapped case head. With a wrench, tighten the screw which hopefully pulls the case free. Once the case is free, clamp the case in a vice and pull it free of the de-capping pin. There is tension here because the sizing ball is oversized to the neck dimension as part of the sizing process. It doesn’t take much force, but be aware there is still this last little hurdle to clear before you get back to loading. Don’t feel bad, everyone does this. Just use more lube next time!
Article find by EdLongrange. We welcome reader submissions.
Berger Twist-Rate Stability Calculator
On the updated Berger Bullets website you’ll find a handy Twist-Rate Stability Calculator that predicts your gyroscopic stability factor (SG) based on mulitiple variables: velocity, bullet length, bullet weight, barrel twist rate, ambient temperature, and altitude. This very cool tool tells you if your chosen bullet will really stabilize in your barrel.
LIVE DEMO BELOW — Just enter values in the data boxes and click “Calculate SG”.
How to Use Berger’s Twist Rate Calculator
Using the Twist Rate Calculater is simple. Just enter the bullet DIAMETER (e.g. .264), bullet WEIGHT (in grains), and bullet overall LENGTH (in inches). On its website, Berger conveniently provides this info for all its bullet types. For other brands, we suggest you weigh three examples of your chosen bullet, and also measure the length on three samples. Then use the average weight and length of the three. To calculate bullet stability, simply enter your bullet data (along with observed Muzzle Velocity, outside Temperature, and Altitude) and click “Calculate SG”. Try different twist rate numbers (and recalculate) until you get an SG value of 1.4 (or higher).
Gyroscopic Stability (SG) and Twist Rate
Berger’s Twist Rate Calculator provides a predicted stability value called “SG” (for “Gyroscopic Stability”). This indicates the Gyroscopic Stability applied to the bullet by spin. This number is derived from the basic equation: SG = (rigidity of the spinning mass)/(overturning aerodynamic torque).
At the Berger SW Nationals this week in Phoenix, the nation’s top long-range shooters will try to put all their shots in the 10-Ring at 800, 900, and 1000 yards. A good foundation in ballistics is vital if you want to succeed in the long-range game.
How much do you know about BCs, Bullet Shapes, Trajectories, Wind Drift, and other things in the realm of External Ballistics? You can test your knowledge of basic Ballistics principles with this interactive quiz. The questions and answers were provided by Ballistics Guru Bryan Litz of Applied Ballistics LLC. Bryan is the author of Applied Ballistics for Long-Range Shooting and other popular resources in print, DVD, and eBook format. Have fun with our Quiz.
The Quiz contains ten (10) questions. When you complete all ten questions, you can see your results, along with the correct answers.
Many of our Forum members shoot an “improved” 6mmBR cartridge. This might be a 30°-shoulder 6mm BRX, or a 40°-shoulder 6mm Dasher, or the 6mm BRDX, which is very similar to the Dasher, but with a slightly longer neck. This Editor shoots a 6mm BRDX and has found it very accurate, and maybe a bit easier to fire-form than a standard Dasher. Speaking of fire-forming, in our Shooters’ Forum, we often see questions about fire-forming BRX/Dasher brass. For those who need a large number of BRX or Dasher cases, one option to consider is using pistol powder in a dedicated fire-forming barrel. Here’s an explanation of how this process can work.
Forum member Skeeter has a 6mm Dasher falling block varmint rifle. The Dasher case is based on the 6mmBR Norma cartridge with the shoulder blown forward about 0.100″ and out to 40°. This gives the Dasher roughly 3.5 grains added capacity compared to the standard 6BR.
A few seasons back, Skeeter needed to form 300 cases for varmint holiday. Skeeter decided to fire-form his brass without bullets. This method avoids barrel wear and saves on components. There are various ways to do this, but Skeeter chose a method using pistol/shotgun powder, some tissue to hold the powder in place, Cream of Wheat filled to within an 1/8″ of top of the neck, and a “plug” of tissue paper to hold it all in place. Shown below are cases filled with a pistol/shotgun powder charge topped with Cream of Wheat and then a tissue paper plug.
To ensure the case headspaced firmly in his Dasher chamber, Skeeter created a “false shoulder” where the new neck-shoulder junction would be after fire-forming. After chamfering his case mouths, Skeeter necked up all his cases with a 0.257″ mandrel (one caliber oversized). Then he used a bushing neck-sizing die to bring the top half of the neck back down to 0.267″ to fit his 0.269″ chamber. The photo below shows how the false shoulder is created.
After creating the false shoulder, Skeeter chambered the cases in his rifle to ensure he could close the bolt and that he had a good “crush fit” on the false shoulder, ensuring proper headspace. All went well.
The next step was determining the optimal load of pistol powder. Among a variety of powders available, Skeeter chose Hodgdon Titewad as it is relatively inexpensive and burns clean. The goal was to find just the right amount of Titewad that would blow the shoulder forward sufficiently. Skeeter wanted to minimize the amount of powder used and work at a pressure that was safe for his falling block action.
Working incrementally, Skeeter started at 5.0 grains of Titewad, working up in 0.5 grain increments. As you can see, the 5.0 grain charge blew the shoulder forward, but left it a hemispherical shape. At about 7.0 grains of Titewad, the edge of the shoulder and case body was shaping up. Skeeter decided that 8.5 grains of Titewad was the “sweet spot”. He tried higher charges, but the shoulder didn’t really form up any better. It will take another firing or two, with a normal match load of rifle powder and a bullet seated, to really sharpen up the shoulders. Be sure to click on the “View Larger Image” link to get a good view of the cases.
The process proved to be a success. Skeeter now has hundreds of fire-formed Dasher cases and he hasn’t had to put one bullet through his nice, new match-grade barrel. The “bulletless” Cream of Wheat method allowed him to fire-form in a tight-necked barrel without neck-turning the brass first. The only step now remaining is to turn the newly Dasher-length necks down about .0025″ to fit his 0.269″ chamber. (To have no-turn necks he would need an 0.271″ or 0.272″ chamber).
Skeeter didn’t lose a single case: “As for the fire-forming loads, I had zero split cases and no signs of pressure in 325 cases fire-formed. Nor did I have any misfires or any that disbursed COW into the action of the firearm. So the COW method really worked out great for me and saved me a lot of money in powder and bullets.”
Skeeter did have a fire-forming barrel, but it was reamed with a .269 chamber like his 10-twist Krieger “good” barrel. If he fire-formed with bullets, he would have to turn all 300 necks to .267″ BEFORE fire-forming so that loaded rounds would fit in the chamber. Judging just how far to turn is problematic. There’s no need to turn the lower part of the neck that will eventually become shoulder–but how far down the neck to turn is the issue. By fire-forming without bullets now he only has to turn about half the original neck length, and he knows exactly how far to go.
Boresighting the old-fashioned way — by looking down the bore of a rifle at a target — is not difficult. With a conventional bolt-action rifle, visual bore-sighting can be done quickly and easily: rest your gun securely on bags, remove your bolt and set up a 50-yard target with a large bright orange or black center circle. Look through the back of the action and you should be able to sight down the bore with your own eyes just fine. There’s no need for expensive hardware. In fact it may be easier to bore-sight the “old-fashioned way” rather than try to see a laser in bright sunlight at 50 yards (or even 25).
However, with lever guns and semi-auto rifles, including the popular AR15, M1 Garand, and M1A service rifles, the design of the receiver may make it virtually impossible to sight down the bore with the naked eye. That’s where a modern laser bore-sighting device comes in handy. For those situations where a bore-sighting tool is actually needed, we recommend a laser bore-sighter that fits inside your chamber. The in-chamber configuration is more fool-proof, and is inherently safer.
In-Chamber Laser Should Be Safer
Among the laser bore-sighters available on the market, we strongly favor those that fit in the chamber, rather than in the bore. With muzzle-entry laser bore-sighters, you could have a nasty accident if you forget to remove the device. There is always the chance you could chamber and fire a round with the muzzle-entry bore-sighter still in place. Instant Kaboom. That has happened more than once. With an in-chamber bore-sighter, there is no possibility you could chamber a loaded round with the bore-sighter in place. That’s an important safety advantage. Sightmark in-chamber bore-sights are shown in the video below. You can see that, with the bore-sighter in place, you cannot chamber a live round.
In-Chamber Bore-Sighters for Rifles Sightmark offers compact laser bore-sighters that fit inside your firearm’s chamber. The laser is housed in a brass assembly machined to duplicate a cartridge. These are easy to use — simply twist the end-cap to activate the laser, then place the bore-sighter in the rifle’s chamber. The affordable ($29.99 – $35.77) Sightmark boresighters are offered in a wide variety of pistol, shotgun, and rifle “chamberings”. Rifle options include: 17 HMR, .223 Rem, 22-250 30/30, .308 Win Family, .25-06/.270/.30-06, 6.5×55, .270/.300 WSM, .300 Win Mag, 50 BMG, and many other large hunting calibers. SEE Full Product Line.
Cabela’s also offers a Professional .223 Laser Chamber Boresighter that fits in a .223 Rem rifle chamber. This $59.99 unit, shown below, can be adapted to other chamberings by adding a caliber-specific sleeve over the .223 core unit.
Adapt Basic Unit to other Calibers with Sleeves
Cabela’s Professional .223 Laser Chamber Boresighter unit can be used for a variety of chamberings by fitting additional $19.99 caliber-specific sleeves (sold separately). Each sleeve is precision-machined from brass to SAAMI specs. One purchaser notes: “Extremely well made, the fit is so precise that I would recommend using a drop or two of light oil on the 223 laser insert before fitting it into the sleeve.” Available chamber sleeve calibers include:
While many folks enjoy the convenience of an electronic powder scale/dispenser such as the RCBS Chargemaster, some hand-loaders still prefer to use a traditional balance beam. Balance beam scales are simple, compact, and don’t suffer from electronic “glitches”. Moreover, even if you use a digital dispenser at home, when you’re doing load development at the range, a balance-beam scale may be more convenient. A scale doesn’t require electrical power, so you don’t need to bring battery packs or string long power cables. Just bring some kind of box to shelter your beam scale from the wind.
While designs like the RCBS 10-10 are decent performers as built, they can be made much more precise (and repeatable), by “tuning” of key parts. Forum member Scott Parker (aka SParker) optimizes a variety of popular beam scales, including the Ohaus 10-10 (USA-made model), RCBS 10-10 (USA-made model), RCBS 5-10, Lyman M5, Lyman D5, and others. You send Scott your scale, he tunes the key components, tests for precision and repeatability, and ships it back to you. The price is very affordable (under $85.00).
Scott tells us: “I have tuned several 10-10s. They all have turned out very sensitive, consistent and hold linearity like a dream. If only they came that way from the factory. The sensitivity after tuning is such that one kernel of powder registers a poise beam deflection. For repeatability, I remove the pan and replace it for the zero 10 times. The zero line and the poise beam balance line must coincide for each of those 10 tries. I then set the poises to read 250.0 grains. I remove and replace the pan 10 times with the calibration weight. For linearity, the poise beam balance line and the zero line should coincide within the line width. This is roughly one half a kernel of powder. For repeatability, the poise beam balance line must return to that same balance point ten times. I then adjust the poises back to zero and recheck the zero. I have a master’s degree in chemistry, thus I am very familiar with laboratory balances. Email me at vld223 [at] yahoo.com or give me a call at (661) 364-1199.”
The video above, created by British shooter Mark (aka 1967spud), shows a 10-10 beam scale that has been “tuned” by Scott Parker. In the video, you can see that the 10-10 scale is now sensitive to one (1) kernel of powder. Mark also demonstrates the’s scale’s repeatability by lifting and replacing a pan multiple times. You can contact Mark via his website, www.1967spud.com. To enquire about balance-beam scale tuning, call Scott Parker at (661) 364-1199, or send email to: vld223 [at] Yahoo.com.
Video tip from Boyd Allen. We welcome reader submissions.
Most of us have access to a printer at home or at work. That means you can print your own targets. You’ll find hundreds of free target designs online, including dozens of downloadable targets on our AccurateShooter.com Target Page. If you’re feeling creative, you can design your own target with a computer drawing program such as MS Paint.
Paper Stock Is Important
If you want your self-printed targets to show shots cleanly (and not rip when it gets windy), you should use quality paper stock. We recommend card stock — the kind of thick paper used for business cards. Card stock is available in both 65-lb and 110-lb weights in a variety of colors. We generally print black on white. But you might experiment with bright orange or yellow sheets. Forum Member ShootDots report: “They sell cardstock at Fed-Ex Kinko! I use either Orange or Yellow. That makes it easy to see the bullet holes clearly.” On some printers, with the heavier 110-lb card stock, you will need to have the paper exit through the rear for a straighter run.
Here are some Target-Printing Tips from our Forum members:
“Staples sells a 67-lb heavy stock that I have settled on. I use the light grey or light blue, either of these are easy on the eyes on bright days. I have used the 110-lb card stock as well and it works fine. It’s just a little easier to print the lighter stuff.” (JBarnwell)
“Cardstock, as mentioned, works great for showing bullet holes as it doesn’t tear or rip like the thin, lightweight 20-lb paper. I’ve never had a problem with cardstock feeding in the printer, just don’t stick too many sheets in there. If I need three targets, I load only three card stock sheets”. (MEMilanuk)
“I’ve used Staples Sticker paper. This works well and no staples are required (joke intended). It helps if you put slight tension on the lighter weight paper when mounting it on the target frame.” (Mac 86951).
Here are some tips for using lighter weight paper (if you want to save money or your printer won’t work with heavier stock):
“20-lb bond works pretty well for me if I use a spray adhesive and stick the entire back of the paper’s surface to the backer board.” (Lapua40X)
“I use the regular 20-lb paper but the only time it tears is when there is no backer to support it. This can be an issue when going to a public range and the backer are all shot out. I use a large construction paper backer that I clip onto the stands.” (CPorter)
Here Are Three of Our Favorite Targets. Click to Download PDFs.
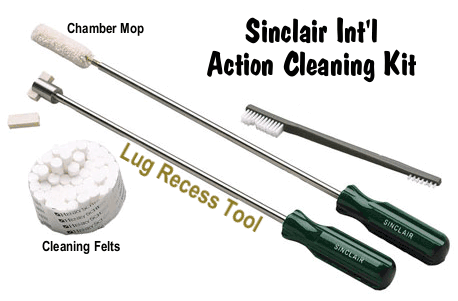
Most competitive shooters are pretty good about bore cleaning (some may even clean their bores too aggressively). However, we’ve found that many shooters neglect the chamber area and the bolt lug recesses. It’s too easy to clean the bore, slip out the guide rod and say “I’m done.” Sinclair Int’l explains why it’s important to clean the action interior: “Shooters use a lot of grease and oil on their bolts to reduce friction and to prevent wear[.] Unfortunately, both of these compounds attract grit, powder and primer residues. Cleaning your receiver is especially critical [with] custom actions where the fit between the action and bolt is held to very tight tolerances. Routine cleaning of the action will prevent unnecessary wear on the bolt body, locking lugs, and the action raceways/guide rails. Frequent action cleaning is also essential to keeping the trigger area free of debris which can cause trigger hang-ups and failures.” Below, we present action cleaning advice from Sinclair’s Reloading Press Newsletter.
Cleaning the Chamber
Combustion by-products, lubricants, and solvent residues can collect in your chamber. Severe build-up of grease and carbon can interfere with chambering. Also some solvents will promote corrosion. You need to keep your chambers clean.
1) Install a clean cotton mop of the correct size on the end of a chamber rod and insert the mop into the chamber. Rotate the mop several times to remove any brush bristles left behind and any excess solvent that was between the rod guide snout and the end of the chamber. Make sure the chamber is dry. Prior to storing a rifle you can oil the chamber but make sure the oil is removed prior to firing the rifle.
2) Alternatively, install an old bore brush on a chamber rod, overlap a couple of patches on the brush bristles, and wrap them around the brush completely. Then insert the patch-covered brush into the chamber while rotating it to remove the excess solvent and debris. Push it firmly into the neck area of the chamber. A similar method is to pierce a large patch on the end of the brush loop and insert it into the action, again rotating the brush as you push the patch up against the breech.
Cleaning the Lug Recess Area
The action lug recess area is one of the dirtiest places on a bolt-action rifle. To properly clean this area, always use a tool designed for the task, such as the $21.50 Sinclair Action Cleaning Tool (part # ACT1) which is part of the Sinclair Action Cleaning Tool Kit (now on sale for $29.99, part #ACT2).
1) Insert a cotton roll or cleaning felt into your lug recess cleaning tool and wet both ends and the face of the cotton roll/felt with solvent.
2) Insert the tool into the action and push it forward until it is positioned fully in the lug recess area and rotate the tool head several times. Then reverse the rotation for another few turns. While rotating the tool move it slightly in and out to cover the entire recess area and to also clean the breech face.
3) Remove the tool from the action and inspect the surface of the felt or cotton roll. If there is quite a bit of residue on both sides of the felt/roll, then repeat with another wet felt/roll.
4) When you feel the recess area is completely clean, insert a dry cotton roll into the tool and rotate the tool head to remove any remaining solvent and debris. If necessary, use a second dry cotton roll.
5) You can follow this step up with another pass of a mop or patches into the chamber to get any debris or solvent that pushed forward out of the lug recess area.
Cleaning Tips from The Reloading Press, used courtesy Sinclair Int’l, All Rights Reserved.




 Gone in Six Seconds. Want to Cry Now?

 Sticking a case in the sizer die is a rite of passage for the beginning handloader. If you haven’t done it yet, that’s great, but it probably will eventually happen. When it does, fixing the problem requires a bit of ingenuity or a nice little kit like the one we got from RCBS.


 Most of us have access to a printer at home or at work. That means you can print your own targets. You’ll find hundreds of free target designs online, including dozens of downloadable targets on our