Top to bottom – Remington firing pin assembly with ISS, Tubb SpeedLock alloy-composite system without ISS (current versions have dual, opposite-wound springs), and Remington short action firing pin assembly without ISS.
Each Wednesday, the U.S. Army Marksmanship Unit publishes a reloading “how-to” article on the USAMU Facebook page. Last week’s “Handloading Hump Day” article covered mechanical issues and related ignition irregularities that can cause vertical fliers even with good ammunition in an otherwise excellent rifle. We highly recommend you read this article, which offers some important tech tips.
Vertical Dispersion: Mechanical/Ignition Issues?
Poor or inconsistent ignition has long been known to be one of the “usual suspects” when one encounters vertical fliers that just shouldn’t be there. By having a sense of some of the basic principles involved, and a few basic areas to check, the shooter may avoid colsiderable frustration, not to mention time, expensive loading components and barrel wear.
Is your well-built rifle of high-quality components plagued with vertical fliers across more than 1-3 handload combinations? Consider the bedding, crown and scope/sight mounts. Are they correct? If so, then you might check for ignition issues before boldly undertaking an extensive, expensive, and quite possibly fruitless quest for the “magic handload”.
SEEING IS BELIEVING: While the author had been aware for many years that poor ignition should be considered and ruled out when dealing with vertical fliers in an otherwise-excellent rifle, actually seeing the problem and its almost instantaneous cure really drove the lesson home.
He was working with a “dot” rifle – a .22 LR match rifle that really stacked bullets into little piles at 50 yards and beyond. With one lot of ELEY Tenex, it produced consistent “bughole” groups at 50, but with another, selected lot of Tenex, similar groups were regularly ruined by single, vertical fliers that did not appear in other rifles. Rather than spending days burning up expensive, select ammunition looking for “magic lots”, he contacted a well-respected rimfire gunsmith and explained the situation.
Without so much as batting an eye, the highly-experienced ‘smith tore into the rifle’s action, and quickly found the cause(s) of the problem. He discovered a demonstrably weak firing pin spring, plus a chip out of the face of the firing pin where it contacted the cartridge rim.
After replacing and tuning the offending parts, the rifle immediately began shooting tiny, bughole groups with the previously “unacceptable” lot of Tenex. Centerfire rifles can also benefit from ensuring positive, consistent ignition. A wise riflesmith is literally worth his weight in gold!
So, what are some issues we as shooters can inspect in our rifles to help determine if ignition woes could be part of our problem? At the club level, ask yourself if that “experienced” Remington, Winchester 70, or even Springfield-based match bolt gun you’re using is still running its’ original 40-80 year-old factory striker spring? If so, a new replacement is cheap insurance against current or future problems. (And BTW, it might be best to stick to the normal, factory-spec spring weight. A super-powerful spring can cause vertical, just as a weak one one can.) Along with that, a routine check for proper firing-pin protrusion is a quick preventive measure that can rule out potential issues.
Other areas to consider are the centering and consistency of the firing pin’s operation in the bolt. Admittedly, with the increasing use of precision-machined custom actions, this is becoming less an issue every day. Below is the firing pin assembly from a custom BAT action:
However, particularly with factory actions, a very quick and easy check is to remove the bolt, let the firing pin go forward, and look at the firing pin tip through the firing pin hole. Is the tip off-center in the hole, and possibly striking it as it moves forward? Is the hole out-of-round or burred from being struck repeatedly? If so, a trip to the riflesmith is likely in order.
Similarly, machining issues in the bolt/firing pin system can lead to rough and erratic firing pin movement, in which the firing pin drags against an internal surface of the bolt. In high-quality rifles these issues are relatively rare, but not unheard-of, and it takes mere minutes to rule them out. It may be worthwhile to remove the cocking piece/firing pin/spring assembly and look for any unusual gouges, dings, peening, burrs or signs of abnormal wear.
This task is especially easy with Winchester 70s, Springfields, and the similar Mauser 98s, involving little more than the push of a button and unscrewing the cocking piece assembly. This is just one of the many reasons these tried-and-true actions have earned such a loyal following in the field, among hunters who must maintain their rifles away from a shop.
Particularly with older rifles, watch for and remove excess grease (or even Cosmoline!) from both the firing pin assembly and inside the bolt. This can help improve firing pin speed and consistency. Other bolt-action designs may need a take-down tool or other measures.
As part of this inspection, AFTER ENSURING THE RIFLE IS UNLOADED, slowly cock the rifle, dry-fire, and repeat several times. Listen carefully near the action for inconsistency in the sounds it generates. Does the striker falling make the same sound each time? Do you hear or feel grinding upon operation? If so, where?
Be sure to check the operation of the cocking piece (bolt shroud), firing pin within the bolt shroud, the cocking piece cam and the rear of the bolt body where the cocking piece cam operates. As with our examination for abnormal wear marks discussed above, look for marks indicating roughness or a possible need for light polishing. Then, clean and lightly grease the bearing surfaces while you’re at it.
Remington 700 bolt shroud and cocking cam
These are relatively easy checks that shooters can undertake to perform a preliminary inspection on their own. Other mechanical issues can also cause ignition issues, chiefly centered around the action of the trigger, sear and sear spring. If these are suspected, a trip to an experienced, qualified riflesmith for diagnosis is recommended. We hope you find this information helpful! Join us again next week, and in the meantime, enjoy the shooting sports safely!
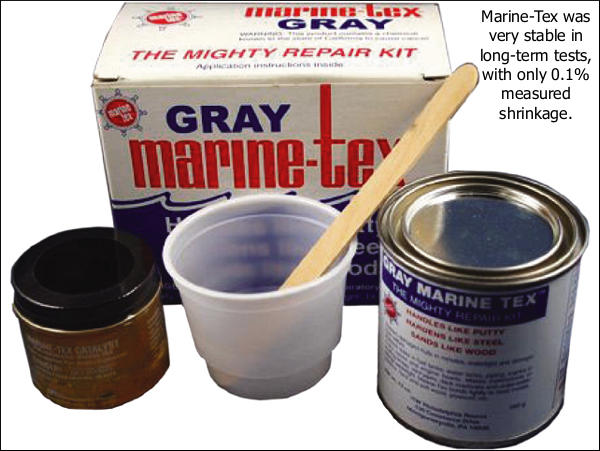
A customer of well-known gunsmith (and Hall-of-Fame shooter) Thomas “Speedy” Gonzalez recently asked Speedy about bedding compounds. Speedy offered some interesting advice based on long-term testing of various materials. Speedy favors Marine-Tex because it is very stable over time, while other materials can shrink up to 6% dimensionally. A good bedding job should be a perfect fit to your barreled action. If the bedding material shrinks over time, that is NOT a good thing….
Speedy’s customer asked: “I know you’re not a Devcon man in regards to bedding compounds but I respect your input in such matters and my question is this in regard to aluminum actions. If Devcon was considered, for an aluminum action, would you prefer aluminum compound formula or steel formula? I personally prefer Devcon steel and Marine-Tex for steel receivers but my experience with aluminum is limited. Also do you have a release agent preference that works better with aluminum?”
Speedy answered: “My only preference of one epoxy over another is their stability over time. My buddy who works for the Texas State Weights and Measures Department had me cast several of the most common types of epoxies used for bedding into 1.000″ machined blocks. After one year of being kept in a controlled climate and measured for shrinkage monthly, the Marine Tex shrunk only 1/10th of 1% (i.e. 0.1%) whereas almost all the others (including Devcon Steel formula, Devcon Aluminum formula…) shrunk 3% to 6%. The only other compounds that matched the Marine Tex were Araldite 1253 and Araldite 2014, with the latter being quite expensive for daily use.”
Speedy added: “The Marine Tex Grey has no atomized metal in its makeup even though it appears that it does. This can be proven by the use of a strong neodymium magnet. What is humorous to me is that people don’t like aluminum yet will bed their actions atop aluminum pillars that have twice the coefficient of expansion (COE) of steel. Like Devcon, it is what people have always done and used. Thus [they] perpetuate the same old stuff. That’s my two cents’ worth. But as I tell everyone, ‘I’ll tell you what I know or do, but it’s not my job to convince anyone to do it my way’.”
Release Agents — Try Shoe Polish
Regarding release agents, Speedy stated: “I use Kiwi Neutral or Tan shoe polish. This works great and you can find it anywhere. Do NOT use the black or brown as it will stick.”
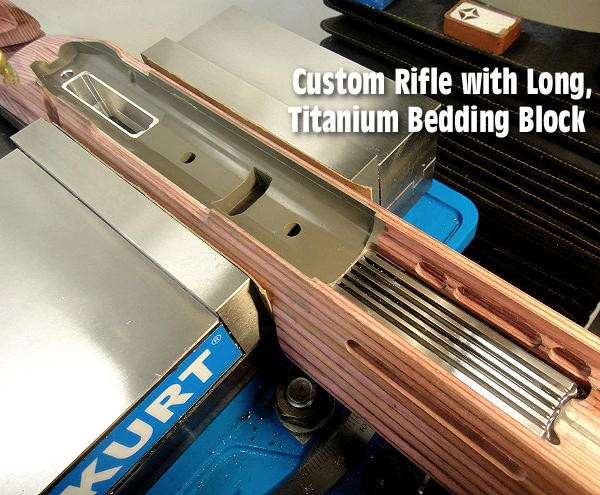
View More Photos of Speedy Inletting and Bedding Job CLICK HERE to see an interesting bedding job done by Speedy using a custom titanium bedding block. Speedy notes, “The stock was a raw blank requiring full inletting for the action to fit properly plus the titanium block. All the loading ports, bolt handle cut, bolt stop, and trigger guard cuts were done with diamond tooling to eliminate fraying and/or delamination of the wood.” You’ll find more projects by Speedy on his Facebook Page. Speedy is in San Antonio, Texas now, and accepting new projects with his company S.G. Rifles LLC.
There are many reasons you might want to make a chamber cast. You may have acquired an older rifle and need to verify the chamber dimensions. Or, if you have a new reamer, you may want to check the exact “cut” dimensions against the blueprint specs. A chamber casting is also valuable if you run across a firearm that you believe has a custom barrel on it and you want to find out the dimensions of the chamber. Lastly, you may want to prepare a chamber casting to be used in the making of custom dies. (Most reloading die makers know how to work from Cerrosafe chamber casts.)
Cerrosafe is a metal alloy that has some unique properties which make it ideal for chamber casting. First, it has a relatively low melting point of 158 to 190° Fahrenheit. This makes it easy for the handloader to melt the Cerrosafe in his home shop. Second, it shrinks slightly during cooling which allows it to be extracted from the chamber easily. It then re-expands to the chamber’s original size after about one hour at room temperature. After cooling for about 200 hours, the chamber cast will expand to about .0025″ larger than the actual chamber size.
One of our Forum members has done many Cerrosafe castings and he offers this smart advice:
1. Remove the barrel from the action to make the pour much easier. If you don’t remove the barrel, it can be hard to pour through the action (even with a funnel) and can make a mess if you’re not careful.
2. Pre-heat the barrel for 5-10 minutes in the oven on the very lowest setting (170° F in my oven). (DON’T overdo it!). Allow to cool for a couple minutes so you can pick it up and it is under 120° F. Pre-heating the barrel helps the Cerrosafe stay liquid as you pour the casting. This helps ensure a good, complete fit to the chamber.
How to Use Cerrosafe for Chamber Casting
The basic ingredient of Cerrosafe is bismuth. Bismuth is a heavy, coarse, crystalline metal which expands when it solidifies, up to 3.3% of its volume. When bismuth is alloyed with other metals, such as lead, tin, cadmium and indium, this expansion is modified according to the relative percentages of bismuth and other components present. As a general rule, bismuth alloys of approximately 50% bismuth exhibit little change of volume during solidification. Alloys containing more than this tend to expand during solidification and those containing less tend to shrink during solidification.
What all this means for the gunsmith is that you can make chamber castings using only Cerrosafe and a few, simple hand tools. To make a chamber casting, first clean and degrease the chamber. Use a tight-fitting, cotton patch that’s wrapped around a bore mop or brush to plug the bore just ahead of the throat. I usually leave the cleaning rod attached to the plug until it’s time to remove the plug. Melt the entire bar of Cerrosafe in a heatproof container that you can easily pour the hot Cerrosafe out of. You can use a propane torch or heat over a hot plate or the burner of a stove. Cerrosafe melts easily at 158°-195° F. While the casting metal is still liquid, stir very well, skim off the dross, and pour your chamber. The real trick with Cerrosafe is not to overheat it. If you heat the solid slowly, and keep it within the required temperature range, you shouldn’t get any dross.
Note the time the casting was poured. The casting will take only a very short time to solidify, usually within a minute. Wait 30 minutes and then remove the plug from the bore. Turn the muzzle upward and the casting will fall from the chamber. At 30 minutes after initial solidification, Cerrosafe shrinks slightly, so removal is very easy. Allow the new casting to cool thoroughly then measure the casting exactly one hour from the time it was cast. The casting will give you an exact measurement of the chamber. Cerrosafe casting metal can be used over and over. Remelt the entire amount back together and pour the Cerrosafe into a small mold of the appropriate size. Always melt the entire Cerrosafe ingot to make a chamber casting. For best results, never cut off, or use, just a part of the ingot.
Brux Barrels, based in Lodi, Wisconsin, has earned a reputation for producing great-shooting tubes. Brux-made barrels have won their fair share of matches, and set some notable records in the process. A few years back, Rodney Wagner shot the smallest five-shot, 600-yard group (0.336″) in the history of rifle competition, using a Brux barrel chambered for the 6mm Dasher.
Folks often ask us why Brux barrels shoot so well. “What’s the secret?” they ask. We can only answer with what Brux explains on its own website: “To make a cut-rifled barrel you have to start off with the proper ingredients: the best steel available, skill, and experience. Since there are really only two main suppliers of barrel-quality steel, the skill and experience is what really makes a barrel maker stand out.” Here is how Brux’s co-owners, Norman Brux and Ken Liebetrau, explain all the procedures involved in making a Brux cut-rifled barrel:
Brux Barrel-Making Process, Start to Finish
We start out with either 4150 chrome-moly or 416R stainless steel double stress-relieved bar stock. The bar stock starts out at 1-9/32″ in diameter and 20-24 feet long so we cut it to length.
Step two is to rough-contour the outside of the barrel blank in a lathe.
Thirdly, the blank gets mounted into a Barnes gun drill. The cutter bit has holes through which oil or coolant is injected under pressure to allow the evacuation of chips formed during the cutting process. This is called “oil-through” or “coolant-through”. Without this, you wouldn’t want to even attempt drilling a hole 30” long and under ¼” in diameter. The combination of a 3600rpm and good flushing allows us to drill a beautifully straight and centered hole .005” under “land” diameter at a rate of 1” per minute.
Clean the barrel.
Next the blank is sent back to the lathe to machine the finished contour of the outside.
Clean the barrel again.
Now, the blank is sent on to the Pratt & Whitney reamer in which an “oil through” reaming tool is used to cut away the extra .005” left in the drilling process. The reamer makes an extremely accurate bore size and after it is finished the bore will have a better surface finish and will be at the proper “land” diameter.
Clean the barrel again.
In the sixth step we hand lap each barrel to remove any slight tool marks that may have been left by the reamer and inspect every one with a bore scope. If the barrel doesn’t meet our standards for surface finish and tolerance it doesn’t get any further.
Clean the barrel again.
The barrels then go onto the rifling machine which is responsible for cutting the all so familiar grooves in the bore. A caliber/land configuration-specific rifling head is used to progressively shave away small amounts of steel to form the rifling grooves. This is accomplished by simultaneously pulling the rifling head through the reamed blank as the blank is spun at a controlled rate. After each cut, the blank is rotated 90 degrees (for a four-land configuration) and after one full rotation (360 degrees) the rifling head is slightly raised to shave off the next bit of material. This process is repeated until we reach groove diameter.
Clean the barrel again.
Lastly, the barrel is hand-lapped again (to ensure a smooth bore), and a final inspection is performed with the bore scope.
The barrel is cleaned one last time, wrapped, packed, and shipped to [the customer].
Anyone reading this detailed description of the Brux barrel-making process will doubtless come away with a new appreciation for the time, effort, and dedication required to produce a premium match-grade cut-rifled barrel. Obviously, there are no easy shortcuts and great attention to detail is required each step of the way. As shooters we’re lucky that we have barrel-makers so dedicated to their craft.
Credit James Mock for steering us to this Barrel Making 101 feature on the Brux website.
Many short-range Benchresters have thought about converting their 6 PPC to shoot a 30BR for score matches, or a Dasher for mid-range (or even 1000-yard) games. That way you have a rifle that does double duty, giving you the most bang for your buck. Though an action with a PPC bolt won’t normally work with 30BR/6BR/Dasher cases with their larger .308-class rim (0.4728″ diameter), there is a pretty easy solution that allows you to cycle these bigger cartridges with a 6PPC-style bolt (designed to fit .220 Russian rims).
“Rebating case rims … lets you shoot a 30BR in score matches using your PPC action. All you need is a new barrel. This saves buying another bolt, receiver, or rifle.” — Butch Lambert
Butch Lambert of ShadeTree Engineering provided this tip. Butch notes that many 6 PPC benchrest group shooters also enjoy shooting in score matches. But to be really competitive in the BR for score game, that means shooting a 30BR, which has a wider, .308-class rim (0.4728″ diameter). Likewise, if you want to compete in 600-yard registered BR events or in varmint matches, you probably want to run a bigger case, such as the 6BR, 6mm Dasher, or 6-6.5×47. Those cartridges also have the larger 0.4728″ rims.
To convert a PPC-boltface action to shoot the bigger cases you can spend a ton of money and buy a new bolt. That can cost hundreds of dollars. The simpler solution is to turn down the diameter of the larger cases on a lathe. Butch explains: “We’ve seen plenty of interest in rebating case rims. This lets you shoot a 30BR in score matches using your PPC action. All you need is a new barrel. This saves buying another bolt, receiver, or rifle if you have a PPC boltface. Anyone who has access to a lathe can do this job pretty easily. Yesterday I turned 150 case in about an hour.” Below is the lathe form tool Butch uses to rebate the case rims.
It’s December already. That means winter has definitely arrived — no doubt about it. If you plan to put away all or some of your firearms for the winter, here are TEN Tips for winterizing your firearms.
1. Bore Cleaning and Coating — Clean your barrels and neutralize any solvents you may have used. Then run a couple patches with a corrosion-fighter down the bore. We recommend Eezox or CorrosionX. Eezox leaves a glossy dry film shield with excellent rust resistance. CorrosionX is more like a conventional oil, but with special anti-rust additives. Other products may work well too. Just be wary of the “all in one” products that have a strong solvent, and don’t use any fluid that contains ammonia — this can actually promote corrosion. Here’s a test of various anti-corrosion products: Rust Block Comparison Test.
2. Crown Inspection — After cleaning the barrel, inspect the crown with a magnifying glass. If you see any unusual wear, abrasion, or “shark’s teeth” at the very outer edge of the rifling, make a note — it may be wise to recrown the barrel next spring. Before you place your rifle in the safe, we recommend putting a piece of electrical tape or blue masking tape loosely over the muzzle to protect the crown. This is just to protect the delicate crown during handling — you are NOT trying to seal off the bore.
3. Optics Storage — If your gunsafe is crowded, you may wish to remove the optics and rings from your rifles before winter storage. You can use a white crayon to mark the ring position (on the rail) for next season. We recommend that you store your optics inside a warm part of your house, where temperatures and humidity are relatively stable.
4. Trigger Group — Inspect your trigger assembly. Trigger housings accumulate dirt, grit, and oily gunk over the course of a season. If you have some basic mechanical skills, you may wish to remove the trigger from the hanger and clean it per the manufacturer’s recommendations. Don’t flood it with any kind of thick oil.
5. Bolt and Action – Clean the gunk off your bolt and raceway in your receiver. Put a thin coat of anti-corrosion product on the bolt, and re-grease the lugs and camming surfaces as recommended by the manufacturer. Don’t forget the fasteners and pins on the action and scope rail — these may not be stainless even if you have a stainless steel receiver.
6. Use Thin Gloves — When oiling firearms during the winterization process, we recommend you wear thin latex or nitrile gloves. This will prevent you from leaving skin oils and acids that can actually promote corrosion. This will also protect YOU from any chemicals in the corrosion-blockers you put on your guns.
7. Applying Surface Protectants — For blued firearms, put Eesox or other rust-fighter on a cloth and wipe the barrel and exposed metal. Eezox works best with a couple light coats. Don’t forget iron sights, bottom metal, trigger guards, bolt handles, and sling swivels — they can rust too if not protected. Use Q-Tips or small swabs to reach small, internal parts.
8. Use Gun Sacks — We put rifles and pistols in Bore-Store Gun sleeves. These thick, synthetic-fleece sacks cushion your guns, preventing nicks and scratches. The breathable fabric wicks away moisture, and the fibers are coated with corrosion inhibitors to help fight rust. Bore-Stores are offered in a wide range of sizes, so you can find something to fit everything from a Snub-nosed revolver to a 32″-barrelled 50 BMG. Rifle-size Bore Stores can be purchased for $10.00 – $22.00 from Brownells.com or Amazon.com. While we prefer Bore-Stores for regularly-used guns, if you have heirloom firearms that will be kept in storage for very long periods without seeing any use, you may want to grease them up and place them in the thin, but rugged three-layer storage bags sold by Brownells. Here’s one VITAL bit of advice for using these bags. Be absolutely sure, before you seal up the bags, that your guns are DRY and that all metal surfaces have been coated with an effective rust-blocker, such as BoeShield T9 or Eezox.
9. Take Your Guns OUT of Foam-lined Cases — These common foam-lined cases are Rust Magnets. This may be the most important Tip in this article. Just about the worst thing you can do in the winter (short of leaving your rifle outside in the rain) is to store firearms in tight, foam-padded cases. The foam in these cases actually collects and retains moisture from the air, acting as the perfect breeding ground for rust. Remember, those plastic-shelled cases with foam interiors are for transport, not for long-term storage.
10. Make Your Gun Safe Ready for Winter — If you don’t have a Goldenrod (or equivalent), buy one. Sold as a “dehumidifier”, the Goldenrod is a simple electrical element that can maintain temperature in your gun vault. This helps prevent moisture in the air from condensing on your guns. A small incandescent light-bulb can help as well (just make sure it cannot touch any flammable fabrics or objects). In addition, you may want to purchase Dessicant packs to put inside the safe to absorb moisture. If you have an electronic keypad for your safe, we recommend replacing the batteries at least once a year.
It’s December, time to decorate your Christmas tree with sparkling lights. Maybe you should do the same thing with your gun safe…
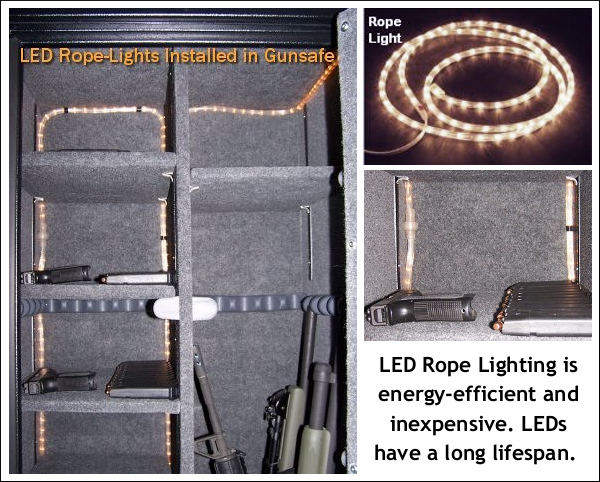
Few, if any, gun safes come with adequate factory-installed lighting. Even if you have overhead lamps in the room where your safe resides, you’ll still find that the inside of your safe is dark, making it difficult to find small items. By adding interior lighting to your gun safe, you’ll lessen the chance of “bumping and grinding” your precious firearms as you move them in and out of the safe.
Here is a simple, do-it-yourself project that costs very little money. String LED lighting is now available at low cost. Called “rope lights” or “string lights”, these are strings of LEDs in lengths of plastic tubing. Gunsafe vendors sell strings for up to $35.00 per coil, but you can buy the same products at discount chains for under $5.00. Brian J. from Virginia reports: “I just went to Wally World’s Christmas clearance section and picked up two strands of Rope Lights for $3.50 each!” He then installed the strings behind the shelves of his gunsafe, as you can see in the photos.
LED string lights draw very little electrical power and have a very long life-span so you can leave your Rope Lights running continuously in winter. In addition to illumination, LED strings will provide some warming of the air in the safe, which helps prevent rust by raising the dew point. We still recommend that you use a GoldenRod or similar warming unit, placed at the bottom of your safe, plus desiccant packs to actually absorb moisture.
As you can see, Rope Lights provide a great lighting solution that illuminates even the small dark corners of internal shelving units. Rope Lights are easy to install. Just string the lights behind your shelves. Most safes come with a pre-drilled hole in the bottom for a dehumidifier. Just slip your Rope Light power cord through this hole and plug it into the wall.
Gun Safe Buyers’ Guide
For more tips on how to illuminate your safe and protect its contents from rust and corrosion, read our Gun Safe Buyers’ Guide. The most comprehensive Gun Safe Resource on the web, this article covers a multitude of topics including lock selection (electronic vs. manual dial), fire-proofing, door hinge design, water-proofing, wall construction, rust prevention, handgun storage options, and gun safe installation.
Gun safe interior photos by Brian J., used with permission.
The 6.5 Guys have been testing the bargain-priced Magnetospeed Sporter chronograph. This compact chrono offers great utility at an affordable price — you can buy the Sporter for under $180.00. Strapped on your barrel, the MagnetoSpeed Sporter records velocities accurately without requiring any hardware to be placed downrange. Everything is self-contained at your shooting station, so you no longer have to waste time setting up tripods and aligning the bullet path through old-fashioned chrono skyscreens.
Watch Video Review of MagnetoSpeed Sporter by the 6.5 Guys:
The 6.5 Guys give the MagnetoSpeed Sporter two thumbs up:
“Optical chronographs have been in use for decades but can be cumbersome to deploy and don’t work well in certain weather conditions. The folks at MagnetoSpeed have addressed these shortcomings with a completely different technology that is extremely compact, cost effective, convenient to use, insensitive to weather conditions and, best of all, accurate.
We’ve been using the MagnetoSpeed since V1 and the only reason we use our optical chronographs is for situations where we cannot hang the bayonet from the gun barrel. This is the most convenient, accurate, and portable chronograph system that we have come across. You’re also less likely to damage your MagnetoSpeed when compared to optical chronographs (which seem to attract bullets). There are also a number of useful accessories available. As discussed in the video, the XFR adapter and associated smartphone application allows users with MagnetoSpeed Sporter and V3 displays to download their current (un-archived) shot series to their Android or iOS device.”
CLICK HERE for MagnetoSpeed Sporter specifications and operating instructions.
MagnetoSpeed Sporter in Stock Now at Grafs.com for $179.99
Priced at just $179.99 at Grafs.com, the Magnetospeed Sporter model costs less than half as much as Magnetospeed’s V3 models. This chronograph attaches directly to your barrel so you don’t have to go downrange to position tripods and set up skyscreens. For most people, the Sporter model contains all the features they need. READ Magnetospeed Sporter Review.
A fire in the home is always to be feared. And a fire in your reloading room can be disastrous. Near your reloading bench you probably have flammable solvents, and maybe gunpowder. What would happen if an electrical fire started in your reloading room? Would you be alerted? Do you have a proper fire extinguisher at hand?
Here’s a true story from Forum Member Joe O. (aka “Joecob”) that provides a valuable safety lesson. After Joe started up his old tumbler, an internal connector worked loose, causing an arc which started a fire in his basement reloading area. Luckily Joe had a functioning smoke detector, and a fire extinguisher.
Very few of us would worry about fire when we plug in a tumbler or other AC-powered reloading tool. But there is always the possibility of a malfunction and a fire. Quick thinking (and a handy extinguisher) prevented serious damage to Joe’s reloading room and house — but things could have been worse (much worse), had Joe not responded quickly.
Fire in the Reloading Room — Report by Joecob
The day before ‘Sandy’ hit I was cleaning brass the way I always have. I set the vibratory tumbler on the back of my reloading bench in the basement. I loaded the media hopper with 40 fired empty brass cases (and walnut media), plugged the cord in, turned the tumbler on and went back upstairs to watch TV. I could hear the tumbler running in the background.
About half an hour later I heard the basement smoke alarm go off. I ran downstairs. Flames were licking from the melting plastic of the tumbler.
I grabbed the nearby ABC cannister extinguisher and squirted out the fire and soaked the charred bench areas with water. Good thing I had the extinguisher! And I was glad I religiously store powder and primers properly — away from the bench (and everything else).
What caused the fire? It looks like an internal AC connector finally vibrated loose enough to arc and ignite the plastic. WHEH! I had been using that thing for 25 years the same way without mishap. Guess I should have known to periodically check the guts of a thing that plugs in and vibrates for a living?
Today I went out and bought a new even bigger ‘Pro’ ABC extinguisher, plus a dual-detector smoke alarm, and an ultrasonic cleaner. That experience was scarier than the storm. I hope this true account might help someone else to avoid a bad experience.
In his account, Joe refers to an “ABC” cannister fire extinguisher. The “ABC” refers to the fire classification rating: Class A (trash, wood, and paper), Class B (liquids and gases), and Class C (energized electrical equipment) fires. There are many brands of ABC-rated extinguishers.
The rechargeable Kidde 210 unit contains four pounds of a multipurpose monoammonium phosphate dry chemical extinguishing agent. It has a discharge time of 13 to 15 seconds, a discharge range of 10 to 15 feet, and an operating pressure of 100 PSI. The seamless aluminum cylinder measures 4.5 inches in diameter and 15.7 inches tall. The Kidde 210 has a six-year limited warranty.
Check Your Fire Extinguishers Regularly
Forum member Steve Urban says: Make sure to inspect your extinguisher every year. Turn it upside down and then right-side up. You should be able to feel the powder move freely in the extinguisher. If not, it is time to get a new one.
Many shooters are familiar with ballistics tables, weather programs, and even wind meters for smart devices, but few may know about a very handy Leveling Tool that comes factory-installed on Apple iPhones. The leveling function is a little-known option in Apple’s Compass App. It works well for a multitude of tasks.
There are a numerous reasons that a leveling tool should be in every rifleman’s range bag. From leveling optics during mounting to figuring out how much extra compensation is going to be required for a tricky angled shot, knowing just how far off things are from plumb can go a long way towards realizing success in the field.
This writer has used the leveling app on his iPhone to level a rifle on a rest while at the range. It definitely worked for “field expedient” leveling duties. That’s especially important for long-range applications. Just one degree of cant (tilt) can move your point of impact 7 inches at 1000 yards.
Of course, the iPhone level doesn’t use an actual bubble to find angles. Rather, it relies on the device’s sophisticated accelerometer to do so, and with a great degree of accuracy. Navigating to the level is done by first selecting the Compass App, at which point the device will need to be calibrated by rotating it a full 360 degrees. Once the compass is fully calibrated, simply make right swipe gesture to bring up the level — it will start operating immediately.
From there, use is intuitive and easy, like most iPhone Apps. Switching from horizontal plane to vertical is done by simply changing the physical axis of the phone. How do you know when you’ve got things just right — well the entire lower half of the screen turns green when everything is perfectly level. You’ll also see a zero° read-out, like this:
Bottom Line: If you already own an iPhone, you should definitely give this App a try. The price is right (free), and for a wide variety of tasks the iPhone Level App is actually pretty handy.



 Is your well-built rifle of high-quality components plagued with vertical fliers across more than 1-3 handload combinations? Consider the bedding, crown and scope/sight mounts. Are they correct? If so, then you might check for ignition issues before boldly undertaking an extensive, expensive, and quite possibly fruitless quest for the “magic handload”.



 Cerrosafe is a metal alloy that has some unique properties which make it ideal for chamber casting. First, it has a relatively low melting point of 158 to 190° Fahrenheit. This makes it easy for the handloader to melt the Cerrosafe in his home shop. Second, it shrinks slightly during cooling which allows it to be extracted from the chamber easily. It then re-expands to the chamber’s original size after about one hour at room temperature. After cooling for about 200 hours, the chamber cast will expand to about .0025″ larger than the actual chamber size.


 1. Bore Cleaning and Coating — Clean your barrels and neutralize any solvents you may have used. Then run a couple patches with a corrosion-fighter down the bore. We recommend
  3. Optics Storage — If your gunsafe is crowded, you may wish to remove the optics and rings from your rifles before winter storage. You can use a white crayon to mark the ring position (on the rail) for next season. We recommend that you store your optics inside a warm part of your house, where temperatures and humidity are relatively stable.
 6. Use Thin Gloves — When oiling firearms during the winterization process, we recommend you wear thin latex or nitrile gloves. This will prevent you from leaving skin oils and acids that can actually promote corrosion. This will also protect YOU from any chemicals in the corrosion-blockers you put on your guns.
 9. Take Your Guns OUT of Foam-lined Cases — These common foam-lined cases are Rust Magnets. This may be the most important Tip in this article. Just about the worst thing you can do in the winter (short of leaving your rifle outside in the rain) is to store firearms in tight, foam-padded cases. The foam in these cases actually collects and retains moisture from the air, acting as the perfect breeding ground for rust. Remember, those plastic-shelled cases with foam interiors are for transport, not for long-term storage.


 A fire in the home is always to be feared. And a fire in your reloading room can be disastrous. Near your reloading bench you probably have flammable solvents, and maybe gunpowder. What would happen if an electrical fire started in your reloading room? Would you be alerted? Do you have a proper fire extinguisher at hand?
 I grabbed the nearby ABC cannister extinguisher and squirted out the fire and soaked the charred bench areas with water. Good thing I had the extinguisher! And I was glad I religiously store powder and primers properly — away from the bench (and everything else).
 Many shooters are familiar with ballistics tables, weather programs, and even


