Widener’s Reloading & Shooting Supply recently published a helpful introduction to reloading powders. Widener’s online Guide to Smokeless Powders shows the various types of powders, and explains how the differences in powder kernel/flake size and shape, and burn rate affect performance. We recommend you visit Widener’s website and read the Powder Guide in full.
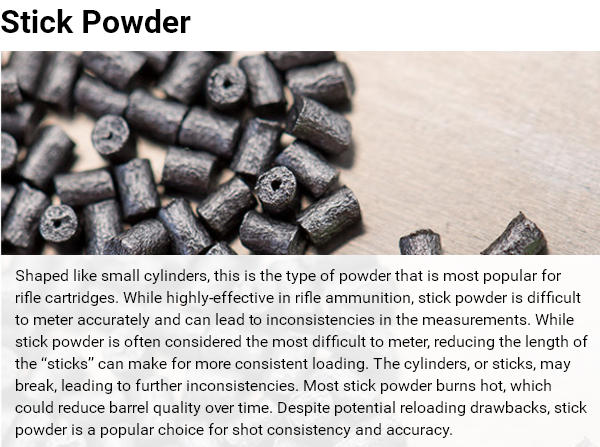
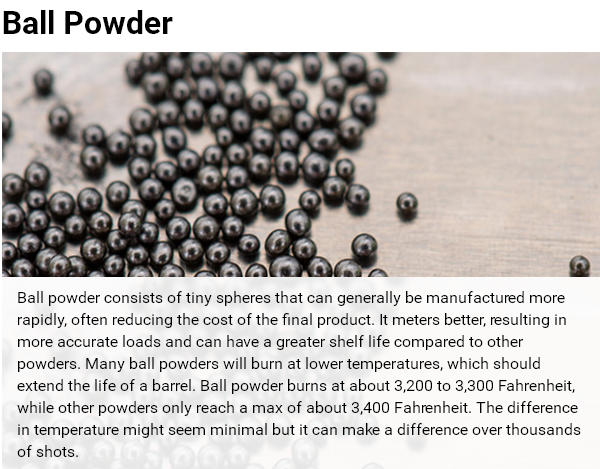
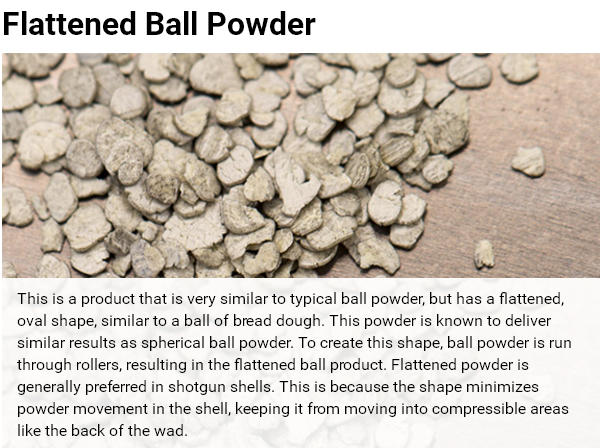
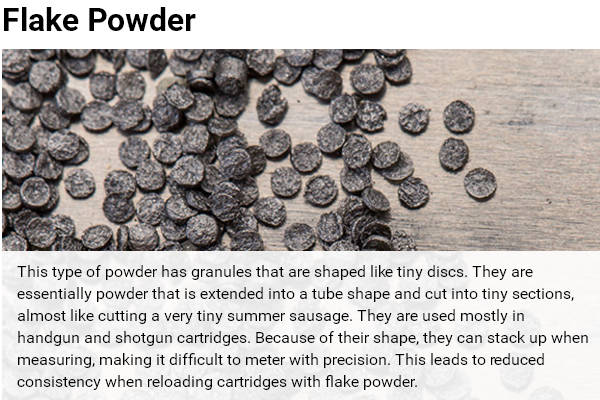
Take a close look at these illustrations which show the key differences between the four main powder types: extruded (stick) powder, ball (spherical) powder, flattened ball powder, and flake powder.
Burn Rate Basics
Widener’s Guide to Smokeless Powders also has a useful discussion of Burn Rate (a confusing topic for many hand-loaders). Wideners explains: “While a gun powder explosion in the cartridge seems instantaneous, if you slow it down you will actually find that each powder has a different ‘burn rate’, or speed at which it ignites.” This video shows powders with two very different burn rates. Watch closely.
Different burn rates suit different cartridge types notes Widener’s: “In general a fast-burning powder is used for light bullets and low-speed pistols and shotguns. Medium-rate powders are used for magnum pistols, while high-velocity, large bore rifle cartridges will need slow powders[.]
It should be noted that burn rate does not have a standardized unit of measurement. In fact, burn rate is really only discussed in comparison to other powders; there is no universal yardstick. Specifics will change by cartridge and bullet types[.]”
Let’s say you’ve purchased a new scope, and the spec-sheet indicates it is calibrated for quarter-MOA clicks. One MOA is 1.047″ inches at 100 yards, so you figure that’s how far your point of impact (POI) will move with four clicks. Well, unfortunately, you may be wrong. You can’t necessarily rely on what the manufacturer says. Production tolerances being what they are, you should test your scope to determine how much movement it actually delivers with each click of the turret. It may move a quarter-MOA, or maybe a quarter-inch, or maybe something else entirely. (Likewise scopes advertised as having 1/8-MOA clicks may deliver more or less than 1 actual MOA for 8 clicks.)
Reader Lindy explains how to check your clicks: “First, make sure the rifle is not loaded. Take a 40″ or longer carpenter’s ruler, and put a very visible mark (such as the center of an orange Shoot’N’C dot), at 37.7 inches. (On mine, I placed two dots side by side every 5 inches, so I could quickly count the dots.) Mount the ruler vertically (zero at top) exactly 100 yards away, carefully measured.
The Coriolis Effect comes into play with extreme long-range shots like this (2100 yards at Raton, NM). The rotation of the earth actually moves the target a small distance (in space) during the long duration of the bullet’s flight.
When you’re out at the range, the Earth seems very stable. But it is actually a big sphere zooming through space while spinning around its axis, one complete turn every 24 hours. The rotation of the earth can create problems for extreme long-range shooters. During extended bullet flight times, the rotation of the planet causes an apparent deflection of the bullet path over very long distances. This is the ballistics manifestation of the Coriolis Effect.
Bryan Litz of Applied Ballistics has produced a short video that explains the Coriolis Effect. Bryan notes that Coriolis is “a very subtle effect. People like to make more of it than it is because it seems mysterious.” In most common shooting situations inside 1K, Coriolis is not important. At 1000 yards, the Effect represents less than one click (for most cartridge types). Even well past 1000 yards, in windy conditions, the Coriolis Effect may well be “lost in the noise”. But in very calm conditions, when shooting at extreme ranges, Bryan says you can benefit from adjusting your ballistics solution for Coriolis.
Bryan explains: “The Coriolis Effect… has to do with the spin of the earth. You are basically shooting from one point to another on a rotating sphere, in an inertial reference frame. The consequence of that is that, if the flight time of the bullet gets significantly long, the bullet can have an apparent drift from its intended target. The amount [of apparent drift] is very small — it depends on your latitude and azimuth of fire on the planet.”
Coriolis is a very subtle effect. With typical bullet BCs and velocities, you must get to at least 1000 yards before Coriolis amounts to even one click. Accordingly, Bryan advises: “Coriolis Effect is NOT something to think about on moving targets, it is NOT something to think about in high, uncertain wind environments because there are variables that are dominating your uncertainty picture, and the Coriolis will distract you more than the correction is worth.”
“Where you could think about Coriolis, and have it be a major impact on your hit percentage, is if you are shooting at extended range, at relatively small targets, in low-wind conditions. Where you know your muzzle velocity and BC very well, [and there are] pristine conditions, that’s where you’re going to see Coriolis creep in. You’ll receive more refinement and accuracy in your ballistics solutions if you account for Coriolis on those types of shots. But in most practical long-range shooting situations, Coriolis is NOT important. What IS important is to understand is when you should think about it and when you shouldn’t, i.e. when applying it will matter and when it won’t.”
The Coriolis Effect — General Physics
The Coriolis Effect is the apparent deflection of moving objects when the motion is described relative to a rotating reference frame. The Coriolis force acts in a direction perpendicular to the rotation axis and to the velocity of the body in the rotating frame and is proportional to the object’s speed in the rotating frame.
A commonly encountered rotating reference frame is the Earth. The Coriolis effect is caused by the rotation of the Earth and the inertia of the mass experiencing the effect. Because the Earth completes only one rotation per day, the Coriolis force is quite small, and its effects generally become noticeable only for motions occurring over large distances and long periods of time. This force causes moving objects on the surface of the Earth to be deflected to the right (with respect to the direction of travel) in the Northern Hemisphere and to the left in the Southern Hemisphere. The horizontal deflection effect is greater near the poles and smallest at the equator, since the rate of change in the diameter of the circles of latitude when travelling north or south, increases the closer the object is to the poles. (Source: Wikipedia)
When we first ran this story a while back, it generated great interest among readers. By popular request, we’re reprinting this story, in case you missed it the first time around. — Editor
Precision shooters favor premium brass from Lapua, Norma, or RWS. (Lake City also makes quality brass in military calibers.) Premium brass delivers better accuracy, more consistent velocities, and longer life. Shooters understand the importance of good brass, but many of us have no idea how cartridge cases are actually made. Here’s how it’s done.
The process starts with a brass disk stamped from strips of metal. Then, through a series of stages, the brass is extruded or drawn into a cylindrical shape. In the extrusion process the brass is squeezed through a die under tremendous pressure. This is repeated two or three times typically. In the more traditional “draw” process, the case is progressively stretched longer, in 3 to 5 stages, using a series of high-pressure rams forcing the brass into a form die. While extrusion may be more common today, RWS, which makes some of the most uniform brass in the world, still uses the draw process: “It starts with cup drawing after the bands have been punched out. RWS cases are drawn in three ‘stages’ and after each draw they are annealed, pickled, rinsed and subjected to further quality improvement measures. This achieves specific hardening of the brass cases and increases their resistance to extraordinary stresses.” FYI, Lapua also uses a traditional draw process to manufacture most of its cartridge brass (although Lapua employs some proprietary steps that are different from RWS’s methods).
After the cases are extruded or drawn to max length, the cases are trimmed and the neck/shoulder are formed. Then the extractor groove (on rimless cases) is formed or machined, and the primer pocket is created in the base. One way to form the primer pocket is to use a hardened steel plug called a “bunter”. In the photos below you see the stages for forming a 20mm cannon case (courtesy OldAmmo.com), along with bunters used for Lake City rifle brass. This illustrates the draw process (as opposed to extrusion). The process of draw-forming rifle brass is that same as for this 20mm shell, just on a smaller scale.
River Valley Ordnance explains: “When a case is being made, it is drawn to its final draw length, with the diameter being slightly smaller than needed. At this point in its life, the head of the draw is slightly rounded, and there are no provisions for a primer. So the final drawn cases are trimmed to length, then run into the head bunter. A punch, ground to the intended contours for the inside of the case, pushes the draw into a cylindrical die and holds it in place while another punch rams into the case from the other end, mashing the bottom flat. That secondary ram holds the headstamp bunter punch.
The headstamp bunter punch has a protrusion on the end to make the primer pocket, and has raised lettering around the face to form the headstamp writing. This is, of course, all a mirror image of the finished case head. Small cases, such as 5.56×45, can be headed with a single strike. Larger cases, like 7.62×51 and 50 BMG, need to be struck once to form a dent for the primer pocket, then a second strike to finish the pocket, flatten the head, and imprint the writing. This second strike works the brass to harden it so it will support the pressure of firing.”
Thanks to Guy Hildebrand, of the Cartridge Collectors’ Exchange, OldAmmo.com, for providing this 20mm Draw Set photo. Bunter photo from River Valley Ordnance.
We are sad to report that long-time Forum member Frank S. (aka fdShuster) passed away last year. Frank was a very knowledgeable shooter who was always willing to help others. Here is one of Frank’s smart inventions. He devised a way to measure the length of a rifle’s chamber using a fired cartridge case. This lets you find your MAX trim-to-length for any chamber. Frank’s system works by cutting a “collar” from part of the case neck. This then slips over a bullet seated in a case loaded without powder or primer. As you chamber the dummy round, the collar will move back to indicate the full length of the chamber. (Make sure the bullet is seated well off the lands so the dummy round can chamber fully.)
The pictured gauge can be home made (for free) with components you already have on hand. Frank explained: “I used a Dremel cut-off wheel to cut the front half of the case neck off. A jewelers needle file to de-burr both rough-cut edges. The cut-off surface does not need to be perfectly square, because you are using the original straight mouth to make contact at the front of the chamber. Seat any old bullet to the approximate normal seating length. Next apply a tiny drop of oil on the ogive of the bullet, and slide the ‘collar’ over the bullet. Then chamber the dummy round and close the bolt. Extract the round slowly and carefully and take the measurement with calipers (see top photo).”
Frank’s DIY chamber length gauge works well. In a related Forum thread, Frank posted: “I’ve compared length dimensions doing it this way and with the chamber length shown on my chambering reamer drawings, and the Sinclair gauge, and they are all within .001″ or so.”
Commercial Chamber Length Gauges May Not Work with Custom Chambers
Frank did use Sinclair chamber-length gauges for some applications. These bullet-shaped gauges slip into a cartridge, but “it’s inconvenient to order that little gauge only… without spending $6 shipping for a $7 item.” Moreover, the Sinclair gauges may not fit a custom chamber with a tighter neck dimension because the diameter of the ring at the end is too large.
As an alternative to commercial gauges, the collar-type, homemade gauge will function properly in a custom chamber. The homemade gauge will work with smaller-than-standard chamber neck dimensions, as long as you use a piece of appropriately-turned fired brass that fits your chamber.
A quality borescope is a pricey tool, but once you get to use one, it’s hard to imagine how you ever did without it. To learn how a borescope can help you diagnose barrel issues, you should read a Rifle Shooter magazine feature story, What the Eye Can See.
In this article, writer Terry Wieland explains how to inspect for defects in new barrels, how to recognize different kinds of fouling (in both barrels and brass), and how to spot throat erosion in its early stages. Terry uses a Gradient Lens HawkEye BoreScope. The current generation of HawkEyes can be attached to a still or video camera to record digital images of your bore. The most interesting part of the article is on the second page. There, author Wieland provides photos of various types of internal flaws that can appear in barrels. This will help you spot pitting, excessive land wear, rust damage, and damage from corrosive primers.
Wieland notes that BoreScopes aren’t just for barrels: “The borescope has other uses as well. It can be used to examine the interior of a cartridge case to look for the beginnings of a case separation or to examine the interior of a loading die that is giving you trouble. When you consider the number of tubular objects that play such an important role in rifle shooting, it is a wonder we were ever able to function without such a method of studying bores.”
This Gradient Lens video shows how to correctly borescope your barrel:
Lapua, maker of premium brass, bullets, and loaded ammo, has released a new, state-of-the-art Ballistics program that runs on smartphones and mobile devices. The all-new Lapua Ballistics Mobile App is the first mobile ballistics app utilizing the 6DOF calculation model. 6DOF refers to “Six Degrees of Freedom”, referring to the multiple variables the software calculates. As explained below, a 6DOF solver can account for 3 components of movement PLUS 3 components of rotation. Of course, as with other ballistics software, the Lapua Mobile App looks at Bullet BC, velocity, and cross-wind effects. This software can also account for subtle, extreme long range factors such as the Coriolis Effect.
Notably, the new Lapua Ballistics App includes a library of up-to-date bullet profiles based on extensive field tests with Doppler Radar. Having an ultra-sophisticated 6DOF solver combined with Doppler Radar data makes the Lapua Mobile App one of the most accurate ballistics Apps on the market. Lapua Ballistics offers the latest, Doppler-proven Lapua cartridge and bullet data for you to combine with your firearm and local weather information. The App also includes the option to define custom bullets.
The Lapua Ballistics App is available for Android and iOS smart phones and mobile devices free of charge. For more info, visit www.lapua.com/lapuaballisticsapp.
6DOF, the most accurate calculation method. Lapua cartridge / bullet information. Distance, wind speed and angle. outputs numerical, reticle, table and graph views, metric and imperial values. Set Point Blank-range to different sight-in distances and impact windows. Define custom bullets ( BC G1 or G7 and Siacci method), Pre-set max 4 powder temperature.Sight-in-POI, Coriolis calculation
Here’s a tip for guys who shoot the 6 PPC, 6 Dasher, or other wildcat cartridges that require fire-forming. Use your fouler shots to fire-form new cases. That way your fouler shots do “double-duty” and you get your brass fire-formed without putting extra rounds through your expensive barrel.
This procedure is recommended by Joel Kendrick, the 2004 IBS 600-yard Shooter of the Year. After he cleans his barrel, Joel knows it takes two or three shots to foul in the bore before accuracy returns. When shooting his PPC, Joel uses those fouler shots to fire-form his new brass. Joel explains: “I like to have relatively new brass always ready. By fire-forming a couple cases after each barrel-cleaning during a match, by the end of the weekend I’ve got a dozen or more freshly fire-formed cases to put into the rotation. If you do this with your fouler shots you get your fire-forming accomplished without using up any extra barrel life.”
We thank Joel for this smart suggestion. For those who do not have a dedicated barrel for fire-forming, this should help keep your round-count down. Joe currently works as the Supplier Quality Process Engineer for MMI-TruTec, a company that offers barrel surface coatings that can further extend your barrel life.
Tech Milestone — Norm Crawford won the 2016 Wimbledon Cup at Camp Perry using a carbon-fiber composite barrel. That’s a first for composite barrel technology.
With a score of 200-16X, Norman Crawford won the Wimbledon Cup Match during the 2016 National Long Range Rifle Championships using a 32″ Proof Research carbon-fiber composite barrel chambered in .284 Shehane. The Wimbledon Cup Match, a prestigious 1,000-yard shooting competition, dates back to 1875. The current course of fire consists of 20 timed shots, fired from prone. Crawford’s win represents the first time in the Cup’s 141-year history that it has been won with anything other than an all-steel barrel. The Proof Research barrel features a steel core with an external multi-axis carbon wrap.
Crawford’s Wimbledon Cup win really is an important technological milestone. Crawford’s performance may encourage other competitors to consider steel/carbon composite barrels for a variety of shooting disciplines. Without question, composite technology barrels offer significant weight-savings over conventional all-steel barrels. And Crawford proved that a composite barrel can deliver winning accuracy, at least in a sling/prone discipline.
“I don’t know of anyone else in this sport using a carbon fiber [composite] barrel,” said Crawford, who has been shooting Proof composite barrels since 2013.
“The benefits over a steel barrel are that you get a larger-diameter, stiffer, faster-cooling barrel that weighs less than a standard, medium Palma-taper barrel. [There is] no real downside I’ve been able to identify in three years of shooting them. All five Proof barrels I own are capable of winning any match — providing I do my part.”
A 30-year Army vet and former Army Special Operations Sniper, Crawford has been shooting competitively since 1990. He has won many major titles, including the NRA National Long Range Championship in 2005. His 2016 Wimbledon Cup victory was his second — Norm also won the Cup in 2003. A three-time member of the U.S. Rifle Team at the World Championships, Crawford also used a Proof Research barrel to tie the national record for a 600-yard Any Gun, Any Sight competition in North Carolina last November, one of five national records he has set or tied during his shooting career.
Proof Research CEO Larry Murphy praised Crawford: “We are honored that Norm chose our barrel to go up against the best shooters in the world with. By putting our barrels to the test in intense competition, he pushes us to do our best as well.”
Brownell’s has prepared a useful video showing how to remove light rust from a firearm. This shows how to use soft cloths, polishes, and 0000 steel wool to eliminate light surface rust. CAUTION — if you have a very high gloss blued finish, ANY abrasive and even the finest grade of oiled steel wool can scratch or alter the finish. With something like a $1200.00 “Royal Blue” Colt Python, it may be better to tolerate a few small pits than to work it over with steel wool.
Watch Brownell’s Video on Rust Removal
Brownell’s technician, Steve Ostrem, notes that many things can promote rust — some you might not expect. In addition to moisture in the air, rust can be caused by the salts and oils from your hands, sweat, blood, or even insect repellent. Ostrem also observes that temperature changes can produce condensation which may lead to rust inside the gun that you don’t even notice: “In the real world we know that if you take the gun outside, sooner or later, it’s going to rust. When you come inside, wipe the gun down the first opportunity you get. If you bring a cold gun into a warm, humid house, you’re going to have an instant coating of moisture… make sure you get the gun dried off and you’ll avoid a lot of problems.”
Rust Prevention
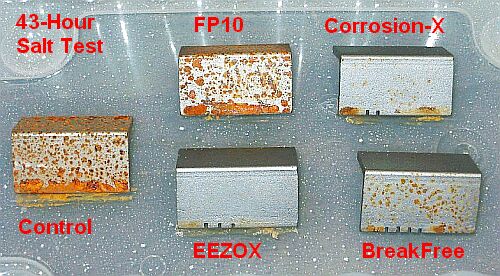
We’ve conducted a comprehensive test of corrosion-fighters. Among the best products to prevent rust are Boeshield T-9, Corrosion-X, and Eezox. Break-Free also works well, but it leaves a somewhat greasy residue, and it did not perform as well during long-term salt exposure as did the other three products.
For long-term storage, nothing beats a coating of Cosmoline, Rig or similar grease. This provides a barrier layer that blocks the oxidation process, which is how rust forms. These greases performed extremely well in a comparison test of Rust Preventative Products performed by Brownell’s. CLICK HERE for Comparison Test.



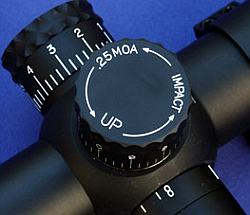 Let’s say you’ve purchased a new scope, and the spec-sheet indicates it is calibrated for quarter-MOA clicks. One MOA is 1.047″ inches at 100 yards, so you figure that’s how far your point of impact (POI) will move with four clicks. Well, unfortunately, you may be wrong. You can’t necessarily rely on what the manufacturer says. Production tolerances being what they are, you should test your scope to determine how much movement it actually delivers with each click of the turret. It may move a quarter-MOA, or maybe a quarter-inch, or maybe something else entirely. (Likewise scopes advertised as having 1/8-MOA clicks may deliver more or less than 1 actual MOA for 8 clicks.)
 When you’re out at the range, the Earth seems very stable. But it is actually a big sphere zooming through space while spinning around its axis, one complete turn every 24 hours. The rotation of the earth can create problems for extreme long-range shooters. During extended bullet flight times, the rotation of the planet causes an apparent deflection of the bullet path over very long distances. This is the ballistics manifestation of the

 Precision shooters favor premium brass from


 Commercial Chamber Length Gauges May Not Work with Custom Chambers
 A quality borescope is a pricey tool, but once you get to use one, it’s hard to imagine how you ever did without it. To learn how a borescope can help you diagnose barrel issues, you should read a


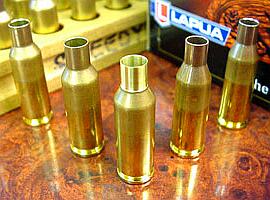 Here’s a tip for guys who shoot the 6 PPC, 6 Dasher, or other wildcat cartridges that require fire-forming. Use your fouler shots to fire-form new cases. That way your fouler shots do “double-duty” and you get your brass fire-formed without putting extra rounds through your expensive barrel.