Readers who have just recently discovered the Daily Bulletin may not realize that AccurateShooter.com has hundreds of reference articles in our archives. These authoritative articles are divided into mutiple categories, so you can easily view stories by topic (such as competition, tactical, rimfire, optics, shooting skills etc.). One of the most popular categories is our Technical Articles Collection. On a handy index page (with thumbnails for every story), you’ll find over 120 articles covering technical and gunsmithing topics. These articles can help you with major projects (such as stock painting), and they can also help you build more accurate ammo. Here are five popular selections from our Technical Articles archive.
Stress-Free Pillar Bedding. Richard Franklin explains how to do a top-quality bedding job, start to finish.
OnTarget Software Review. Our Editors test free software that measures shot groups with great precision. We explain how to use the program and configure advanced features.
Savage Action Tuning. Top F-TR shooter Stan Pate explains how to enhance the performance of your Savage rifle by optimizing the torque settings of the action screws.
Complete Precision Case Prep. Jake Gottfredson covers the complete case prep process, including brass weight sorting, case trimming, primer pocket uniforming, neck-sizing, and, case-neck turning.
Stock Painting Instructions. Step-by-step guide for stock painting by expert Mike Ricklefs. Mike shows both simple coverage and fancy effects.
Forum member Mike T. (aka “Watercam”), has cleverly adapted a tubegun cheek piece to conventional fiberglass and wood stocks. The cheek piece hardware comes from Competition Machine and is the same as used on Gary Eliseo’s tubegun stocks. Here is Watercam’s Project Report:
Installing Tubegun Cheek Piece on Conventional Gun Stock
All of my match rifles are equipped with thumb-wheel adjustable cheek pieces for the best of reasons — adjustments can be made while in position, on target. I’ve learned that variations in position, terrain, and vertical angle all demand adjustability to achieve optimal cheek weld.
I wanted a cheek piece for my hunting and tactical type stocks that gave the same adjustability without having to cut a chunk off of my butt stocks. It needed to be affordable and easy to install. I also wanted a unit that would not push my head laterally away from the centerline of the scope or iron sights. Turns out I already had what I needed on my Gary Eliseo B-1 tubegun. I ran the idea past Gary, who said: “If you’ll be the guinea pig I’ll send the hardware”.
Using Gary’s hardware, I mounted Eliseo alloy thumb-wheel adjustable cheek pieces on a Bell & Carlson Medalist hunting stock and a Boyd’s laminate tactical stock. Read Forum Discussion.
Building Version One on Bell & Calson Stock
I had a Bell & Carlson Medalist stock for a Mauser 98 chambered in 9.3×62. This test rifle was enough of a thumper to reveal if the metal cheek piece could handle strong recoil.
I started by drilling three 1/2″ holes into the top of the comb to match the two pillars and one threaded shaft on the cheek piece. I used aluminum tubing to make guides for each and epoxied them in place. Inletting the oval hole for the thumb wheel was reasonably straight forward and the fiber reinforced foam in the buttstock offered enough support. A large flat washer epoxied underneath where the thumbwheel lay gave a smooth bearing surface. Total adjustment (with 2.25″ pillars and shafts) is just about an inch. I chose to trim the bottom of the skirt of Gary’s cheek plate so as to allow better position behind the scope for me and allow maximum adjustment even with the cheek piece of the stock. Set screws could be used instead of the thumb-wheel or in conjunction with it. In the end it was exactly what I envisioned and works great! The only thing left to do is paint the metal to match the stock.
Version Two — Installed on Boyds Laminated Tactical Stock
Watercam’s second metal cheek piece installation was on a laminated tactical stock. This Boyds stock did have a movable comb, but the original adjustable cheek section was too awkward to adjust from position. So I adapted the Eliseo cheek piece to to the Boyds stock, as you can see:
Cheek piece installation for both stocks was straight-forward, and the new cheek pieces work every bit as well the systems on my match rifles. Aluminum tubes epoxied in place guide the rods and threaded shank. A matching-diameter flat washer epoxied under the wheel provides smooth bearing surface. The glass-filled filler of the butt stock is plenty strong enough to support the unit. A set screw and knob can be added to lock in changes if so desired.
Here’s a significant new addition to our knowledge base for Long-Range shooting. Hornady has released a new Ballistics Calculator that employs bullet profiles derived from Doppler radar testing and 3D projectile modeling. Hornady’s Patent Pending 4DOF™ Ballistic Calculator provides trajectory solutions based on projectile Drag Coefficient (not static G1/G7 ballistic coefficients) along with the exact physical modeling of projectiles and their mass and aerodynamic properties. This new 4DOF (Four Degrees of Freedom) calculator also accounts for spin drift and the subtle VERTICAL effects of crosswinds.
We strongly recommend you watch this video from start to finish. In greater detail than is possible here, this video explains how the 4DOF System works, and why it is more sophisticated than other commercially-offered Ballistics calculators. There’s a LOT going on here…
Aerodynamic Jump from Crosswind Calculated
According to Hornady, the 4DOF Ballistics Calculator “is the first publicly-available program that will correctly calculate the vertical shift a bullet experiences as it encounters a crosswind.” This effect is called aerodynamic jump. The use of radar-derived drag profiles, correct projectile dynamics, aerodynamic jump, and spin drift enable the Hornady® 4DOF™ ballistic calculator to provide very sophisticated solutions. Hornady says its 4DOF solver is “the most accurate commercially available trajectory program … even at extreme ranges.”
“Current ballistic calculators provide three degrees of freedom in their approach — windage, elevation, and range — but treat the projectile as an inanimate lump flying through the air,” said Dave Emary, Hornady Chief Ballistician. “This program incorporates the projectile’s movement in the standard three degrees but also adds its movement about its center of gravity and subsequent angle relative to its line of flight, which is the fourth degree of freedom.”
Using Doppler radar, Hornady engineers have calculated exact drag versus velocity curves for each bullet in the 4DOF™ calculator library. This means the 4DOF™ calculator should provicde more precise long range solutions than calulators that rely on simple BC numbers or drag curves based with limited data collection points. Emary adds: “The Hornady 4DOF also accurately calculates angled shots by accounting for important conditions that [other ballistic] programs overlook.”
“This calculator doesn’t utilize BCs (Ballistic Coefficients) like other calculators,” added Jayden Quinlan, Hornady Ballistics Engineer. “Why compare the flight of your bullet to a standard G1 or G7 projectile when you can use your own projectile as the standard?” That makes sense, but users must remember that Hornady’s 4DOF projectile “library” includes mostly Hornady-made bullets. However, in addition to Hornady bullets, the 4DOF Calculator currently does list seven Berger projectiles, six Sierra projectiles, and one Lapua bullet type. For example, Sierra’s new 183gr 7mm MatchKing is listed, as is Berger’s 105gr 6mm Hybrid.
This Video Explains How to Use Hornady’s New 4DOF Ballistics Calculator
Using the 4DOF™ Ballistic Calculator:
The Hornady 4DOF Ballistic Calculator provides trajectory solutions based on projectile Drag Coefficient (not ballistic coefficients) along with exact physical modeling of the projectile and its mass and aerodynamic properties. Additionally, it calculates the vertical shift a bullet experiences as it encounters a crosswind, i.e. “aerodynamic jump”. The use of drag coefficients, projectile dynamics, aerodynamic jump, and spin drift enable the 4DOF Ballistic Calculator to accurately measure trajectories even at extreme ranges. It is ideal for both long range and moderate distances and is available for the low-drag precision bullets listed in the drop down menu of the calculator. For calculating trajectories of traditional hunting and varmint bullets using BCs (ballistic coefficients), you can use Hornady’s Standard Ballistics Calculator.
Craters may look interesting on the moon, but you don’t want to see them on your primers. Certain mechanical issues that cause primer craters can also cause primer piercing — a serious safety problem that needs to be addressed. If you have a gun that is cratering primers (even at moderate pressure levels), there is a solution that works with many rifles — send your bolt to Greg Tannel to have the firing pin hole bushed.
Shooters who convert factory actions to run 6BRs, 6PPCs or other high-pressure cartridges should consider having the firing pin bushed. These modern cartridges like to run at high pressures. When running stout loads, you can get cratering caused by primer flow around the firing pin hole in the bolt face. The reason is a little complicated, but basically the larger the hole, the less hydraulic pressure is required to crater the primer.
A limited amount of cratering is normally not a big issue, but you can reduce the problem significantly by having a smith fit a bushing in the firing pin hole. In addition to reduced cratering, bushing the firing pin often produces more consistent ignition.
This is a highly recommended procedure that our editors have had done to their own rifles. Greg Tannel (Gre-Tan Rifles) is an expert at this procedure, and he does excellent work on a wide variety of bolts. Current price for a bushing job, which includes turning the firing pin to .062″, is $92.00, or $100.00 with USPS Priority Mail return shipping.
If you have a factory rifle, a bushed firing pin is the way to go if you are shooting the high-pressure cartridges such as 6PPC, 6BR, 6-6.5×47 and 6.5×47. This is one of the most cost-effective and beneficial upgrades you can do to your factory rifle. For more info on the Firing Pin Bushing process, visit GreTanRifles.com, or email greg [at] gretanrifles.com. After clicking the link for GreTanRifles.com, Click on “Services” > “Shop Services” and you’ll see a listing for “Bush Firing Pin Hole & Turn Pin”. CLICK that Box.
Firing Pin Hole Bushing by Greg Tannel
Work Done: Bush firing pin hole and turn pin
Functions: Fixes your cratering and piercing problems
Price: $92.00 + $8.00 return shipping Total Price: $100.00
Actions for which Bushing is Offered: Remington, Winchester, Savage multi-piece pin, Sako, Kimber, Nesika, Stiller, BAT Machine, Kelbly, Lawton, Surgeon, Borden, Wichita, Hall, Ruger, Howa, Weatherby, Dakota, Pacific Tool, Phoenix, and Defiant bolt action rifle or pistol.
Actions for which Bushing is NOT Available: Case hardened receivers, ARs, Accuracy International (AI), Barnard, Big Horn, Cooper, Desert Tactical Arms, Kimber, Rosenthal, New Savage single piece pin, Rim fires, Falling block, Break open, Lever, Pump rifles, 1903-A3, CZ, Mauser.
How to send your bolt in to be bushed:
Send your bolt and firing pin assembly via snail mail, priority mail, or UPS. Please do not use FEDEX as it sometimes has delivery delays.Include your name, phone number, and return shipping address, and a note as to what you want done. Pack your bolt carefully and ship to: Gre’-Tan Rifles, 24005 Hwy. 13, Rifle CO 81650.
Due to the high volume of work, turn-around time for bolt bushing jobs can be 12 weeks (though it usually is faster). Customers can pay by check, money order, or credit card. For more information visit GretanRifles.com.
It’s summer time. That means many of our readers are on the road (attending major shooting matches or enjoying summer vacations). How do you do your reloading chores while living like a Gypsy for a few weeks? Here’s a solution from Forum member Dave Gray (U.S. Army Retired).
Dave is a self-declared “full-time RVer” who spends most of his time on the road. Behind his Ram 3500 pickup, Dave tows a huge 41-foot Heartland Cyclone toy hauler featuring a 12X8 foot garage in the rear. In the rear garage area, which holds a Smart Car, Dave has set up a removable reloading bench complete with RCBS Rockchucker single stage press and Dillon progressive press.
Reloading Bench Mounts to RV Wall with Brackets
Dave explains: “I used a 2″X6″X5′ board for the bench. It’s perfect for my needs, and is easy to disassemble. I made it this small so that I can park my Smart Car in the garage during travel to my destinations. The bench, attached to the wall frames, is very solid. The presses’ centers are 3″ and 6.5″ from the brackets. [There are] four bolts on the wall into aluminum wall frame and 3 bolts in the bench. If I ever have to replace the current board, I’ll do so with oak or birch or hickory. When I’m not reloading, I remove the presses and store them in a protected space. I can easily attach other equipment to the bench by using C-Clamps.” Dave’s “rolling reloading room” looks very well thought-out. We commend Dave for his inventiveness.
Are you a do-it-yourself kind of guy with a creative eye? Then you’ll love the Target Generator from the folks at ShooterShed.com. This free, interactive webpage allows you to design a variety of fun targets, including grids, benchrest-type Score Shooting targets, sight-in targets, and even playing card targets. Choose the paper size and orientation (vertical or horizontal), then select the number of target elements on the page. For example, you could have four (4) bulls or 52 playing cards. You can include a grid on the target, or tell the program to include load information blocks. For bullseye targets, you can control the number, color, and spacing (diameter) of the rings. LINK to TARGET GENERATOR.
The program provides a preview of each target you generate. If you like a particular design, save the file, and then print as many targets as you want. Check it out, this program is fun and handy to use. Here are four (4) targets your Editor created just for this article. With a bit of practice, you can be generating your own custom targets in minutes. Have fun.
About the Creator of the Target Generator
The excellent Target Generator program was created by Rod Brown of Sheridan, Wyoming. Rod tells us: “I build custom rifles and coach shooters. I’ve got a 100-yard range out my back door. I shoot short- and long-range benchrest competitively around the country. I’m a full-time software development consultant and an FFL holder. When I’m not developing custom software for my clients, I’m usually fiddling in the shop, building a custom benchrest rifle, traveling to a match, chambering a barrel, or reloading some ammunition.
Story tip from Boyd Allen. We welcome reader submissions.
Think you can “get by” without protective eyewear? This story provides yet another example of why you should wear safety glasses every time you go shooting. You only have one set of eyes — they are much too precious to risk.”
Bad Primer Blasts Gas Through Side of Casehead
Our friend Grant Guess recently had a “close encounter” with a bad primer. An apparently defective primer caused part of the casehead on one of his rounds to blow out. This, in turn, allowed high pressure gas to vent through the damaged primer pocket. Take a good look, boys and girls. This is yet another very good reason to wear safety glasses. The cartridge was a 6.5-06, hand-loaded in necked-down Winchester-headstamp .270 Win brass. Grant reports:
“I had a blow-through between the primer and the primer pocket today. The action was really smoking and I got a face full of gas. This was a reasonably light charge. Thank God for safety glasses.
I should also mention that it appears there is a 3/64 hole that is halfway between the primer and the primer pocket. Like it burned a small jet hole through both of them.”
Could this happen to you? It just might. On seeing this damaged case, one of Grant’s Facebook friends, Chris D., observed: “Search the internet, you will see a lot of these pin hole ‘in the corner’ failures. Obviously Winchester has some issues with the LR primers.”
Careful Examination Reveals Apparent Primer Defect
After this incident, Grant examined the damaged case: “I pinned the flash hole and it is not over-sized or under-sized. The primer clearly has an area where it had a defect. At [50,000 CUP], it doesn’t take much of a defect to cause issues. There was a slight bit of pucker-factor on the next shot….”
Berger Twist-Rate Stability Calculator
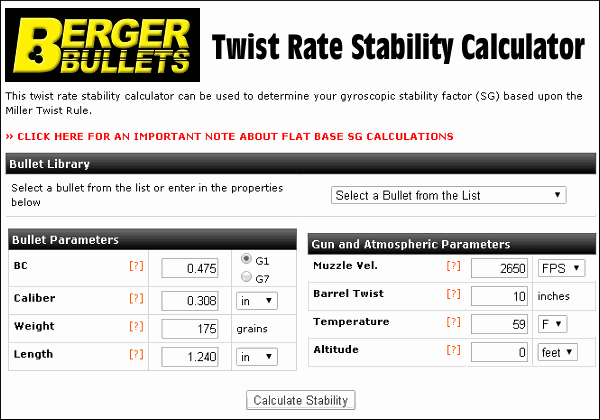
On the Berger Bullets website you’ll find a handy Twist-Rate Stability Calculator that predicts your gyroscopic stability factor (SG) based on mulitiple variables: velocity, bullet length, bullet weight, barrel twist rate, ambient temperature, and altitude. This cool tool tells you if your chosen bullet will really stabilize in your barrel.
How to Use Berger’s Twist Rate Calculator
Using the Twist Rate Calculator is simple. Just enter the bullet DIAMETER (e.g. .264), bullet WEIGHT (in grains), and bullet overall LENGTH (in inches). On its website, Berger conveniently provides this info for all its bullet types. For other brands, we suggest you weigh three examples of your chosen bullet, and also measure the length on three samples. Then use the average weight and length of the three. To calculate bullet stability, simply enter your bullet data (along with observed Muzzle Velocity, outside Temperature, and Altitude) and click “Calculate SG”. Try different twist rate numbers (and recalculate) until you get an SG value of 1.4 (or higher).
Gyroscopic Stability (SG) and Twist Rate
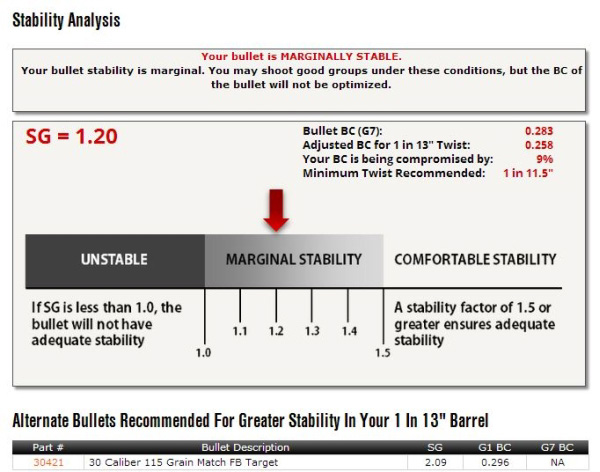
Berger’s Twist Rate Calculator provides a predicted stability value called “SG” (for “Gyroscopic Stability”). This indicates the Gyroscopic Stability applied to the bullet by spin. This number is derived from the basic equation: SG = (rigidity of the spinning mass)/(overturning aerodynamic torque).
If you have an SG under 1.0, your bullet is predicted not to stabilize. If you have between 1.0 and 1.1 SG, your bullet may or may not stabilize. If you have an SG greater than 1.1, your bullet should stabilize under optimal conditions, but stabilization might not be adequate when temperature, altitude, or other variables are less-than-optimal. That’s why Berger normally recommends at least 1.5 SG to get out of the “Marginal Stability” zone.
In his book Applied Ballistics For Long-Range Shooting, Bryan Litz (Berger Ballistician) recommends at least a 1.4 SG rating when selecting a barrel twist for a particular bullet. This gives you a safety margin for shooting under various conditions, such as higher or lower altitudes or temperatures.
Story idea from EdLongrange. We welcome reader submissions.
We know you guys like do-it-yourself (DIY) projects. And we also know that our readers like anything that helps a rifle sit more securely in the bags, and track better on recoil. Here’s a little accessory you can make yourself for pennies that will help rifles with conventional (non-benchrest) stocks ride the rear bag better.
This DIY Bag-Rider is simple in design and easy to make. The invention of Forum member Bill L. (aka “Nomad47″), this is simply a short section of PVC pipe attached to the bottom of a wood stock with a couple of screws. The back half of the PVC tube is cut at an angle to match the lower profile of the stock. Nomad47 painted the PVC Bag-Rider black for sex appeal, but that’s not really necessary.
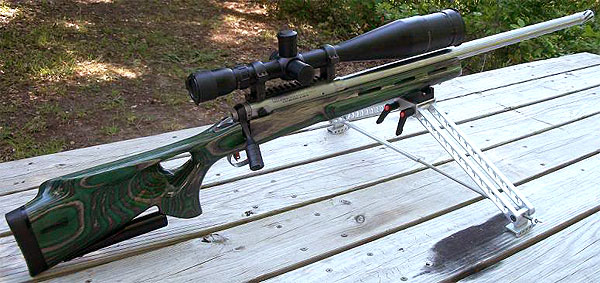
In the top photo you can see Nomad47’s bagrider attached to a Savage varminter. In the photo below, the PVC bag-rider tube is fitted to an F-TR style rig with a green, laminated thumbhole stock. This rifle also features a Savage action with a custom barrel and “wide-track” bipod. (Note: to be legal in F-Class competition, the muzzle brake would have to be removed.)
In our Shooters’ Forum, many questions are asked about QuickLOAD software — how to get best results, how to use the advanced features, how to adjust for temperature and so on. To help answer those questions, here’s a short feature we first ran during SHOT Show 2012. You can also CLICK HERE for a very detailed explanation of QuickLOAD in our main site.
At SHOT Show, we had the chance to meet with German software engineer Hartmut Broemel, creator of QuickLOAD software. This software program, while not a substitute for conventional load manuals, allows shooters to evaluate a wide range of powders and bullets, comparing potential loads on the basis of predicted pressures, velocities, load density and projectile in-barrel time.
We took the opportunity, in the video below, to explain some of the fine points of QuickLOAD for our members. QuickLOAD, sold by Neconos.com, helps reloaders understand how changing variables can affect pressures and velocities. It can predict the effect of changes in ambient temperature, bullet seating depth, and barrel length.
In the video below we explain how to adjust the program for true case capacity, bullet seating into the lands, and other important factors. If you are a new QuickLOAD user, or are contemplating buying the $152.95 program, you should watch the video. The program isn’t perfect, but it can accelerate the load development process, and it can save you money by narrowing down the list of appropriate powders for your cartridge.
No other product currently available to serious reloaders offers as much predictive power as QuickLOAD, and you’ll find your money well spent just for the vast collection of data on bullets and cartridges. With a couple mouse-clicks you can instantly get the specifications of hundreds of bullets and cartridges. Likewise, in a matter of seconds, you can compare load density for a half-dozen powders, or compare the projected velocities of one cartridge versus another.


 Readers who have just recently discovered the Daily Bulletin may not realize that AccurateShooter.com has hundreds of reference articles in our archives. These authoritative articles are divided into mutiple categories, so you can easily view stories by topic (such as competition, tactical, rimfire, optics, shooting skills etc.). One of the most popular categories is our Technical Articles Collection. On a handy index page (with thumbnails for every story), you’ll find over 120 articles covering technical and gunsmithing topics. These articles can help you with major projects (such as stock painting), and they can also help you build more accurate ammo. Here are five popular selections from our Technical Articles archive.


 Craters may look interesting on the moon, but you don’t want to see them on your primers. Certain mechanical issues that cause primer craters can also cause primer piercing — a serious safety problem that needs to be addressed. If you have a gun that is cratering primers (even at moderate pressure levels), there is a solution that works with many rifles — send your bolt to
  Firing Pin Hole Bushing by Greg Tannel


 Reloading Bench Mounts to RV Wall with Brackets




 At SHOT Show, we had the chance to meet with German software engineer Hartmut Broemel, creator of QuickLOAD software. This software program, while not a substitute for conventional load manuals, allows shooters to evaluate a wide range of powders and bullets, comparing potential loads on the basis of predicted pressures, velocities, load density and projectile in-barrel time.


