Well folks, it’s July 1st already — the means we’re moving into “peak heat” summer conditions. It’s vitally important to keep your ammo at “normal” temps during the hot summer months. Even if you use “temp-insensitive” powders, studies suggest that pressures can still rise dramatically when the entire cartridge gets hot, possibly because of primer heating. It’s smart to keep your loaded ammo in an insulated storage unit, possibly with a Blue Ice Cool Pak if you expect it to get quite hot. Don’t leave your ammo in the car or truck — temps can exceed 140° in a vehicle parked in the sun.
To learn more about how ambient temperature (and primer choice) affect pressures (and hence velocities) you should read the article Pressure Factors: How Temperature, Powder, and Primer Affect Pressure by Denton Bramwell. In that article, the author uses a pressure trace instrument to analyze how temperature affects ammo performance. Bramwell’s tests yielded some fascinating results.
For example, barrel temperature was a key factor: “Both barrel temperature and powder temperature are important variables, and they are not the same variable. If you fail to take barrel temperature into account while doing pressure testing, your test results will be very significantly affected. The effect of barrel temperature is around 204 PSI per F° for the Varget load. If you’re not controlling barrel temperature, you about as well might not bother controlling powder temperature, either. In the cases investigated, barrel temperature is a much stronger variable than powder temperature.”
Powder Heat Sensitivity Comparison Test
Our friend Cal Zant of the Precision Rifle Blog recently published a fascinating comparison test of four powders: Hodgdon H4350, Hodgdon Varget, IMR 4451, and IMR 4166. The first two are Hodgdon Extreme powders, while the latter two are part of IMR’s new Enduron line of propellants.
The testers measured the velocity of the powders over a wide temperature range, from 25° F to 140° F. Hodgdon H4350 proved to be the most temp stable of the four powders tested.
Reader Mike Etzel has come up with a simple, cost-effective way to apply moly or danzac coatings to your bullets. And you won’t need any expensive gear other than your regular vibratory tumbler and some small plastic containers.
Mike explains: “For a number of years I have been using a very convenient way of coating my projectiles with DANZAC in a tumbler. Instead of using a separate tumbler filled with DANZAC and stainless steel balls for coating applications, use small resealable plastic cake or pudding cups filled with stainless balls and DANZAC. Each cup will accommodate between 20 to 70 projectiles depending on caliber once the polishing balls and DANZAC are added. When I need to polish some cases, I insert the sealable plastic container(s) into the polishing material in the tumbler, add cases to the media, and in the process clean cases and coat the projectiles simultaneously in one tumbler. This does two operations in one session, saving on time and resources.”
While Mike uses DANZAC (Tungsten DiSulfide or WS2), you can use the same impact-tumbling-in-a-cup method to moly-coat your bullets, or to apply HBN (Hexagonal Boron Nitride).
TIPS for COATING your BULLETS, by “GS Arizona”
1. Start with Clean Bullets. This is simple enough, but some people overlook it and others overdo it. Get the bullets out of the box, wash them with warm water and dish soap and dry them. No need for harsh chemicals, after all, we’re only removing some surface dirt from shipping and maybe some left over lanolin from the forming process. Don’t handle them with bare hands once they’re clean, your skin oils will contaminate them.
2. Get Everything Hot — Real Hot. This is probably the single most important element in producing good-looking moly-coated bullets. I put the tumbler, the drum and the bullets out in the sun for at least 30 minutes before starting and then do all the tumbling in direct sunlight. On a summer day in Arizona, everything gets to the point that its uncomfortably hot to handle. If you are tumbling in the winter, you should heat the bullets in some form, a hair dryer can be useful, but they will cool off in the drum if you’re tumbling in cold temperatures. Your best bet is to plan ahead and do your coating in the summer. I coated about 3000 bullets in a couple of days recently to see me through our winter season (we’re a bit reversed from the rest of the country in terms of shooting season).
Any long range shooter knows that wind is our ultimate nemesis. The best ways of overcoming wind are to measure what we can and use computers to calculate deflection. The Applied Ballistics Kestrel is a great tool for this. As good as our tools may be, we don’t always have them at our fingertips, or they break, batteries go dead, and so on. In these cases, it’s nice to have a simple way of estimating wind based on known variables. There are numerous wind formulas of various complexity.
The Applied Ballistics (AB) Wind Hack is about the simplest way to get a rough wind solution. Here it is: You simply add 2 to the first digit of your G7 BC, and divide your drop by this number to get the 10 mph crosswind deflection. For example, suppose you’re shooting a .308 caliber 175-grain bullet with a G7 BC of 0.260 at 1000 yards, and your drop is 37 MOA. For a G7 BC of 0.260, your “wind number” is 2+2=4. So your 10 mph wind deflection is your drop (37 MOA) divided by your “wind number” (4) = 9.25 MOA. This is really close to the actual 9.37 MOA calculated by the ballistic software.
WIND HACK Formula
10 mph Cross Wind Deflection = Drop (in MOA) divided by (G7 BC 1st Digit + 2)
Give the AB wind hack a try to see how it works with your ballistics!
Some Caveats: Your drop number has to be from a 100-yard zero. This wind hack is most accurate for supersonic flight. Within supersonic range, accuracy is typically better than +/-6″. You can easily scale the 10 mph crosswind deflection by the actual wind speed. Wind direction has to be scaled by the cosine of the angle.
When a rifle isn’t shooting up to it’s potential, we need to ask: “Is it the gun or the shooter?” Having multiple shooters test the same rifle in the same conditions with the same load can be very revealing…
When developing a load for a new rifle, one can easily get consumed by all the potential variables — charge weight, seating depth, neck tension, primer options, neck lube, and so on. When you’re fully focused on loading variables, and the results on the target are disappointing, you may quickly assume you need to change your load. But we learned that sometimes the load is just fine — the problem is the trigger puller, or the set-up on the bench.
Here’s an example. A while back we tested two new Savage F-Class rifles, both chambered in 6mmBR. Initial results were promising, but not great — one gun’s owner was getting round groups with shots distributed at 10 o’clock, 2 o’clock, 5 o’clock, 8 o’clock, and none were touching. We could have concluded that the load was no good. But then another shooter sat down behind the rifle and put the next two shots, identical load, through the same hole. Shooter #2 eventually produced a 6-shot group that was a vertical line, with 2 shots in each hole but at three different points of impact. OK, now we can conclude the load needs to be tuned to get rid of the vertical. Right? Wrong. Shooter #3 sat down behind the gun and produced a group that strung horizontally but had almost no vertical.
Hmmm… what gives?
Shooting Styles Created Vertical or Horizontal Dispersion
What was the problem? Well, each of the three shooters had a different way of holding the gun and adjusting the rear bag. Shooter #1, the gun’s owner, used a wrap-around hold with hand and cheek pressure, and he was squeezing the bag. All that contact was moving the shot up, down, left and right. The wrap-around hold produced erratic results.
Shooter #2 was using no cheek pressure, and very slight thumb pressure behind the tang, but he was experimenting with different amounts of bag “squeeze”. His hold eliminated the side push, but variances in squeeze technique and down pressure caused the vertical string. When he kept things constant, the gun put successive shots through the same hole.
Shooter #3 was using heavy cheek pressure. This settled the gun down vertically, but it also side-loaded the rifle. The result was almost no vertical, but this shooting style produced too much horizontal.
A “Second Opinion” Is Always Useful
Conclusion? Before you spend all day fiddling with a load, you might want to adjust your shooting style and see if that affects the group size and shape on the target. Additionally, it is nearly always useful to have another experienced shooter try your rifle. In our test session, each time we changed “drivers”, the way the shots grouped on the target changed significantly. We went from a big round group, to vertical string, to horizontal string.
Interestingly, all three shooters were able to diagnose problems in their shooting styles, and then refine their gun-handling. As a result, in a second session, we all shot that gun better, and the average group size dropped from 0.5-0.6 inches into the threes — with NO changes to the load.
That’s right, we cut group size in half, and we didn’t alter the load one bit. Switching shooters demonstrated that the load was good and the gun was good. The skill of the trigger-puller(s) proved to be the limiting factor in terms of group size.
A Kestrel Wind Meter will record wind speed with its impeller wheel. However, to get the most accurate wind velocity reading, you need to have your Kestrel properly aligned with the wind direction. To find wind direction, first orient the Kestrel so that the impeller runs at minimal speed (or stops), and only then turn the BACK of the Kestrel into the wind direction. Do NOT simply rotate the Kestrel’s back panel looking for the highest wind speed reading — that’s not the correct method for finding wind direction. Rotate the side of the Kestrel into the wind first, aiming for minimal impeller movement. The correct procedure is explained below by the experts at Applied Ballistics.
How to Find the Wind Direction with a Kestrel Wind Meter
Here is the correct way to determine wind direction with a Kestrel wind meter when you have no environmental aids — no other tools than a Kestrel. (NOTE: To determine wind direction, a mounted Wind Vane is the most effective tool, but you can also look at flags, blowing grass, or even the lanyard on your Kestrel).
Step 1: Find the wind’s general direction.
Step 2: Rotate the Wind Meter 90 degrees, so that the wind is impacting the side (and not the back) of the wind meter, while still being able to see the impeller.
Step 3: Fine-tune the direction until the impeller drastically slows, or comes to a complete stop (a complete stop is preferred). If the impeller won’t come to a complete stop, find the direction which has the lowest impact on the impeller.
Step 4: Turn the BACK of the Kestrel towards the direction from which the wind is blowing. Then press the capture button, and record your wind speed.
Do NOT simply point the Kestrel’s back into the wind until you get the highest wind speed — that’s not the correct method.
At SHOT Show 2013 we had the chance to chat with legendary barrel-maker John Kreiger of Krieger Barrels. In this wide-ranging interview, John addressed a number of questions our readers often pose…. What is better for a 6mm, 0.236″ land or 0.237″ land? What are the pros/cons of various barrel types: 3-groove, 4-groove, 6-groove, 8-groove, and 5R? What types of land/groove configurations clean up more easily? (John says the 5R might be the winner there).
John also discusses barrel cleaning and he explains why it’s unwise to pull a dirty brush back across your delicate crown: “The problem comes from the fact that abrasive materials — powder and primer residues in particular — get embedded in the brush. Essentially that is how a lap works.”
When we suggested that Krieger Barrels might want to offer three-groove barrels in the future, John surprised us by revealing that he has been considering putting a 3-groove design into production. John says that, in theory at least, a canted-land 3-groove holds a lot of promise. John hopes to build some prototype 3-grooves to test. Krieger Barrels has a 300-yard underground tunnel where barrels with various land/groove configurations and calibers can be tested using a return-to-battery fixture. John admits that tunnel testing of barrels is “on the back burner” as his company focuses on filling orders. But he says that he has a strong personal interest in testing different land/groove configurations, different amounts of choke, and different internal dimensions. We hope we’ll be able to share some results from the Krieger Barrels test tunnel in the near future.
Barrel-maker Dan Lilja’s website has an excellent FAQ page that contains a wealth of useful information. On the Lilja FAQ Page as you’ll find informed answers to many commonly-asked questions. For example, Dan’s FAQ addresses the question of barrel life. Dan looks at factors that affect barrel longevity, and provides some predictions for barrel life, based on caliber, chambering, and intended use.
Dan cautions that “Predicting barrel life is a complicated, highly variable subject — there is not a simple answer. Signs of accurate barrel life on the wane are increased copper fouling, lengthened throat depth, and decreased accuracy.” Dan also notes that barrels can wear prematurely from heat: “Any fast varmint-type cartridge can burn out a barrel in just a few hundred rounds if those rounds are shot one after another without letting the barrel cool between groups.”
Q. What Barrel Life, in number of rounds fired, can I expect from my new barrel?
A: That is a good question, asked often by our customers. But again there is not a simple answer. In my opinion there are two distinct types of barrel life. Accurate barrel life is probably the type most of us are referencing when we ask the question. But there is also absolute barrel life too. That is the point where a barrel will no longer stabilize a bullet and accuracy is wild. The benchrest shooter and to a lesser extent other target shooters are looking at accurate barrel life only when asking this question. To a benchrest shooter firing in matches where group size is the only measure of precision, accuracy is everything. But to a score shooter firing at a target, or bull, that is larger than the potential group size of the rifle, it is less important. And to the varmint hunter shooting prairie dog-size animals, the difference between a .25 MOA rifle or one that has dropped in accuracy to .5 MOA may not be noticeable in the field.
The big enemy to barrel life is heat. A barrel looses most of its accuracy due to erosion of the throat area of the barrel. Although wear on the crown from cleaning can cause problems too. The throat erosion is accelerated by heat. Any fast varmint-type cartridge can burn out a barrel in just a few hundred rounds if those rounds are shot one after another without letting the barrel cool between groups. A cartridge burning less powder will last longer or increasing the bore size for a given powder volume helps too. For example a .243 Winchester and a .308 Winchester both are based on the same case but the .308 will last longer because it has a larger bore.
And stainless steel barrels will last longer than chrome-moly barrels. This is due to the ability of stainless steel to resist heat erosion better than the chrome-moly steel.
Barrel Life Guidelines by Caliber and Cartridge Type
As a very rough rule of thumb I would say that with cartridges of .222 Remington size you could expect an accurate barrel life of 3000-4000 rounds. And varmint-type accuracy should be quite a bit longer than this.
For medium-size cartridges, such as the .308 Winchester, 7×57 and even the 25-06, 2000-3000 rounds of accurate life is reasonable.
Hot .224 caliber-type cartridges will not do as well, and 1000-2500 rounds is to be expected.
Bigger magnum hunting-type rounds will shoot from 1500-3000 accurate rounds. But the bigger 30-378 Weatherby types won’t do as well, being closer to the 1500-round figure.
These numbers are based on the use of stainless steel barrels. For chrome-moly barrels I would reduce these by roughly 20%.
The .17 and .50 calibers are rules unto themselves and I’m pressed to predict a figure.
The best life can be expected from the 22 long rifle (.22 LR) barrels with 5000-10,000 accurate rounds to be expected. We have in our shop one our drop-in Anschutz barrels that has 200,000 rounds through it and the shooter, a competitive small-bore shooter reported that it had just quit shooting.
Remember that predicting barrel life is a complicated, highly variable subject. You are the best judge of this with your particular barrel. Signs of accurate barrel life on the wane are increased copper fouling, lengthened throat depth, and decreased accuracy.
Benchrest Barrel Life — You May Be Surprised
I thought it might be interesting to point out a few exceptional Aggregates that I’ve fired with 6PPC benchrest rifles with barrels that had thousands of rounds through them. I know benchrest shooters that would never fire barrels with over 1500 shots fired in them in registered benchrest matches.
I fired my smallest 100-yard 5-shot Aggregate ever in 1992 at a registered benchrest match in Lewiston, Idaho. It was a .1558″ aggregate fired in the Heavy Varmint class. And that barrel had about 2100 rounds through it at the time.
Another good aggregate was fired at the 1997 NBRSA Nationals in Phoenix, Arizona during the 200-yard Light Varmint event. I placed second at this yardage with a 6PPC barrel that had over 2700 rounds through it at the time. I retired this barrel after that match because it had started to copper-foul quite a bit. But accuracy was still good.
Take a look at that unusual target below. We bet you’ve never seen one of these before. It’s a 50-Yard Sighting Target for the M1 Garand. It’s designed to allow a rifleman to confirm his zeros for multiple yardages all the way out to 1000 yards. But importantly, he can establish those zeros at a very “short” shooting facility, since the target is positioned at a mere 50 yards.
Here’s how it works. The target is placed at fifty (50) yards. You start at the bottom, aiming at the black circle. Then check your come-up table and work your way up, clicking step-by-step to the various horizontal lines set for 200, 300, 500, 600 and 1000 yards. This is NOT “spray and pray” — you need to have a pretty good idea of the clicks you need, based on your ammo’s ballistics. This target is calibrated for the U.S. Military M72 Ball Ammo. The targets are available from Champion’s Choice ($0.75 each) or from Creedmoor Sports (12 for $5.95).
Lapua’s Kevin Thomas used this target to get zeroed for the recent D-Day Anniversary Match at the Talladega Marksmanship Park. Kevin used the target for both his M1 Garand as well as his M1903A1 Springfield, both chambered for the .30-06 Springfield cartridge.
Zeroing at a Short Distance — How to Use the 50-Yard Sighting Target, by Kevin Thomas
As part of my preparation for the Garand Match at the CMP’s Talladega Marksmanship Park, I needed to zero my new M1 Garand, but I was crunched for time. I didn’t have time to get to my normal range and confirm zeros at actual yardages. But a 50-yard zero target came to the rescue. Made for M1s using the M72 National Match ammo, the target allows the shooter to establish fairly good zeros at 200, 300, 500, 600 and 1,000 yards if you’ve got access to a 50-yard range.
I have no idea when these 50-yard Sighting Targets were first developed, but they’ve been around for at least as long as I’ve been involved in this game (longer than I care to admit). It consists of a tall target, with a smallish black bullseye located at the bottom center. The bullseye is an aiming point only. Extending through the top of the target is a vertical line that runs directly up the center, to nearly the top of the paper. Across this, there are intersecting horizontal lines that are marked 200, 300, 500, 600 and 1,000.
The target was designed for the M1 rifle using then-issued M72 National Match ammunition. This ammo launched a 173gr FMJBT bullet at approximately 2,640 fps. It was a good load in its day, supersonic out to the 1,000-yard line. While that ammo is fairly scarce these days, this isn’t a problem for the handloader. My standard match load for the M1 Garand utilizes the 175gr Lapua Scenar HPBT, and delivers remarkably similar ballistic performance. Thus my normal Garand load translates nicely to this 50-yard target. Yes, this is by design. No point in reinventing the wheel when Lake City has already established what works!
In use, the shooter sets the target up at a measured 50 yards, and (this is critical) checks the vertical line with a plumb bob or a carpenter’s level, to ensure that it is absolutely vertical. Once the target is set, the rifle is fired and the group noted. From there, it is a simple matter of zeroing it normally to bring the groups into alignment with the vertical line, at the elevation needed for a particular range. Once your group is hammering the intersection of the vertical line and the horizontal line marked “200”, you have established your 200-yard zero for that rifle. Record the number of clicks, and you’re good to go. Raise the impacts up to coincide with the line marked “300” and you now have a 300-yard zero as well. And so on, right up the target. Record those settings in your data book, and you’re ready to go to the range at the full distances. If done carefully, you may be in the X-Ring, but at the very least, you’ll be well-centered and ready to get some hard dope recorded for future shoots.
The same target can also be used with an M14/M1A, at least at the shorter distances. The ballistics of the M118 and the current M118LR are similar enough that this will get you on target at the full distances, probably requiring just a half MOA or so change from the 50 yard zero you recorded. Same bullets, moving at a slightly more sedate 2,550 fps, you’ll be in the ballpark at least.
Bryan Litz has recently popularized the short-range zeroing methods once again, reintroducing it to a new generation of shooters that may not have been aware of the old M72 short-range zero target. The same principles apply, and with the advent of the myriad computer ballistics programs and chronographs on the market today, any shooter can rapidly develop his own zero targets to accomplish the same result. But in the meantime, especially with the M1’s resurgent popularity, it’s nice to know that there’s an easy way to do things without a trip to a full-length range. The modestly-priced 50-Yard Sighting Targets can be ordered through Champion’s Choice or Creedmoor Sports.
Oh, and when I arrived in Talladega, yes, my zeros were good! All’s well that ends well. Safe Shooting! — Kevin Thomas
We often receive questions from varmint hunters and AR shooters regarding barrel length. They want to know how much velocity they will loose if they run a shorter barrel in their .223-Rem rifle. Our friends at Rifleshooter.com did a test that provides some surprising answers to that question.
With barrels, one always wonders “Can a little more length provide a meaningful velocity gain?” To help answer that question, Rifleshooter.com performed an interesting test, cutting the barrel of a .223 Rem rifle from 26″ all the way down to 16.5″. The cuts were made in one-inch intervals with a rotary saw. At each cut length, velocity was measured with a Magnetospeed chronograph. To make the test even more interesting, four different types of .223 Rem/5.56 ammo were chron’d at each barrel length.
Test Barrel Lost 25.34 FPS Per Inch (.223 Rem Chambering)
How much velocity do you think was lost, on average, for each 1″ reduction in barrel length? The answer may surprise you. The average speed loss of the four types of .223/5.56 ammo, with a 9.5″ shortening of barrel length, was 240.75 fps total (from start to finish). That works out to an average loss of 25.34 fps per inch. (See inch-by-inch data HERE.)
5.56/.223 Barrel Cut-Down Speed Test 26″ to 16.5″
Start FPS at 26″
End FPS at 16.5″
Total Loss
Average Loss Per Inch
UMC .223 55gr
3182*
2968
214
22.5 FPS
Federal M193 55gr
3431
3187
244
25.7 FPS
Win m855 62gr
3280
2992
288
30.3 FPS
Blk Hills .223 68gr
2849
2632
217
22.8 FPS
*There may have been an error. The 25″ velocity was higher at 3221 fps.
Rifleshooter.com observed: “Cutting the barrel from 26″ to 16.5″ resulted in a velocity reduction of 214 ft/sec with the UMC 223 55-grain cartridge, 244 ft/sec with the Federal M-193 cartridge, 288 ft/sec with the Winchester M855 cartridge and 217 ft/sec with the Back Hills 223 68-grain match cartridge.”
How the Test Was Done
The testers described their procedure as follows: “Ballistic data was gathered using a Magnetospeed barrel-mounted ballistic chronograph. At each barrel length, the rifle was fired from a front rest with rear bags, with five rounds of each type of ammunition. Average velocity and standard deviation were logged for each round. Once data was gathered for each cartridge at a given barrel length, the rifle was cleared and the bolt was removed. The barrel was cut off using a cold saw. The test protocol was repeated for the next length. Temperature was 45.7° F.”
Much Different Results with 6mmBR and a Longer Barrel
The results from Rifleshooter.com’s .223/5.56 test are quite different than the results we recorded some years ago with a barrel chambered for the 6mmBR cartridge. When we cut our 6mmBR barrel down from 33″ to 28″ we only lost about 8 FPS per inch. Obviously this is a different cartridge type, but also our 6mmBR barrel end length was longer than Rifleshooter.com’s .223 Rem start length. Velocity loss may be more extreme with shorter barrel lengths.
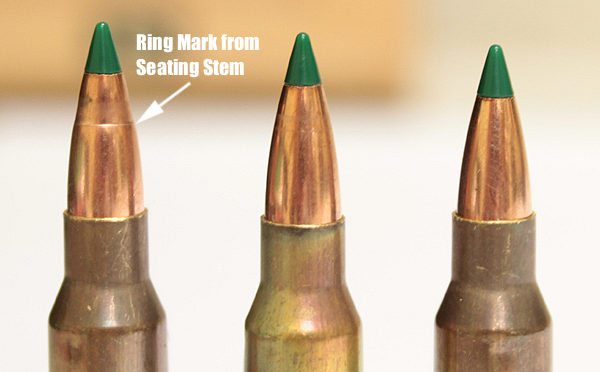
Here’s a helpful hint for hand-loaders from Sierra Bullets. While this article focuses on Sierra’s new Tipped Match-King bullets, the recommended solutions apply to other bullet types as well. The article explains how sharp edges on a seating stem can cause a ring to be pressed into the bullet jacket — especially with compressed loads that resist downward bullet movement. Here Sierra technician Rich Machholz diagnoses the problem and provides a solution.
Solutions for Ring Marks Caused by Seating Stems
by Sierra Bullets Ballistic Technician Rich Machholz
Now that the new Tipped MatchKing® (TMK) bullets are being shipped and shooters are putting them to use I have received several calls regarding marking on the bullet ogive from the seating stem.
The cause can be traced to one of several things.
In the .223 and especially with the long, 77 grain TMK seated at 2.250” or even 2.260” most loads of Varget® and Reloder® 15 are compressed loads, sometimes heavily compressed. This puts a great deal of pressure on the bullet through the seating stem. The result of all this pressure is a mark of varying depth and appearance on the ogive of the bullet. [Editor: We have seen this issue with a variety of other bullet types/shapes as well, including non-tipped VLDs. The solution is profiling the internal cone of the seating stem to match your bullet shape.]
Some older seating stems might even bear against the tip of the bullet which can make a slight bulge in the jacket just below the junction of the resin tip and the copper jacket in a compressed load. If this is the case there is not a ready fix other than calling the die manufacturer and requesting a new deeper seating stem.
Polish Your Seating Stem to Remove Sharp Internal Edges
If the seating stem is of proper depth the culprit most generally is a thin sharp edge on the inside taper of the seating stem. This is an easy fix that can be accomplished by chucking a spare 77 grain bullet in your drill, coating it with valve grinding compound or even rubbing compound or in a pinch even tooth paste.* Remove the seating stem assembly from the seating die. Turn the drill on and put the seating stem recess over the spinning bullet with the polishing compound to break or smooth the sharp edge that is making the offending mark. This might take more than one application to get the proper polish depending upon what you use, but the more you polish the better the blend of angles which will [ensure the stem matches the bullet contours, not leaving a sharp ring].
If the above is a little more than you care to tackle you might try very fine emery cloth twisted to a point that can be inserted into the mouth to the seating stem and rotated to polish the inside to eliminate any sharp edges that might be present.
Load Advice for 77gr TMKs in the .223 Rem
And last but certainly not least. Actually, even though we don’t say you need additional data for the TMKs, remember you are dealing with heavily-compressed loads in some cases because of the additional bullet length. Due to the additional length of these new bullets and in the interest of gaining some room in the case you might consider trying a slightly faster extruded powder like BenchMark or the 4895s or an even more dense powder like the spherical H335®, CFE223 or TAC. The extra room will allow for trouble free bullet seating also.
Good luck and remember we are no further away than your telephone: 1-800-223-8799.


 To learn more about how ambient temperature (and primer choice) affect pressures (and hence velocities) you should read the article
 Reader Mike Etzel has come up with a simple, cost-effective way to apply moly or danzac coatings to your bullets. And you won’t need any expensive gear other than your regular vibratory tumbler and some small plastic containers.
 2. Get Everything Hot — Real Hot. This is probably the single most important element in producing good-looking moly-coated bullets. I put the tumbler, the drum and the bullets out in the sun for at least 30 minutes before starting and then do all the tumbling in direct sunlight. On a summer day in Arizona, everything gets to the point that its uncomfortably hot to handle. If you are tumbling in the winter, you should heat the bullets in some form, a hair dryer can be useful, but they will cool off in the drum if you’re tumbling in cold temperatures. Your best bet is to plan ahead and do your coating in the summer. I coated about 3000 bullets in a couple of days recently to see me through our winter season (we’re a bit reversed from the rest of the country in terms of shooting season).


 At SHOT Show 2013 we had the chance to chat with legendary barrel-maker John Kreiger of