|
|
May 7th, 2016

Ever wonder how (and where) Sierra tests its bullets? The answer is underground, in a 300-meter test tunnel located under Sierra’s factory in Sedalia, Missouri. The photo above shows the construction of the tunnel back in May, 1990. Like most bullet manufacturers, Sierra does live-fire bullet testing to ensure that Sierra projectiles perform as promised, with repeatable accuracy. Sierra’s 300-meter test range is the longest, privately-owned underground bullet test facility in the world. Sierra offers free tours of the test tunnel as part of Sierra’s Factory Tour Program.

Sierra Bullets tests every new bullet design and each lot of bullets. Sierra tells us: “When [we] change to a new bullet they are continually shooting them until they get the bullet properly set up and running and the range releases them to run (meaning the bullets shoot to spec). [Testers] are required to shoot at any lot change and periodically throughout the lot … even if it is just a press operator change. Lot sizes can vary from 5,000 to over 100,000 thousand. If anything changes — it is a new lot. When a new operator comes on — it is a new lot.”
Bevy of Barreled Actions for Bullet Testing
Sierra Bullets uses dozens of barreled actions for testing bullets. These barreled actions are clamped in stout, return-to-battery test fixtures. These heavy test fixtures provide near-perfect repeatability (with no human-induced holding or aiming errors). Each barrel has its own logbook to track the barrel’s usage. Interestingly, Sierra does not have a specific round count for barrel life. When a barrel starts “opening up”, i.e. showing a decline in accuracy, then the barrel is replaced, whether it has 800 rounds through it or 5,000.

Click Photo to Zoom
Sierra Bullets 10-Shot Groups at 200 yards
What kind of 200-yard accuracy can you get in an enclosed, underground test range? Would you believe 0.162 MOA at 200 yards with a .338? Check out these 10-shot test groups shot at the Sierra Test Range at 200 yards. Note that the numbers listed on each sample are actual measurements in inches. To convert to MOA, cut those numbers in half (to be more precise, divide by 2.094, which is 1 MOA at 200 yards). For example, the 0.340″ middle group works out to 0.162 MOA at 200 yards.

May 5th, 2016
The last half-inch or so of your barrel is absolutely critical. Any damage (or abnormal wear) near the crown will cause a significant drop-off in accuracy. Here are ways you can check the end of your barrel, using a common Q-Tip.
Use Q-Tip for Barrel Inspection
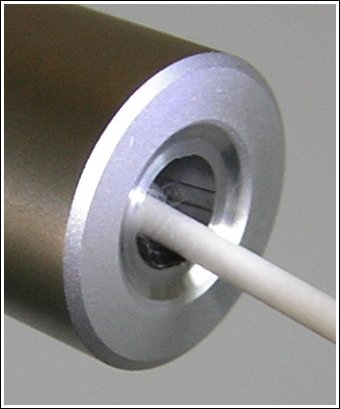 To find out if you have a burr or damage to your crown, you can use an ordinary Q-tip cotton swab. Check the edges of the crown by pulling the Q-tip gently out past the edge of the crown. If you have a burr, it will “grab” the cotton and leave strands behind. To find out if you have a burr or damage to your crown, you can use an ordinary Q-tip cotton swab. Check the edges of the crown by pulling the Q-tip gently out past the edge of the crown. If you have a burr, it will “grab” the cotton and leave strands behind.
Larry Willis has another way to use a Q-Tip: “Here’s a neat trick that will surprise you with how well it works.” Just insert a Q-Tip into your barrel (like the picture below), and it will reflect enough light so that you can get a real good look at the last half inch of rifling and the crown of your barrel. In most cases you’ll find that this works much better than a flashlight. Larry tells us: “I’ve used this method about a jillion times. Q-Tips are handy to keep in your cleaning supplies anyway. This is a good way to judge approximately how well you are cleaning your barrel when you’re at the range. It’s also the best way to examine your barrel when you’re in the field.”
Larry Willis is the inventor of Innovative Technologies’ Belted Magnum Collet Resizing Die. Larry explains how this die works, and offers other reloading tips on LarryWillis.com.
May 4th, 2016

 Readers who have just recently discovered the Daily Bulletin may not realize that AccurateShooter.com has hundreds of reference articles in our archives. These authoritative articles are divided into mutiple categories, so you can easily view stories by topic (such as competition, tactical, rimfire, optics, shooting skills etc.). One of the most popular categories is our Technical Articles Collection. On a handy index page (with thumbnails for every story), you’ll find over 100 articles covering technical and gunsmithing topics. These articles can help you with major projects (such as stock painting), and they can also help you build more accurate ammo. Here are five popular selections from our Technical Articles archive. Readers who have just recently discovered the Daily Bulletin may not realize that AccurateShooter.com has hundreds of reference articles in our archives. These authoritative articles are divided into mutiple categories, so you can easily view stories by topic (such as competition, tactical, rimfire, optics, shooting skills etc.). One of the most popular categories is our Technical Articles Collection. On a handy index page (with thumbnails for every story), you’ll find over 100 articles covering technical and gunsmithing topics. These articles can help you with major projects (such as stock painting), and they can also help you build more accurate ammo. Here are five popular selections from our Technical Articles archive.
 |
Complete Precision Case Prep. Jake Gottfredson covers the complete case prep process, including brass weight sorting, case trimming, primer pocket uniforming, neck-sizing, and, case-neck turning.
|
 |
Stress-Free Pillar Bedding. Richard Franklin explains how to do a top-quality bedding job, start to finish.
|
 |
OnTarget Software Review. Our Editors test free software that measures shot groups with great precision. We explain how to use the program and configure advanced features.
|
 |
Savage Action Tuning. Top F-TR shooter Stan Pate explains how to enhance the performance of your Savage rifle by optimizing the torque settings of the action screws.
|
 |
Stock Painting Instructions. Step-by-step guide for stock painting by expert Mike Ricklefs. Mike shows both simple coverage and fancy effects.
|
May 2nd, 2016
This is a grim tale. A man almost lost the use of his right hand, and did suffer terrible injuries to his fingers. All because he picked the wrong bottle of powder off the shelf.

Similar Labels, Disasterous Consequences
The shooter, Denny K., was assembling some rounds for his brand new 7mm-08 Savage hunting rifle. He thought he was loading with Hodgdon Varget. Instead he had filled his powder measure with Hodgdon TiteGroup, a fast-burning pistol powder. The labels are similar, so the mistake is understandable. But the results were devastating. Here’s what 41 grains of TiteGroup can do in a 7mm-08:

Posting on the Firing Line, in a thread entitled “Lucky to Be Alive”, Denny writes:
“This is the hardest post to post. I know if I had read it a week ago my comment would have been: ‘You have no business reloading’. I had everything perfect, except pouring the wrong powder in the powder measure. I type this slowly with my left hand, embarrassed but … possibly saving someone else a tragedy or, like me, a long drive to the Emergency Room and surgery to save my finger.”
CLICK HERE for bigger, more graphic photo of injury.

The Still-Sealed Bottle of Varget
Denny did not initially comprehend exactly why the kaboom happened. He thought maybe his new Savage rifle was at fault. Then, on his return home, he discovered something…
Denny wrote: “The seven-hour period it took to go to ER, transport to Trauma Center and surgery made me think it was a Savage rifle issue. Brand new rifle, new brass, triple-checked loading data. The next day I was humbled when I realized the Varget powder was still sealed.
I knew what powder to use. I thought [Varget] was what I used. Not until the following day did I realize the Varget was still sealed.”
At that point, Denny realized what caused the accident — “operator error”. He knew he had to warn others about using the wrong powder: “I knew I needed to share my mistake, even though it is embarrassing, just to remind people. I’ve been reloading for 30 years…”
Editor’s Comment: Denny was not a novice reloader. His experience demonstrates that this kind of mistake can be made by any hand-loader, even one with decades of experience. Be safe guys, take your time when you load your ammo. Remove powders from measures after your loading sessions (pistol powders can look very similar to rifle powders). And by all means CHECK the LABEL on the jug. As the TiteGroup label says: “A little goes a long way.”
It’s not a bad idea to separate your pistol powders from your rifle powders, or perhaps even load for pistol in a separate part of your workshop.
April 27th, 2016

In our Shooters’ Forum, a member recently noted that he needed to pull down (disassemble) some ammunition that was loaded incorrectly by one of his shooting buddies. You can use an impact puller to do this task, but if you have more than a dozen rounds or so, you may prefer to use a collet-style bullet puller. These work very quickly and positively, making quick work of big jobs. The efficiency of the collet-style puller is worth the investment if you frequently disassemble ammo. These devices retail for under $25.00 (collets sold separately). Normally, you’ll need a specific collet for each bullet diameter. But collets are not that costly, so this isn’t a big deal, particularly if you only load a few calibers, such as .223, 6mm, and .308.
Hornady and RCBS use different mechanisms to tighten the collet around the bullet. On Hornady’s Cam-Lock Bullet Puller, a lever-arm on the top of the bullet puller serves to tighten the collet around the bullet. Simply rotate the lever from the vertical to the horizontal position to grab the bullet. Lower the ram to remove the case. The bullet will drop out when you return the lever arm to the vertical position. This is demonstrated in the video below:
Hornady Cam-Lock Bullet Puller Demonstrated
Collet bullet-pullers resemble a loading die with a lever or handle on the top. They screw into a standard reloading press. Hornady and RCBS both make collet-style bullet pullers. They use the same basic principle — the device tightens a collet around the bullet, and then the bullet is separated from the case by lowering the press ram. NOTE: Collet pullers may leave small marks on your bullets, unlike impact (kinetic) pullers.*
 Like the Hornady tool, the RCBS Bullet Puller employs a collet to grab the bullet. However, the RCBS tool tightens the collet in a different way. The head of the RCBS tool is threaded internally. By rotating the lever arm clockwise in a horizontal circle you squeeze the collet around the bullet. To remove the bullet, after lowering the press ram, simply spin the lever arm back in the opposite direction. The use of the RCBS tool is demonstrated in this video: Like the Hornady tool, the RCBS Bullet Puller employs a collet to grab the bullet. However, the RCBS tool tightens the collet in a different way. The head of the RCBS tool is threaded internally. By rotating the lever arm clockwise in a horizontal circle you squeeze the collet around the bullet. To remove the bullet, after lowering the press ram, simply spin the lever arm back in the opposite direction. The use of the RCBS tool is demonstrated in this video:
RCBS Collet Bullet Puller Demonstrated:
WARNING: When removing bullets from loaded cartridges, always make sure there are no obsructions or debris in your shell-holder or under the loaded round. NEVER engage a primer seating accessory on your press when working with loaded rounds. You can cause a round to discharge by contacting the primer! Also, we recommend you keep your head and torso away from the bullet puller tool at all times.
*By contrast, impact pullers rarely mark bullets, particularly if you put a little bit of foam or paper wadding in the closed end of your impact puller. When dismantling loaded rounds, powder kernels can get trapped in the wadding, so you should remove and replace the wadding before changing to cartridges loaded with a different powder type (assuming you intend to save the powder).
April 26th, 2016
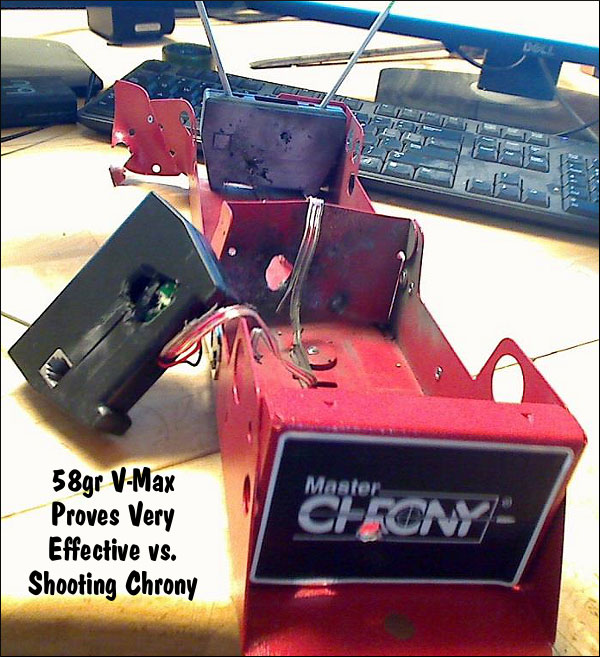
There is nothing more frustrating (or embarassing) than sending a live round into your expensive new chronograph. As the photo below demonstrates, with most types of chronographs (other than the barrel-hung Magnetospeed), you can fatally injure your expensive chrono if it is not positioned precisely.
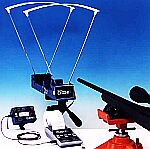 When setting up a chrono, we always unload the rifle, remove the bolt and bore-sight to ensure that the path of the bullet is not too low. When bore-sighting visually, set up the rifle securely on the sandbags and look through the bore, breech to muzzle, lining up the barrel with your aim point on the target. Then (during an appropriate cease-fire), walk behind the chronograph. Looking straight back through the “V” formed by the sky-screens, you should be able to see light at the end of the barrel if the gun is positioned correctly. You can also use an in-chamber, laser bore-sighter to confirm the visual boresighting (see photo). When setting up a chrono, we always unload the rifle, remove the bolt and bore-sight to ensure that the path of the bullet is not too low. When bore-sighting visually, set up the rifle securely on the sandbags and look through the bore, breech to muzzle, lining up the barrel with your aim point on the target. Then (during an appropriate cease-fire), walk behind the chronograph. Looking straight back through the “V” formed by the sky-screens, you should be able to see light at the end of the barrel if the gun is positioned correctly. You can also use an in-chamber, laser bore-sighter to confirm the visual boresighting (see photo).

Adjust the height, angle and horizontal position of the chronograph so the bullet will pass through the middle of the “V” below the plastic diffusers, no less than 5″ above the light sensors. We put tape on the front sky-screen supports to make it easier to determine the right height over the light sensors.
Use a Test Backer to Confirm Your Bullet Trajectory
You can put tape on the support rods about 6″ up from the unit. This helps you judge the correct vertical height when setting up your rifle on the bags. Another trick is to hang a sheet of paper from the rear skyscreen and then use a laser boresighter to shine a dot on the paper (with the gun planted steady front and rear). This should give you a good idea (within an inch or so) of the bullet’s actual flight path through the “V” over the light sensors. Of course, when using a laser, never look directly at the laser! Instead shine the laser away from you and see where it appears on the paper.

Alignment of Chronograph Housing
Make sure the chrono housing is parallel to the path of the bullet. Don’t worry if the unit is not parallel to the ground surface. What you want is the bullet to pass over both front and rear sensors at the same height. Don’t try to set the chrono height in reference to the lens of your scope–as it sits 1″ to 2″ above your bore axis. To avoid muzzle blast interference, set your chronograph at least 10 feet from the end of the muzzle (or the distance recommended by the manufacturer).

Rifles with Elevated Iron Sights
All too often rookie AR15 shooters forget that AR sights are positioned roughly 2.4″ above the bore axis (at the top of the front sight blade). If you set your bullet pass-through point using your AR’s front sight, the bullet will actually be traveling 2.4″ lower as it goes through the chrono. That’s why we recommend bore-sighting and setting the bullet travel point about 5-8″ above the base of the sky-screen support shafts. (Or the vertical distance the chronograph maker otherwise recommends). NOTE: You can make the same mistake on a scoped rifle if the scope is set on very tall rings, so the center of the cross-hairs is much higher than the bore axis line.

TARGET AIM POINT: When doing chrono work, we suggest you shoot at a single aiming point no more than 2″ in diameter (on your target paper). Use that aiming point when aligning your chrono with your rifle’s bore. If you use a 2″ bright orange dot, you should be able to see that through the bore at 100 yards. Using a single 2″ target reduces the chance of a screen hit as you shift points of aim. If you shoot at multiple target dots, place them in a vertical line, and bore sight on the lowest dot. Always set your chron height to set safe clearance for the LOWEST target dot, and then work upwards only.
Other Chronograph Tips from Forum Members:
When using a chronograph, I put a strip of masking tape across the far end of the skyscreens about two-thirds of the way up. This gives me a good aiming or bore-sighting reference that’s well away from the pricey bits. I learned that one the hard way. — German Salazar
A very easy and simple tool to help you set up the chronograph is a simple piece of string! Set your gun (unloaded of course) on the rest and sight your target. Tie one end of the string to the rear scope ring or mount, then pull the string along the barrel to simulate the bullet path. With the string showing the bullet’s path, you can then easily set the chronograph’s placement left/right, and up/down. This will also let you set the chrono’s tilt angle and orientation so the sensors are correctly aligned with the bullet path. — Wayne Shaw
If shooting over a chrono from the prone position off a bipod or similar, beware of the muzzle sinking as recoil causes the front of the rifle to drop. I “killed” my first chronograph shooting off a gravel covered firing point where I’d not given enough clearance to start with and an inch or two drop in the muzzle caused a bullet to clip the housing. — Laurie Holland
April 25th, 2016

This article appears courtesy Target Shooter magazine from the UK.
 Field Target (FT) and Hunter Field Target (HFT) airgun disciplines are popular outdoor shooting sports that simulate the challenges of hunting small game. One of the unique aspects of FT competition is target range-finding using parallax and optical focus. (HFT is limited to lower power scopes, so this type of range-fiding is not used in HFT.) Range-finding is very important because the pellets shot by FT airguns drop rapidly once they leave the muzzle (pellets can drop roughly 5″ at 50 yards). If you don’t have your scope set to the correct distance, you’ll probably miss the target high or low. Field Target (FT) and Hunter Field Target (HFT) airgun disciplines are popular outdoor shooting sports that simulate the challenges of hunting small game. One of the unique aspects of FT competition is target range-finding using parallax and optical focus. (HFT is limited to lower power scopes, so this type of range-fiding is not used in HFT.) Range-finding is very important because the pellets shot by FT airguns drop rapidly once they leave the muzzle (pellets can drop roughly 5″ at 50 yards). If you don’t have your scope set to the correct distance, you’ll probably miss the target high or low.
FT competitors employ high-magnification (35-55X) scopes to sight targets placed from 10 to 55 yards (7.3 to 50m in the UK). Because these scopes have very short depth-of-field at high-magnification, the target will be out of focus unless you have the scope focus/parallax control set very precisely. But competitors can use this to their advantage — once the target is precisely focused, you have effectively established its distance from the shooter. FT scopes often have large-diameter wheels on the side parallax control so the focus can be set very precisely. You can then read marks placed on the scope to adjust the amount of elevation need to put the pellet on target.
To simplify the adjustment of elevation on FT rifles, competitors will place tapes on the windage knobs with marks that correspond to distances in 3-5 yard (or smaller) increments. These marks allow you to quickly spin your elevation to the setting matching the target range established with your focus/parallax control.
Field Target Accessories
There are a variety of specialized products for FT competitors that help you set up your scope for precise ranging. First, Compufoil offers a computer program, ScopeKnob, that lets you easily create accurate elevation knob tapes for your scope. ScopeKnob even comes with a built-in Ballistics Module that will calculate the pellet trajectory for you and plot range settings for your tape. Chairgun.com also offers ChairGunPRO, specialized airgun ballistics software that lets you simultaneously compare four different pellets, or different scope heights.
 In the past, the A-Team offered replacement elevation knobs optimized for use with yardage marking tapes. These were offered in two versions, one which replaced the existing turret altogether and a second which clamped OVER the factory turret. Shown at right is the larger-diameter version in place over the factory turret. Unfortunately we don’t know a current source for this product, but this may help you crate something similar on your own. In the past, the A-Team offered replacement elevation knobs optimized for use with yardage marking tapes. These were offered in two versions, one which replaced the existing turret altogether and a second which clamped OVER the factory turret. Shown at right is the larger-diameter version in place over the factory turret. Unfortunately we don’t know a current source for this product, but this may help you crate something similar on your own.
Last but not least, Pyramid Air offers large-diameter parallax control wheels. According to Pyramid: “The enlarged sidewheel is the most popular FT scope accessory of all. It lets you put white artist’s tape around the rim to mark the actual distances at which the scope focuses”. A 6″ sidewheel provides over 18″ of space on which to inscribe yardage, and that means you can have a meaningful separation between 18 yards and 20 — where there is a huge parallax and trajectory difference. Though the ranges are already engraved on the rim of the wheel, field target competitors will measure them again on an actual range and write the markings on a strip of white artist’s tape.

Tips on Field Target Scope Set-Up
The creator’s of the A-Team knobs suggest taking your time when setting up a scope for Field Target competition: “We normally take from three to four hours preparing a scope to be mounted on a gun. We mark the scope in 1-yard increments from 9 to 40 yards, then to 55 yards by 3 or 5-yard increments depending on the scope being calibrated.”
April 14th, 2016
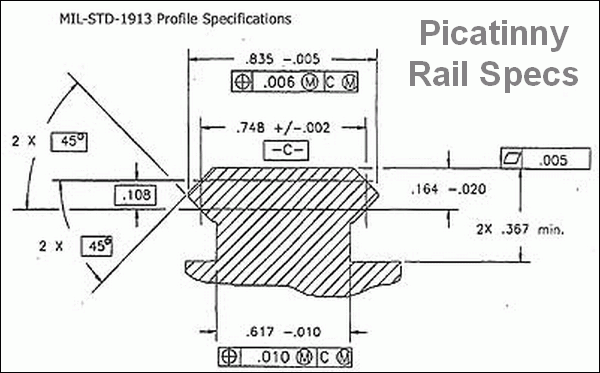
Readers often ask “What’s the difference between a Weaver scope rail and a Picatinny Rail?” The answer is not as simple as it seems. The dimensions of a Picatinny Rail should be consistent (from one rail-maker to another), since there IS a government spec. Conversely, there is some variance in “Weaver-style” rails. The width of the groove is the most important difference between Picatinny Rails and weaver rails. “Mil-spec” Picatinny rails will have a grove width of 0.206″ while Weaver rails typically have a narrower, 0.180″ groove width.
Brownell’s has a helpful GunTech™ Article that discusses the Picatinny Rail vs. Weaver Rail. That article explains:
“What are the differences between the ‘Picatinny’ and the ‘Weaver’ systems? The profile of the two systems is virtually identical. Depending on the quality of the machining done by the manufacturer, the two systems should be indistinguishable from the profile. The key difference lies in the placement of the recoil grooves and with width of the grooves. MIL-STD-1913 (Picatinny) grooves are .206″ wide and have a center-to-center width of .394”. The placement of these grooves has to be consistent in order for it to be a true ‘Picatinny’MIL-STD system. Weaver systems have a .180” width of recoil groove and are not necessarily consistent in a center-to-center measurement from one groove to the next.

In many instances, a Weaver system has a specific application that it is machined for, so interchangeability is not necessarily an issue. A MIL-STD-1913 system must adhere to the specifications listed above in order for it to be considered MIL-STD, since the military desires uniformity in the recoil grooves to allow for different systems to be mounted on the weapon with no concern for compatibility.
Now, what does this mean to you? Boiled down, it means that accessories designed for a Weaver system will, in most cases, fit on a ‘Picatinny’ system. The reverse, however, is probably not the case. Due to the larger recoil groove, ‘Picatinny’ accessories will not fit a Weaver system. There are, of course, exceptions to every rule, but for a good rule-of-thumb, [full-width] ‘Picatinny’ won’t fit Weaver, but Weaver will fit ‘Picatinny’.”
April 12th, 2016

Bart Sauter of Barts Custom Bullets has acquired a LabRadar chronograph. He was curious to see how his loads performed in actual match conditions, so he brought his LabRadar to a match and set it up right on his benchtop. What he learned was quite surprising. For one thing, Bart found that tuning for the best accuracy (in the conditions), was NOT simply a matter of maintaining velocity. Read all about Bart’s experience in this AccurateShooter Forum Thread.
LabRadar Report by Bart Sauter
Bart posted: “I shot a short range NBRSA match [in March] with the LabRadar on the bench! The benches were quite close, but the LabRadar was able to pick up my shots even with the other guns going off very close to it. This is a pretty impressive piece of gear.”
It’s great for tuning. I can’t say for sure but what I saw with the PPC is that just maintaining a certain velocity will not keep the gun in tune.”
One Forum member asked: “Was the LabRadar able to pick up shots that far back (behind the muzzle) and to the side? What setting did you have it set at?”
Bart’s LabRadar unit had no trouble picking up shots when set on the bench, a bit behind the muzzle. In fact, Bart noted: “Yes it can go a long way back. At home I could get back up to around 8 feet and pick up the bullet. It’s more sensitive about the side distance. I had mine on level 4. You can be a lot farther behind the muzzle then advertised. You can also point it at your buddy’s target and get his velocity.”
Bart set his LabRadar to be triggered by the shot: “I had a tuner on the gun but no muzzle brake. [The Chrono] was set to be triggered by the sound of the gun. When you move back you have to play with the trigger level. I put mine on a tripod and was able to pick up projectiles 8 feet back, but from the side had to be within 18 inches.”
 Long-Life Battery Power Long-Life Battery Power
Powering the LabRadar at the range is not a problem. Bart used a portable battery pack that can power the LabRadar for a long time: “I bought a RavPower battery pack from Amazon.com. It was the most powerful compact cell phone charger they had and [it costs about $30.00]. It was able to run the LabRadar for two full days without recharging and still had juice.”
The LabRadar is a pretty expensive piece of kit, but there’s nothing else like it on the market. Bart notes: “The LabRadar itself is about $560.00. The stand is $29.95 for the bench mount and the padded carry case is $39.95. So you’re around $630.00 plus shipping.”
LabRadar Field Test by Ray Gross

If you are considering purchasing a LabRadar Chronograph system, we strongly suggest you read the very thorough and informative LabRadar Review by Ray Gross, Captain of the USA F-TR team.

April 9th, 2016
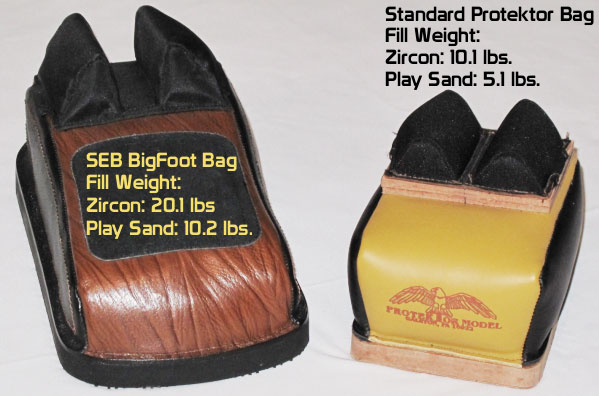
Over the years, noted gunsmith and a Benchrest Hall-of-Fame inductee Thomas ‘Speedy’ Gonzalez has learned a few things about “tuning” rear sandbags for best performance. On his Facebook page, Speedy recently discussed how sand bag fill levels (hard vs. soft) can affect accuracy. Speedy says you don’t want to have both your front and rear sandbags filled up ultra-hard. One or the other bag needs to have some “give” to provide a shock-absorbing function (and prevent stock jump).
SAND BAGS & HOW TO FILL THEM by Speedy Gonzalez
I was asked several times by competitors at the S.O.A. Matches and F-Class Nationals as to how I fill my sand bags for benchrest competition. Here is a copy of a reply I gave several years ago:
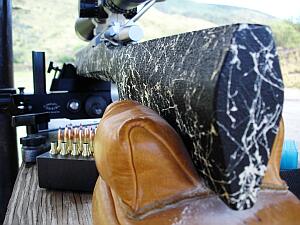 Back in the old days, about the time Fred Flintstone was still alive, I worked for Pat McMillan for free, from time to time to learn all his secrets. One day little Speedy was filling some new sand bags out behind Pat’s shop, stuffing them with more sand than Taco Bell put beans in their Burritos. When Pat stepped out the back door and inquired as to what in the hell was I doing packing them there bags the way I was. Back in the old days, about the time Fred Flintstone was still alive, I worked for Pat McMillan for free, from time to time to learn all his secrets. One day little Speedy was filling some new sand bags out behind Pat’s shop, stuffing them with more sand than Taco Bell put beans in their Burritos. When Pat stepped out the back door and inquired as to what in the hell was I doing packing them there bags the way I was.
I looked up at him with eyes like a kid with his hands in a cookie jar. My reply must have sounded like Homer Simpson “Doooh”. Finally I said “I don’t know, Boss. I just thought you were supposed to fill these babies up and go shoot. I got that ‘You dumb bastard look’ from Pat and I knew it was lecture time. This was what he told me:
You can not have two bags filled so hard that you gun bounces on them in the process of firing round at your target, especially if you have a rig with a very flexible stock. The bags must be set up in a manner for them to absorb the initial shock of the firing pin moving forward and igniting the primer. Then [they must] maintain their shape and absorb the second shock wave as well the rearward thrust and torque of the rifle. What happens to the rifle when this is not done? Well let me tell you. The rifles have a very bad tendency to jump and roll in the bags. This causes many of those wild, lost shots that one can’t explain.
Charles Huckaba, Ken Terrell, Larry Baggett, Ralph Stewart and some of us Texas shooters talk about this phenomena quite often. We have all agreed that:
- 1: You can not have two hard bags [i.e. both front AND rear] in your set-up.
- 2: Heavy sand magnifies these phenomena.
- 3: If you are a bag squeezer, pack ears hard and leave bag pliable enough to squeeze for the movement required. You may pack front bag as hard as rules permit.
- 4: Free recoil shooters pack both bags firm, but not so hard as to allow stock jump. Especially if you have a stock with a very flexible forearm.
- 5: We use play-ground sand, also know as silica sand. I sift mine to get any large impurities out then mix it with 25% to 50% with Harts parakeet gravel to the desired hardness that I am looking for. The bird gravel keeps the sand from packing itself into that solid as a brick state.
Speaking of bricks — another thing that happens when shooters employ that heavy zircon sand is the ears form a low spot under them from recoil and then tend to rock back and forth with the rifle causing many low shots to crop up. Edgewood makes an Edgewood/Speedy rear bag specially reinforced under the ears to eliminate this scenario.
One last note –If you use the Cordura bags keep them sprayed with a good silicon spray or “Rain-Ex”. This keeps them from getting sticky. Hey guys, try that and see if it helps. — Speedy
P.S.: I do not like the solid double-stitched leather bottoms. While this seems like a good idea, I see more shooters have problems because of them. They tend to slide around the bench and or slide with the rifle on recoil. The standard Protektor with Cordura rabbit ears and an Otto ring bag with a Cordura front would be what I would suggest to the new shooter or one of the Edgewood / Speedy rear bags, these mimic the “Donut” and feature a ring of leather around the bottom circumference that keep the bottom from rocking on the bench or ground if that is where you reside these days…
|


