We first ran this eye-opening story two years ago. We’re republishing it today as a reminder that safety should always be a shooter’s #1 concern at the range. Avoid distractions and always check your barrel for obstructions before you chamber a round or pull the trigger. A moment of inattention can result in a catastrophic kaboom …
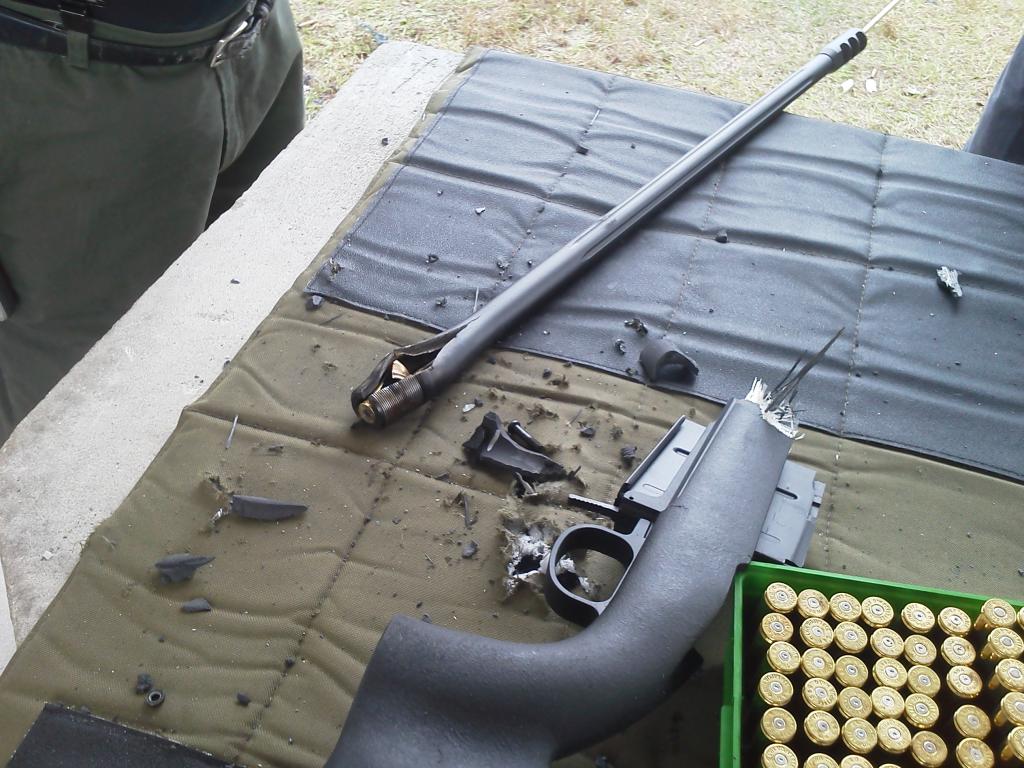
Discharging a .338 Lapua Magnum round with a cleaning rod in the barrel — that’s a recipe for disaster. What happens when a fired .338 caliber bullet and a cleaning rod try to occupy the same place at the same time? Well you get a catastrophic kaboom, with metal pieces flying all over the place, and a shooter very lucky to escape without serious injury. This incident occurred recently in Manatee, Florida, as reported by Sniper’s Hide member Queequeg. We thank SnipersHide.com for granting permission to publish these revealing images in the Daily Bulletin.
This story should serve as a chilling reminder to follow proper safety practices whenever you are at the range. Always check to make sure there is no obstruction in the bore BEFORE loading a live round.
.338 Lapua Magnum + Cleaning Rod + Inattention = Kaboom!
Kaboom at Manatee!
A while back, Sniper’s Hide member Queequeg published shocking photos of a catastrophic kaboom involving a .338 Lapua Magnum (Savage action). The action was blown off the rifle, shrapnel went through the roof, and the barrel split at the tenon before taking an excursion downrange. The action did crack in the front but the lugs remained engaged so the bolt did not slam to the rear (luckily for the shooter).
Here’s the report: “This happened [January 20, 2014] at the Manatee Gun and Archery Club. Al, Ren and myself were there with a couple other folks. Ren was at bench 12, I was at 13. The fellow at 11 was running a Savage .338 Lapua. He had a very bad day! He damn sure could have killed himself and quite likely Ren as well.”
Queeqeg added: “After the boom, I heard Ren ask ‘Are you alright’ and then turned to look in time to see the fellow reacting in total shock — literally stunned. Ren and I went over to him and could not see any major injuries. Ren was uninjured as well but had a lot of fiberglass splinters on him. The barrel nut is what I presume punched the two holes in the roof. The shooter is a regular there[.] He had been having a problem with sticky cases though he said he was certain the loads were mild. That’s why he was content to knock the sticky ones out with the rod. He simply forgot to remove the rod after knocking out the last stuck case. You can see what happened next.”
The Important Lesson Here
What did the .338 LM shooter do wrong here? You will say — “Well that’s obvious, he left a cleaning rod in the barrel and then shot a round.” Yes, that was a potentially fatal error. But that was his second mistake — one that occurred only because he made a more fundamental judgment error first.
The FIRST mistake was not acknowledging the problem with his ammo. Had he heeded the warning signs, he would still have a rifle (and an unsoiled pair of trousers). When he first observed that he was having problems with extracting cases, a warning light should have gone off in his head. Presuming his extractor was not broken (and that the chamber was cut properly) he should have been able to extract his brass if he was running safe loads. The lesson here we all need to learn is that if you observe a serious ammo-related issue, it is time to stop shooting. Don’t try to invent work-arounds just to extend your range session, when there are clear signs that something is wrong, very wrong.
What do you get when you cut a 6.5 Creedmoor-chambered barrel down to just over 16 inches? A lot more velocity than you might think. Our friends at Rifleshooter.com recently did a barrel cut-down test with 6.5 Creedmoor test rifle, shortening the barrel from 27 to 16.1 inches in one-inch increments. Surprisingly, with a 142gr Sierra MK, the total velocity loss (as measured with a Magnetospeed) was just 158 FPS, an average of 14.4 FPS per inch of barrel length. With the lighter 120gr A-Max bullet, the total velocity loss was 233 FPS, or 21.8 FPS average loss per inch of barrel.
Test Procedure
Five (5) rounds of each type of cartridge were fired at each barrel length and the velocity data was recorded with a MagnetoSpeed V3 barrel-mounted chronograph. The rifle was then cleared and the barrel was cut back one inch at a time from 27″ to just over 16″. NOTE: During this winter test, the air temperature was a very chilly 23° F. One would expect higher velocities across the board had the outside temperature been higher.
The photo below shows how the barrel was cut down, inch-by-inch, using a rotary saw. The barrel was pre-scored at inch intervals. As the main purpose of the test was to measure velocity (not accuracy) the testers did not attempt to create perfect crowns.
6.5 Creedmoor vs. Other Mid-Sized 6.5mm Cartridges
The 6.5 Creedmoor is a very popular cartridge with the tactical and PRS crowd. This mid-size cartridge offers good ballistics, with less recoil than a .308 Winchester. There’s an excellent selection of 6.5mm bullets, and many powder choices for this cartridge. When compared to the very accurate 6.5×47 Lapua cartridge, the 6.5 Creedmoor offers similar performance with less expensive brass. For a tactical shooter who must sometimes leave brass on the ground, brass cost is a factor to consider. Here’s a selection of various 6.5 mm mid-sized cartridges. Left to right are: 6.5 Grendel, 6.5×47 Lapua, 6.5 Creedmoor with 120gr A-Max, 6.5 Creedmoor with 142gr Sierra MK, and .260 Remington.
When asked to compare the 6.5 Creedmoor to the 6.5×47 Lapua, Rifleshooter.com’s editor stated: “If you don’t hand load, or are new to precision rifle shooting, get a 6.5 Creedmoor. If you shoot a lot, reload, have more disposable income, and like more esoteric cartridges, get a 6.5×47 Lapua. I am a big fan of the 6.5×47 Lapua. In my personal experience, the 6.5×47 Lapua seems to be slightly more accurate than the 6.5 Creedmoor. I attribute this to the quality of Lapua brass.”
What is “Overbore”? That’s a question rifle shooters can debate to no end. This article from our archives proposes one way to identify “overbore cartridges”. We think the approach outlined here is quite useful, but we know that there are other ways to define cartridges with “overbore” properties. Whenever we run this article, it stimulates a healthy debate among our readers — and that is probably a good thing.
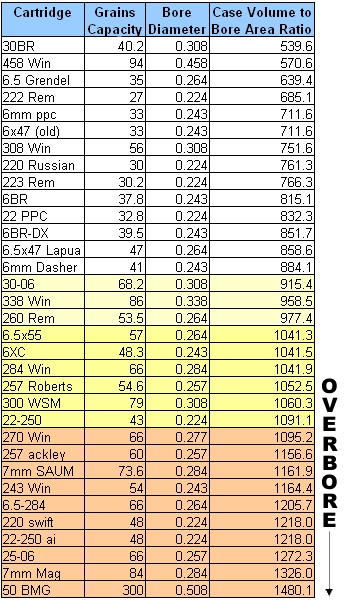
Forum Member John L. has been intrigued by the question of “overbore” cartridges. People generally agree that overbore designs can be “barrel burners”, but is there a way to predict barrel life based on how radically a case is “overbore”? John notes that there is no generally accepted definition of “overbore”. Based on analyses of a wide variety of cartridges, John hoped to create a comparative index to determine whether a cartridge is more or less “overbore”. This, in turn, might help us predict barrel life and maybe even predict the cartridge’s accuracy potential.
John tells us: “I have read countless discussions about overbore cartridges for years. There seemed to be some widely accepted, general rules of thumb as to what makes a case ‘overbore’. In the simplest terms, a very big case pushing a relatively small diameter bullet is acknowledged as the classic overbore design. But it’s not just large powder capacity that creates an overbore situation — it is the relationship between powder capacity and barrel bore diameter. Looking at those two factors, we can express the ‘Overbore Index’ as a mathematical formula — the case capacity in grains of water divided by the area (in square inches) of the bore cross-section. This gives us an Index which lets us compare various cartridge designs.”
OVERBORE INDEX Chart
So what do these numbers mean? John says: “My own conclusion from much reading and analysis is that cartridges with case volume to bore area ratio less than 900 are most likely easy on barrels and those greater than 1000 are hard on barrels.” John acknowledges, however, that these numbers are just for comparison purposes. One can’t simply use the Index number, by itself, to predict barrel life. For example, one cannot conclude that a 600 Index number cartridge will necessarily give twice the barrel life of a 1200 Index cartridge. However, John says, a lower index number “seems to be a good predictor of barrel life”.
John’s system, while not perfect, does give us a benchmark to compare various cartridge designs. If, for example, you’re trying to decide between a 6.5-284 and a 260 Remington, it makes sense to compare the “Overbore Index” number for both cartridges. Then, of course, you have to consider other factors such as powder type, pressure, velocity, bullet weight, and barrel hardness.
Overbore Cases and Accuracy
Barrel life may not be the only thing predicted by the ratio of powder capacity to bore cross-section area. John thinks that if we look at our most accurate cartridges, such as the 6 PPC, and 30 BR, there’s some indication that lower Index numbers are associated with greater inherent accuracy. This is only a theory. John notes: “While I do not have the facilities to validate the hypothesis that the case capacity to bore area ratio is a good predictor of accuracy — along with other well-known factors — it seems to be one important factor.”
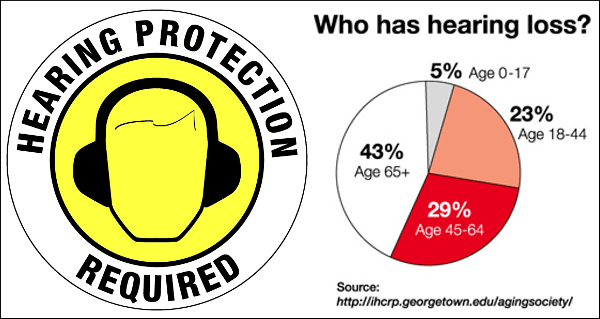
Hearing loss can be progressive and irreversible. If you are a shooter, this is serious business. You need to use effective hearing protection every time you go to the range. Even if you are away from the firing line, gunshot noises can damage your hearing. Good foam earplugs costs mere pennies but they can prevent deafness in your later years. Many folks also wear muffs over plugs. Some other shooters prefer the custom-molded ear plugs. Electronic muffs can be useful when you are away from the firing line because they allow you to converse.
Here are some comments from Forum members on the subjects of hearing loss and the need for proper ear protection. You can join the discussion in this FORUM THREAD:
“If you are young and don’t want to end up with profound hearing loss like I have… ALWAYS ALWAYS ALWAYS use hearing protection. This is from a guy who is social security/medicare eligible, has two Re-Sound aids at a not so cheap $2000.00 EACH… and now has religion! When I was young [we] never wore ear gear and laughed at the ringing after 100 rounds of 12 gauge at the skeet range. Now we live with the consequences. Be smarter than I was!” — Gary0529
“Take it from a 70-year-old that has been shooting 49 years. I now have a Re-Sound hearing aid in the left ear and a Cochlear Implant in my right. I still cannot hear. Custom molded plugs are best. Some are sold at gun shows and some are made by the folks that make hearing aids. They are cheap as compared to this $200,000 implant. DO IT NOW for everyone around guns.” — Richard King, King’s Armory
“Say WHAT? You have to type a little louder! I used to shoot without any muffs, when I was ‘young and indestructible’, and now I have about 40% loss. When I take youngsters and friends shooting, they get muffs and plugs. I’m not allowed suppressors where I live. I would use them if I could.” — Josh B.
“For what it’s worth, I wear both ear plugs and muffs that have NO sound adjustment capability. As a youngster (15) I wore no ear protection either in shooting or motorcycle riding. I kept doing that until entering military service at age 18 where we had to wear ear plugs at the range. Started wearing ear plugs after that, except when motorcycle riding. At around age 53 my hearing started going south as a result of my own stupidity as a youngster and now some 15 years later I only have about 45% of my hearing left. So beware all — there is a price to pay if you don’t protect your hearing.” — Shynloco
Important Safety Considerations:
1. The NRR (noise reduction rating) is determined by “experimenter” fit, not user fit, and trained listeners during the testing period. This results in inflated protection numbers compared to real-world protection.
2. Any disruptions in the protector/skin seal will greatly reduce the effectiveness. Think eye glass temple bars, lots of hair, ear wax, etc. A 5% leak results in a 50% reduction in effectiveness.
3. Double protection gives only 5-10 dB extra protection.
4. Bone conduction gives about 50 dB protection so hearing protectors are the weak link[.]
5. Keep the protectors in/on your ears. Over 8 hours, if you remove them for only 30 minutes (cumulative), the effective protection is cut in half.
So, if you are using a really good muff with NRR of 33 and a foam plug with NRR of 27, the real-world NRR would be about 35 dB, at best. This would attenuate a gunshot by that amount. The key is time versus exposure. Limit the exposure and you limit the dose. — DelS
Ear Protection for Small Children
Don’t forget to protect your kids if you take them to the range (or loud rock concerts). Parents of very young infants should consider Baby BanZ Muffs, which are designed for infants 0-2 years. These small-sized muffs can protect toddlers’ hearing when loud machinery is running, during fireworks displays, or other noisy activities. These really work for tiny tots. One mother reports: “I bought these for my two-month old and they work great! He’s never fought us putting them on. He’s now falling asleep with them. He’s slept through a demolition derby and a rowdy wedding reception. I’m ordering another pair for my nephew.” Another mom says: “We bought these when we took our four month-old to a loud event. They fit her head well and were well-padded. She looked very comfortable, so comfortable in fact that she slept for most of her first rock concert. I’d say they worked exceptionally well!”
Improve Your Hit Ratio by Using Wing Flags
It’s not unusual for varmint hunters to invest $3,000.00 in a custom rifle, pay thousands more for spotting scope and laser rangefinder, and spend countless hours loading ultra-precise ammo. Yet, when they head off to the prairie dog fields, they’ll omit an essential piece of gear that can make the difference between a hit and a miss.
We’re talking about windflags. Many casual shooters, varmint hunters, and even some “tactical” shooters disdain windflags as gadgets suited only for the accuracy-obsessed benchrest crowd. In fact, windflags are just as important for the varminter as for the benchrest competitor. You may think that you can easily notice a major wind shift. But consider this, a change from a light 2.5 mph left breeze to a 2.5 mph right is a 5 mile per hour switch. That is enough to make you miss a prairie dog even at just 200 yards.
Here’s a chart that shows the effect of a 5 mph full-value (i.e. 90-degree) wind change at various distances. The values assume a typical .250 G1 BC varmint bullet launched at 3500 fps at a 3″-wide critter (center hold).
You don’t need to spend a lot of money on windflags. Even a bit of surveyors’ tape on a post is better than nothing. A simple windflag, placed at your shooting station, helps minimize the effect of cross-winds. If you align your shooting position so the breeze is at your back you can shoot with greater confidence even in high winds. Watch the way the windflag blows, and shoot at the dog mounds that are directly downwind.
Our friend Boyd Allen offers another tip: “When you go varminting, be sure to bring some kind of portable target stand. Accuracy or zero problems are much easier to diagnose and remedy if you can set up a target at 100 yards. A simple wood, A-Frame design, hinged at the top, works well, stores flat, and is easy to build.”
Sometimes simpler is better when it comes to targets for fun shooting and load testing. While we normally use test targets from our Downloadable Target Page, it’s sometimes easier to just use brightly-colored “Hi-Viz” adhesive target dots.
Hi-Viz Stick-On Dots in Assorted Colors and Diameters
You can order 1″ target dots in bulk from Labeloutfitters.com. Many colors are available including fluorescent (hi-viz) Red, Green, Orange, and Yellow. These are bright and easy to see even in fading afternoon light. A pack of twenty (20) sheets (1260 dots total) costs just $5.97 (that works out to $4.74 per thousand). For the 1″-diameter stick-on dots you get 63 dots per sheet. Larger, 1.5″-diameter fluorescent dots are also available in 20-sheet packs for $5.97, with 24 large dots per sheet (480 dots total). If you want even bigger, 2″-diameter dots, sheets with 20 Hi-Viz dots per sheet are on sale for $5.97 per 20-pack (400 dots total).
Our friend Danny Reever really likes the bright dots from Label-Outfitters: “Ordered some of the 1″ dots from LabelOutfitters.com and recieved them in two days Priority Mail! Bought the flourescent red,green, and yellow and they are really nice — especially for the price.”
If you prefer smaller, 3/4″-diameter circles, Amazon.com sells Avery packs with 1008 adhesive dots for just $2.99 or $3.99 per pack. Colors include Neon Red/Orange (item 5467), Neon Yellow (item 5470), Neon Green (item 5468), and Bright Blue (item 5461). We recommend the Neon Red/Orange for most uses, or the Neon Yellow dots for use on a black background. There is even a dispenser-box option with 1000 3/4″ dots on a roll in a box. Amazon.com also offers 1″, 1.25″, and 2″-diameter target pasters in 1000-dot rolls for $13.99 per roll.
Half-Inch Fluorescent Dots for 100-200 Yards
For close-range work, you may prefer 1/2″-diameter dots. Forum member Steve found a source for very small 1/2″ dots: Uline.com. The 1/2″ dots are available in a wide variety of colors including fluorescent Red, Pink, Yellow, and Green. Price is $12 for a roll of 1000 dots (item S-2063). Steve notes: “A 1/2″ circle at 300 yards is not quite entirely covered by Nightforce crosshairs at 42-power (I’d say 70% coverage). I.e., it seems easier to line up repeatedly than with the bigger (3/4″) circles, which I used to use. Note that, for me, neon green and neon orange work best on brown cardboard targets. Neon orange works well on white paper.”
Before he retired, Forum member Ron D. served as a Police Officer assigned to Chicago’s O’Hare airport. Ron offers some excellent advice for shooters traveling with firearms and expensive optics.
First, Ron explains that airport thieves can spot bags containing firearms no matter how they are packaged: “Don’t think you’re safe if your guns are placed in cases designed for golf clubs or trade show items. Baggage is X-Rayed now and cases are tagged with a special bar code if they contain firearms. It doesn’t take long for bad guys to figure out the bar coding for firearms.”
Carry-On Your Scopes and Expensive Items
Ron advises travelers to avoid placing very expensive items in checked baggage: “When traveling by air, carry on your rangefinder, spotting scope, rifle scope, medications, camera, etc. You would be surprised at the amount of people that carry-on jeans and shirts, but put expensive items in checked baggage. Better to loose three pairs of jeans than some expensive glass.”
Mark Bags to Avoid Confusion
Ron notes that carry-on bags are often lost because so many carry-on cases look the same. Ron reports: “People do accidentally remove the wrong bag repeatedly. I frequently heard the comment, ‘But it looks just like my bag.’ When de-planing, keep an eye on what comes out of the overhead that your bag is in. It’s easy to get distracted by someone that has been sitting next to you the whole flight. I tie two streamers of red surveyors’ tape on my carry-on bag.” You can also use paint or decals to make your carry-on bag more distinctive.
Choosing a Rifle Transport Case
Ron advises: “Buy the best [rifle case] that you can afford. Don’t cry when your $3,000+ Benchrest rifle has a cracked stock or broken scope. Think about what it would be like to travel across the country (e.g. to Montana or the Cactus Classic) and arrive with a damaged rifle. Remember the Samsonite commercial. (For you younger shooters, it shows a monkey throwing the suitcase around in his cage at the zoo.) Baggage handling is NOT a fine art. There is no guarantee that your rifle case will be on top of all the other baggage. Then there is shifting of baggage in the belly of the plane. Ponder that for a while. Rifle and pistol cases must be locked. It doesn’t take a Rocket Scientist to figure out that a simple pry tool will open most case locks. There is not much that you can do to disguise a rifle case. It is what it is, and opportunists know this. Among thieves, it doesn’t take long for the word to get around about a NEW type of case.”
General Advice for Air Travelers
Ron cautions: “Keep your hands on your items before boarding. One of the most often heard comments from theft victims was, ‘I just put my computer down for a minute while I was on the phone.’ Also, get to the baggage claim area quickly. If your family/friends can meet you there, so can the opportunists. Things do get lost in the claim area. Don’t be a Victim. Forewarned is forearmed.”
Here’s a great Do-It-Yourself (DIY) project from Martin Tardif. Build your own height-adjustable ammo caddy for under ten bucks. This is a great project for F-Open competitors as well as anyone who shoots with a pedestal front rest, either on the ground or from a bench. The ammo caddy attaches, via a flexible arm, to your front rest. The flexy arm allows you to position your ammunition close to your rifle’s feeding port. That makes it easy to grab cartridges and load them into the chamber without shifting your shooting position. Nice job Martin! The total cost of the whole project, according to Martin, was just $8.00!
Martin Explains How to Build the Ammo Caddy
Here are some pics of my DIY P.L.A.B. (Port Level Ammo Block). I cannibalized the goose neck from a Craftsman bendy-style utility light and bought a 3.5″x 1″ Acetal disk on eBay. I then drilled out the disk to accept twenty .284 Winchester rounds and screwed the disk to the bendy arm. The arm, by itself, wasn’t sturdy enough to support my fully loaded ammo block, so I inserted a 1/8″-diameter steel rod cut to length into the arm before I screwed it to the disk. On this Bald Eagle rest, I wasn’t using the windage adjustment cable. That allowed me to secure the bottom end of the arm to the unused 5/16″ x 18 bolt hole for the cable. [Editor’s Note: For other pedestal rest types/brands you may need to drill a hole for the base of the flexy arm.]
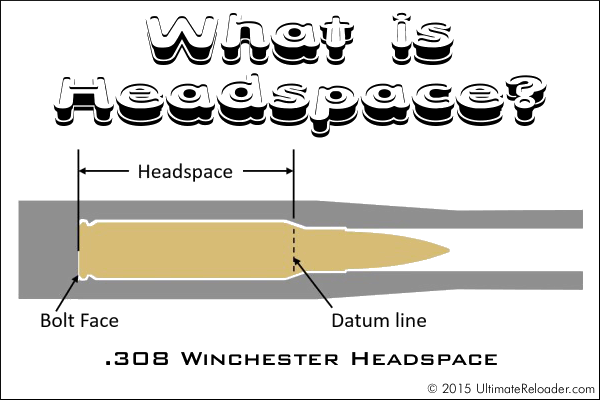
This illustration shows headspace measurement for the popular .308 Winchester cartridge, which headspaces on the shoulder. Image copyright 2015 Ultimate Reloader.
In this Brownells Tech Tip, Brownells gun tech Steve Ostrem explains what headspace is and why it’s one of the most critical measurements for nearly all firearms. Even if you’re an experienced rifle shooter, it’s worth watching this video to refresh your understanding of headspace measurements, and the correct use of “GO” and “NO-GO” gauges.
Headspace Definition
In firearms, headspace is the distance measured from the part of the chamber that stops forward motion of the cartridge (the datum reference) to the face of the bolt. Used as a verb, headspace refers to the interference created between this part of the chamber and the feature of the cartridge that achieves the correct positioning. Different cartridges have their datum lines in different positions in relation to the cartridge. For example, 5.56x45mm NATO ammunition headspaces off the shoulder of the cartridge, whereas .303 British headspaces off the forward rim of the cartridge.
If the headspace is too short, ammunition that is in specification may not chamber correctly. If headspace is too large, the ammunition may not fit as intended or designed and the cartridge case may rupture, possibly damaging the firearm and injuring the shooter. (Source: Wikipedia)
Headspace Gauges
Headspace is measured with a set of two headspace gauges: a “Go” gauge, and a “No-Go” gauge. Headspace gauges resemble the cartridges for the chambers they are designed to headspace, and are typically made of heat-treated tool steel. Both a “Go” and a “No-Go” gauge are required for a gunsmith to headspace a firearm properly. A third gauge, the “Field” gauge, is used (as the name implies) in the field to indicate the absolute maximum safe headspace. This gauge is used because, over time, the bolt and receiver will wear, the bolt and lugs compress, and the receiver may stretch, all causing the headspace to gradually increase from the “factory specs” measured by the “Go” and “No-Go” gauges. A bolt that closes on “No-Go” but not on “Field” is close to being unsafe to fire, and may malfunction on cartridges that are slightly out of spec. (Source: Wikipedia)
To learn more, read Brownell’s longer article Headspace Gauges and How to Use Them. Among other things, this explains the relative lengths of “Go”, “No-Go”, and “Field” gauges. The “Field” is actually the longest: “The GO gauge corresponds to the SAAMI (Sporting Arms & Ammunition Manufacturer’s Institute) minimum chamber length, while the FIELD gauge usually matches the maximum chamber depth, or slightly less. NO-GO gauges are an intermediate length between minimum and maximum, that, technically, is a voluntary dimension. A firearm that closes on a NO-GO gauge and does not close on a FIELD gauge may not give good accuracy and may have very short cartridge case life from the ammunition re-loader’s standpoint.”
Sooner or later you’ll want to clean your rifle brass, even if you aren’t fussy about appearance. You can tumble your cases in a vibratory tumbler with dry media, but that can leave cases with a fine layer of dust, or worse yet, clogged flash holes. As an alternative to tumbling, many shooters are experimenting with ultrasonic case cleaning. Here are three tips to achieve the best results when using ultra-sound to clean your brass:
Try a Commercial Ultrasonic Cleaning Solution
As a companion product to its new ultrasonic cleaning tank, Hornady is selling a citric-acid based One Shot™ Sonic Clean™ Solution, that is claimed to speed up cleaning times, and not leave your brass an odd pinkish color like some “home-brew” solutions. We’ve heard good reports about the One-Shot Solution (cartridge case formula) as well as Citranox®. Both products are economical to use since you dilute them heavily with water. For example, Hornady recommends you mix forty (40) parts water to one part of One Shot Sonic Clean.
Forum member Dave B is a chemist/physicist with decades of experience working with the ultrasound process. Dave tried a variety of solutions and he favors a mix of water and Citranox®. Dave notes: “So far I’ve been very impressed with the Citranox. Once- or twice-fired brass clean up very quickly. The worst cases I tried were 6 Dashers that had been fired ten times with Varget and never cleaned. The worst fouling was in the bottom of the case around the flash hole. They took longer and I used a more concentrated cleaning solution but they did come out clean. The price is reasonable. I paid $35 a gallon and for once- or twice-fired cases I dilute the cleaner 100 to 1. There is much less chemical reaction with the brass than there is with vinegar. No weird colors, just shiny bright. I even used it with hot water, which speeds up the cleaning process. The cleaner is mostly detergents with a little citric acid. Even at a 1:75 ratio my $35 worth of cleaner will make 75 gallons of solution.” The price has gone up a bit since Dave acquired his Citranox, but Amazon.com sells Citranox for $48.00 per gallon.
Another good ultrasonic solution is L&R non-ammoniated Safety Cleaning Solution, sold by Brownells, item #515-000-004. Brownell’s L&R solution is non-toxic and biodegradeable. The strong surfactant in L&R solution helps penetrate the grit so the ultrasonic cavitation can carry the grime away.
De-Gas the Solvent Before Adding Brass
One of our readers, Eddy M. in Glasgow, Scotland writes: “I have read a couple of articles recently about ultrasonic cleaning of cases and not one has mentioned de-gassing the cleaning liquid before starting to clean items. As an engineer who traveled around for ten years servicing ultrasonic tanks I would like to point out that the cleaning liquid when first put into the tank has invisible dissolved air bubbles in it which will absorb ultrasonic energy until the liquid de-gasses. (Ten minutes in a powerful industrial tank — longer in a small hobby tank). You must let the tank run on its own for 20 minutes on the first use of the liquid to allow this to happen. Only after the new liquid or re-introduced liquid has been de-gassed will the tank give good results.”
Apply Dry-Lube Inside Case Necks
Jason Baney has found that Ultrasonic cleaning leaves the inside of the case-necks so “squeaky clean” that there is excess friction when seating bullets. On a fired case that has been cleaned conventionally (no ultra-sound), a thin layer of carbon remains to lubricate the bullet entry and exit. To restore that lubricity in cases cleaned with ultrasound, Jason applies a dry lube to the inside of his case necks. Jason prefers the $10.95 moly dry lube kit from Neconos.com. With this kit, small carbon steel balls transfer moly to the neck when you place your brass nose-down in the container.






 Improve Your Hit Ratio by Using Wing Flags

 Hi-Viz Stick-On Dots in Assorted Colors and Diameters

 First, Ron explains that airport thieves can spot bags containing firearms no matter how they are packaged: “Don’t think you’re safe if your guns are placed in cases designed for golf clubs or trade show items. Baggage is X-Rayed now and cases are tagged with a special bar code if they contain firearms. It doesn’t take long for bad guys to figure out the bar coding for firearms.”


 Headspace Gauges
 Apply Dry-Lube Inside Case Necks


