|
|
February 3rd, 2016

For many Americans, real incomes have stayed flat in recent years, while the true cost of living has risen. Accordingly, it’s important to save money whenever possible. Prices are going up, but wages aren’t following (for most of us). Here are six ways shooters can save money on gear purchases and other shooting-related expenses.
 1. Check Out the Forum Classifieds. There are great deals to be found every day in the AccurateShooter Shooters’ Forum. The latest deals are displayed in the right column of every Forum page. To see all the listings, browse through the Forum MarketPlace section which has four main categories: 1. Check Out the Forum Classifieds. There are great deals to be found every day in the AccurateShooter Shooters’ Forum. The latest deals are displayed in the right column of every Forum page. To see all the listings, browse through the Forum MarketPlace section which has four main categories:
- Guns, Actions, Stocks, & Barrels
- Tools, Dies, Rests, Reloading Components & Misc
- Scopes, Optics, Sights, Rings, Bases Etc.
- Commercial Sales by Paid Sponsors
 2. Use Discount Codes to Save. It’s always smart to check for discount codes before you buy. In the Daily Bulletin, we feature “Deals of the Week” every Monday morning, and we provide discount Coupon Codes when available. These can reduce the price substantially or lower shipping costs. Search codes for Brownells, Sinclair Int’l, Cabela’s, and Amazon.com. Check your email also — some discount codes are only announced in email newsletters. If you can’t find a Coupon Code for your preferred vendor, visit RetailMeNot.com and/or SlickGuns.com. Both those sites list current coupon codes, and RetailMeNot.com covers thousands of vendors. 2. Use Discount Codes to Save. It’s always smart to check for discount codes before you buy. In the Daily Bulletin, we feature “Deals of the Week” every Monday morning, and we provide discount Coupon Codes when available. These can reduce the price substantially or lower shipping costs. Search codes for Brownells, Sinclair Int’l, Cabela’s, and Amazon.com. Check your email also — some discount codes are only announced in email newsletters. If you can’t find a Coupon Code for your preferred vendor, visit RetailMeNot.com and/or SlickGuns.com. Both those sites list current coupon codes, and RetailMeNot.com covers thousands of vendors.
 3. Shop for “Demo” Optics. Modern high-quality optics can easily cost $1500.00 or more, often exceeding the value of the rifle on which they are mounted. However, you can often save 20-30% by purchasing demo optics. These are normally display units used at trade shows. They may have slight ringmarks, but otherwise they are “as new”, having never been carried in the field or used on a rifle that has fired live ammo. When purchasing demo scopes, you should always ask about the warranty before consummating the sale. However, most demo scopes from name-brand manufacturers come with full factory warranties. EuroOptic.com and SWFA.com are two respected vendors that offer a good selection of demo optics. 3. Shop for “Demo” Optics. Modern high-quality optics can easily cost $1500.00 or more, often exceeding the value of the rifle on which they are mounted. However, you can often save 20-30% by purchasing demo optics. These are normally display units used at trade shows. They may have slight ringmarks, but otherwise they are “as new”, having never been carried in the field or used on a rifle that has fired live ammo. When purchasing demo scopes, you should always ask about the warranty before consummating the sale. However, most demo scopes from name-brand manufacturers come with full factory warranties. EuroOptic.com and SWFA.com are two respected vendors that offer a good selection of demo optics.
 4. Train with Rimfire Rifles. The true cost of shooting a match-grade centerfire rifle, when you consider barrel wear, approaches $1.00 per round. READ Shooting Cost Article. By contrast, decent .22LR target ammo sells for under $0.19 per round (though it is, admittedly, hard to find right now). Good rimfire barrels last a long, long time, so you don’t have to be concerned about wearing out your barrel quickly. A quality rimfire barrel can retain its accuracy for 7,000 rounds or more. If you run the ballistics, a .22LR round at 100 yards can emulate the wind drift experienced by a centerfire cartridge at long range. This allows for effective cross-training with much less expensive ammo. 4. Train with Rimfire Rifles. The true cost of shooting a match-grade centerfire rifle, when you consider barrel wear, approaches $1.00 per round. READ Shooting Cost Article. By contrast, decent .22LR target ammo sells for under $0.19 per round (though it is, admittedly, hard to find right now). Good rimfire barrels last a long, long time, so you don’t have to be concerned about wearing out your barrel quickly. A quality rimfire barrel can retain its accuracy for 7,000 rounds or more. If you run the ballistics, a .22LR round at 100 yards can emulate the wind drift experienced by a centerfire cartridge at long range. This allows for effective cross-training with much less expensive ammo.
 5. Take Advantage of Factory Rebates. There are some attractive rebates available right now from quality manufacturers such as Bushnell, Leupold, RCBS, and Zeiss. You have to be a bit wary because rebates are typically used to move less-popular merchandise. But some rebates, such as the RCBS ‘Buy Green, Get Green’ Promo, apply to very wide range of merchandise, so it’s hard to go wrong. Just make sure that, when you buy a product, you retain the sales slip and the original packaging (it’s also wise to print out online orders). To qualify for the rebate, you may need to mail in a product identification code found on the box, along with your original sales receipt. 5. Take Advantage of Factory Rebates. There are some attractive rebates available right now from quality manufacturers such as Bushnell, Leupold, RCBS, and Zeiss. You have to be a bit wary because rebates are typically used to move less-popular merchandise. But some rebates, such as the RCBS ‘Buy Green, Get Green’ Promo, apply to very wide range of merchandise, so it’s hard to go wrong. Just make sure that, when you buy a product, you retain the sales slip and the original packaging (it’s also wise to print out online orders). To qualify for the rebate, you may need to mail in a product identification code found on the box, along with your original sales receipt.
 6. Share a Ride to Matches. Gas prices have fallen dramatically in the past year, but fuel remains a significant part of a shooter’s hobby budget, particularly if you drive long distances to compete at major matches. We’d say 90% of shooters drive solo to matches, often in large, gas-guzzling trucks. If you drive 200 miles round-trip to attend a match in a 20-mpg vehicle, you’ll burn nearly $30.00 worth of gasoline on your trip. That adds up. By simply sharing the ride with one fellow shooter you can cut your fuel expenditures in half. And, if you alternate vehicles from one match to the next, you also save on wear and tear on your own vehicle. At $0.50/mile consider the savings. 6. Share a Ride to Matches. Gas prices have fallen dramatically in the past year, but fuel remains a significant part of a shooter’s hobby budget, particularly if you drive long distances to compete at major matches. We’d say 90% of shooters drive solo to matches, often in large, gas-guzzling trucks. If you drive 200 miles round-trip to attend a match in a 20-mpg vehicle, you’ll burn nearly $30.00 worth of gasoline on your trip. That adds up. By simply sharing the ride with one fellow shooter you can cut your fuel expenditures in half. And, if you alternate vehicles from one match to the next, you also save on wear and tear on your own vehicle. At $0.50/mile consider the savings.
February 2nd, 2016
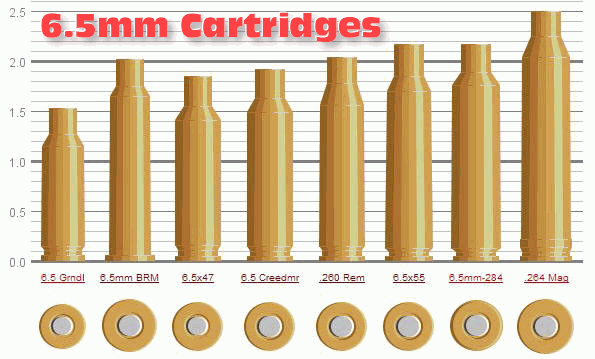
Chart created with Ammoguide’s Visual Comparison Tool. Visit Ammoguide.com to learn more.
One of our forum members was looking for a very accurate, mid-sized 6.5mm cartridge for target working and coyote hunting. There are many great options including the 6.5 Grendel, 6.5×47 Lapua, 6.5 Creedmoor, and Remington .260 (a 6.5-08). If you are considering the 6.5×47 you should read our 6.5×57 Cartridge Guide authored by the 6.5 Guys. This and other 6.5mm cartridges are covered in this introduction to 6.5 mm cartridges prepared by Eben Brown, President of Eabco.com.
Guide to 6.5mm Cartridges
by Eben Brown, EABCO.com, (E. Arthur Brown Co. Inc.)
The current popularity of 6.5mm cartridges in the USA has been a long time in coming. I won’t go into my opinions on why it took so long to catch on. The important thing is that it finally HAS caught on and we’re now so fortunate to have a wide selection of 6.5mm cartridges to choose from!
6.5mm Grendel – Developed by Alexander Arms for the AR15 and military M4 family of rifles. The Grendel fits the dimensional and functional requirements of these rifles while delivering better lethality and downrange performance. There are now similar cartridges from other rifle companies. We chamber for the Les Baer “264 LBC-AR”. Designed for velocities of 2400-2500 fps with 123gr bullets, it shoots the 140-grainers at about 2000 fps (for comparison purposes).
6.5mm BRM – Developed by E. Arthur Brown Company to give “Big Game Performance to Small Framed Rifles” — namely our Model 97D Rifle, TC Contender, and TC Encore. Velocities of 2400-2500 fps with 140gr bullets puts it just under the original 6.5×55 Swede performance.

6.5mm x 47 Lapua – Developed by Lapua specifically for international 300m shooting competitions (with some interest in long-range benchrest as well). Case capacity, body taper, shoulder angle, and small rifle primer are all features requested by top international shooters. You can expect velocities of 2500-2600+ with 140 gr bullets.
 6.5mm Creedmoor – Developed by Hornady and Creedmoor Sports, the 6.5mm Creedmoor is designed for efficiency and function. Its shape reaches high velocities while maintaining standard .308 Winchester pressures and its overall length fits well with .308 Win length magazines. You can expect velocities of 2600-2700+ fps with 140gr bullets. 6.5mm Creedmoor – Developed by Hornady and Creedmoor Sports, the 6.5mm Creedmoor is designed for efficiency and function. Its shape reaches high velocities while maintaining standard .308 Winchester pressures and its overall length fits well with .308 Win length magazines. You can expect velocities of 2600-2700+ fps with 140gr bullets.
.260 Remington – Developed by Remington to compete with the 6.5mmx55 Swedish Mauser that was (finally) gaining popularity in 1996. By necking down the 7mm-08 Remington to 6.5mm (.264 cal), the .260 Remington was created. It fit the same short-action [receivers] that fit .308 Win, .243 Win, 7mm-08 Rem, etc. You can expect velocities of 2600-2700 fps with 140gr bullets in the 260 .Remington.
[Editor’s Note: In the .260 Rem, try the Lapua 120gr Scenar-Ls and/or Berger 130gr VLDs for great accuracy and impressive speeds well over 2900 fps.]
6.5mm x 55 Swedish Mauser – This was the cartridge that started the 6.5mm craze in the USA. It is famous for having mild recoil, deadly lethality on even the biggest game animals, and superb accuracy potential. Original ballistics were in the 2500 fps range with 140gr bullets. Nowadays handloaders get 2600-2700+ fps.
[Editor’s Note: Tor from Scandinavia offers this bit of 6.5x55mm history: “Contrary to common belief, the 6.5×55 was not developed by Mauser, but was constructed by a joint Norwegian and Swedish military commission in 1891 and introduced as the standard military cartridge in both countries in 1894. Sweden chose to use the cartridge in a Mauser-based rifle, while Norway used the cartridge in the Krag rifles. This led to two different cartridges the 6.5×55 Krag and 6.5×55 Mauser — the only real difference being safe operating pressure.”]
6.5-284 Norma — This comes from necking the .284 Winchester down to .264 caliber. Norma standardized it for commercial ammo sales. The 6.5mm-284 was very popular for F-Class competition and High Power at 1,000 yards. However, many F-Class competitors have switched to the straight .284 Win for improved barrel life. 6.5-284 velocities run 3000-3100+ fps with 140gr bullets.
.264 Winchester Magnum – Developed by Winchester back in 1959, the .264 Win Mag never really caught on and may have delayed the ultimate acceptance of 6.5mm cartridges by US shooters (in my opinion). It missed the whole point and original advantage of 6.5 mm cartridges.
The Original 6.5mm Advantage
The special needs of long-range competition have skewed things a little. However the original advantages of 6.5mm cartridges — how deadly the 6.5mms are on game animals, how little recoil they produce, and how easy they are to shoot well — still hold true today.

January 30th, 2016
 Craters may look interesting on the moon, but you don’t want to see them on your primers. Certain mechanical issues that cause primer craters can also cause primer piercing — a serious safety problem that needs to be addressed. If you have a gun that is cratering primers (even at moderate pressure levels), there is a solution that works with many rifles — send your bolt to Greg Tannel to have the firing pin hole bushed. Craters may look interesting on the moon, but you don’t want to see them on your primers. Certain mechanical issues that cause primer craters can also cause primer piercing — a serious safety problem that needs to be addressed. If you have a gun that is cratering primers (even at moderate pressure levels), there is a solution that works with many rifles — send your bolt to Greg Tannel to have the firing pin hole bushed.
Shooters who convert factory actions to run 6BRs, 6PPCs or other high-pressure cartridges should consider having the firing pin bushed. These modern cartridges like to run at high pressures. When running stout loads, you can get cratering caused by primer flow around the firing pin hole in the bolt face. The reason is a little complicated, but basically the larger the hole, the less hydraulic pressure is required to crater the primer. A limited amount of cratering is normally not a big issue, but you can reduce the problem significantly by having a smith fit a bushing in the firing pin hole. In addition to reduced cratering, bushing the firing pin often produces more consistent ignition.
This is a highly recommended procedure that our editors have had done to their own rifles. Greg Tannel (Gre-Tan Rifles) is an expert at this procedure, and he does excellent work on a wide variety of bolts. Current price for a bushing job, which includes turning the firing pin to .062″, is $80.00, or $88.00 with USPS Priority Mail return shipping.
If you have a factory rifle, a bushed firing pin is the way to go if you are shooting the high-pressure cartridges such as 6PPC, 6BR, 6-6.5×47 and 6.5×47. This is one of the most cost-effective and beneficial upgrades you can do to your factory rifle. For more info on the Firing Pin Bushing process, visit GreTanRifles.com, or email greg [at] gretanrifles.com. (After clicking the link for GreTanRifles.com, Click on “Services” > “Shop Services” > “Bolt Work”, and you’ll see a listing for “Bush Firing Pin Hole & Turn Pin”. Select “View Details”.)
 Firing Pin Hole Bushing by Greg Tannel Firing Pin Hole Bushing by Greg Tannel
Work Done: Bush firing pin hole and turn pin.
Functions: Fixes your cratering and piercing problems.
Price: $80.00 + $8.00 return shipping
Total Price: $88.00
Actions for which Bushing is Offered: Remington, Winchester, Savage multi-piece pin, Sako, Kimber, Nesika, Stiller, BAT Machine, Kelbly, Lawton, Surgeon, Borden, Wichita, Hall, Ruger, Howa, Weatherby, Dakota, Pacific Tool, Phoenix, and Defiant bolt action rifle or pistol.
Actions for which Bushing is NOT Available: Case hardened receivers, ARs, Accuracy International (AI), Barnard, Big Horn, Cooper, Desert Tactical Arms, Kimber, Rosenthal, New Savage single piece pin, Rim fires, Falling block, Break open, Lever, Pump rifles, 1903-A3, CZ, Mauser.
How to send your bolt in to be bushed:
You can send your bolt snail mail, priority mail, or UPS (Please do not use FEDEX as it sometimes has delivery delays). Pack your bolt carefully and ship to: Gre’-Tan Rifles, 24005 Hwy. 13, Rifle CO 81650. Please include your name, phone number, and return shipping address.
Due to the high volume of work, turn around is 5 to 8 weeks on bushing a bolt. Three or more bolts will be sent back to you UPS and we will have to calculate shipping. We can overnight them at your expense. You can pay by check, money order, or credit card. For more information visit GretanRifles.com.
January 27th, 2016
 One of our Forum readers complained that his 6mm jags fit very tight with patches, making it difficult to apply much solvent. The problem with a tight-fitting patch is that the solvent gets squeezed off in the first few inches. You can switch to a smaller jag, or a bore mop, but there is an even better way to get an ample amount of solvent in your bore — just spray it in with a “wash bottle”. This is an inexpensive plastic bottle with an L-shaped dispensing neck, tapered at the end. You can either just plug the breech and spray from the muzzle end (where most copper fouling is), or, alternately, put the wash bottle neck directly in the chamber and spray forward. When spraying from the chamber forward, you may need to use a rubber O-Ring to seal off the action… depending on the bore size and the particular wash bottle’s neck spout diameter. One of our Forum readers complained that his 6mm jags fit very tight with patches, making it difficult to apply much solvent. The problem with a tight-fitting patch is that the solvent gets squeezed off in the first few inches. You can switch to a smaller jag, or a bore mop, but there is an even better way to get an ample amount of solvent in your bore — just spray it in with a “wash bottle”. This is an inexpensive plastic bottle with an L-shaped dispensing neck, tapered at the end. You can either just plug the breech and spray from the muzzle end (where most copper fouling is), or, alternately, put the wash bottle neck directly in the chamber and spray forward. When spraying from the chamber forward, you may need to use a rubber O-Ring to seal off the action… depending on the bore size and the particular wash bottle’s neck spout diameter.
Bottle Solvent Application Great for Smaller Bores
Using wet patches or wet brushes is an inefficient way to really saturate the tight bores of 17s, 20s, and 22s. Even with a cotton bore mop, most of the solvent will be squeezed out before it gets to the end of the bore, where most copper fouling occurs. For these smaller 17, 20, and 22-caliber bores, you can just take the “wash bottle” and stick the tapered nozzle right in the chamber. The tapered end will press fit in the throat, sealing off the chamber. With the barrel slightly nose-down, give the bottle a couple good squirts until the solvent mists out the muzzle. In just a few seconds, this will put more solvent in the bore than a half-dozen wet patches.
A solvent-filled wash bottle is also handy for wetting your brushes. It’s much easier to saturate a bore brush (without spilling solvent on your stock), by using the wash bottle. You can get wash bottles from USPlastic.com, Amazon.com, or lab supply stores.
January 24th, 2016
Editor: This article appears on the Criterion Barrels website. It provides good, conservative advice about barrel cleaning. Understand that cleaning methods may need to be adapted to fit the amount and type of fouling (and the particular barrel). In general, we do try to minimize brushing, and we follow the procedures Criterion recommends respecting the crown/muzzle. We have also had very good success using wet patches followed by Wipe-Out bore foam. Along with the practices outlined by Criterion below, you may want to try Wipe-Out foam. Just be sure to use a fitted cleaning rod bore guide, to keep foam out of the action recesses and trigger assembly.
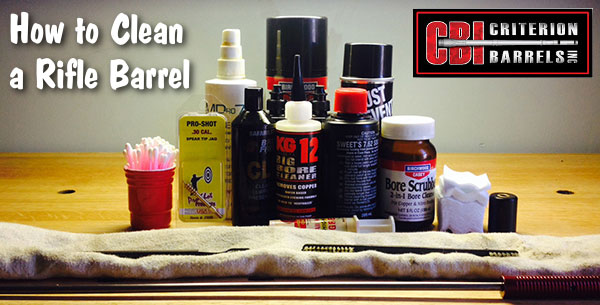
What is the Best Way to Clean a Rifle Barrel?
We are asked this question quite frequently alongside requests for recommended break-in procedures. Improper barrel cleaning methods can damage or destroy a barrel, leading to diminished accuracy or even cause a catastrophic failure. When it comes to barrel maintenance, there are a number of useful techniques that we have not listed. Some techniques may work better with different barrel types. This series of recommendations is designed to incorporate a number of methods that the Criterion Barrels staff has used successfully both in the shop and on their personal rifles. Please feel free to to list your own recommendations in the below comments section.
We recommend the use of the following components during rifle cleaning:
• Cloth patches (sized for the appropriate caliber)
• Brass jag sized properly for your bore
• One-piece coated cleaning rod
• General bore cleaner/solvent (Example: Hoppes #9)
• Copper solvent of your choosing (Example: Sweets/KG 12)
• Fitted cleaning rod bore guide
• Plastic AP brush or toothbrush
• Q-Tips
• Plastic dental picks
• CLP or rust preventative type cleaner
There are a number of schools of thought relating to the frequency in which a barrel should be cleaned. At minimum we recommend cleaning a barrel after each shooting session to remove condensation, copper, and carbon build-up. Condensation is the greatest immediate threat, as it can cause the barrel to rust while the rifle sits in storage. Copper and carbon build-up may negatively impact future barrel performance, increasing the possibility of a failure in feed or function. Fouling should be removed whenever possible.
The below tips will help limit the wear of different parts of your barrel during routine maintenance, helping extend the life of the barrel and improving its performance.
The Crown
The crown is the portion of the barrel where the bullet loses contact with the lands and grooves and proceeds to exit the firearm. The area most critical to accuracy potential is the angle where the bullet last touches the bore of the barrel.
Avoid damage to this area by using a plastic toothbrush and CLP type cleaner to scrub the crown from the exterior of the barrel. Even the most minimal variation in wear to the crown will negatively impact barrel performance, so be careful to avoid nicking or wearing away this part of the barrel.
Reducing Cleaning Rod Wear to the Crown
When running a patch through the barrel, place the muzzle about a ¼” from a hard surface that runs flat at a perpendicular angle to the cleaning rod’s direction of travel, like a wall or the edge of a work bench (pictured). When the jag impacts the hard surface, retract the cleaning rod and remove the patch.
By withdrawing the jag prior to its exit from the barrel, you are limiting the possibility of the brass dragging upon the crown if the rod is at all bent or misaligned. The soft cloth patch will continue to serve as the point of contact between the jag and the barrel, minimizing potential wear.
If possible, insert the rod through the chamber, pushing it forward toward the muzzle. Some rifles, such as the M1 Garand or M14, will require you to insert the cleaning rod through the muzzle. In these situations the use of a cleaning rod guide is recommended to limit the friction placed upon the crown.
Avoid using cleaning rod segments for scraping carbon from the recessed muzzle of an AR-15 barrel. We used this trick in the Marine Corps to impress the armorers and NCO’s with the cleanliness of our muzzles, but it likely played a significant role in reducing the service life of the rifle barrel in question.
Use a Q-Tip soaked in solvent to remove any copper or carbon residue from the recessed muzzle of an AR-15 barrel. A little bit of remaining carbon on the face of the muzzle will not negatively affect bullet travel so long as the crown edge remains consistent around the circumference of the bore.
The Lands and Grooves
This portion of the barrel may experience reduced efficiency due to copper fouling and cleaning rod damage. If copper fouling takes place during the initial break-in of the rifle, make sure to check our barrel break-in article.
For regular maintenance we suggest using a single piece coated cleaning rod rather than the traditional segmented rod or bore snake. While segmented rods and bore snakes may be convenient for field use, the corners between the segments may bow out and catch on the lands, scraping along the length of the rifling. Residual grit and particles from expended cartridges may also get caught between segments, resulting in an abrasive surface working its way down the length of the barrel. Most bore snakes will remove significant amounts of carbon fouling, but may fall short in the removal residual carbon buildup and copper fouling during deep cleaning. Good rods can be sourced from multiple manufacturers, but we have found good results using both Pro-Shot and Dewey brand products.
General cleaning requires the use of patches rather than nylon or brass bore brushes. Brass brushes may be required when aggressive cleaning is required, but can lead to unnecessary wear on the barrel if used frequently. This is not due to the nature of the soft brushes themselves, but from the abrasive particles of grit that become embedded in the material that is being run repeatedly through the bore. We recommend the use of bore guides when cleaning from both the muzzle and breech. These bore guides will help serve to protect the crown and throat from cleaning rod damage.
If significant resistance develops while running the cleaning rod through the bore, no attempt should be made to force it in further. Back the rod out and inspect the barrel to determine the cause of the resistance. The jag may be pushing between a bore obstruction and the rifling, digging a divot into the barrel before pushing the obstruction back through the muzzle. One way to minimize the risk of a stuck rod is by utilizing a slightly smaller patch during the initial push.
The process of cleaning the length of the rifling is relatively straightforward:
1. Check to make sure the rifle is safely unloaded.
2. Carry out any necessary disassembly procedures prior to cleaning.
3. Remove bolt (if possible) and insert fitted cleaning rod bore guide in action.
4. Soak a patch in bore solvent (similar to Hoppes #9).
5. Center and affix the patch on the brass jag, inserting it into the chamber end of the barrel. A misaligned patch may cause the jag to damage the lands of the rifling, so make sure the patch is centered on the jag.
6. Run the patch the full length of the barrel, retracting it upon reaching the end of the muzzle.
7. Let the solvent sit for a minute.
8. Continue to run patches through the bore until carbon residue is minimized.
9. Run a dry patch through the bore to ensure carbon residue has been removed.
10. Soak a patch in copper solvent (Sweet’s or KG-12).
11. Run the patch through the bore, leaving it to sit for 3-5 minutes (do not let solvent sit for more than 15 minutes.*)
12. Repeat this process until no blue residue remains on the patches.
13. Run a patch of Hoppes #9 and a dry patch through the bore to neutralize the copper solvent.
14. Inspect the barrel prior to reassembling the rifle, verifying that no bore obstructions remain.
*Please note that some ammonia-based copper solvents may prove to be corrosive if left sitting in the barrel for an extended period of time. It is essential that these solvents be removed within 15 minutes to avoid ruining the bore.
The Chamber
Proper cleaning of the chamber is a critical component of a general cleaning procedure. Carbon rings can build up near the neck and throat of the chamber wall, leading to feeding malfunctions and pressure spikes inside the chamber.
The chamber can be the trickiest part of the barrel to effectively clean, due to its fluctuation in size and the awkward ergonomics often required to remove carbon residue. Numerous chamber specific devices have been created to address this problem, and while some should be avoided (steel chamber brushes), others can be used to great effect (cleaning stars and plastic dental picks). The simplest approach to cleaning a chamber is to apply solvent to a couple patches, and use the cleaning rod to spin the wadded up patches inside the confines of the chamber. This should aid in removing any excess carbon. A Q-Tip can be used to reach portions of the chamber unreached by patches.
The Barrel Exterior
While the condition of the crown, rifling, and chamber are essential to firearm performance, the finish of the exterior should also be cleaned after handling. Condensation, humidity, direct water contact, and salt residue from skin contact can cause rust or corrosion. An application of anti-corrosion products is recommended when placing a firearm into deep storage for an extended period of time. [Editor: AccurateShooter.com recommends Corrosion-X or Eezox, but other products work well too.]
Finding Cleaning Components
While most cleaning components can be found at your local gun shop, some specialty items may need to be sourced through online retailers such as Brownell’s. Criterion utilizes both Dewey and Pro-Shot brand cleaning components during our day-to-day operations.
Do you have any rifle cleaning tips or tricks not mentioned in the above article? We’d love to hear about them. You can post your comments below.
January 22nd, 2016
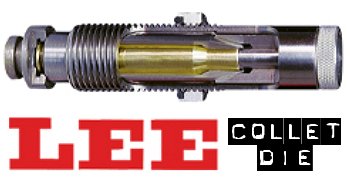
For those who prefer to neck-size their brass (rather than full-length-size), the LEE Collet Die is a popular, inexpensive option. It works by having collet tangs or “fingers” press the neck against a central mandrel. The benefit is that you get a very straight neck, which is sized consistently from top to bottom. Canadian shooter Jerry Teo explains: “LEE Collet Dies produce sized cases with very low runout (measured runout is under .001″ using a Sinclair concentricity gauge). You also don’t get the build-up of brass at the base of the neck, as can happen with bushing neck dies. The neck-shoulder junction stays nice and crisp.”
TIP ONE — Adjusting Tension
LEE Collet dies don’t have a specific mechanical adjustment for neck tension. But you CAN easily modify the die to provide more or less tension. If you want to adjust the neck tension using a Lee Collet die, you can simply chuck the mandrel in a drill and reduce the diameter with some sand-paper (to increase neck tension) or you can order a mandrel the next caliber larger and turn it to whatever diameter you want (the larger the mandrel diameter, the less the neck tension). You can also order custom mandrels from Lee sized to any diameter you want.
Lee also offers Custom Collet Dies, made from two fired cases. Lee offers custom standard collet dies for $78.00 and custom large collet dies for $160.00. CLICK HERE to ORDER.
 TIP TWO — Polish and Tune for Easy Case Removal TIP TWO — Polish and Tune for Easy Case Removal
Some users have complained that their Collet Dies grab the case-neck too firmly, making the case hard to remove. There are solutions to this problem. First inspect the collet fingers and smooth the inner surface up a bit with polishing compound or an extra-fine sanding pad. Second, you can open up the fingers a little bit. LEE recommends that if your Collet Die is sticking, take a steel punch and tap the fingers apart a little bit so that the natural “unloaded” position is wider. Lastly, you should lightly lubricate the outside of the collet fingers (see arrows) before you re-assemble the die. This will ensure they slide smoothly. Also, to prevent the collet fingers from closing too tight, never load up the die with your press without putting a case in place first. Without a case neck between the collet fingers and the mandrel, the collet can clamp itself too tight as you raise the ram.
TIP THREE — Size Twice and Spin Your Case 1/8th Turn
After reaching fully “down” on your press handle, withdraw the case about an inch and manually rotate it about 1/8th (NOT 1/4 or 1/2) turn while still in the shell-holder, then size again. This will place the die’s collet petals on the four “high spots” of the case neck and will result in a rounder, more evenly-sized neck with slightly more bullet tension. This takes only about one second more per case and is well worth the slight extra effort. (We thank reader Stonecreek for this smart tip).
January 20th, 2016
Each Wednesday, the U.S. Army Marksmanship Unit publishes a reloading “how-to” article on the USAMU Facebook page. Yesterday’s post covered primer seating depth. This article offers many useful tips — including a clever way to measure primer seating depth with ordinary jaw-type calipers. Visit the USAMU Facebook page next Wednesday for the next installment.

Primer Seating Depth — Why Uniformity is Important
The first concern is for safety: for that reason, primers should be seated below flush with the case head. One primary cause of “slam fires” (which includes catastrophic failures from firing out of battery) is “high,” or protruding primers. These stand above the case head, are readily felt with simple finger-tip inspection, and may fire when slammed by the bolt face and/or a floating firing pin in feeding.
Here at the USAMU, we ensure our rifle primers generally run -0.003″ to -0.005″ below the case head. Maximum primer depth is -0.006″ and minimum is -0.002″. Upon inspection, any cases with high primers will be corrected before loading. Aside from improving ballistic uniformity, ensuring the primers have proper compression upon seating also helps reduce possible misfires. These can be caused by the firing pin’s expending part of its energy either seating the primer or having to deform the primer cup enough to reach the anvil.
SMART TIP: How to Measure Primer Seating Depth with a Set of Calipers
A zeroed, precision set of standard calipers will also measure primer seating depth. (You don’t really need a custom tool.) Merely close the jaws and place the calipers’ narrow end squarely across the center of the case head/primer pocket. Keeping the narrow end in full contact with the case head, gently open the jaws, and the center bar will extend until it reaches the primer face. Voilà! Primer depth is read on the dial. Taking a few measurements to ensure accuracy and repeatability is recommended until one is familiar with this technique.

Brass and Primer Defects Can Cause Seating-Depth Variances
Factors affecting variance of primer seating depth include brass maker and lot number — all primer pockets are not created equal! Another factor is the primer manufacturer and individual primer lot. We’ve encountered occasional primer lots by top-quality makers that included some primers with slight defects affecting seating. While finely accurate, these primers were out-of-round or had small slivers of cup material protruding which affected primer feeding or seating depth.
Has one’s brass been fired previously? If so, how many times and the pressures involved also affect future primer seating. Obviously, this is another factor in favor of segregating one’s high-accuracy brass by maker, lot number, and number of times fired, if possible.
Measuring Primer Seating Depth with Purpose-Built Gauge
The next question, “How do we measure primer depth?” happily can be answered using tools already owned by most handloaders. [See tip above on how to measure depth with calipers.] At the USAMU, we have the luxury of purpose-built gauges made by the talented machinists of the Custom Firearms Shop. One places the primed case into the gauge, and the dial indicator reads the depth quickly and easily. The indicator is calibrated using a squarely-machined plug that simulates a case head with a perfectly flush-seated primer, easily giving meaningful “minus” or “plus” readings. The gauge is usable with a variety of case head sizes.

Primer Seating with Progressive Presses
Methods of primer seating include hand-seating using either hand held or bench-mounted tools, vs. progressive-press seating. Progressive presses may either seat by “feel,” subjective to each operator, or by using a mechanical “stop” that positively locates primers nearly identically every time. Testing here has shown that we get more uniform seating with the latter type progressive press, than we do with a high-quality bench-mounted tool lacking a positive stop.
Primer stop depth adjustments on our main progressive presses involve turning a punch screw in and out. While the screw is not calibrated, fine “tick” marks added to the top of the press help users gauge/repeat settings by “eye” efficiently with practice. Then, once a sample of primed cases is run to confirm the range and accuracy of depths, the identifying lot number and maker is noted on the press for reference. When it’s necessary to switch brass/primer lots, changes are easy to make and settings are easily repeated when it’s time to switch back.
January 19th, 2016
 Most of us have access to a printer at home or at work. That means you can print your own targets. You’ll find hundreds of free target designs online, including dozens of downloadable targets on our AccurateShooter.com Target Page. If you’re feeling creative, you can design your own target with a computer drawing program such as MS Paint. Most of us have access to a printer at home or at work. That means you can print your own targets. You’ll find hundreds of free target designs online, including dozens of downloadable targets on our AccurateShooter.com Target Page. If you’re feeling creative, you can design your own target with a computer drawing program such as MS Paint.
Paper Stock Is Important
If you want your self-printed targets to show shots cleanly (and not rip when it gets windy), you should use quality paper stock. We recommend card stock — the kind of thick paper used for business cards. Card stock is available in both 65-lb and 110-lb weights in a variety of colors. We generally print black on white. But you might experiment with bright orange or yellow sheets. Forum Member ShootDots report: “They sell cardstock at Fed-Ex Kinko! I use either Orange or Yellow. That makes it easy to see the bullet holes clearly.” On some printers, with the heavier 110-lb card stock, you will need to have the paper exit through the rear for a straighter run.

Here are some Target-Printing Tips from our Forum members:
“Staples sells a 67-lb heavy stock that I have settled on. I use the light grey or light blue, either of these are easy on the eyes on bright days. I have used the 110-lb card stock as well and it works fine. It’s just a little easier to print the lighter stuff.” (JBarnwell)
“Cardstock, as mentioned, works great for showing bullet holes as it doesn’t tear or rip like the thin, lightweight 20-lb paper. I’ve never had a problem with cardstock feeding in the printer, just don’t stick too many sheets in there. If I need three targets, I load only three card stock sheets”. (MEMilanuk)
“I’ve used Staples Sticker paper. This works well and no staples are required (joke intended). It helps if you put slight tension on the lighter weight paper when mounting it on the target frame.” (Mac 86951).

Here are some tips for using lighter weight paper (if you want to save money or your printer won’t work with heavier stock):
“20-lb bond works pretty well for me if I use a spray adhesive and stick the entire back of the paper’s surface to the backer board.” (Lapua40X)
“I use the regular 20-lb paper but the only time it tears is when there is no backer to support it. This can be an issue when going to a public range and the backer are all shot out. I use a large construction paper backer that I clip onto the stands.” (CPorter)
Here Are Three of Our Favorite Targets. Click to Download PDFs.

January 3rd, 2016

Here’s a handy training option for F-Class shooters. Forum member SleepyGator is an F-Class competitor, but it’s not convenient for him to shoot at long ranges close to home. Accordingly, he wanted some “reduced-distance” targets he could use at 300 yards for practice. There is an official reduced-distanced standard for 300-yard F-Class matches. This utilizes the NRA No. MR-63FC – F-Class Target Center which is pasted over the MR-63 target. It provides a 1.42″ X-Ring, 2.85″ 10-Ring, and 5.85″ Nine-Ring. (The dimensions of F-Class targets are found in the NRA High Power Rules, Sec. 22, part 4, page 70 — see sample below.)

CLICK HERE to Download F-Class 300-yard Target Centers (.Zip archive with three targets)
To duplicate the 300-yard target, SleepyGator has prepared a printable version of the MR-63FC Target Center, along with a pair of training targets with two bulls and five bulls. The two-bull and five-bull targets mirror the scoring rings on the MR-63FC, but they display only the innermost three rings and two rings respectively. All three targets are Adobe Acrobat (PDF) files that can be easily printed. You may need to adjust the scale (sizing) on your printer to get the dimensions exactly correct. As noted above, when printed, the 10-Ring on all three targets should measure 2.85″. This should provide some handy practice targets you can use between matches. Thanks to SleepyGator for providing these targets. You can download all three as a .Zip archive. After downloading the .Zip file, just click on the .Zip archive to extract the individual targets.
CLICK HERE to Download NRA High Power Rules with F-Class Target Dimensions

December 29th, 2015

Looking for authentic U.S. Military Specification Standards (MIL-STD) for gun parts, safety products, or other hardware? Log on to EverySpec.com. This website provides FREE access to the complete archive of U.S. Government spec sheets and technical manuals. You can quickly access and download thousands of public domain U.S. Government documents. For example, we searched for “Picatinny” and came up with MIL-STD-1913 “Dimensioning of Accessory Mounting Rail for Small Arms Weapons”. With one click we downloaded the file as a PDF. Then a search for “M118″ yielded the engineering drawing for 7.62×51 M118 LR Match ammo. Pretty cool.
Using EverySpec.com is fast and easy. And everything you find and save is FREE. Search as often as you like — there are no limits on search requests or downloads. You can either search by keyword, or Federal Supply Class Code (FSC). CLICK HERE for a complete list of FSCs for all products.
Here are FSCs for a few common product types. Keep in mind that there are hundreds of other FSCs — for everything from Office Supplies (FSC 7510) to Nuclear Projectiles (FSC 1110).
|
1095 — Miscellaneous Weapons (incl. Knives)
1240 — Optical Sighting and Ranging Equipment
1395 — Miscellaneous Ammunition (incl. Small Arms)
3455 — Cutting Tools for Machine Tools
6140 — Batteries, Rechargeable
6230 — Electric Portable Lighting Equipment
7640 — Maps, Atlases, Charts and Globes
8340 — Tents and Tarpaulins
8405 — Outerwear, Mens
|

|
Credit Gunsmith Thomas ‘Speedy’ Gonzales for finding this resource. Thanks Speedy!
|


