|
|
May 27th, 2015


 You have to admire someone with serious do-it-yourself skills. Not just hammer and nail skills, but formidable design and fabrication skills. Well Forum Member Dave D. (aka “AKShooter”) has a DIY skill set that might put some trained machinists to shame. You see, “DIY Dave” crafted his own pedestal front rest from scratch, using his own design and about $100.00 in materials (not counting the Edgewood front bag). Dave estimates he put 20 hours of labor into the project, but the end result was worth it: “This Do-It-Yourself rest drives like a dream. I’ve played with the Caldwell and a Sinclair, they have nothing on this one.” You have to admire someone with serious do-it-yourself skills. Not just hammer and nail skills, but formidable design and fabrication skills. Well Forum Member Dave D. (aka “AKShooter”) has a DIY skill set that might put some trained machinists to shame. You see, “DIY Dave” crafted his own pedestal front rest from scratch, using his own design and about $100.00 in materials (not counting the Edgewood front bag). Dave estimates he put 20 hours of labor into the project, but the end result was worth it: “This Do-It-Yourself rest drives like a dream. I’ve played with the Caldwell and a Sinclair, they have nothing on this one.”
Dave tells us: “Here is my Do-It-Yourself front rest. I wanted to show other folks who are handy that a solid front rest is doable with a bit of time — and you don’t need to spend $1000.00. (You could say this is a design for shooters with more time than money.) This is for F-Class. I was originally overwhelmed by the equipment needed, so I decided to make my own rest. I didn’t have the money for a SEB or Farley Coaxial. This is what I’ll run this season (my second as an F-Class competitor).”
May 17th, 2015
“Shooting Chrony” is a product name. “Shooting Chrony” should not describe (post-mortem) what you have been doing to your chronograph. Sooner or later all of us may make a mistake, and ventilate our chronograph. With luck, the bullet just “wings” your chronograph, and the damage is minor. But if you hit the unit smack dab in the middle, you may have to retire your chrono for good.
A while back, Forum member Jeff M. (aka “JRM850″) experienced a “low blow” that put his Shooting Chrony out of commission. With tongue firmly in cheek, Jeff started a Forum thread entitled Chronograph Not Picking Up Shots in Bright Sunlight Anymore. Looking at the photo below, the problem is obvious.

This was Jeff’s first chrono kill in 23 years of use, so we shouldn’t be too critical. Jeff explained: “I didn’t realize a friend was shifting from a 300-yard target to 100 yards.” The agent of destruction was a low-traveling 58gr V-Max running at 3415 fps. What happened? Well, when one is shooting at 300 yards, the trajectory will be higher than at 100 yards. We should say, however, that this may have been a low shot, or the 100-yard aiming point may have been placed lower to the ground (closer to the bottom of the target frame), as compared to the 300-yard aiming point.
May 15th, 2015
Gunsmith Nat Lambeth (“RustyStud” on our Shooters’ Forum) offers the following advice for readers who need to ship rifles or major gun components (actions, barrels etc.) to gunsmiths or repair facilities.
You have several options when shipping your guns to and from a gunsmith. Nat Lambeth has tried them all and had problems with them all. Here are some pointers:
1. Always package your unloaded firearm so that it is not loose and can’t work itself loose during transport. I recommend, at minimum, you use a hardcase inside a cardboard box. You can order a hard case from any of the major gun gear web vendors or get one at Walmart. It will come in a nice cardboard box. Just open the end and slide it out. Put your gun in the plastic hard case (after oiling the metal parts) and slide it back into the box. Then tape and relabel the box. Make sure marking on the box does NOT identify the contents as a gun. (You may be required to identify the contents to the shipping company or U.S. Postal Service clerk however.) For a very expensive gun, consider using a wood shipping crate. I will be making some shipping cases from plywood and foam line them. I will have to charge my customer a deposit and when they return the shipping crate I will return their deposit.
2. Pack individual components carefully, and enclose them in separate bubble wrap (or styrofoam) if there is any chance the parts can contact one another. Your editor had an experience where the finish of a fine, blued handgun was ruined because the repair facility had placed old, replaced trigger parts loosely in a foam-lined case with the handgun. During shipping these spare parts worked back and forth, gouging and scratching the pistol.
 
3. Confirm the recipient’s address BEFORE you ship. Individuals and businesses change locations all the time. Don’t assume an address you used a few months ago is still valid. It’s tempting to use old addresses that are pre-configured in the UPS or Fedex web-based shipping programs, but you should always confirm address validity prior to shipping.
May 12th, 2015
 With the end summer, the shooting season in full swing. When you head to the range you’ll want to be prepared. That means collecting all the gear you’ll need at the range. It’s easy to forget small, critical items, so we’ve provided a checklist of the small “extras” you should pack before you head out to the range. In addition to rifle, rests, ammo, targets, and cleaning gear, here are a dozen essentials you should include in your range bag. With the end summer, the shooting season in full swing. When you head to the range you’ll want to be prepared. That means collecting all the gear you’ll need at the range. It’s easy to forget small, critical items, so we’ve provided a checklist of the small “extras” you should pack before you head out to the range. In addition to rifle, rests, ammo, targets, and cleaning gear, here are a dozen essentials you should include in your range bag.
 • Shell-Holder — If you don’t have calipers, you can use a shell-holder to check for excessive case expansion from hot loads. If a fired case doesn’t slip into the shell-holder easily, your load is definitely TOO HOT. • Shell-Holder — If you don’t have calipers, you can use a shell-holder to check for excessive case expansion from hot loads. If a fired case doesn’t slip into the shell-holder easily, your load is definitely TOO HOT.
• Extra Earplugs — Always use ear protection when shooting. We bring a 35mm film canister with extra sets of foam earplugs.
 • Hex Wrench or Screwdriver for action screws — Action screws can work loose with time. Always bring the appropriate hex wrench or screwdriver whenever you go to the range. • Hex Wrench or Screwdriver for action screws — Action screws can work loose with time. Always bring the appropriate hex wrench or screwdriver whenever you go to the range.
• Small Wrench for Scope Rings — Check the tension of your scope base and ring fasteners before you go. Bring along a small Torx wrench for the ring screws (or other tool that fits your fasteners).
April 30th, 2015
 This is an interesting technical article prepared by Action Target, a leading steel target manufacturer based in Provo, Utah. With technical data provided by the American Iron and Steel Institute in Washington D.C., this report is designed to cut through the recent hype and establish a basis of fact for accurate evaluation and comparison. This is an interesting technical article prepared by Action Target, a leading steel target manufacturer based in Provo, Utah. With technical data provided by the American Iron and Steel Institute in Washington D.C., this report is designed to cut through the recent hype and establish a basis of fact for accurate evaluation and comparison.
What Is Steel?
 Steel is an alloy metal composed of iron and varying amounts of carbon and/or other elements such as chromium, nickel, tungsten, manganese, and so on. Steel with specific properties and characteristics is created by adjusting the overall chemical composition or by altering the various production processes such as rolling, finishing, and heat treatment. Because each of these factors can be modified, there is potentially no limit to the number of different steel recipes that can be created. Currently, there are over 3,000 cataloged grades or chemical compositions of steel available. Steel can utilize a wide variety of alloying elements and heat treatments to develop the most desirable combination of properties. Steel is an alloy metal composed of iron and varying amounts of carbon and/or other elements such as chromium, nickel, tungsten, manganese, and so on. Steel with specific properties and characteristics is created by adjusting the overall chemical composition or by altering the various production processes such as rolling, finishing, and heat treatment. Because each of these factors can be modified, there is potentially no limit to the number of different steel recipes that can be created. Currently, there are over 3,000 cataloged grades or chemical compositions of steel available. Steel can utilize a wide variety of alloying elements and heat treatments to develop the most desirable combination of properties.
April 23rd, 2015
 The experts at ELEY Limited, top rimfire ammo-maker, have posted a helpful guide to cleaning rimfire barrels. We reprint highlights of the article below, but we suggest you read the full article on the Eley website: How to Clean Your Rifle the ELEY Way. The experts at ELEY Limited, top rimfire ammo-maker, have posted a helpful guide to cleaning rimfire barrels. We reprint highlights of the article below, but we suggest you read the full article on the Eley website: How to Clean Your Rifle the ELEY Way.
Editor’s Comment: This is not the only way to clean a rimfire barrel. There are other procedures. This is the method recommended by ELEY based on decades of experience with the top smallbore shooters in the world, including many Olympic Gold Medalists. Some shooters have been very successful cleaning less frequently, or using different types of solvents. The ELEY method is a good starting point.
Rimfire Barrel Cleaning
1. Clean the extension tube with a 12 gauge brush and felt or tissue moistened with solvent.

2. Smoothly insert a cleaning rod guide into the receiver.

3. Apply a dry felt to the cleaning rod adapter and push it through the barrel to the muzzle in one slow steady movement. As the felt is dry it may feel stiff.
 
April 19th, 2015

Commentary by Mark Walker, Sierra Bullets Product Development Manager
This story originally appeared in the Sierra Bullets Blog. Visit SierraBullets.com.
Some people love tuners and others hate them. I use them on my rifles and I’ve had more than one person ask me why on earth I would put one of those things on my barrel. I’ve even had a national long range champion tell me to unscrew it and throw it into Lake Erie on my next trip to the pits at Camp Perry. However, there are other shooters that swear by them and have many match wins to back it up.
It’s an indisputable fact that tuners do have an effect on a rifle’s accuracy, however how much is somewhat open for debate. The large heavy target barrels that we use for benchrest or f-class may not be affected as much by a tuner as a lighter weight sporter type barrel. Each barrel that I’ve installed a tuner on not only showed improvement in accuracy but also displayed a wider load window. The increased accuracy is because of the ability to adjust the tuner to the load, however I believe the wider load window is due to the added weight of the tuner slowing down the barrel vibrations. These are both very important aspects of having a very accurate rifle.

While better accuracy and a wider load window are two areas of improvement, I believe the most important feature of a tuner is the ability to adjust the tune during the middle of a match. This is especially important during matches where you must load all your ammo earlier and cannot make adjustments to the load during the match. If you happen to miss the load, instead of having to deal with a gun that isn’t shooting you can make an adjustment to the tuner and hopefully improve the accuracy of the rifle.
While I’ve laid out several ways that a tuner can help, there are also a few ways that tuners can cause problems. They add weight so if you are shooting a discipline that has weight limits on the rifle, you may not be able to install a tuner and still make weight. Sometimes, a barrel just doesn’t show improvement with a tuner installed. These are few and far between, but it is something to consider. If you make an adjustment to the tuner in a match, you need to make sure you move it in the right direction. Adjusting a tuner in the wrong direction can cause very large groups. And finally, if they aren’t tightened properly, tuners can come loose during firing which will cause a lot of problems as well.
As you can see, tuners have both positive and negative aspects. In my personal experience, the positives far outweigh the negatives so I will continue to use them on all of my competitive rifles. If you’ve been thinking about installing a tuner, hopefully some of the information that I’ve presented will help you make an informed decision.

April 17th, 2015
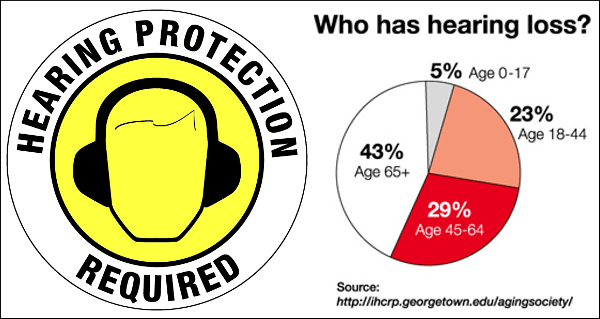
Hearing loss can be progressive and irreversible. If you are a shooter, this is serious business. You need to use effective hearing protection every time you go to the range. Even if you are away from the firing line, gunshot noises can damage your hearing. Good foam earplugs costs mere pennies but they can prevent deafness in your later years. Many folks also wear muffs over plugs. Some other shooters prefer the custom-molded ear plugs. Electronic muffs can be useful when you are away from the firing line because they allow you to converse.
Here are some comments from Forum members on the subjects of hearing loss and the need for proper ear protection. You can join the discussion in this FORUM THREAD:
“If you are young and don’t want to end up with profound hearing loss like I have… ALWAYS ALWAYS ALWAYS use hearing protection. This is from a guy who is social security/medicare eligible, has two Re-Sound aids at a not so cheap $2000.00 EACH… and now has religion! When I was young [we] never wore ear gear and laughed at the ringing after 100 rounds of 12 gauge at the skeet range. Now we live with the consequences. Be smarter than I was!” — Gary0529
“Take it from a 70-year-old that has been shooting 49 years. I now have a Re-Sound hearing aid in the left ear and a Cochlear Implant in my right. I still cannot hear. Custom molded plugs are best. Some are sold at gun shows and some are made by the folks that make hearing aids. They are cheap as compared to this $200,000 implant. DO IT NOW for everyone around guns.” — Richard King, King’s Armory
“Say WHAT? You have to type a little louder! I used to shoot without any muffs, when I was ‘young and indestructible’, and now I have about 40% loss. When I take youngsters and friends shooting, they get muffs and plugs. I’m not allowed suppressors where I live. I would use them if I could.” — Josh B.
“For what it’s worth, I wear both ear plugs and muffs that have NO sound adjustment capability. As a youngster (15) I wore no ear protection either in shooting or motorcycle riding. I kept doing that until entering military service at age 18 where we had to wear ear plugs at the range. Started wearing ear plugs after that, except when motorcycle riding. At around age 53 my hearing started going south as a result of my own stupidity as a youngster and now some 15 years later I only have about 45% of my hearing left. So beware all — there is a price to pay if you don’t protect your hearing.” — Shynloco

“Here are several points to consider:
1. The NRR (noise reduction rating) is determined by “experimenter” fit, not user fit, and trained listeners during the testing period. This results in inflated protection numbers compared to real-world protection.
2. Any disruptions in the protector/skin seal will greatly reduce the effectiveness. Think eye glass temple bars, lots of hair, ear wax, etc. A 5% leak results in a 50% reduction in effectiveness.
3. Double protection gives only 5-10 dB extra protection.
4. Bone conduction gives about 50 dB protection so hearing protectors are the weak link[.]
5. Keep the protectors in/on your ears. Over 8 hours, if you remove them for only 30 minutes (cumulative), the effective protection is cut in half.
So, if you are using a really good muff with NRR of 33 and a foam plug with NRR of 27, the real-world NRR would be about 35 dB, at best. This would attenuate a gunshot by that amount. The key is time versus exposure. Limit the exposure and you limit the dose.” — DelS
“Personally, I use Etymotic Research GSB-15 electronic blast protectors. They are rated at 26-28 dB, but inserted correctly, with the correct fitting tip, approach 38 dB. And, they have a compressor amplifier that allows you to hear soft sounds normally and with very high fidelity. As the sound level goes up, the gain goes down till at an ambient sound pressure level of around 90 dB SPL, the gain is unity, or what comes in goes to the ear canal. However, once the sound level gets to 117dB SPL, the amplifier cannot go higher. So, if you are firing a large rifle with an impulse noise of around 160 dB SPL, your ear only hears 117 dB SPL of that for an effective attenuation of about 40 dB. RIGHT! about the same as the mastoid bone! Can’t get any better than that.
What gives me the right to say all these things? First, a BSEE as well as the graduate course in Audiology and a hearing aid dispensers license. And working in research and product development for the ear the last decade of my career.” — Norm Matzen
March 29th, 2015
 These days, a smartphone is an indispensable tool for a serious shooter. Smartphones can forecast the weather, direct you to the range, map your terrain, calculate your ballistics, photograph your targets, and even measure wind velocity (with a $35.00 plug-in impeller). These days, a smartphone is an indispensable tool for a serious shooter. Smartphones can forecast the weather, direct you to the range, map your terrain, calculate your ballistics, photograph your targets, and even measure wind velocity (with a $35.00 plug-in impeller).
Having all those capabilities is great… until your battery goes flat. Even the most advanced smartphone on the planet is nothing but a useless paperweight when you run out of juice. Thankfully there’s an affordable fix for that problem — back-up Li-ion battery packs with built-in solar chargers.
There are a variety of external power-packs on the market, some with solar panels, some without. These will charge smartphones, tablets, PDAs, and other mobile devices. We like the units with solar chargers because they can recover a little energy when you’re outdoors. You still need to plug them in to get a full charge BEFORE before you head to the range. But once fully charged, these back-up battery devices can get your smartphone back in action and keep it running all day long.

We like the Poweradd portable chargers*. These feature lithium-ion batteries, solar panels, and tough weatherproof shells. We’ve tried two models, the 8000 mAh Apollo 3 ($29.99, dual-port), and the original 7200 mAh Apollo ($19.99, single port). We purchased the 7200 mAh Poweradd (Photo above) before its third-generation bigger brother was offered. The original 7200 mAh Apollo has served us well. It can fully charge most smartphones a couple times, or smaller tablets once. As long as you make sure the Poweradd is fully charged before you leave home (since the solar charger is slow and secondary), this unit does everything it claims. This editor’s first-generation Poweradd Apollo has done yeoman duty for many months now. It has revived both an iPhone and a tablet. If I were to purchase a Poweradd unit now, I would get the Apollo 3, mainly because it offers two (2) charging ports compared to one (1) on the original Apollo. That lets you charge two devices at once.


| 7200 mAh |
8000 mAh |
10000 mAh |
23000 mAh |
|
|
|
|
* If you need even more power, consider the Poweradd Pro. This 23000 mAh powerpack offers Multi-Voltage (5V 12V 16V 19V) output, and has enough juice to run a modern laptop. It comes with a complete set of jacks/cables so it can work with almost any device. This kind of capability doesn’t come cheap — the Poweradd Pro sells for $109.99, more than five times the cost of our 7200 mAh Apollo.
March 27th, 2015
We know many of our readers live on farms or ranches. When driving around these properties you may want to keep a firearm handy for pest control or to deal with feral animals. If you live in the country, chances are good you have utility vehicles — such as ATVs, Gators or tractors — and transporting guns safely to allow for easy access is essential. In this video, American Handgunner magazine Editor Roy Huntington highlights some inexpensive solutions for safely transporting guns on various outdoor utility vehicles. Roy shows set-ups for an E-Z-Go Cart, a Honda 4×4 ATV, and a John Deer tractor. Of course, as Huntington explains, always practice the four firearm safety rules. Roy cautions that you should never transport a shotgun or rifle with a round in the chamber, and be very careful when getting in or out of the vehicle if you have a gun in your hands.

New Polaris ATV Features Non-Pneumatic Tires
If you’re thinking about buying a ranch or hunting vehicle, here’s something to drool over — the new Sportsman WV850 H.O. from Polaris. This hard-working ATV features non-pneumatic tires, which employ a lattice structure developed for the U.S. military. The Sportsman WV850 H.0. features 600-lb load-carrying capacity (on stout steel racks), power steering, and a massive 11.75 gallon gas tank. That’ll get you out into the backwoods!

American Handgunner video find by EdLongrange. We welcome reader submissions.
|


