In the video below, Forum Member Thomas Haugland (from Norway) shows how to install a Picatinny-type rail on a Sako action. Every stage of the process is illustrated — removing the barrel from the action, drilling/tapping the action, aligning/attaching the rail, and finally mounting the scope and test-firing the rifle. Note that the action is removed using a large adjustable-end wrench with brass disks to protect the finish. This is possible because this particular Sako action has a flat bottom and top. With a different action you’ll want to use a custom action wrench.
In the video, Thomas and his assistant actually fabricate the rail from scratch. That’s probably beyond the ability of most do-it-yourselfers. You can purchase precisely machined Picatinnny rails from Seekins Precision and other sources instead. Still, it is interesting to see the milling of the rail. Note that, before screwing the rail to the top of the action, Thomas applies a marine epoxy (timeline 3:18). This effectively beds the rail to the top of the action and provides a more secure installation.
You can find more interesting gunsmithing, hunting, and long-range shooting videos on Thomas Haugland’s YouTube Channel.
With barrels, one always wonders “Can a little more length provide a meaningful velocity gain?” To help answer that question, Rifleshooter.com performed an interesting test, cutting the barrel of a .223 Rem rifle from 26″ all the way down to 16.5″. The cuts were made in one-inch intervals with a rotary saw. At each cut length, velocity was measured with a Magnetospeed chronograph. To make the test even more interesting, four different types of .223 Rem/5.56 ammo were chron’d at each barrel length.
Test Barrel Lost 25.34 FPS Per Inch (.223 Rem Chambering)
How much velocity do you think was lost, on average, for each 1″ reduction in barrel length? The answer may surprise you. The average speed loss of the four types of .223/5.56 ammo, with a 9.5″ shortening of barrel length, was 240.75 fps total (from start to finish). That works out to an average loss of 25.34 fps per inch. (See inch-by-inch data HERE.)
5.56/.223 Barrel Cut-Down Speed Test 26″ to 16.5″
Start FPS at 26″
End FPS at 16.5″
Total Loss
Average Loss Per Inch
UMC .223 55gr
3182*
2968
214
22.5 FPS
Federal M193 55gr
3431
3187
244
25.7 FPS
Win m855 62gr
3280
2992
288
30.3 FPS
Blk Hills .223 68gr
2849
2632
217
22.8 FPS
*There may have been an error. The 25″ velocity was higher at 3221 fps.
Rifleshooter.com observed: “Cutting the barrel from 26″ to 16.5″ resulted in a velocity reduction of 214 ft/sec with the UMC 223 55-grain cartridge, 244 ft/sec with the Federal M-193 cartridge, 288 ft/sec with the Winchester M855 cartridge and 217 ft/sec with the Back Hills 223 68-grain match cartridge.”
How the Test Was Done
The testers described their procedure as follows: “Ballistic data was gathered using a Magnetospeed barrel-mounted ballistic chronograph. At each barrel length, the rifle was fired from a front rest with rear bags, with five rounds of each type of ammunition. Average velocity and standard deviation were logged for each round. Once data was gathered for each cartridge at a given barrel length, the rifle was cleared and the bolt was removed. The barrel was cut off using a cold saw. The test protocol was repeated for the next length. Temperature was 45.7° F.”
Much Different Results with 6mmBR and a Longer Barrel
The results from Rifleshooter.com’s .223/5.56 test are quite different than the results we recorded some years ago with a barrel chambered for the 6mmBR cartridge. When we cut our 6mmBR barrel down from 33″ to 28″ we only lost about 8 FPS per inch. Obviously this is a different cartridge type, but also our 6mmBR barrel end length was longer than Rifleshooter.com’s .223 Rem start length. Velocity loss may be more extreme with shorter barrel lengths.
This is a message to my friends in the shooting community: be careful with your skin. I wasn’t careful enough and now I have skin cancers. When the Doctor says the “C” word, trust me, it’s a scary thing. That’s me in the photo below. The reason I have band-aids on my cheek and my chest is that I was just diagnosed with multiple basal cell carcinomas (the band-aids cover biopsy sites). These basal cell cancers can (and will) be surgically treated, but any skin cancer is worrisome. The worst kind of skin cancers, melanomas, can be fatal if not detected very early.
An Ounce of Prevention — How to Protect Your Skin
Fellow shooters, my message to you is: Protect your skin… and see a dermatologist regularly. If you are over 40 and have spent a lot of time outdoors, I suggest you see a skin doctor every year.
As gun guys (and gals) we spend a lot of time outdoors, much of it in bright sunlight. When working and playing outdoors, you should always try to minimize the risk of skin damage and possible skin cancers. Here are some practical tips:
1. Wear effective sunscreen. Get the kind that still works even if you sweat.
2. Wear a wide-brimmed hat and quality sunglasses with side protection.
3. Protect your arms and neck. It’s smart to wear long-sleeve shirts with high collars. There are “breathable” fabrics that still offer good sun protection.
4. Stay in the shade when you can. Direct sunlight is more damaging to your skin.
5. When testing loads or practicing you can make your own shade with an umbrella fixed to a tripod or scope stand. This has the added benefit of keeping you (and your ammo) cool.
6. Do a “field survey” of your skin every few weeks. Have your spouse or “significant other” inspect your back and the backside of your legs.
What to Look For — How to Spot Possible Skin Cancers
Here is an illustration that shows various types of skin cancers. But understand that an early basal cell carcinoma can be much, more subtle — it may just look like a small, pale pink spot. Also, if you have a scab that flakes off and re-appears, that might be a cancer. In the case of the basal cell on my face, I initially thought it was just a shaving abrasion. The skin was just slightly pinkish, with a little scab that would form and come back. But after a couple months, it never got any better. That’s what prompted me to see the doctor. And I’m glad I did….
Some of our readers have questioned how to set up their body dies or full-length sizing dies. Specifically, AFTER sizing, they wonder how much resistance they should feel when closing their bolt.
Forum member Preacher explains:
“A little resistance is a good, when it’s time for a big hammer it’s bad…. Keep your full-length die set up to just bump the shoulder back when they get a little too tight going into the chamber, and you’ll be good to go.”
To quantify what Preacher says, for starters, we suggest setting your body die, or full-length sizing die, to have .0015″ of “bump”. NOTE: This assumes that your die is a good match to your chamber. If your sizing or body die is too big at the base you could push the shoulder back .003″ and still have “sticky case” syndrome. Also, the .0015″ spec is for bolt guns. For AR15s you need to bump the shoulder of your cases .003″ – .005″, for enhanced reliability. For those who have never worked with a body die, bump die, or Full-length sizing die, to increase bump, you loosen lock-ring and screw the die in further (move die down relative to shell-holder). A small amount (just a few degrees) of die rotation can make a difference. To reduce bump you screw the die out (move die up). Re-set lock-ring to match changes in die up/down position.
That .0015″ is a good starting point, but some shooters prefer to refine this by feel. Forum member Chuckhunter notes: “To get a better feel, remove the firing pin from your bolt. This will give you the actual feel of the case without the resistance of the firing pin spring. I always do this when setting up my FL dies by feel. I lock the die in when there is just the very slightest resistance on the bolt and I mean very slight.” Chino69 concurs: “Remove the firing pin to get the proper feel. With no brass in the chamber, the bolt handle should drop down into its recess from the full-open position. Now insert a piece of fire-formed brass with the primer removed. The bolt handle should go to the mid-closed position, requiring an assist to cam home. Do this several times to familiarize yourself with the feel. This is how you want your dies to size your brass, to achieve minimal headspace and a nearly glove-like fit in your chamber.”
We caution that, no matter how well you have developed a “feel” for bolt-closing resistance, once you’ve worked out your die setting, you should always measure the actual amount of shoulder bump to ensure that you are not pushing the shoulder too far back. This is an important safety check. You can measure this using a comparator that attaches to your caliper jaws, or alternatively, use a sized pistol case with the primer removed. See Poor Man’s Headspace Gauge.
Horizontal Wind-Drift vs. Distance
OK, here’s a challenge question for you.
Let’s see if you get it right.
Q: If the wind is blowing 10 mph from 9 o’clock and if my horizontal wind deflection is 0.7 inches at 100 yards, what is the horizontal drift at 1000 yards?
You may be thinking, “Well, since the target is ten times more distant, the wind-drift should be around 7 inches, maybe a little more since the bullet will be slowing down.” That sounds reasonable, right?
WRONG.
As you move from near to far, the increase in lateral deflection (from a 90° crosswind) is (roughly speaking) a function of the square of the multiple of distance. If your target is two times farther away, you use the square of two, namely four. If your target is five times farther away, you use the square of five, or twenty-five. In this example, the increased wind drift (from 100 to 1000 yards) is at least 0.7″ times (10 X 10) — over 70 inches (give or take a few inches depending on bullet type). We call that the Rule of the Square. This Rule lets you make a quick approximation of the windage correction needed at any yardage.
Precision Shooting and the Rule of the Square
I was going through some back issues of Precision Shooting Magazine and found many references to the Rule of the Square. This made me curious — I wondered how well the Rule really stacked up against modern ballistics programs. Accordingly, I ran some examples through the JBM Ballistics Trajectory Calculator, one of the best web-based ballistics programs. To my surprise, the Rule of the Square does a pretty good job of describing things.
EXAMPLE ONE — .308 Win (100 to 400 Yards)
For a 168gr Sierra MK (.308), leaving the muzzle at 2700 fps, the JBM-predicted values* are as follows, with a 10 mph, 9 o’clock crosswind (at sea level, 65° F, Litz G7 BC):
Drift at 100: 0.8 MOA (0.8″)
Drift at 200: 1.6 MOA (3.3″)
Drift at 400: 3.4 MOA (14.4″)
Here you can see how the Rule of the Square works. The rule says our drift at 200 yards should be about FOUR times the drift at 100. It the example above, 0.8″ times 4 is 3.2″, pretty darn close to the JBM prediction of 3.3″. Quoting Precision Shooting: “Note that the deflections at 100 yards are typically a quarter of those at 200; lateral deflections increase as the square of the range”. Precision Shooting, June 2000, p. 16.
EXAMPLE TWO — .284 Win (100 to 1000 Yards)
For a .284 Win load, with the slippery Berger 180gr Target Hybrids, the Rule of the Square still works. Here we’ll input a 2750 fps velocity, Litz G7 BC, 10 mph, 9 o’clock crosswind, (same 65° temp at sea level). With these variables, JBM predicts:
Drift at 100: 0.5 MOA (0.5″)
Drift at 500: 2.5 MOA (13.3″)
Drift at 1000: 5.9 MOA (61.3″)
Again, even with a higher BC bullet, at 1000 yards we end up with something reasonably close to the 100-yard deflection (i.e. 0.5″) multiplied by (10×10), i.e. 50 inches. The Rule of the Square alerts you to the fact that the effects of crosswinds are MUCH greater at very long range. In this example, our JBM-calculated drift at 1000 is 61.3″ — that’s over 100 times the 100-yard lateral drift, even though the distance has only increased 10 times.
Note that, even with a 5 mph 90° sidewind, the “Rule of the Square” still applies. The 1000-yard lateral deflection in inches is still over 100 times the lateral deflection at 100 yards.
Why This All Matters (Even in the Age of Smartphones) Now, some would say, “Why Should I Care About the Rule of the Square? My iPhone has a Ballistics App that does all my thinking for me”. Fair enough, but knowledge of this basic Rule of the Square enables a shooter to make an informed guess about necessary windage even without a come-up sheet, as long as he knows the distance AND can fire a sighter at 100 or 200 yards as a baseline.
For example, if I see empirically that I need 1″ windage correction at 100 yards, then I know that at 600 yards I need at least roughly (6 x 6 x 1″) or 36 total inches of drift correction, or 6 MOA. (To be precise, 1 MOA = 1.047″ at 100 yards). I can figure that out instantly, even without a ballistics chart, and even if my Smartphone’s battery is dead.
*Values shown are as displayed on the JBM-figured trajectory tables. The numbers can be slightly imprecise because JBM rounds off to one decimal place for both inches and MOA.
Many shooters are familiar with ballistics tables, weather programs, and even wind meters for smart devices, but few may know about a very handy Leveling Tool that comes factory-installed on Apple iPhones. The leveling function is a little-known option in Apple’s Compass App. It works well for a multitude of tasks.
There are a numerous reasons that a leveling tool should be in every rifleman’s range bag. From leveling optics during mounting to figuring out how much extra compensation is going to be required for a tricky angled shot, knowing just how far off things are from plumb can go a long way towards realizing success in the field.
This writer has used the leveling app on his iPhone to level a rifle on a rest while at the range. It definitely worked for “field expedient” leveling duties. That’s especially important for long-range applications. Just one degree of cant (tilt) can move your point of impact 7 inches at 1000 yards.
Of course, the iPhone level doesn’t use an actual bubble to find angles. Rather, it relies on the device’s sophisticated accelerometer to do so, and with a great degree of accuracy. Navigating to the level is done by first selecting the Compass App, at which point the device will need to be calibrated by rotating it a full 360 degrees. Once the compass is fully calibrated, simply make right swipe gesture to bring up the level — it will start operating immediately.
From there, use is intuitive and easy, like most iPhone Apps. Switching from horizontal plane to vertical is done by simply changing the physical axis of the phone. How do you know when you’ve got things just right — well the entire lower half of the screen turns green when everything is perfectly level. You’ll also see a zero° read-out, like this:
Bottom Line: If you already own an iPhone, you should definitely give this App a try. The price is right (free), and for a wide variety of tasks the iPhone Level App is actually pretty handy.
The Applied Ballistics team tested six (6) same-length/same-contour Bartlein barrels to observe how twist rate might affect muzzle velocity. This unique, multi-barrel test is featured in the book Modern Advancements in Long Range Shooting. That book includes many other fascinating field tests, including a comprehensive chronograph comparison.
Barrel Twist Rate vs. Velocity — What Tests Reveal by Bryan Litz
When considering barrel twist rates, it’s a common belief that faster twist rates will reduce muzzle velocity. The thinking is that the faster twist rate will resist forward motion of the bullet and slow it down. There are anecdotal accounts of this, such as when someone replaces a barrel of one brand/twist with a different brand and twist and observes a different muzzle velocity. But how do you know the twist rate is what affected muzzle velocity and not the barrel finish, or bore/groove dimensions? Did you use the same chronograph to measure velocity from both barrels? Do you really trust your chronograph?
Savage Test Rifle with Six Bartlein Barrels
Most shooters don’t have access to the equipment required to fully explore questions like this. These are exactly the kinds of things we examine in the book Modern Advancements in Long Range Shooting. In that book, we present experiments conducted in the Applied Ballistics lab. Some of those experiments took on a “Myth Buster” tone as we sought to confirm (or deny) popular pre-conceptions. For example, here’s how we approached the question of barrel twist and muzzle velocity.
Six .308 Win Barrels from Bartlein — All Shot from the Same Rifle
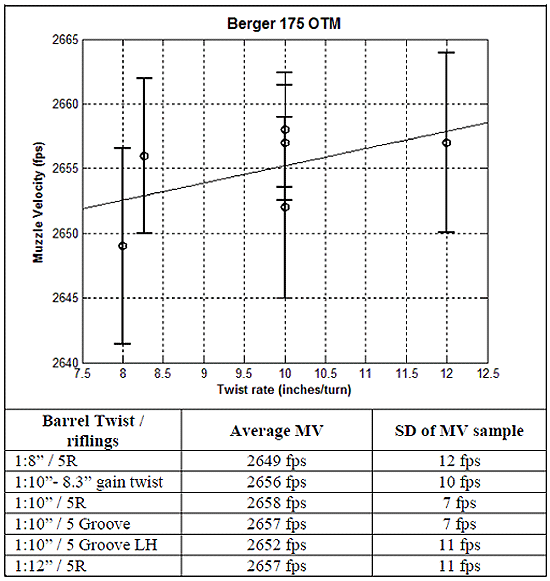
We acquired six (6) barrels from the same manufacturer (Bartlein), all the same length and contour, and all chambered with the same reamer (SAAMI spec .308 Winchester). All these barrels were fitted to the same Savage Precision Target action, and fired from the same stock, and bench set-up. Common ammo was fired from all six barrels having different twist rates and rifling configurations. In this way, we’re truly able to compare what effect the actual twist rate has on muzzle velocity with a reasonable degree of confidence.
Prior to live fire testing, we explored the theoretical basis of the project, doing the physics. In this case, an energy balance is presented which predicts how much velocity you should expect to lose for a bullet that’s got a little more rotational energy from the faster twist. In the case of the .30 caliber 175 grain bullets, the math predicts a loss of 1.25 fps per inch-unit of barrel twist (e.g. a 1:8″ twist is predicted to be 1.25 fps slower than a 1:9″ twist).
Above, data shows relationship between Twist Rate and Muzzle Velocity (MV) for various barrel twist rates and rifling types. From fast to slow, the three 1:10″ twist barrels are: 5R (canted land), 5 Groove, 5 Groove left-hand twist.
We proceeded with the testing in all 6 barrels from 1:8” to 1:12”. After all the smoke cleared, we found that muzzle velocity correlates to twist rate at the rate of approximately 1.33 fps per inch of twist. In other words, your velocity is reduced by about 5 fps if you go from a 1:12” twist to a 1:8” twist. [Editor: That’s a surprising number — much less than most folks would predict.] In this case the math prediction was pretty close, and we have to remember that there’s always uncertainty in the live fire results. Uncertainty is always considered in terms of what conclusions the results can actually support with confidence.
This is just a brief synopsis of a single test case. The coverage of twist rates in Modern Advancements in Long-Range Shooting is more detailed, with multiple live fire tests. Results are extrapolated for other calibers and bullet weights. Needless to say, the question of “how twist rate affects muzzle velocity” is fully answered.
Other chapters in the book’s twist rate section include: · Stability and Drag – Supersonic
· Stability and Drag – Transonic
· Spin Rate Decay
· Effect of Twist rate on Precision
Other sections of the book include: Modern Rifles, Scopes, and Bullets as well as Advancements in Predictive Modeling. This book is sold through the Applied Ballistics online store. Modern Advancements in Long Range Shooting is also available in eBook format in the Amazon Kindle store.
Sierra Bullets Product Development Manager Mark Walker recently acquired a barrel with canted lands. It turns out he needed to modify his bore-cleaning methods. His brushes and patches were not following the rifling… and he was well on his way to ruining his barrel before he figured out the solution. Read about Mark’s interesting (and puzzling) experience. This article first appeared in the Sierra Bullets Blog.
Lessons Learned (The Canted Land Mystery) by Mark Walker
Sometimes when you have done something so often, you take for granted that it will work for all equipment. In this case, I had used my cleaning process and equipment for years with no problems however a new barrel on a rifle caused me to rethink how I clean.
Last year, the barrel on my mid-range benchrest rifle decided to give up the ghost. After doing some research and asking fellow shooters, I decided to purchase a barrel that had rifling with “canted” lands. The barrel arrived and after looking it over, everything looked great.
Threading and chambering went very well with the barrel indicating in very straight and cutting very smoothly. After torqueing the barrel to the action, I went about loading some ammunition to break the barrel in with. At the range, the barrel shot as good as any I have ever had. Even with loads that were thrown together with no tuning whatsoever.
During the break in, I would clean the barrel after every five shots or so just because that’s what everyone says to do. The barrel cleaned up extremely well, however I noticed that the first patches down a dirty barrel would cause the cleaning rod to vibrate as I pushed them down the tube. That was something that I had never experienced before so I was a little concerned….
After looking at the barrel with a bore scope, everything looked clean and no indication of what might have caused the vibration in the rod. I did notice some surface marks in the bore that traveled perpendicular with the bore. Usually when a barrel is lapped, all marks follow the rifling twist so these marks parallel to the bore where another phenomenon that I had never seen before. The mystery was getting deeper.
After another range session where the barrel shot lights out, I brought it home to clean it as before. The first patches down the barrel again caused the strange vibration in the rod. After stopping and thinking about the vibration and the strange marks in the bore, I checked the bearings in cleaning rod handle to make sure it was spinning freely and everything seemed to be in working order. I then decided to mark the cleaning rod to make sure it was actually turning when it went down the barrel. Bingo — this revealed the problem.
When the first patch went down the barrel and the rod didn’t even attempt to turn, the light bulb went on. The patches and even the bronze brushes were simply skipping over the tops of the rifling and not following the rifling at all. I tried tighter patches and larger brushes, but the only thing that seemed to fix the problem was pushing them down the bore as slowly as possible while watching the mark on the rod to make sure it was turning. Had I continued to clean as I normally do, I surely would have ruined the barrel!
Once I figured out the problem, the barrel shot great and my cleaning process worked just like every other barrel I have ever owned except for having to go slow with the rod. This just goes to show that even though you may have done something a thousand times before, you should always be aware of what your equipment is telling you.
In our Shooters’ Forum, there was an discussion about a range that was threatened with closure because rifle over-shoots were hitting a farm building over two miles from the firing line. One reader was skeptical of this, asking “how’s that possible — were these guys aiming at the stars?” Actually, you may be surprised. It doesn’t take much up-angle on a rifle to have a bullet land miles down-range. That’s why it’s so important that hunters and target shooters always orient their barrels in a safe direction (and angle). Shooters may not realize how much a small tilt of the barrel (above horizontal) can alter a bullet’s trajectory.
How many degrees of muzzle elevation do you think it would take to hit a barn at 3000 yards? Ten Degrees? Twenty Degrees? Actually the answer is much less — for a typical hunting cartridge, five to seven degrees of up-angle on the rifle is enough to create a trajectory that will have your bullet impacting at 3000 yards — that’s 1.7 miles away!
Five degrees isn’t much at all. Look at the diagram below. The angle actually displayed for the up-tilted rifle is a true 5.07 degrees (above horizontal). Using JBM Ballistics, we calculated 5.07° as the angle that would produce a 3000-yard impact with a 185gr .30-caliber bullet launched at 2850 fps MV. That would be a moderate “book load” for a .300 Win Mag deer rifle.
Here’s how we derived the angle value. Using Litz-derived BCs for a 185gr Berger Hunting VLD launched at 2850 fps, the drop at 3000 yards is 304.1 MOA (Minutes of Angle), assuming a 100-yard zero. This was calculated using a G7 BC with the JBM Ballistics Program. There are 60 MOA for each 1 degree of Angle. Thus, 304.1 MOA equals 5.068 degrees. So, that means that if you tilt up your muzzle just slightly over five degrees, your 185gr bullet (2850 fps MV) will impact 3000 yards down-range.
Figuring Trajectories with Different Bullets and MVs
If the bullet travels slower, or if you shoot a bullet with a lower BC, the angle elevation required for a 3000-yard impact goes up, but the principle is the same. Let’s say you have a 168gr HPBT MatchKing launched at 2750 fps MV from a .308 Winchester. (That’s a typical tactical load.) With a 100-yard zero, the total drop is 440.1 MOA, or 7.335 degrees. That’s more up-tilt than our example above, but seven degrees is still not that much, when you consider how a rifle might be handled during a negligent discharge. Think about a hunter getting into position for a prone shot. If careless, he could easily touch off the trigger with a muzzle up-angle of 10 degrees or more. Even when shooting from the bench, there is the possibility of discharging a rifle before the gun is leveled, sending the shot over the berm and, potentially, thousands of yards down-range.
Hopefully this article has shown folks that a very small amount of barrel elevation can make a huge difference in your bullet’s trajectory, and where it eventually lands. Nobody wants to put holes in a distant neighbor’s house, or worse yet, have the shot cause injury. Let’s go back to our original example of a 185gr bullet with a MV of 2850 fps. According to JBM, this projectile will still be traveling 687 fps at 3000 yards, with 193.7 ft/lbs of retained energy at that distance. That’s more than enough energy to be deadly.
In the video below, Forum member Eric Cortina shows how to install a Jewell Benchrest trigger into a Kelbly F-Class Panda action. You could follow the same simple procedure to install a Jewell in a standard Panda action. Kelbly’s sell both standard and long versions of the F-Class Panda action. Both versions feature integral recoil lugs in the front.
To see more detail in this “how-to” video, you can zoom it to full-screen size. Simply click the full-screen icon (4-cornered frame) just to the right of the YouTube logo in the lower right.


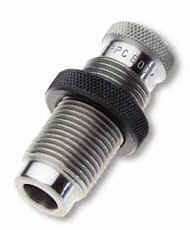 To quantify what Preacher says, for starters, we suggest setting your body die, or full-length sizing die, to have .0015″ of “bump”. NOTE: This assumes that your die is a good match to your chamber. If your sizing or body die is too big at the base you could push the shoulder back .003″ and still have “sticky case” syndrome. Also, the .0015″ spec is for bolt guns. For AR15s you need to bump the shoulder of your cases .003″ – .005″, for enhanced reliability. For those who have never worked with a body die, bump die, or Full-length sizing die, to increase bump, you loosen lock-ring and screw the die in further (move die down relative to shell-holder). A small amount (just a few degrees) of die rotation can make a difference. To reduce bump you screw the die out (move die up). Re-set lock-ring to match changes in die up/down position.
 Horizontal Wind-Drift vs. Distance
 Now, some would say, “Why Should I Care About the Rule of the Square? My iPhone has a Ballistics App that does all my thinking for me”. Fair enough, but knowledge of this basic Rule of the Square enables a shooter to make an informed guess about necessary windage even without a come-up sheet, as long as he knows the distance AND can fire a sighter at 100 or 200 yards as a baseline.
 Many shooters are familiar with ballistics tables, weather programs, and even



 Lessons Learned (The Canted Land Mystery)
 During the break in, I would clean the barrel after every five shots or so just because that’s what everyone says to do. The barrel cleaned up extremely well, however I noticed that the first patches down a dirty barrel would cause the cleaning rod to vibrate as I pushed them down the tube. That was something that I had never experienced before so I was a little concerned….
 In our Shooters’ Forum, there was an discussion about a range that was threatened with closure because rifle over-shoots were hitting a farm building over two miles from the firing line. One reader was skeptical of this, asking “how’s that possible — were these guys aiming at the stars?” Actually, you may be surprised. It doesn’t take much up-angle on a rifle to have a bullet land miles down-range. That’s why it’s so important that hunters and target shooters always orient their barrels in a safe direction (and angle). Shooters may not realize how much a small tilt of the barrel (above horizontal) can alter a bullet’s trajectory.


