|
|
January 21st, 2015
Forum member Preacher recently crafted a nice varmint rifle for fellow Forum member Dave 0. (aka “Waskawood”). But rather than buy an off-the-shelf stock, Preacher crafted this stock all by hand, starting from a laminated blank panel. He calls this stock project his “Axe Job”.
CLICK for Full-size Photo

This stock is being used on a prairie dog rifle, chambered for a 17-caliber wildcat, the 17 VHA, which is based on an H&K 4.6x30mm parent case. With about nine grains of 300 MP pistol powder, the 17 VHA drives 20-grainers at about 3850 fps. (SEE details at end of article).
The ‘Axe Job’
Report by Preacher
I like carving with the laminates because all the lines are right there in front of my eyes, so it’s easy to follow along and get it just right, until it’s pleasing to the eye. I never use a template, I just keep checking the lines as I go along. I have all the needed equipment to power build one of these, but I really enjoy the time spent on the hand work. From start to completely ready-to-install, I’ll have about six (6) weeks into one of these stock projects. A lot of that is drying time for the clear coats.
A little work with the hand axe, after a trip through the band saw…

The majority of the laminated blank panels I use for my gunstocks are purchased directly from Cousineau Wood Products or from Rutply.com. You have to buy at least four full panels at a time, all the same color, but that will yield eight (8) stocks. Seems like I have a little over $150.00 in a blank large enough to start making a full-sized, benchrest-style stock.
A little work with a chisel…

A little work with a rasp. (Before I was rich and famous and could afford really good rasps, I used a good old horse shoe rasp.)

A little more work with the chisel…

Preacher’s Advice on Carving Your Own Stock
The one main advantage of being older that dirt, and tormented with MS the past 40 years, is lots of free time to enjoy what ever I can do these days, as long as I can set down to do it, and I can make a lot of wood chips setting down.
Any one can do this if they have the time to devote to it. All it takes is time and a good eye for details. I made a lot of firewood over the years, until I got the hang of it. Most all those problems were inletting, and screw hole spacing. Get those right the first time and you’re on your way….
A little more work with the rasp…

A few coats of Auto clear has it about buttoned up…

Micro 17 VHA Wildcat
 Here’s the finished rifle built by Preacher for Dave, using the ‘Axe Job’ stock. Dave tells us: “Preacher chambered the rifle for the 17 VHA, a wildcat based on the H&K 4.6x30mm MP7 PDW case necked down to 17 caliber. There are numerous articles in the Varmint Hunter’s Magazine about it. This efficient little round shoots 20gr ballistic tips at 3850+ fps. That’s not too shabby for ‘nine point something’ grains of pistol powder.” Here’s the finished rifle built by Preacher for Dave, using the ‘Axe Job’ stock. Dave tells us: “Preacher chambered the rifle for the 17 VHA, a wildcat based on the H&K 4.6x30mm MP7 PDW case necked down to 17 caliber. There are numerous articles in the Varmint Hunter’s Magazine about it. This efficient little round shoots 20gr ballistic tips at 3850+ fps. That’s not too shabby for ‘nine point something’ grains of pistol powder.”
“My intentions for my 17 VHA rifle are to plop down in the middle of a PD town with my swivel bench and shoot prairie dogs. I also thought it would be a nice platform to test the accuracy of the cartridge. If I like the little round as well as I think, I plan to build a more practical rifle that I can carry. I really want to thank Preacher for his patience with me through this project, as it was my first custom build.”

January 13th, 2015
Forum member Erik Cortina recently launched his own YouTube Channel dedicated to precision reloading and accurizing. Erik’s videos demonstrate the proper use of specialized reloading tools and provide helpful hints. Erik’s latest video is about the “mother of all brass trimmers”, the Giraud powered case trimmer. Erik says: “It you do volume reloading… this is the only trimmer to get. It not only trims to length but it also chamfers your case mouth inside and out.” In his video, Erik offers some very clever and useful tips that will help you get the most from your Giraud.
The Giraud trimmer is very precise. When set up correctly, it can trim brass with amazing consistency. In the video, Erik trims 5 pieces of brass in 15 seconds (6:32 mark). He then measures all five with precision calipers (7:00-8:08). All lengths are exact within .0005 (half a thousandth). Erik notes that the Giraud trimmer indexes off the case shoulder. As long as you have fire-formed brass with consistent base-to-shoulder dimensions, you should get very consistent trim lengths.
The secret to the system is a 3-way cutting head. This cutter can be swapped in and out in a couple minutes with wrenches provided with the kit. Erik has three different heads; one each for 6.5mm, 7mm, and .30 caliber. The video shows how to adjust the cutting heads to match caliber diameter (and to get the desired amount of inside/outside chamfer).
This is a manufacturer’s photo showing an older model.

To trim and chamfer cases, you simply insert them nose-first into the cartridge-specific case-holder. Erick offers a smart tip — He uses a die locking ring to position the cartridge holder (3:15). This can be locked in place. Erik says die locking rings work much better than the hex-nuts provided by Giraud (with the hex-nut, one must re-set cut length each time you change case-holders.)

The Giraud can be used in either horizontal or vertical modes. Erik prefers to have the trimmer aligned vertically, allowing him to push cases down on the trimmer head. But the trimming unit has twin sets of rubber feet, allowing horizontal or vertical orientation.

Improved Case-Holder Made with Chamber Reamer:
For his .284 Shehane, Erik had to create his own case-holder (Giraud does not make one for that wildcat cartridge). Erik used his chamber reamer. To his surprise, Erik found that the brass was easier to trim in the custom case holder (compared to the Giraud-made spring-loaded holders). With a perfect fit, trimming and case extraction went more smoothly and the process was easier on his hands. (See 9:00-10:00). Based on Erik’s experience, you may want to create your own custom case-holder.
Trim Bullet Meplats Also
With a special bullet-holder fitting and meplat cutter head, the Giraud power trimmer can be used to trim bullet meplats. Trimming meplats can help make the Ballistic Coefficents of a batch of bullets more consistent. Uniforming meplats is also often done as a first step in the process of “tipping” bullets to improve BC.


January 13th, 2015
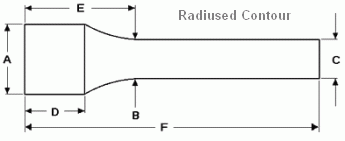
 Are you re-barreling a match rifle and need to know if you will still make weight? Or perhaps you want to select the right contour to hit an optimal carry weight for a new varmint rifle? Dan Lilja offers FREE software that will calculate barrel weight for straight contour, straight taper, and radius-tapered barrels. Dan’s software even calculates how fluting alters barrel weight. Are you re-barreling a match rifle and need to know if you will still make weight? Or perhaps you want to select the right contour to hit an optimal carry weight for a new varmint rifle? Dan Lilja offers FREE software that will calculate barrel weight for straight contour, straight taper, and radius-tapered barrels. Dan’s software even calculates how fluting alters barrel weight.
For general info on barrel weight calculation for straight and straight tapers, read this article on Lilja’s website. Click HERE for another article explaining weight calculation with barrels that have a radiused (curved) contour section.
Here are the free software programs offered by Dan Lilja. Right click and “Save As”:
Straight Contour (.exe file) | Straight Contour (Excel file) | Contoured Barrels with Radius (Excel file)
December 29th, 2014
 In our Shooters’ Forum a reader asked: “How much neck tension should I use?” This prompted a Forum discussion in which other Forum members recommended a specific number based on their experience, such as .001″, .002″, or .003″. These numbers, as commonly used, correspond to the difference between case-neck OD after sizing and the neck OD of a loaded round, with bullet in place. In other words, the numbers refer to the nominal amount of interference fit (after sizing). In our Shooters’ Forum a reader asked: “How much neck tension should I use?” This prompted a Forum discussion in which other Forum members recommended a specific number based on their experience, such as .001″, .002″, or .003″. These numbers, as commonly used, correspond to the difference between case-neck OD after sizing and the neck OD of a loaded round, with bullet in place. In other words, the numbers refer to the nominal amount of interference fit (after sizing).
While these commonly-used “tension numbers” (of .001″, .002″ etc.) can be useful as starting points, neck tension is actually a fairly complex subject. The actual amount of “grip” on the bullet is a function of many factors, of which neck-OD reduction during sizing is just one. Understanding these many factors will help you maintain consistent neck tension as your brass “evolves” over the course of multiple reloadings.
Neck Tension (i.e. Grip on Bullets) Is a Complex Phenomenon
While we certainly have considerable control over neck tension by using tighter or looser bushings (with smaller or bigger Inside Diameters), bushing size is only one factor at work. It’s important to understand the multiple factors that can increase or decrease the resistance to bullet release. Think in terms of overall brass-on-bullet “grip” instead of just bushing size.
One needs to understand that bushing size isn’t the beginning and end of neck tension questions, because, even if bushing size is held constant, the amount of bullet “grip” can change dramatically as the condition of your brass changes. Bullet “grip” can also change if you alter your seating depth significantly, and it can even change if you ultrasonically clean your cases.
Bullet grip is affected by many things, such as:
- 1. Neck-wall thickness.
- 2. Amount of bearing surface (shank) in the neck.
- 3. Surface condition inside of neck (residual carbon can act as a lubricant; ultrasonic cleaning makes necks “grabby”).
- 4. Length of neck (e.g. 6BR neck vs. 6BRX).
- 5. Whether or not the bullets have an anti-friction coating.
- 6. The springiness of the brass (which is related to degree of work-hardening; number of firings etc.)
- 7. The bullet jacket material.
- 8. The outside diameter of the bullet and whether it has a pressure ridge.
- 9. The time duration between bullet seating and actual firing (necks can stiffen with time).
- 10. How often the brass is annealed
— and there are others…
Seating Depth Changes Can Increase or Decrease Grip on Bullet
You can do this simple experiment. Seat a boat-tail bullet in your sized neck with .150″ of bearing surface (shank) in the neck. Now remove the bullet with an impact hammer. Next, take another identical bullet and seat it with .300″ of bearing surface in another sized case (same bushing size/same nominal tension). You’ll find the deeper-seated bullet is gripped much harder.
 Neck-Wall Thickness is Important Too Neck-Wall Thickness is Important Too
I have also found that thinner necks, particularly the very thin necks used by many PPC shooters, require more sizing to give equivalent “grip”. Again, do your own experiment. Seat a bullet in a case turned to .008″ neckwall thickness and sized down .003″. Now compare that to a case with .014″ neckwall thickness and sized down .0015″. You may find that the bullet in the thin necks actually pulls out easier, though it supposedly has more “neck tension”, if one were to consider bushing size alone.
In practical terms, because thick necks are less elastic than very thin necks, when you turn necks you may need to run tighter bushings to maintain the same amount of actual grip on the bullets (as compared to no-turn brass). Consequently, I suspect the guys using .0015″ “tension” on no-turn brass may be a lot closer to the guys using .003″ “tension” on turned necks than either group may realize.
Toward a Better Definition of Neck Tension
As a convenient short-cut, we tend to describe neck tension by bushing size alone. When a guy says, “I run .002 neck tension”, that normally means he is using a die/bushing that sizes the necks .002″ smaller than a loaded round. Well we know something about his post-sizing neck OD, but do we really have a reliable idea about how much force is required to release his bullets? Maybe not… This use of the term “neck tension” when we are really only describing the amount of neck diameter reduction with a die/bushing is really kind of incomplete.
My point here is that it is overly simplistic to ask, “should I load with .001 tension or .003?” In reality, an .001″ reduction (after springback) on a thick neck might provide MORE “grip” on a deep-seated bullet than an .003″ reduction on a very thin-walled neck holding a bullet with minimal bearing surface in the neck. Bushing ID is something we can easily measure and verify. We use bushing size as a descriptor of neck tension because it is convenient and because the other important factors are hard to quantify. But those factors shouldn’t be ignored if you want to maintain consistent neck tension for optimal accuracy.
Consistency and accuracy — that’s really what this all about isn’t it? We want to find the best neck tension for accuracy, and then maintain that amount of grip-on-bullet over time. To do that you need to look not only at your bushing size, but also at how your brass has changed (work-hardened) with time, and whether other variables (such as the amount of carbon in the neck) have changed. Ultimately, optimal neck tension must be ascertained experimentally. You have to go out and test empirically to see what works, in YOUR rifle, with YOUR bullets and YOUR brass. And you may have to change the nominal tension setting (i.e. bushing size) as your brass work-hardens or IF YOU CHANGE SEATING DEPTHS.
Remember that bushing size alone does not tell us all we need to know about the neck’s true “holding power” on a bullet, or the energy required for bullet release. True bullet grip is a more complicated phenomenon, one that is affected by numerous factors, some of which are very hard to quantify.
December 28th, 2014
This article originally appeared in Sinclair Intl’s Reloading Press Blog, which has been merged into the Gun Tech Section on Sinclair’s website, www.SinclairIntl.com
Steps to Minimize Bullet Run-Out
Poor bullet run-out can cause poor and inconsistent accuracy, and variations in bullet velocities. The truer the loaded round, the more consistent your results will be on paper and across the chronograph.
 Measuring Concentricity Measuring Concentricity
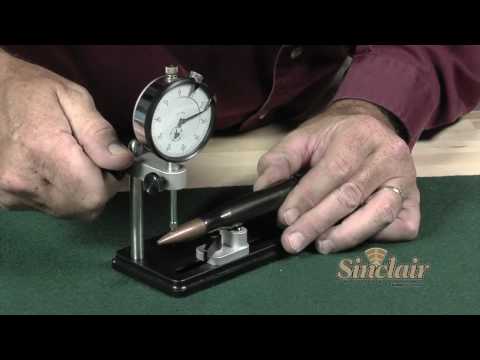
We all know that low run-out is the goal. But how can you tell if your run-out is high or low? Run-out is generally measured in thousandths of an inch with a concentricity gauge. There are many concentricity gauges to choose from that work well. Some work on loaded rounds only, some have a bullet straightening feature, and a few work on both loaded rounds and empty cases for checking case neck concentricity. The tool of choice for the Sinclair Reloading Tech Staff is the Sinclair Concentricity Gauge (Part # 09-175).
This tool is a mainstay on my bench, and it is used about as much as I use my reloading press! The tool uses two sets of bearings that are set on lateral, length-adjustable anodized aluminum blocks to accommodate cartridges from .221 Fireball-sized cases up to .50 BMG. The indicator is set on a height adjustable swiveling base on a stand that can be used for checking bullet or case neck run-out. The adjustable blocks ride aligned in a precision-milled slot. The entire set up is on an anodized base plate that gives excellent support during the process that is crucial to operation and accuracy. Basically the operation consists of placing a loaded round (for checking bullet run-out) or an empty case (for case run-out) on the bearings with the indicator end touching the chosen point to be measured. The case is easily spun with one finger as the indicator measures the amount of run-out. Once this process has been done a few times it is a fast and accurate means of measurement. In terms of indicator type being used, whether dial or digital, I actually prefer a standard dial indicator over the digital type. My reason for this choice is that you can see the needle jump when run-out is present. I believe this to be easier and faster than looking at digital numbers while measuring. In the video below, Sinclair’s Bill Gravatt shows how to use the Sinclair Concentricity Gauge correctly.
Sizing Steps to Minimize Run-Out
One of the most common steps in the reloading process that contributes to bullet run-out occurs is the sizing operation. If improper techniques are used or there are issues with the sizing die set up, a once perfectly concentric case can become out of whack. By using the proper dies for your application, properly setting up the die/shell holder or floating the de-capping/expander assembly, you can eliminate problems before they happen.
 Many of us on the technical staff choose the Redding Type-S series of dies. These are full-Length or neck sizing dies that utilize a removable/changeable neck bushing (sold separately) to size the neck according to your application. These dies are machined with true precision and quality in mind. The Type-S dies come with a standard de-capping assembly with a caliber-specific expander ball in place. In addition to this an undersized retainer to hold the de-capping pin is included with the die. In my experience with these dies I use the standard expander ball with new, unfired brass on the initial re-size. I will then use the undersized retainer in place of the expander ball with brass that has been fired. I have found this step crucial in my reloading regiment to minimize bullet run out. The use of the expander ball can cause a few thousandths of run-out when the case is being pulled back out of the sizing die. With the undersized retainer in place the only thing that touches the neck of the case in sizing is the bushing. If you prefer to use an expander ball, Redding offers caliber specific carbide floating expander balls that fit on the de-capping rod. This free floating expander ball will self center on the case neck, and reduce the amount of run-out that can be caused by a standard expander ball. Many of us on the technical staff choose the Redding Type-S series of dies. These are full-Length or neck sizing dies that utilize a removable/changeable neck bushing (sold separately) to size the neck according to your application. These dies are machined with true precision and quality in mind. The Type-S dies come with a standard de-capping assembly with a caliber-specific expander ball in place. In addition to this an undersized retainer to hold the de-capping pin is included with the die. In my experience with these dies I use the standard expander ball with new, unfired brass on the initial re-size. I will then use the undersized retainer in place of the expander ball with brass that has been fired. I have found this step crucial in my reloading regiment to minimize bullet run out. The use of the expander ball can cause a few thousandths of run-out when the case is being pulled back out of the sizing die. With the undersized retainer in place the only thing that touches the neck of the case in sizing is the bushing. If you prefer to use an expander ball, Redding offers caliber specific carbide floating expander balls that fit on the de-capping rod. This free floating expander ball will self center on the case neck, and reduce the amount of run-out that can be caused by a standard expander ball.
When setting up a Type-S sizing die, set the neck bushing into the die with the numbers facing down toward the body of the die. Tighten the de-capping assembly until it contacts the bushing and then back it off ¼ of a turn. This allows the bushing to free float in the die. You should be able to hear the bushing rattle if you shake the die. Having the bushing free floating self centers the neck, and again minimizes any run-out that can occur.
If you prefer other brands of sizing dies there are a few tricks that people use to minimize run-out as well. Many reloaders claim that the use of an O-ring at the base of the de-capping assembly lock nut will float the assembly and help self center during sizing. Another trick that has been used is to remove the retaining pin on the shell holder slot on the press ram, and use an O-ring in its place to hold the shell holder in place. This allows the shell holder to self center during sizing as well.
Seating Steps to Minimize Run-Out
Run-out issues can arise during the bullet seating process. To reduce run-out during seating, use a high-quality die with a sliding sleeve. The sliding sleeve perfectly aligns the case with the bullet to be seated. Good examples of these dies are the Redding Competition Micrometer bullet seating dies, Forster Ultra Seaters, or RCBS Competition Seating dies. All of these dies utilize a micrometer top to precisely set seating depth. They are all very high quality dies that have tight tolerances to maximize bullet straightness during seating.
We receive many questions about seating long pointed bullets such as the Berger VLD or Hornady A-Max. One problem that the reloader faces with longer bullets is that they are so long that the standard seating stem is not machined deep enough to contact these bullets properly. The point of the bullet “bottoms out” in the stem and the result is off-center seating and/or rings and dents on the bullet nose. If you plan on using such bullets, you should purchase a “VLD” style seating stem, which is cut to accommodate the longer bullets. The use of this stem results in truer seating of the bullet without leaving a ring or marring the tip of the bullet.
Besides using a traditional press and threaded seating die, another great way to get a true bullet seat is by using an arbor press and Wilson chamber-type seating die. These dies are cut to very tight tolerances and have proven themselves as the main choice for bench rest enthusiasts. The design of the die positively aligns the case with the bullet as they are both captured by the die before the bullet is pushed straight into the case by the stem. These seating dies are available with the standard seating cap and stem or an additional micrometer top can be added for precise adjustment. Wilson also offers a stainless seating die with an integral micrometer seating head.
Finally another trick used by many in the seating process is to turn the case while the bullet is being seated. Some people claim this will keep things straight. What they do is raise the ram in increments while seating and rotate the case in the shellholder in increments of 90 degrees from the original starting while the bullet is being seated. Personally I have tried this and have seen no significant difference at all. However you may be the judge of this one. It makes sense, and maybe I should try this a little more before I rule it out.
After the Rounds Are Loaded — Batch Sorting by Concentricity Levels
No matter how meticulous you are, and no matter how good your components and tools are, run-out will still show up. Reloaders can drive themselves crazy trying to make each and every loaded round a true “0” in run-out. You will still see some minimal amount no matter what you do. Set yourself a standard of maximum allowable run-out for your loads. For instance for my Long Range 600- and 1000-yard F-Class loads I like to see .002” or less. I average .0015” and see a few in the range up to .004”. I spin each loaded round on my Sinclair Concentricity Gauge and sort them by run-out. Those that run over .002” I use for sighters or practice. Though achieving zero run-out (on every round) isn’t possible, minimizing run-out can definitely help your performance. Not only will your loads shoot better but you will have one less thing to worry about when you are lining up the sights on the target.
December 15th, 2014
We first featured this story in 2010, but the results of this rimfire ammo test have been of such widespread interest that we try to bring the test to readers’ attention every year.
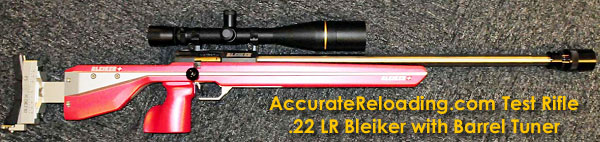
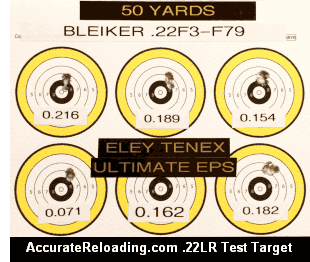 In 2010, the staff of AccurateReloading.com Forum completed a massive .22LR Rimfire Ammunition Testing Project. Some 55 different types of ammo were tested, using a highly-accurate Swiss-made Bleiker rifle, with a 2-stage trigger. All ammo varieties were tested at 50 yards, 75 yards, and 100 yards, shooting five, 5-shot groups at each distance. Though these tests were completed some time ago, many readers have requested a “reprint” of the ammo rankings, so we’ve republished this data below. In 2010, the staff of AccurateReloading.com Forum completed a massive .22LR Rimfire Ammunition Testing Project. Some 55 different types of ammo were tested, using a highly-accurate Swiss-made Bleiker rifle, with a 2-stage trigger. All ammo varieties were tested at 50 yards, 75 yards, and 100 yards, shooting five, 5-shot groups at each distance. Though these tests were completed some time ago, many readers have requested a “reprint” of the ammo rankings, so we’ve republished this data below.
The results are fascinating to say the least (and perhaps eye-opening). The tester observed: “I got some amazing groups, and some which are, frankly, absurdly bad! This has re-enforced what I had experienced with 22 ammo in the past — that is being consistently inconsistent.”
While we strongly caution that .22LR rimfire ammo may work well in one gun and not another, and ammo performance can be improved through the use of barrel tuners, the AccurateReloading.com research provides invaluable guidance for smallbore shooters. Overall, the testers burned through over 4,000 rounds of ammo, and you can see the actual test targets online. To read all the test reports, and view target photos visit AccurateReloading.com.
The lists below rank the average accuracy (by brand) of five, 5-shot groups shot at 50, 75, and 100 yards. CLICK HERE for Complete Test Results with target photos.
| 50-Yard Results |
75-Yard Results |
100-Yard Results |
0.162 Eley Tenex Ultimate EPS
0.164 Lapua Midas Plus
0.177 Lapua Polar Biathlon
0.187 Eley Match EPS
0.193 Eley Match
0.203 Lapua Midas M
0.215 Lapua Center X
0.216 Western Value Pack
0.229 Lapua Signum
0.241 Lapua Master L
0.243 Eley Pistol Match
0.256 Olin Ball
0.256 Akah X-Zone
0.261 Lapua Midas L
0.261 Lapua Master M
0.263 Eley Tenex Semi Auto
0.270 Lapua Super Club
0.272 Eley Tenex
0.303 Lapua Standard Plus
0.312 CCI Standard Velocity
0.319 RWS R 50
0.319 Eley Standard
0.328 SK High Velocity
0.339 Eley Club Xtra
0.340 Winchester T22
0.356 Federal Champion
0.362 Eley Subsonic HP
0.371 CCI Mini Mag
0.376 Federal American Eagle
0.377 Norinco Target
0.380 Sellier & Bellot Club
0.384 Eley Club
0.387 Eley Sport
0.388 Totem
0.392 Swartklip Match Trainer
0.398 Federal Gold Medal
0.403 Swartklip HV
0.409 Eley Match Xtra Plus
0.424 Sellier & Bellot Std
0.443 Remington Target
0.461 Lapua Crow HP
0.475 Eley Silhouex
0.479 Magtech
0.498 Eley High Velocity
0.513 Winchester Super X
0.516 Kassnar Concorde
0.539 CCI Blazer
0.560 Winchester Supreme Pistol
0.576 Norinco Pistol Revolver
0.593 SK Standard
0.611 Sellier And Bellot HP
0.626 SK Standard HP
0.686 Logo HV
0.956 Pobjeda Target |
0.274 Lapua Center X
0.283 Lapua Standard Plus
0.295 Eley Tenex Ultimate EPS
0.307 Lapua Midas M
0.329 Lapua Master M
0.346 Eley Match
0.373 Lapua Polar Biathlon
0.399 RWS R 50
0.432 Lapua Midas L
0.448 Eley Tenex Semi Auto
0.467 Eley Match EPS
0.474 Lapua master L
0.491 Eley Match Xtra Plus
0.494 CCI Standard
0.496 Eley Subsonic HP
0.507 Eley Sport
0.512 Federal American Eagle
0.513 SK High Velocity
0.514 Eley Standard
0.516 Eley Tenex
0.516 Lapua Crow HP
0.532 Western Value Pack
0.533 Fed. Champion Target
0.535 Lapua Midas Plus
0.564 Akah X Zone
0.566 Olin Ball
0.573 Eley Club Xtra
0.616 Lapua Signum
0.631 Winchester T22
0.639 Swartklip HV HP
0.641 Eley Club
0.642 Eley Silhouex
0.647 CCI Mini Mag
0.679 Eley Pistol Match
0.682 Swartklip Match Trainer
0.690 Federal Gold Medal
0.692 Remington HV
0.703 Lapua Super Club
0.720 Winchester Super X
0.738 Eley High Velocity
0.759 Kassnar Concorde
0.765 Sellier And Bellot Club
0.770 Winch. Supreme Pistol
0.770 Norinco target
0.775 CCI Blazer
0.802 Norinco Pistol Revolver
0.841 LVE Logo HV
0.855 Sellier & Bellot Std
0.871 Magtech
0.923 Sellier & Bellot HP
0.934 SK Standard HP
1.017 Remington Target
1.257 Totem Standard
1.442 SK Standard
1.578 Pobjeda target |
0.455 Eley Match
0.510 Lapua Midas Plus
0.549 Lapua Midas M
0.611 Lapua Polar Biathlon
0.611 Eley Tenex Ultimate EPS
0.619 Eley Match EPS
0.622 Eley Club
0.630 Lapua Center X
0.631 RWS R50
0.679 Eley Tenex Semi Auto
0.694 Lapua Midas L
0.729 Eley Tenex
0.739 Lapua Master L
0.753 Lapua Super Club
0.785 Lapua Master M
0.831 Eley Sport
0.851 Eley Match Xtra
0.859 Lapua Standard Plus
0.867 Akah X-Zone
0.877 Eley Pistol Match
0.907 Norinco Target
0.924 Eley Silhouex
0.939 CCI Standard
0.952 Eley Subsonic HP
0.963 Magtech
0.970 Olin Ball
0.978 Kassnar Concorde
0.995 Eley Club Xtra
1.009 Western Value Pack
1.032 Federal Champion
1.087 Norinco Pistol Revolver
1.100 CCI Mini Mag
1.112 Lapua Crow HP
1.143 Winchester T22
1.142 Federal Gold Medal
1.144 federal American Eagle
1.156 Swartklip Hollo Point
1.165 Lapua Signum
1.170 Swartklip Match Trainer
1.175 Fed. Champion Value Pk
1.182 SK high Velocity
1.201 Totem
1.224 Winchester Super X
1.358 Eley Standard
1.367 Remington High Velocity
1.375 CCI Blazer
1.414 Eley High Velocity
1.450 Remington Target
1.504 LVE Logo
1.813 SK Standard
1.879 S&B Club
1.947 S&B Hollow Point
2.073 SK Standard HP
2.221 S&B Standard
2.266 Pobjeda Target |

December 15th, 2014
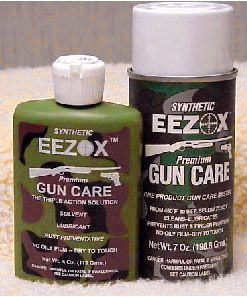 We’re well into December, and that means many readers will be putting guns in storage for a few months. It also means the weather is cold and damp — conditions that encourage corrosion. To ensure your rifles remain rust-free over the winter, we recommend some preventative measures. First clean the bore thoroughly, and remove carbon and gunk from the action areas. Slide a couple oiled patches down the bore and make sure that any bare metal parts (including sights, trigger guard, action, and bolt) are coated with some protective oil. We recommend Eezox, Boeshield T9, or CorrosionX. Eezox leaves a glossy dry film shield with excellent rust resistance. CorrosionX is more like a conventional oil, but with special anti-rust additives. Boeshield T9 leaves a slightly thicker, wax-like coating that blocks all kinds of oxidation, even on aluminum parts. We’re well into December, and that means many readers will be putting guns in storage for a few months. It also means the weather is cold and damp — conditions that encourage corrosion. To ensure your rifles remain rust-free over the winter, we recommend some preventative measures. First clean the bore thoroughly, and remove carbon and gunk from the action areas. Slide a couple oiled patches down the bore and make sure that any bare metal parts (including sights, trigger guard, action, and bolt) are coated with some protective oil. We recommend Eezox, Boeshield T9, or CorrosionX. Eezox leaves a glossy dry film shield with excellent rust resistance. CorrosionX is more like a conventional oil, but with special anti-rust additives. Boeshield T9 leaves a slightly thicker, wax-like coating that blocks all kinds of oxidation, even on aluminum parts.
 Laminated Long-Term Storage Bags Laminated Long-Term Storage Bags
Before you put your guns away for the winter, you may want to pack them in long-term storage bags. You can get superior protection with ZCORR long-term storage bags. Used by the USMC for arsenal storage, ZCORR bags are like the ultimate zip-lock baggie. They keep air and moisture out, and the interior is impregnated with corrosion inhibitors that block rust. The basic long-gun bags cost $12-$16, and have a velcro closure. The “Collectors Series” storage bags ($22-$30 for long-guns) feature a foil-adhesive closure that is 100% air and water tight. The deluxe preservation-grade ZCORRs, priced at $32-$39, can be vacuum-sealed for maximum protection — just hook up a vacuum cleaner to the special one-way valve. See photo below of rifle in ZCORR Vacuum storage bag.
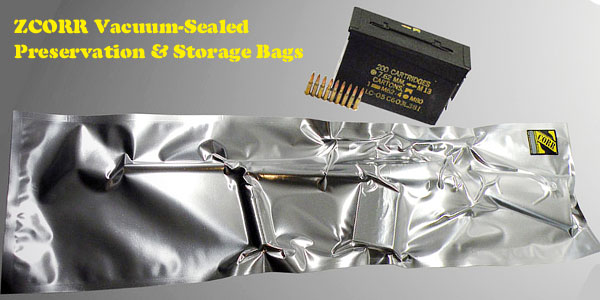
Our friend Jim Sheppard of the Shooting Wire, has used ZCORR bags for years. He writes: “I’ve used ZCORR bags in the past, but the latest firearms versions are reusable, equally durable (they’re far tougher than a plastic bag) and available in sizes that will protect pistols, carbines and long rifles. Their Collector Series storage bags and Ammunition and Parts Pouches use zip closures to protect a variety of sizes of parts, ammo or whatever.”
 How ZCORR Bags Work How ZCORR Bags Work
The laminated material used in ZCORR bags is puncture-resistant, tear-resistant, and will not harm any non-metal surfaces. Two key elements in bag’s laminate construction allow ZCORRs to block corrosion: 1) the foil barrier layer; and; 2) the VpCI-impreg-nated sealant layer.
The foil layer in ZCORR FSP Bags™ performs two tasks simultaneously; it keeps harmful corrosion causing elements out of the bag and keeps the corrosion inhibiting VpCI chemistry in the bag
The VpCI-impregnated inner layer provides the anti-corrosive properties. The VpCI chemistry impregnated in the interior layer migrates out of the plastic and forms an invisible gas inside of the bag. This gas is made up of VpCI molecules that are attracted to the interior and exterior metal surfaces of your firearm. The gas coats these metal surfaces with a one-molecule-thick layer of VpCI chemistry that stops corrosion before it can begin. This one-molecule-thick layer of VpCI chemistry dissipates off of the firearm when it is removed from the bag.
December 11th, 2014
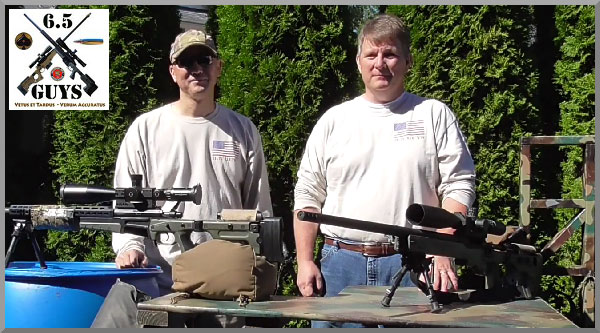
 The 6.5 Guys, a dedicated duo of Pacific NW rifle shooters, have created an interesting series of shooting-related videos on their 6.5 Guys YouTube Channel. In this video, The 6.5 Guys set up and demonstrate the Bench-Source cartridge brass annealing machine. The video explains how to set up the machine, how to attach and adjust the torches, and how to “fine tune” the flame and dwell time to achieve best results. The 6.5 Guys, a dedicated duo of Pacific NW rifle shooters, have created an interesting series of shooting-related videos on their 6.5 Guys YouTube Channel. In this video, The 6.5 Guys set up and demonstrate the Bench-Source cartridge brass annealing machine. The video explains how to set up the machine, how to attach and adjust the torches, and how to “fine tune” the flame and dwell time to achieve best results.
Read Full Annealing Article on 65Guys.com.
To complement this video, the 6.5 Guys (aka Ed and Steve) have published an Annealing Tech Talk article on 65guys.com. If you own an annealing machine, or are getting started with cartridge annealing, you should read that article. It covers basic annealing principles, and gives useful tips on temp control, dwell time, and frequency of annealing. After the video, we feature highlights from this article.
Temperature Control
We use 750° Tempilaq applied inside the case neck to indicate that the proper temperature has been achieved. If you turn off the lights, you will notice that the brass just barely starts to turn color. As you go beyond the 750° mark we observed that the case mouth will start to flare orange — you can see this with the lights on. From our research, we understand that this is the result of zinc burning off. We adjust the time on our machine between the point that the Tempilaq turns liquid and the flame starts to turn orange. In other words, if the flame is starting to turn orange reduce the time. We let the cases air cool — we don’t quench them in water.
The case starts to flare orange here, during a set-up test. Dwell time was then reduced slightly.

Read Full Annealing Article on 65Guys.com.
Flame Orientation
We aim the flame at the neck-shoulder junction. Some folks like to aim it at the neck and others the shoulder. When you see how the two flames meet and spread out vertically, it probably doesn’t make that much of a difference.
Here you can see the flame points aimed at the neck-shoulder junction.

Case Coloration
Cases will turn color after annealing, but the degree of color change is not a reliable indicator. We have noticed that the appearance of cases will vary depending on brass manufacturer, brass lot, light source, and how long ago the case was annealed.
How Often Should You Anneal?
Some shooters anneal every time while others choose a specific interval. We noticed work hardening around five firings that resulted in inconsistency in shoulder setback and neck tension, so we choose to anneal every three firings. Your mileage will vary depending on how hot your loads are and how aggressively you resize.
Who are the 6.5 Guys? They are Ed (right) and Steve (left), a pair of avid shooters based in the Pacific Northwest. They have released 22 Videos on the 6.5 Guys YouTube Channel.
December 11th, 2014
There are many different systems for storing handguns in a gun safe: coated wire racks (with U-shaped baskets), wood racks, plastic racks, rotary racks, door-mount brackets, door-mount holsters, and vertical shelving units. The rotary racks take up a lot of vertical space (and have a fairly large footprint), while the wire racks use up considerable horizontal space for their capacity.
If you’re looking for the most space-efficient, in-safe handgun storage system, consider the clever Handgun Hangers from Gun Storage Solutions. These vinyl-coated, wire hangers organize handguns below the shelf, freeing up storage space above the shelf. You simply slide each hanger on the shelf and then slip your pistol’s barrel over the lower rod. Handgun Hangers are intended for guns with an overall length of 10 inches or shorter. They will fit shelves that are at least 11 inches deep and 5/8-1 inch in thickness. Handgun Hangers will hold handguns .22 caliber and up, though the fit is a bit snug on .22s. A four-pack of Handgun Hangers costs $15.14.
WARNING — Always Make Sure Handgun is UNLOADED when using Handgun Hangers!!
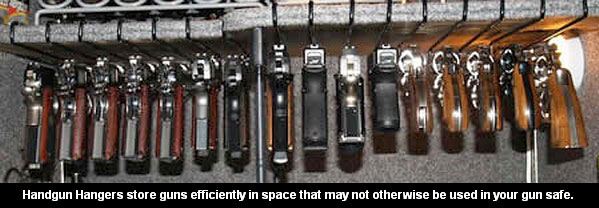
 Gun Storage Solutions also offers an Over-Under Hanger that holds two handguns — one above the shelf, and one below. A two-pack of Over-Under Hangers (capable of holding four handguns) costs $16.96. This may be a good solution for you. This editor personally prefers the standard model, so I can use the upper surface of the shelve to hold odd-shaped items such as cameras, binoculars, and miscellaneous valuables. Gun Storage Solutions also offers an Over-Under Hanger that holds two handguns — one above the shelf, and one below. A two-pack of Over-Under Hangers (capable of holding four handguns) costs $16.96. This may be a good solution for you. This editor personally prefers the standard model, so I can use the upper surface of the shelve to hold odd-shaped items such as cameras, binoculars, and miscellaneous valuables.
Magnetic Gun Caddy for Safe Doors or Walls
 Many gun owners like to mount handguns on the inside door panel of their gun safes. If this doesn’t interfere with your long gun storage, this can be a smart solution. Most of the door-mount units require special holsters or a series of peg-board style hangers. That may not work if the exposed inside of your door is bare metal. Here’s a smart solution from Benchmaster. The new two-pistol Magnetic WeaponRAC has four magnetic strips that allow the $24.99 two-gun caddy to mount directly to a metal door surface or the inner side-walls of your safe. If your safe door and walls are carpet-lined, there is also a two-pistol WeaponRAC Caddy with Velcro Mounts. A single-pistol caddy is also offered in both magnetic and Velcro versions. Many gun owners like to mount handguns on the inside door panel of their gun safes. If this doesn’t interfere with your long gun storage, this can be a smart solution. Most of the door-mount units require special holsters or a series of peg-board style hangers. That may not work if the exposed inside of your door is bare metal. Here’s a smart solution from Benchmaster. The new two-pistol Magnetic WeaponRAC has four magnetic strips that allow the $24.99 two-gun caddy to mount directly to a metal door surface or the inner side-walls of your safe. If your safe door and walls are carpet-lined, there is also a two-pistol WeaponRAC Caddy with Velcro Mounts. A single-pistol caddy is also offered in both magnetic and Velcro versions.
Editor’s Comment: If you only have 3 or 4 handguns, you may want to avoid racks altogether. Our preferred solution for 3-4 handguns is to place each gun in a synthetic fabric BoreStores sack and then line them up on the end of the top shelf in the safe. The silicone-treated BoreStores sacks wick away moisture and provide vital cushioning for the gun. This works fine for a small collection. If you have lots of wheelguns and pistols, however, look into the Handgun Hangers — they really are a space-saving solution.
December 6th, 2014
 With Christmas less than three weeks away, our readers’ thoughts are turning to holiday decorations, Yuletide gatherings, and “Where the heck can I find some darn .22 LR ammo!” Sad to say, you won’t find large quantities of .22 LR rimfire ammunition on the shelves of Wally World — those days are long gone. Affordable rimfire fodder remains in (relatively) short supply in the USA. However, if you’re willing to harness the power of the internet, you should be able to find the rimfire ammo you need. With Christmas less than three weeks away, our readers’ thoughts are turning to holiday decorations, Yuletide gatherings, and “Where the heck can I find some darn .22 LR ammo!” Sad to say, you won’t find large quantities of .22 LR rimfire ammunition on the shelves of Wally World — those days are long gone. Affordable rimfire fodder remains in (relatively) short supply in the USA. However, if you’re willing to harness the power of the internet, you should be able to find the rimfire ammo you need.
We use three specialty search engines to locate bulk .22 LR ammo (and centerfire ammo as well): Ammoseek.com, Gunbot.net, and Slickguns.com. There are others, but these are three of the most effective. Here’s what we found this morning of December 6, 2014, using these three websites.
Ammoseek.com
It’s really easy to find .22 LR ammo using Ammoseek.com. There is a handy “Quick Seek” .22 LR search link that instantly searches 108 different vendors. Shown below is just a partial list of the 481 items we found in seconds using Ammoseek’s .22 LR Quick Link. For future reference, bookmark the following link: http://ammoseek.com/ammo/22lr.

Gunbot.net
Link Ammoseek.com, Gunbot.net provides single-click search capability for .22 LR rimfire ammo. Simply click on the “22LR” Link on Gunbot’s home page, and within a few seconds you’ll get results from dozens of online ammunition suppliers. And of course you can select other popular types of ammo with a single click as well. For the best deals, select “Sort by Price” with the sort pull-down menu (by default it displays the newest result first.) We’ve highlighted the sort field in the illustration below so you don’t miss it. (You’ll probably want to click “in-stock only” as well.) Bookmark this GunBot .22 LR Quicklink to speed up your next 22LR search: http://gunbot.net/ammo/rimfire/22lr/.

NOTE: Gunbot.net is slower than Ammoseek.com. However Gunbot.net’s page is clean and simple, not plagued by distracting banners.
Slickguns.com
The Slickguns.com site is a little different than Ammoseek and Gunbot, because it covers a wider range of products, including firearms, knives, shooting accessories and more. With so many options, it’s easy to get lost on the Slickguns.com home page. Here’s a tip for ammo-shoppers — first click the “Ammo” link at the top. Then pick “22 LR” from the list of ammo types. For easy reference, bookmark this link: http://www.slickguns.com/category/ammo?caliber=3.
NOTE: You can pick other ammo types from the list of “Popular Calibers”. Here’s what you’ll see on Slickguns.com’s Ammo Page:

|


