|
|
December 5th, 2014
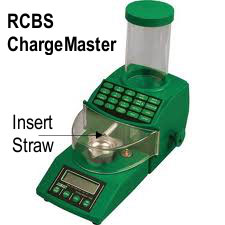 Here’s a clever, easy modification for your RCBS ChargeMaster electronic powder dispenser. Many folks use a McDonald’s straw to smooth kernel flow out of the dispensing tube. Forum member Mike S. (aka in2deep) found that, even with a straw in place, he sometimes got clumps, which dropped 5-6 kernels at once, throwing off his dispensed weight. Here’s a clever, easy modification for your RCBS ChargeMaster electronic powder dispenser. Many folks use a McDonald’s straw to smooth kernel flow out of the dispensing tube. Forum member Mike S. (aka in2deep) found that, even with a straw in place, he sometimes got clumps, which dropped 5-6 kernels at once, throwing off his dispensed weight.
Mike looked at the situation and ingeniously decided to trim the straw into little v-shaped arms or prongs. This helps to break up the clumps, so the kernels flow out the end of the tube more consistently during the dispense cycle. Mike writes:
Soda Straw Modification
This is a further tweak of the popular soda straw modification as the original mod would still allow Varget powder to collect in the straw and dump sometimes as many as 6 or 8 or even more extra kernels in the pan. It would sometimes signal an overcharge, but even when it didn’t there could be as many as 6+ kernels too high or too low (total spread of 12+).
The little arms (prongs) on the straw tend to separate the kernels into groups of 1 or 2 or 3 and prevents piling and many times the throw is now within 1 or 2 kernels of the desired weight.

Straw Cutting Tips — Mike found the shape/angle of the “arms” is very important. If the cuts are too fine or too course it allows the kernels to collect almost like before but the illustrated angle seems to allow an average of only 2 or 3 kernels per trickle input from the machine. This means that more charges are much closer to the actual desired weight and max kernel variances will be cut in less than half and there will be almost no overthrows.
Credit Boyd Allen for sourcing this tip.
December 2nd, 2014
Useful reloading gear does not have to be costly. Here are ten handy (and very inexpensive) items that belong on your loading bench or in your range kit.
|
 • Magnifying Glass – We use a flat, 2″x2″ pocket 4x-8x magnifier. This folds up on itself. Very handy, we use it to inspect bullets and brass. Use this to check your flash holes for burrs, and check the meplats of your bullets before loading. • Magnifying Glass – We use a flat, 2″x2″ pocket 4x-8x magnifier. This folds up on itself. Very handy, we use it to inspect bullets and brass. Use this to check your flash holes for burrs, and check the meplats of your bullets before loading.
• Clear 35mm Film Cannister – Use this to transfer the thrown powder charge to the little measuring cup that sits on your scale. That way you don’t get any kernel splash. Also if the charge weight is obviously off, it’s easy to dump back in the measure. A film canister works pretty well as a trickler too.
• Compressed Air in a Can -- Get these at office supply stores. Use the can (with tube attached) to blow crud out of cases after cleaning the neck with a brush, and blast loose debris out of primer pockets.
• Pin Vise – A simple $7.00 pin vise with a #53 bit is perfect for deburring Lapua PPC and BR flash holes without reaming the flash-holes any larger. The Lapua PPC/BR flash-hole diameter is 1.5 mm, or 0.059″. eHobbyTools.com sells a 1.5mm pin vise bit. Other vendors offer a #53 pin vise bit that measures .0595″ or .060″ (depending or source). You can find pin vises and bits at hobby stores.

• Bounce Dryer Sheets – The common dryer sheets will eliminates “static cling” on your plastic reloading parts such as powder measure cylinders, powder funnels, and reloading press plastic bins. Thanks to Doc76251 for this tip.
 • Ballistol Aerosol – Try using this versatile lubricant/solvent for full-length sizing. Spray some on a patch and you can wipe the carbon of your case necks. Then, continue to apply a very small amount of Ballistol on the case bodies — just thin sheen is all you need. Ballistol is super slippery, and easy to remove. For general full-length sizing (on small cases) it works great and doesn’t leave a gooey, waxy, or chalky residue. For heavier case-forming jobs, we recommend Imperial Die Wax. • Ballistol Aerosol – Try using this versatile lubricant/solvent for full-length sizing. Spray some on a patch and you can wipe the carbon of your case necks. Then, continue to apply a very small amount of Ballistol on the case bodies — just thin sheen is all you need. Ballistol is super slippery, and easy to remove. For general full-length sizing (on small cases) it works great and doesn’t leave a gooey, waxy, or chalky residue. For heavier case-forming jobs, we recommend Imperial Die Wax.
• Shotgun Mop – Stick this in the chamber when using Wipe-Out foaming bore cleaner. This will seal off the chamber so the foam doesn’t flow into your action. For long chambers screw on one section of cleaning rod to aid extraction.
• Colored Sharpie Marking Pens – Mark your bullets ahead of the bearing surface, and the color transfers to the target. This way you can shoot multiple loads at the same point of aim and discern which load shoots the tightest. (Recommended for 300 yards and beyond). With colored bullet tips you can test multiple loads “round robin” to equalize wind effects. When testing seating depths for example, you can mark the longer-seated set of bullets red and the shorter-seated set green and shoot them during the same sequence. Just look at the colored marks on the target to see which grouped better.

• Thin Latex Gloves – You should keep a box of inexpensive, disposable latex gloves (the kind doctors use) in your loading room. These will prevent contamination of primers or powder kernels that you handle directly. Also, use the gloves when handling fine blued tools or firearms to prevent transfering body oils and salts that promote rust.
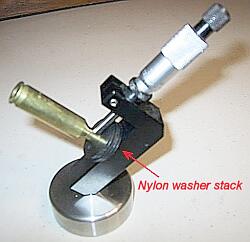
• Plastic Washers for Neck Mic – If you use a Sinclair Neck-wall Micrometer Gauge with integral stand, you can use thin plastic washers to adjust the height of the case on the mandrel. This makes it much easier to measure the same point on the case neck every time. Thanks to MikeCR for this tip (and photo).
|
December 1st, 2014
A while back, Forum member BigBlack had an experience at the gun range that reminds us of the importance of safety when shooting. He encountered evidence that someone had fired the wrong cartridge in a 7mm WSM rifle. The problem is more common than you may think. This editor has personally seen novices try to shoot 9mm ammo in 40sw pistols. BigBlack’s story is along those lines, though the results were much more dramatic. It’s too bad a knowledgeable shooter was not nearby to “intervene” before this fellow chambered the wrong ammo.
7mm-08 is Not the Same as a 7mm WSM
BigBlack writes: “I know this has probably been replayed a thousand times but I feel we can never be reminded enough about safety. This weekend at the range I found a ruptured case on the ground. My immediate thoughts were that it was a hot load, but the neck area was begging for me to take a closer look, so I did. I took home the exploded case and rummaged through my old cases until I found a close match. From my investigative work it appears someone shot a 7mm-08 in a 7mm WSM. Take a look. In the photo below I’ve put together a 7mm WSM case (top), the ruptured case (middle), and a 7mm-08 case (bottom).”

You can see from the photo what probably happened to the 7mm-08 case. The shoulder moved forward to match the 7mm WSM profile. The sidewalls of the case expanded outward in the much larger 7mm WSM chamber until they lacked the strength to contain the charge, and then the case sides ruptured catastophically. A blow-out of this kind can be very dangerous, as the expanding gasses may not be completely contained within the action.
November 28th, 2014
 Got a gunsafe with an electronic keypad? Is the battery more than a year old? Then you should replace it right away. Don’t procrastinate! Got a gunsafe with an electronic keypad? Is the battery more than a year old? Then you should replace it right away. Don’t procrastinate!
Here’s an important reminder for readers who have digital keypad entry systems on their gun safes. If you have a safe with an electronic keypad, you should replace the battery every year as a precautionary measure.
Here’s a true story. I have one safe with a Sargent & Greenleaf (S&G) keypad. Last December, I went to get into the safe. Punched in the combination, but all I got was a rapid “beep, beep, beep, beep” after I finished the last combination entry. I tried again to ensure I entered the combination correctly (I did). But again, the locking system responded with multiple rapid beeps indicating something was wrong. And the safe would not open. Now I was worried….
I popped out the battery holder (which slides in from the bottom of the keypad housing on the door). I removed the battery and tested it with a volt-meter. The year-old Duracell 9v only registered 6.1 volts.
Low voltage was the problem. I went down to the store and got a couple new 9V batteries. I tested the new batteries and both measured 9.4 volts output. I slipped one of the new 9V batteries into the keypad housing, punched in the combination and everything worked OK again. Eureka.
Most electronic locks for safes WILL “remember” the combination for a period of time even when the battery is low (and the keypad’s “brain” should retain the combination when you remove the battery for replacement). However, a dead battery, or extended periods of low voltage can give you problems. Don’t rely on wishful thinking…
If the battery on your safe is more than a year old, or if it is not giving you the right voltage, replace it today!
|
My Sargent & Greenleaf (S&G) keypad takes one (1) 9v battery. The version below takes two. Note how the battery compartment slides in from the bottom:
 |
November 22nd, 2014
Lapua brass is so good that you’ll be tempted to just load and shoot, if you have a “no-turn” chamber. However, some minimal case prep will ensure more uniform neck tension. Keeping your neck tension very uniform allows more consistent bullet seating. That, in turn, usually yields better accuracy, and lower Extreme Spread and Standard Deviation (ES/SD). Lapua brass, particularly 6BR, 6.5×47, .243 Win and .308 Win comes from the factory with tighter-than-optimal necks. Before you seat bullets, at a minimum, you should inside chamfer the case mouths, after running an expander mandrel down the necks. The expander mandrels from both Sinclair Int’l and K&M will both leave the necks with enough neck tension (more than .001″) so you can then seat bullets without another operation. Put a bit of lube on the mandrel before running it down the necks — but remove any lube that gets inside the necks before seating bullets.

Both Sinclair and K&M Tools make a die body specifically to hold expander mandrels. The Sinclair version, is shown above. This $24.99 unit fits caliber-specific expander mandrels ($9.95) which measure approximately .001″ less than bullet diameter for each caliber. This is an updated “Gen II” design that completely captures the mandrel within the die so the mandrel cannot pull out. It also has an O-ring in the die cap that allows the mandrel to self-center within the case neck. Sinclair now offers three sizes of die bodies for expander mandrels: .17 -.310 Caliber (#849-011-715WS); .357 – .50 caliber (#749-008-843WS), and a special .50 Cal die body for large-diameter 50 BMG presses (#749-009-163WS, $49.99). All Generation II dies are machined from stainless steel and the standard diameter 7/8-14 dies include the Sinclair Stainless Steel Split Lock Ring.
Once you run the Sinclair expander mandrel down the necks of Lapua brass, after you account for brass spring-back, you’ll have about .002″ neck tension. This will make the process of seating bullets go much more smoothly, and you will also iron out any dents in the case mouths. Once the case mouths are all expanded, and uniformly round, then do your inside neck chamfering/deburring. The same expander mandrels can be used to “neck-up” smaller diameter brass, or prepare brass for neck-turning.
Forum member Mike Crawford adds: “These expanders can also reduce runout from offset seating. Prior to bullet seating, expand the sized necks to force thickness variance outward. With the Sinclair system, the necks will springback fine, and will not be pulled out of center. This leaves plenty of tension, and bullets seated more centered. I do this, even with turned necks, to get improved seating.”
Mandrels vs. Expander Balls on Decapping Rods
If you haven’t acquired an appropriate expander mandrel for your brass, but you DO have a full-length sizing die with an expander ball, this will also function to “iron out” the necks and reduce tension. However, using a die with an expander ball will work the necks more — since you first size them down, then the ball expands them up again. Typically (but not always), run-out is worse when using an expander ball vs. an expander mandrel.
November 19th, 2014
Here’s a shocking video showing a massive Kaboom (KB) that literally destroyed an M1 Garand in the hands of a lady shooter. One second she has a classic .30-06 battle rifle in her arms, and the next second she has nothing but a pile of parts. She is fortunate to have survived this incident without apparent serious injury. She may have had a squib (undercharged round) in her prior shot at the 00:12 time-mark. At 00:15 it seems she may have experienced “click no bang” (we can’t tell for sure). The detonation occurs at time-mark 00:25, and is then replayed in slow-motion.
 If this Kaboom wasn’t caused by a squib, there might have been a catastrophic failure of the cartridge that failed to fire at 00:15. The shooter herself, posting as ArizonaGirl24 on YouTube, thinks the gun may have fired out of battery. What do you think? If this Kaboom wasn’t caused by a squib, there might have been a catastrophic failure of the cartridge that failed to fire at 00:15. The shooter herself, posting as ArizonaGirl24 on YouTube, thinks the gun may have fired out of battery. What do you think?
Text accompanying the posting of this video on LiveLeak, states: “A woman, her shooting partner, and their cameraperson are lucky to be alive. Her M1 Garand detonated after she failed to check the barrel for an obstruction due to an apparent squib round….
[After the shot at 00:12] she is obviously aware that something is amiss and seems to check the chamber, but does not unload the rifle to check for the presence of a barrel obstruction.
She raises the rifle and fires it again, causing a catastrophic weapon failure. Parts of the weapon fly in all directions. The video then terminates.”
What happened to the shooter? She reported: “I was very lucky with the outcome. I have lots of splinters and bruising, but nothing broken. My left hand took the brunt of the blow to my wrist and palm of my hand. Still pretty painful, but I will be fine.”
LESSON ONE: If you experience any kind of malfunction, or what appears to be a light-recoiling (or soft-sounding) shot, you should STOP shooting immediately. Clear the firearm and check for barrel obstructions.
LESSON TWO: Always wear ear and eye protection when shooting any firearm, even rimfires.
LESSON THREE: With a semi-auto gun, ensure the bolt is completely in battery after every shot.
LESSON FOUR: When hand-loading check EVERY round for powder charges prior to seating bullets, and weigh your loaded rounds before boxing them. Also check for high primers on EVERY round. If using a progressive press, use a Lock-Out Die that will alert you to any under-loaded cartridge. Be wary of commercial reloads.
Video tip from Mark LaFevers. We welcome reader submissions.
November 16th, 2014
Most of us assume that if we weigh our powder carefully (down to the tenth of a grain or less) we can achieve a uniform powder fill from case to case in our handloads. Weighing does ensure that the weight of the propellant in each case is the same, but is the column of powder the same by volume each time? “Not necessarily” is the answer. An interesting experiment by our friend Boyd Allen demonstrates that the manner in which you place kernels in the case can make a significant difference in the height of the powder column within the brass case.
Using a Gempro 250 scale, Boyd measured exactly 30.6 grains of Vihtavuori N-133 powder. He then inserted this powder in the same cartridge case multiple times. (The case has a fired primer in place.) But here is the key — Boyd used various filling techniques. He did a slow fill, and a fast fill, and he also experimented with tapping and drop tubes. What Boyd discovered was that you can start with the exact same weight of powder (in fact the very same set of kernels), yet end up with vary different fill heights, depending on how you drop the kernels into the case. Look at the photos. Despite variations in lighting, the photos show the same 30.6 grains of powder, placed in the same cartridge, with four different methods.
Boyd Explains the Procedure Used for his Experiment.
EDITOR’s NOTE: So there is no misunderstanding, Boyd started with a weighed 30.6 grain charge. This identical charge was used for ALL four fills. After a fill the powder was dumped from the case into a pan which was then used for the next fill technique to be tried. So, the powder weight was constant. Indeed the exact same kernels (of constant weight and number) were used for each fill.
Boyd writes: “I used the same powder for all fills, 30.6 gr. on a GemPro 250 checked more than once. All fills employed the same RCBS green transparent plastic funnel. The fast drop with the funnel only overflowed when it was removed from the case neck, and 15 granules of powder fell on the white paper that the case was sitting on. The fast-funnel-only drop with tapping, was done with the funnel in place and the case and funnel in one hand, while tapping the case body with the index finger hard, many times (about 20 fast double taps). My idea here was to “max out” the potential of this tapping technique.
The slow drop with the funnel and 10″-long .22 cal. Harrell’s Precision drop tube, was done by holding the scale pan over the funnel and tapping the spout of the pan repeatedly on the inside of the funnel about 1/3 down from the top, with the scale pan tilted just enough so that the powder will just flow. Many taps were involved, again, to max out the technique.
Again, to be clear, after each case filling, the powder was poured from the case back into the scale pan carefully. You may notice the similarity between the fast drop with the drop tube, and the funnel only with tapping. Although I did not photograph it, fast tube drop and tapping (combined) improved on tapping alone, but only to about half as far down the neck as the slow with drop tube. Due to the endless possible permutations, I picked four and left it at that.
I believe that I can make the rough judgment that the scale pan funnel and drop tube technique, which involved a longer drop period, and probably less velocity at the top of the tube, left more room in the top of the case neck than the slow drop from the measure with the same drop tube. You have both pictures, so you can make the comparison.” — Boyd
Does Powder Column Height Variance Make a Difference?
Boyd’s experiment proves pretty conclusively that the method of dropping a given weight of powder can affect the height of the powder column in the case and the degree of powder compression (when a bullet is seated). He showed this to be true even when the exact same set of kernels (of constant weight) was used in repetitive loadings. This raises some interesting questions:
1. Will subsequent cartridge transport and handling cause the powder to settle so the variances in powder column height are diminished?
2. If significant inconsistencies in powder column height remain at time of firing, will the difference in fill level hurt accuracy, or result in a higher extreme spread in velocity?
3. Is there any advantage (beyond increased effective case capacity) for a tight (low level) fill vs. a loose (high level) fill?
We don’t know the answer to these follow up questions. This Editor guesses that, if we tested low-fill-height rounds vs. high-fill-height rounds (all with same true fill quantity by weight), we might see meaningful differences in average velocity. I would also guess that if you fired 10 rounds that exhibited quite a difference in powder column heights, you might see a higher ES/SD than if you shot 10 rounds loaded with a very consistent powder column height (either high or low). But further testing is needed to determine if these predictions are true.
November 14th, 2014
Gear Review by GS Arizona
This article originally appeared in the Rifleman’s Journal website.
Many of you have doubtlessly read Bryan Litz’s articles in our Daily Bulletin and on his Applied Ballistics website about various current long-range bullets. Bryan’s work carries a great deal of weight in the world of ballistics, so his comments (and mathematical proofs) regarding the benefits of bullet pointing certainly caught my attention. Bullet pointing, like meplat trimming, is an effort to reduce the ballistic inconsistency created by the somewhat jagged tip of the jacket where the bullet forming dies bring it to a point in the manufacturing process. Of course, we could eliminate this problem altogether by shooting closed-tip, open-base bullets like the Lapua D46, but that merely shifts the jacket problem to the other end of the bullet.

In any event, hollow point bullets rule the accuracy world today, so John Whidden, multi-time National Long Range Champion at Camp Perry and a talented gunsmith and designer to boot, came up with a very handy tool to let us make those hollow points pointier. Let’s have a look at John’s tool and see how it works.

The Whidden Bullet Pointing Die System uses a Forster bullet seating die body as its basic structure and that’s a good choice given the quality machining Forster does on these. The real heart of the tool comes in two parts: the caliber sleeve and the pointing die that fits inside the sleeve. In fact, to point up different caliber bullets, you only need to change the caliber sleeve, everything else remains the same. The last item is the bullet base that slips into a standard .308 shellholder and supports the bullet as it goes into the die body.
 It took me less than five minutes to get everything set up, including changing the caliber sleeve from 6mm to .30 caliber. John’s instruction sheets are well illustrated and clearly written; you should have no problem getting up and running. It took me less than five minutes to get everything set up, including changing the caliber sleeve from 6mm to .30 caliber. John’s instruction sheets are well illustrated and clearly written; you should have no problem getting up and running.
Pointing the bullets is as easy as sizing a piece of brass. You can see in the top photo the difference between a few pointed bullets and a few un-pointed ones. The innermost pointed bullet in the picture was my first attempt and I adjusted the die a little after that, you can see that the others are closed a little more. John even includes a couple of sample bullets so that you can see one done right and one done wrong. That is a nice addition that can help you achieve the desired results.
I think Bryan’s work supports the validity of this concept and John’s tool puts it into practice in a simple-to-use manner that makes it just about impossible to do any damage to the bullet. I have shot pointed bullets in various calibers at many matches now. Pointing is not a “miracle cure”, but I believe that pointing bullet tips can produce long-range accuracy gains, through reduced vertical dispersion, for many popular types of match bullets. The Whidden Bullet Pointing Die System retails for $220.00 (with one insert). Additional die inserts are $42.00 each. Extra caliber sleeves are also $42.00. You can purchase directly from Whidden Gunworks, or from Sinclair International.

October 30th, 2014
Can sustained rapid-fire shooting with no cool-down period wear out a quality barrel more quickly? The answer is “Yes” according to Forum member LCazador, who recently did an interesting comparison test with two .243 Win barrels. He started off with two, identical, match-grade HV taper stainless barrels. Both were NEW at the start of testing, and LCazador shot the same load through each: 95gr match bullets with 38 grains of Hodgdon Varget. After giving both barrels the same, gentle 20-round break-in, 300 rounds were then fired through each barrel — in very different ways. Barrel condition and wear were monitored with a borescope.
Barrel One — Slow Fire, Cool Down Periods, Cleaning Every 50 Rounds
At the end of the 300-round test, Barrel One looked brand new. There was none of the severe fire cracking found in Barrel Two. This barrel was shot no more than 10 times without a cool down and firing was done at a much slower pace. Cleaning for this barrel was done every 50 shots.
Barrel Two — Fast Firing, No Waiting, Cleaning Every 100 Rounds
The second barrel, which received hard use and minimal cleaning, was severely damaged with severe fire cracking at the leade and throat. As a result, the barrel had to be re-chambered. This barrel was shot 100 rounds at time without cleaning and was shot up to 20 times in succession without a cool down.
Don’t let your barrel get too hot, and keep it clean. One afternoon can ruin a barrel!
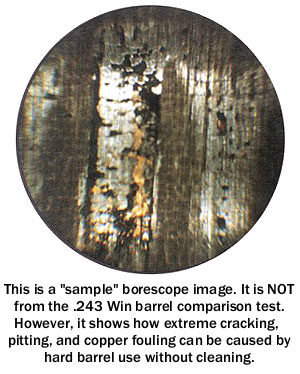 Monitoring Barrel Wear with Borescope Monitoring Barrel Wear with Borescope
Some folks worry too much about what their borescopes reveal — many barrels do not have to be “squeaky clean” to perform well. In fact some barrels run better after ten or more fouling shots. However, a borescope can be very helpful when your barrel starts losing accuracy for no apparent reason. Forum member FdShuster writes:
“A borescope is a positive way of backing up your suspicions when the rifle starts to throw an occasional (soon followed by more frequent) wild shot. Using the scope is also an excellent way to determine that the cause is barrel wear and not simply a need for a concentrated cleaning session to remove built up copper and more importantly, carbon fouling.
I’ve had a few barrels that gave every indication of being shot out. But I ‘scoped them out and found the cause to be nothing more than requiring a good cleaning. They then returned to their usual performance. There’s no guessing involved when you are able to get ‘up close and personal’ using the scope. The borescope also provides an excellent view of the all-important condition of the crown. My borescope is one of the most valuable investments I’ve ever made.”
October 22nd, 2014
 Our take on Bore-Store Gun sleeves is simple: They work great, so buy them and use them — for ALL your valuable firearms. Our take on Bore-Store Gun sleeves is simple: They work great, so buy them and use them — for ALL your valuable firearms.
These thick, synthetic-fleece sacks cushion your guns, preventing nicks and scratches. The breathable fabric wicks away moisture, and the fibers are coating with corrosion inhibitors. I personally use Bore-Stores for in-safe storage with all my guns, and I have never had one of my guns rust inside a Bore-Store, even when I lived a stone’s throw from the ocean.
Bore-Stores are offered in a wide range of sizes, so you can find something to fit everything from a Snub-nosed revolver to a 32″-barrelled 50 BMG. Rifle-size Bore Stores can be purchased for $12.00 – $21.00 from Brownells. For long F-Class or tactical rifles, we recommend the 10″x52″ Scoped Shotgun Bag, Brownells item 132-000-003. You can also order direct from the Bore-Store manufacturer, Big Spring Enterprises, www.BoreStores.com. Big Spring will also craft custom sizes on request.
Consider Military-Style, Triple-Layer Bags for Long-Term Storage
While we prefer Bore-Stores for regularly-used guns, if you have heirloom firearms that will be kept in storage for very long periods without seeing any use, you may want to grease them up and place them in the thin, but rugged three-layer storage bags sold by Brownells. The bags are made from a three-layer laminate of polyester, aluminum, and polyethylene film, with a shiny silver exterior. Though the laminate is thin, the Brownells storage bags are puncture-resistant, and have a 0% moisture transmission rating so moisture can’t get inside. These bags are also resistant to petroleum-based chemicals and they won’t break down even in contact with soil or moisture.
 Here’s one VITAL bit of advice for using these bags. Be absolutely sure, before you seal up the bags, that your guns are DRY and that all metal surfaces have been coated with an effective anti-corrosive, such as BoeShield T9 or Eezox. Brownells’ storage bags are inexpensive. A three-pak of 12″x 60″ rifle sacks (item 083-055-003WB) costs just $22.99 — under eight bucks a gun. That’s cheap insurance for rifles and shotguns that may cost thousands of dollars. Here’s one VITAL bit of advice for using these bags. Be absolutely sure, before you seal up the bags, that your guns are DRY and that all metal surfaces have been coated with an effective anti-corrosive, such as BoeShield T9 or Eezox. Brownells’ storage bags are inexpensive. A three-pak of 12″x 60″ rifle sacks (item 083-055-003WB) costs just $22.99 — under eight bucks a gun. That’s cheap insurance for rifles and shotguns that may cost thousands of dollars.
Get Your Guns Out of Foam-lined Cases — They Are Rust Magnets
Just about the worst thing you can do in the winter (short of leaving your rifle outside in the rain) is to store firearms in tight, foam-padded cases. The foam in these cases actually collects and retains moisture from the air, acting as the perfect breeding ground for rust.
 Remember, those plastic-shelled cases with foam interiors are for transport, not for long-term storage. Don’t repeat the mistake of a wealthy gun collector I know. He stored four valuable Colt Single Action Army (SAA) revolvers in individual foam-padded cases, and locked these away in his gun safe. A year later, every one of his precious SAAs had rusted, some badly. Remember, those plastic-shelled cases with foam interiors are for transport, not for long-term storage. Don’t repeat the mistake of a wealthy gun collector I know. He stored four valuable Colt Single Action Army (SAA) revolvers in individual foam-padded cases, and locked these away in his gun safe. A year later, every one of his precious SAAs had rusted, some badly.
|


