|
|
October 19th, 2014
 One of our readers asked “What effect does altitude have on the flight of a bullet?” The simplistic answer is that, at higher altitudes, the air is thinner (lower density), so there is less drag on the bullet. This means that the amount of bullet drop is less at any given flight distance from the muzzle. Since the force of gravity is essentially constant on the earth’s surface (for practical purposes), the bullet’s downward acceleration doesn’t change, but a bullet launched at a higher altitude is able to fly slightly farther (in the thinner air) for every increment of downward movement. Effectively, the bullet behaves as if it has a higher ballistic coefficient. One of our readers asked “What effect does altitude have on the flight of a bullet?” The simplistic answer is that, at higher altitudes, the air is thinner (lower density), so there is less drag on the bullet. This means that the amount of bullet drop is less at any given flight distance from the muzzle. Since the force of gravity is essentially constant on the earth’s surface (for practical purposes), the bullet’s downward acceleration doesn’t change, but a bullet launched at a higher altitude is able to fly slightly farther (in the thinner air) for every increment of downward movement. Effectively, the bullet behaves as if it has a higher ballistic coefficient.
Forum member Milanuk explains that the key factor is not altitude, but rather air pressure. Milanuk writes:
“In basic terms, as your altitude increases, the density of the air the bullet must travel through decreases, thereby reducing the drag on the bullet. Generally, the higher the altitude, the less the bullet will drop. For example, I shoot at a couple ranges here in the Pacific Northwest. Both are at 1000′ ASL or less. I’ll need about 29-30 MOA to get from 100 yard to 1000 yards with a Berger 155gr VLD @ 2960fps. By contrast, in Raton, NM, located at 6600′ ASL, I’ll only need about 24-25 MOA to do the same. That’s a significant difference.
Note that it is the barometric pressure that really matters, not simply the nominal altitude. The barometric pressure will indicate the reduced pressure from a higher altitude, but it will also show you the pressure changes as a front moves in, etc. which can play havoc w/ your calculated come-ups. Most altimeters are simply barometers that read in feet instead of inches of mercury.”
As Milanuk states, it is NOT altitude per se, but the LOCAL barometric pressure (sometimes called “station pressure”) that is key. The two atmospheric conditions that most effect bullet flight are air temperature, and barometric pressure. Normally, humidity has a negligible effect.
It’s important to remember that the barometric pressure reported on the radio (or internet) may be stated as a sea level equivalency. So in Denver (at 6,000 feet amsl), if the local pressure is 24″, the radio will report the barometric pressure to be 30″. If you do high altitude shooting at long range, bring along a Kestral, or remember to mentally correct the radio station’s pressure, by 1″ per 1,000 feet.”
You can do your own experimental calculations using JBM Online Ballistics (free to use). Here is an extreme example, with two printouts (generated with Point Blank software), one showing bullet trajectory at sea level (0′ altitude) and one at 20,000 feet. For demonstration sake, we assigned a low 0.2 BC to the bullet, with a velocity of 3000 fps.
Trajectory of Bullet fired at Sea Level
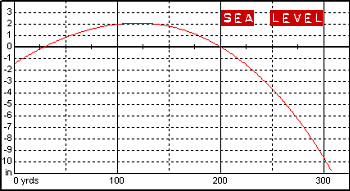 Trajectory of Bullet fired at 20,000 feet

if you want to learn more about all aspects of External Ballistics, ExteriorBallistics.com provides a variety of useful resources. In particular, on that site, Section 3.1 of the Sierra Manual is reprinted, covering Effects of Altitude and Atmospheric Pressure on bullet flight.
October 13th, 2014
by Philip Mahin, Sierra Bullets Ballistic Technician
This article first appeared in the Sierra Bullets Blog
The ANSI / SAAMI group, short for “American National Standard Institute” and “Sporting Arms and Ammunition Manufacturers’ Institute”, have made available some time back the voluntary industry performance standards for pressure and velocity of centerfire rifle sporting ammunition for the use of commercial manufacturers. [These standards for] individual cartridges [include] the velocity on the basis of the nominal mean velocity from each, the maximum average pressure (MAP) for each, and cartridge and chamber drawings with dimensions included. The cartridge drawings can be seen by searching the internet and using the phrase ‘308 SAAMI’ will get you the .308 Winchester in PDF form. What I really wanted to discuss today was the differences between the two accepted methods of obtaining pressure listings. The Pounds per Square Inch (PSI) and the older Copper Units of Pressure (CUP) version can both be found in the PDF pamphlet.

Image by ModernArms, Creative Common License.
 CUP Pressure Measurement CUP Pressure Measurement
The CUP system uses a copper crush cylinder which is compressed by a piston fitted to a piston hole into the chamber of the test barrel. Pressure generated by the burning propellant causes the piston to move and compress the copper cylinder. This will give it a specific measurable size that can be compared to a set standard. At right is a photo of a case that was used in this method and you can see the ring left by the piston hole.
PSI Pressure Measurement
What the book lists as the preferred method is the PSI (pounds per square inch or, more accurately, pound-force per square inch) version using a piezoelectric transducer system with the transducer flush mounted in the chamber of the test barrel. Pressure developed by the burning propellant pushes on the transducer through the case wall causing it to deflect and make a measurable electric charge.
Q: Is there a standardized correlation or mathematical conversion ratio between CUP and PSI values?
Mahin: As far as I can tell (and anyone else can tell me) … there is no [standard conversion ratio or] correlation between them. An example of this is the .223 Remington cartridge that lists a MAP of 52,000 CUP / 55,000 PSI but a .308 Winchester lists a 52,000 CUP / 62,000 PSI and a 30-30 lists a 38,000 CUP / 42,000 PSI. It leaves me scratching my head also but it is what it is. The two different methods will show up in listed powder data[.]
So the question on most of your minds is what does my favorite pet load give for pressure? The truth is the only way to know for sure is to get the specialized equipment and test your own components but this is going to be way out of reach for the average shooter, myself included. The reality is that as long as you are using printed data and working up from a safe start load within it, you should be under the listed MAP and have no reason for concern. Being specific in your components and going to the load data representing the bullet from a specific cartridge will help get you safe accuracy. [With a .308 Winchester] if you are to use the 1% rule and work up [from a starting load] in 0.4 grain increments, you should be able to find an accuracy load that will suit your needs without seeing pressure signs doing it. This is a key to component longevity and is the same thing we advise [via our customer service lines] every day. Till next time, be safe and enjoy your shooting.

October 12th, 2014
 Effects Of Cartridge Over All Length (COAL) And Cartridge Base To Ogive (CBTO) – Part 1 Effects Of Cartridge Over All Length (COAL) And Cartridge Base To Ogive (CBTO) – Part 1
by Bryan Litz for Berger Bullets.
Many shooters are not aware of the dramatic effects that bullet seating depth can have on the pressure and velocity generated by a rifle cartridge. Cartridge Overall Length (COAL) is also a variable that can be used to fine-tune accuracy. It’s also an important consideration for rifles that need to feed rounds through a magazine. In this article, we’ll explore the various effects of COAL, and what choices a shooter can make to maximize the effectiveness of their hand loads.
Sporting Arms and Ammunition Manufacturers’ Institute (SAAMI)
Most loading manuals (including the Berger Manual), present loading data according to SAAMI (Sporting Arms and Ammunition Manufacturers’ Institute) standards. SAAMI provides max pressure, COAL and many other specifications for commercial cartridges so that rifle makers, ammo makers, and hand loaders can standardize their products so they all work together. As we’ll see later in this article, these SAAMI standards are in many cases outdated and can dramatically restrict the performance potential of a cartridge.
Bullet seating depth is an important variable in the accuracy equation. In many cases, the SAAMI specified COAL is shorter than what a hand loader wants to load their rounds to for accuracy purposes. In the case where a hand loader seats the bullets longer than SAAMI specified COAL, there are some internal ballistic effects that take place which are important to understand.
Effects of Seating Depth / COAL on Pressure and Velocity
The primary effect of loading a cartridge long is that it leaves more internal volume inside the cartridge. This extra internal volume has a well known effect; for a given powder charge, there will be less pressure and less velocity produced because of the extra empty space. Another way to look at this is you have to use more powder to achieve the same pressure and velocity when the bullet is seated out long. In fact, the extra powder you can add to a cartridge with the bullet seated long will allow you to achieve greater velocity at the same pressure than a cartridge with a bullet seated short.

Figure 1. When the bullet is seated farther out of the case, there is more volume available for powder. This enables the cartridge to generate higher muzzle velocity with the same pressure.
When you think about it, it makes good sense. After all, when you seat the bullet out longer and leave more internal case volume for powder, you’re effectively making the cartridge into a bigger cartridge by increasing the size of the combustion chamber. Figure 1 illustrates the extra volume that’s available for powder when the bullet is seated out long.
Before concluding that it’s a good idea to start seating your bullets longer than SAAMI spec length, there are a few things to consider.
Geometry of a Chamber Throat
The chamber in a rifle will have a certain throat length which will dictate how long a bullet can be loaded. The throat is the forward portion of the chamber that has no rifling. The portion of the bullet’s bearing surface that projects out of the case occupies the throat (see Figure 2).

The length of the throat determines how much of the bullet can stick out of the case. When a cartridge is chambered and the bullet encounters the beginning of the rifling, known as the lands, it’s met with hard resistance. This COAL marks the maximum length that a bullet can be seated. When a bullet is seated out to contact the lands, its initial forward motion during ignition is immediately resisted by an engraving force.
Seating a bullet against the lands causes pressures to be elevated noticeably higher than if the bullet were seated just a few thousandths of an inch off the lands.
A very common practice in precision reloading is to establish the COAL for a bullet that’s seated to touch the lands. This is a reference length that the hand loader works from when searching for the optimal seating depth for precision. Many times, the best seating depth is with the bullet touching or very near the lands. However, in some rifles, the best seating depth might be 0.100″ or more off the lands. This is simply a variable the hand loader uses to tune the precision of a rifle.
CLICK HERE to Read Full Article with More Info
Article sourced by EdLongrange. We welcome tips from readers.
October 4th, 2014
 Have a good look at the photos below — this may be one of the most noteworthy target strings we’ve ever published. What you can see is the effect of barrel tuner position on point of impact (POI). You can clearly see that the tuner position alters the up/down POI location in a predictable fashion. Have a good look at the photos below — this may be one of the most noteworthy target strings we’ve ever published. What you can see is the effect of barrel tuner position on point of impact (POI). You can clearly see that the tuner position alters the up/down POI location in a predictable fashion.
This remarkable 15-shot sequence was shot by French benchrester Pascal Fischbach using his 6 PPC fitted with a CG (Carlito Gonzales) action and a Bukys barrel tuner.
Pascal reports: “After [bullet] seating and load validation, I put the Bukys tuner on, screwing it out 10 turns. According to Carlito, the CG’s super stiff action-to-barrel fit gives a faster vibration modulus that is detrimental below 10 turns [position of the tuner].” Pascal’s procedure was to screw out the tuner 1/4 turn progressively from one shot to the next. He shot one bullet at each tuner position, with a total of 15 shots.
15-Shot Sequence with Tuner Changes

CLICK HERE to SEE Large Version of Complete Test Strip (All 15 shots in a row).
Left Half of Target Strip (shots with 1/4 rotation change of tuner in sequence)

Right Half of Target Strip (shots with 1/4 rotation change of tuner in sequence)

Pascal observed: “Note the point of impact displacement [from shot to shot] tracks clearly along a sinusoide (sine wave curve).” This is indeed notable and significant! This shows how the tuner’s ability to change barrel harmonics can alter the position of the muzzle as each bullet exits, resulting in a higher or lower POI. Pascal sent his results to Carlito Gonzales in Argentina for analysis.
Pascal poses this question to readers: “Guess which three positions Carlito recommends to try?”
Editor’s Note: While this target sequence clearly shows how tuner position can alter bullet point of impact, this, by itself, does not tell us which tuner position(s) are best for accuracy. That will require further multi-shot group testing, involving careful experimentation with tuner position (and powder charge weights). But for those folks who doubt that a tuner can make a difference on a short, fat barrel, just take another look at the photos. The up/down changes are undeniable, and noteworthy in the wave pattern they follow.

October 2nd, 2014
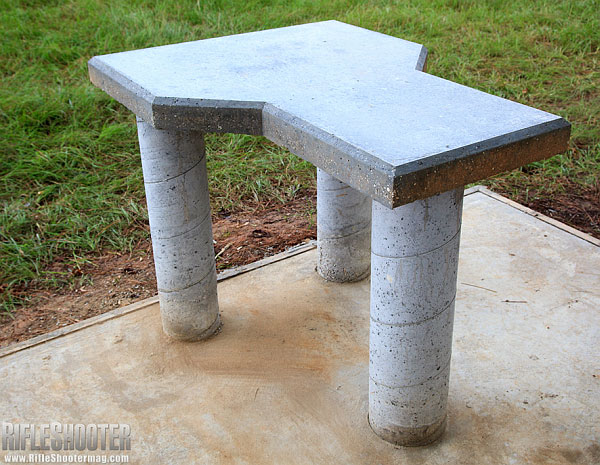
Who hasn’t dreamed of having a professional-quality permanent shooting bench on their own property? Well here’s an article that can help you make that dream come true. The latest online edition of RifleShooter Magazine shows how to build a quality concrete shooting bench step-by-step.

All aspects of the construction process are illustrated and explained. The author, Keith Wood explains: “Construction happened in three phases — first creating the slab foundation, then the support pillars (legs), and finally the table.”
Click image below to load article with slide show.

Each step in the process is illustrated with a large photo and descriptive paragraph. Starting with framing the foundation (Step 1), the article illustrates and explains the 15 Steps that produce the finished, all-concrete bench, shown below.
September 29th, 2014
“All dressed up and nowhere to go” was the comment our IT guy, Jay Christopherson, sent with this photo. This is Jay’s testing set-up at his home range, complete with PVM-21 chronograph and wireless target-cam. The camera signal is sent, via WiFi, to Jay’s laptop computer. However, even with all that high-tech electronic gear, you can’t make the shot if you can’t see the target through the rifle-scope. On this morning, heavy ground fog completely obscured the target. Jay told us: “I ended up waiting a little over an hour for the fog to burn off enough so that I could see the 600-yard target. What was funny was that I had a perfectly clear picture of the target via the target-cam and monitor. But there was no way to aim the rifle since the riflescope showed nothing but fog.”

This photo was taken by Jay at the Cascade Shooting Facility in Ravensdale, WA. The rifle is Jay’s .284 Shehane F-Class rifle. Jay was testing primers for Extreme Spread (ES) variation around 9:00 am. Nature was not cooperating. Jay was running Hodgdon H4831sc and testing various primers to see which provided the best numbers.
The chronograph is the Kurzzheit PVM-21. Equipped with infrared sensors, the PVM-21 is our “go-to” chron for most velocity testing, with an Oehler 35P for “back-up”. The PVM-21 (now updated with Kurzzheit’s BMC-19 model) sets up quickly and gives reliable results in any light conditions. But there is something even more sophisticated on the horizon — the new Labradar, a “stand-off” chronograph that uses Doppler radar to measure bullet speed.

Jay explains: “I am (somewhat) patiently waiting for the new Labradar to release. The PVM-21 works pretty well most of the time and is easy to setup. I do get odd readings out of it every so often, but they are pretty obvious when they occur.” The advantage of the Labradar (if it ever comes to market) is that the unit sits to the left or right of the rifle. The Labradar is situated out of the bullet path, so there is no chance of shooting the chronograph by accident. Another advantage of the Labradar is that you can set it up without needing to go forward of the firing line, which would require a safety break.
September 24th, 2014
If you’re one of those folks who doesn’t wear eye protection, you need to check out the LuckyGunner Labs Eye Protection Test. For those who DO wear safety glasses — don’t assume that everything is OK. Just because you purchased name-brand “safety glasses” doesn’t mean that you are getting truly effective protection. In fact, many forms of protective eyewear sold today are flimsy, or poorly made. Consequently, they won’t stop even low-energy, slow-velocity fragments.
CLICK HERE to Read Complete Eyewear Test Report by LuckyGunner Labs.
 Two years ago, LuckyGunner Labs conducted very extensive field tests of 28 types of eyewear, ranging in price from $7 to $220. Remarkably, some of the most expensive safety eyewear performed no better than $10 items. Many of the products failed shockingly — with the lenses coming right out of the frames when hit with pellets. LuckyGunner recorded these kind of failures even with ANSI Z87-“approved” eyewear. The reason is that the Z87 test is not tough enough: “The basic ANSI standard is referred to as Z87, and you’ll see this marked in a number of locations on most eye protection marketed to shooters. However, the Z87 impact standard involves a .25″ steel ball traveling at 150 fps — this is fine for protecting eyes from debris that might fall or be thrown, but is not extremely relevant to shooters, who are dealing with objects traveling at much higher velocities.” Two years ago, LuckyGunner Labs conducted very extensive field tests of 28 types of eyewear, ranging in price from $7 to $220. Remarkably, some of the most expensive safety eyewear performed no better than $10 items. Many of the products failed shockingly — with the lenses coming right out of the frames when hit with pellets. LuckyGunner recorded these kind of failures even with ANSI Z87-“approved” eyewear. The reason is that the Z87 test is not tough enough: “The basic ANSI standard is referred to as Z87, and you’ll see this marked in a number of locations on most eye protection marketed to shooters. However, the Z87 impact standard involves a .25″ steel ball traveling at 150 fps — this is fine for protecting eyes from debris that might fall or be thrown, but is not extremely relevant to shooters, who are dealing with objects traveling at much higher velocities.”
| Standard |
Impact speed |
Caliber/Size |
ANSI Z87.1-2003
High Velocity |
150 feet/second
45 meters/second |
0.25″ diameter steel ball
(25 caliber) |
Mil-PRF-31013
Vo ballistic test |
640-660 feet/second
195 meters/second |
0.15 inch diameter steel projectile (15 caliber) |
The testers recommend you select eyewear that meets military specification (above and beyond ANSI Z87). The MIL-PRF-31013 Standard covers projectiles up to 650 feet per second. This is much more stringent. Additionally, you want to replace often-used protective eyewear every year or so. Long-term exposure to UV radiation can weaken polycarbonate and lessen its ability to withstand impacts.
SUMMARY — What to Look for in Protective Eyewear
THE GOOD — Eyewear Protects Against Direct Hit with .22 Short Bullet
APEL Revision Sawfly eyewear was shot with a .22 Short, pushing a 29 grain bullet at 710 fps. That’s not powerful by modern firearm standards, but this might be fairly representative of a ricochet bullet fragment. The Sawfly lens stopped this 29gr bullet with minimal damage to the cheek area.

THE BAD — Remington Eyewear Lenses Separate. Right Lens Enters Eye Socket
The most gruesome example was the cheap Remington eyewear which shed both lenses back towards the eyes, one of which embedded itself into the eye socket. The real-world implications of this action are disturbing to say the least.

THE UGLY — Prescription Glasses Failed Miserably
Many ranges don’t see any need for protective eyewear beyond prescription glasses. However, most prescription lenses offer little if any protection. If the prescription lenses are glass, this can create more problems. As shown below, these prescription glasses offered no ballistic protection, and, in fact, proved more dangerous to the eyes due to the flying glass shards.

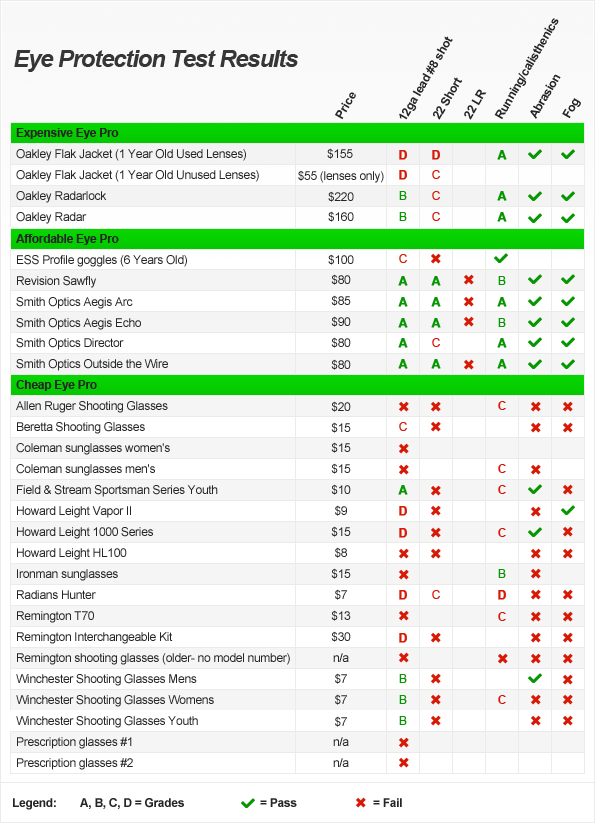
Results Chart, Video Clips, and Photos copyright Luckygunner.com.
Summary and Conclusions:
For faster-moving projectiles such as ricochet fragments, you need high quality, tested eye protection. LuckyGunner recommends eyewear with a single (one-piece) lens for any activity where your face might be struck by small, fast-moving objects. Individual lenses detach from the frames once a certain level of force is reached, and they are driven back into the eye sockets, where considerable damage may be done. There are good examples of protective eyewear with two separate lenses, but a broad, one-piece lens distributes force much better.
 A wide, comfortable, and preferably soft rubber nosepiece is critical. Along with good “arms”, this will serve to keep the eye protection in place and will also reduce the chances of the lens being driven down or back into the face with enough force to damage the orbital bones. A wide, comfortable, and preferably soft rubber nosepiece is critical. Along with good “arms”, this will serve to keep the eye protection in place and will also reduce the chances of the lens being driven down or back into the face with enough force to damage the orbital bones.
A frame that connects across the top of the lens, not individual arms which attach to the outside corners of the lens, is recommended. This will reduce the chances of the lens detaching from the frame under impact (it’s still possible, just less likely). Some types of eye protection actually use the frame to absorb impact and distribute force.
NOTE: Andrew, the author of the LuckyGunner Eyewear report, was a former Navy Corpsman. Accordingly, he is familiar with health and safety matters.
September 22nd, 2014
One of our Forum Members has a .308 Win load that dips into the transonic speed range at 1000 yards. He is concerned that his bullets may lose accuracy as they slow to transonic speeds: “My target is at 1000 yards. How important to accuracy is it to keep the bullet supersonic (Mach 1.2) all the way to the target? How does slowing to transonic speeds in the last 100 yards or so affect accuracy?”
TargetShooter Magazine and AccurateShooter.com contributor Laurie Holland offers some practical answers to this important question, based on his his experience with .223 and .308-caliber bullets.
Thoughts on Accuracy and Transonic Bullet Speeds by Laurie Davidson.
There is no simple answer to the question “How do transonic speeds affect accuracy”. Some bullets manage OK, some not so well, some fail entirely, and I’ve never seen a guide as to which models do and which don’t. But we do have the ‘boat-tail angle rule’, anyway. Bryan Litz says the ideal boat-tail angle is 7-9°. Go much above 10° and it’s too steep for the air to follow the bullet sides around to the base. This seems to manifest itself as much increased drag and turbulence leading to instability in transonic flight.
It is this effect that has led to the common advice of “Don’t use 168gr 30-caliber bullets at 1000 yards”. That is misleading advice as it resulted from use of the 168gr Sierra ‘International’ (aka MatchKing) bullet with its 13-deg BT angle. (This was, originally, a specialized 300m design — there are various near copies on the market from Speer, Hornady and Nosler.) By contrast, Berger 168-grainers are designed as long-range bullets with 8.9, 8.5 and a really nice 7° angle on the BT, VLD and Hybrid respectively. Hornady A-Max 30-cal projectiles (other than the 208-grainer) fall into this enforced shorter-range bracket too thanks to their 12.6° (and greater) boat-tail angles. (155gr = 13.5°, 168gr = 12.87°, and 178gr = 12.6°.)

Even this boat-tail angle ‘rule’ doesn’t always seem to apply. Many older long-range Service Rifle shooters talk about good results at 1000 yards with some batches of 7.62mm match ammo in their 20″-barreled M14s using the 168gn SMK. I’ve successfully used Hornady and Sierra 168s at 1000 yards in 30-cal magnums which drive the bullets fast enough to keep out of trouble at this distance. This is still not recommended of course thanks to their low BCs compared to better long-range speciality bullets.

These four photos show the substantial changes in the shock ware and turbulence patterns for the same bullet at different velocities. The “M” stands for Mach and the numerical value represents the velocity of the bullet relative to the speed of sound at the time of the shot. Photos by Beat Kneubuehl.
Transonic Issues with .223 Rem in F-TR
I was much exercised by [concerns about transonic instability] in the early days of F-Class, when I was shooting a .223 Rem with 80-grainers at 2,800 fps MV or even a bit less. Even the optimistic G1 ballistic charts of the time said they’d be subsonic at 1000 yards. (Bryan Litz’s Point Mass Ballistic Solver 2.0’s program says 1,078 fps at 1000 yards at 2,800 fps MV in standard conditions for the SMK; below 1.2 MACH beyond a point somewhere around 780 yards.) In fact they shot fine in a large range of conditions apart from needing around 60% more windage allowance than 6.5mm projectiles [shot with a larger cartridge]. The biggest problem apart from my wind-reading skills was constantly getting out of the rhythm to call to have the target pulled as the pits crew didn’t hear the subsonic bullets and had trouble seeing their little holes.
In the early days of F-TR I used a 24″ barrel factory tactical rifle that was billed as F-TR ready — it wasn’t! The much touted 175gr Sierra MatchKing, as used in the US military M118LR sniper round, was allegedly good at 1000 yards at .308 velocities — but it wasn’t! It would group OK in [some calm] conditions, but any significant change would cause a much greater deflection on the target than the ballistic charts predicted, so transonic flight was obviously making it barely stable. I also suspect conditions on the day had a big effect as Litz’s program says [the 175gr SMK] is just subsonic at 2,650 fps MV at 1,000 in standard conditions. Throw in MV spread and there was a risk of some round remaining supersonic, while others went transonic. Plus warmer or colder air moving onto the range under some conditions might change things.
I used the combination on Scotland’s notorious Blair Atholl range at 1000 yards in one competition in a day of cold headwinds from the north and frequent rain squalls. The temperatures plummeted during the squalls (and the wind went mad too!) and what was an ‘interesting group pattern’ outside of squall conditions changed to seeing me do well to just stay on the target frame at all. On ranges other than Blair (which is electronic, so no pits crew), target markers reported they heard faint supersonic ‘crack’ and saw round holes on the paper, so the bullets appeared to remain stable and just supersonic in summer shooting conditions.
Transonic Problems with M118LR 7.62×51 Ammo
Confirmation of this transonic performance phenomenon has since come from USMC snipers who say the M118LR’s performance ‘falls off a cliff’ beyond 800m (875 yards), which is just what I found when shooting the bullet at slightly higher than M118LR muzzle velocities. A move to the 190gr SMK with Vihtavuori N550 keeping the MVs reasonable gave a vast improvement in 1000-yard performance.
Practical Advice — Use a Bullet That Stays Supersonic
The ‘easy’ / better answer to all this is to use a design such as the 30-caliber, 185gr Berger LRBT with a reputation for good long range performance and to load it to achieve or exceed 1,350 fps at 1000 yards. If I can get the combination I’m using to be predicted to hold 1,400 fps at this range in a G7-based program calculation, I’m happier still.
Incidentally, the old long-range, 30-cal Sierra bullets (the venerable 190gr, 200gr, and 220gr MatchKings), with their extra length boat-tail sections, have a superb reputation for stable transonic / subsonic flight. They were used by GB and British Commonwealth ‘Match Rifle’ shooters at 1000, 1100, and 1200 yards for many years before the current bunch of 210gr and up VLDs and Hybrids appeared.
 Transonic vs. Supersonic Transonic vs. Supersonic
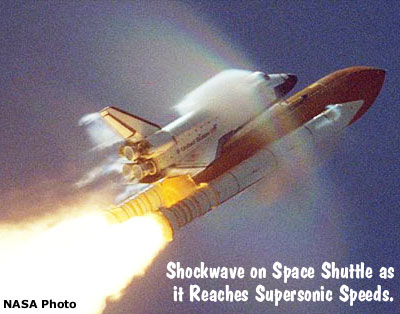
The term “Transonic” refers to velocities in the range of Mach 0.8 to 1.0, i.e. 600–768 mph. It is formally defined as the range of speeds between the critical Mach number, when some parts of the airflow are supersonic, and a higher speed, typically near Mach 1.2, when the vast majority of the airflow is supersonic. Instability can occur at transonic speeds. Shock waves move through the air at the speed of sound. When an aircraft goes transonic and approaches the speed of sound, these shock waves build up in front of it to form a single, very large shock wave. This is dramatically illustrated in this Space Shuttle photo. |
September 21st, 2014
Brass jags perform well for their intended purpose — with one hitch. Strong copper solvents can actually leech metal from the jag itself, leaving the tell-tale blue tint on your patches. This “false positive” can be frustrating, and may lead shooters to over-clean their barrels.
  Gunslick Nylon Spire-Point Jags Gunslick Nylon Spire-Point Jags
There are now some good alternatives to brass jags. The best may be the Gunslick® Nylon Snap-Lock™ jags shown at right. These never leave a “false positive”. A while back, Larry Bartholome, past USA F-Class Team Captain told us: “The best spear-type jags I have used are the GunSlick black nylon tips. I have used the model 92400 for the last couple years in my 6BR and 6.5-284s. Unlike the white plastic jags, these are strong and there’s no brass to worry about.” You can purchase these nylon jags directly from GunSlick just $1.49 each. At that price, they’re worth a try.
#92400 for 22 through 270 calibers: $1.49
#92421 for 30 through 375/8mm calibers: $1.49
#92423 for 38 through 38/9mm calibers: $1.49
 Tipton Nickel-Coated Jags Tipton Nickel-Coated Jags
If you prefer a metal jag, consider the Tipton Nickel-coated Ultra Jags, sold both individually and as a boxed set. All Tipton nickel-plated jags have 8-32 thread, except for the .17 caliber jag which has a 5-40 thread. The vast majority of user reviews have been very positive. A few guys have complained that the nickel-plated Tipton jags run oversize, but we use a .22-caliber jag in our 6mms anyway, so this hasn’t been a problem for us. Both the .22 cal and the .243/6mm cal nickel-plated jags cost $3.08 each at Midsouth. The complete 12-jag set, covering .17 to .45 calibers, including a flip-top carry case, is offered by Midsouth Shooters Supply for $17.62 (Midsouth item 094-500012).
Tipton also makes a nickle-plated 12-Jag Kit in a flat version with a see-through top. Sold by MidwayUSA for $16.99, this features an easy-to-use, clear-topped fitted caddy that can lie flat on your bench, or be attached vertically (to save space).
 
Clear-Coating Your Brass Jags
If you’re reluctant to give up your collection of brass jags (after all they’ve worked pretty well so far), try covering the jag itself with a thin, transparent coating. Forum Member BillPA says: “I give the brass jags a coat of clear lacquer or acrylic; that works for me”. You may need to experiment to find a coating that stands up to your favorite solvent. BillPA says: “The only solvent I’ve found that eats the lacquer off is TM Solution. Butch’s, Shooter’s Choice, or Wipe-Out don’t seem to bother it. Most of the time I use rattle-can clear lacquer”. If you’re feeling creative, you could even color-code your jags by adding tints to the clear-coat.
September 10th, 2014
October’s just around the corner — that means temperatures will be dropping soon in Northern climes. In a month or two, many of you will be putting your guns into storage for many months. To prevent rust from forming on your valuable firearms, you’ll want to control the temperature and humidity in your safe. By maintaining a warm temperature you can keep the relative humidity (in your safe) above the dew point and prevent moisture from condensing on your guns. One popular way to keep a safe warm is to use a Goldenrod. Though marketed as a “de-humidifier”, the Goldenrod tube is actually a simple electric heater. Placed in the bottom of your safe, the Goldenrod can help keep the relative humidity above the dew point.

Rope Lights — Light and Heat for Your Gun Safe
While Goldenrods work, they only provide heat, and Goldenrods typically retail for $20.00-$30.00. There is a less expensive solution that provides both light AND heat. A section of incandescent Rope Lighting will light up your safe AND warm the air. A 6-foot section of rope lighting costs about $6.00 at Lowes. The 6-foot strands can be linked together in longer chains. Rope Lighting can easily be installed in your safe with clips or velcro fasteners. One 6-foot long incandescent Rope Light draws about 18 watts of power — the same as an 18″ Goldenrod. Sheathed in plastic tubing, the incandescent Rope Lighting is slightly warm to the touch. A single 6-foot long strand of incandescent Rope Lighting maintains this Editor’s 23-cubic-foot indoor safe comfortably above 65° F all the time. (If you live in a colder area, or keep your safe in the garage, you may need a longer Rope Light, or a Rope Light in combination with a Goldenrod. Incandescent Rope Lights draw about 0.25 watts per bulb or about 3 watts per foot. Goldenrods draw about 12 watts per foot of length.)
 
Not All Rope Lighting is the Same — Incandescent vs. LED
Thus far, we’ve been talking about incandescent Rope Lights. For more money, you can also purchase energy-efficient LED ropes. LED Rope Lights draw much less electricity, but they won’t provide as much heat as incandescent Rope Lighting. It you use LED strands, you need to string longer sections to warm your safe. Or, just use LED strings for interior lighting only and then add a Goldenrod for heat.
Monitor Temp and Humidity with Thermometer/Hygrometer
To ensure that your safe’s interior is staying warm and dry, you can place a small temp/humidity sensor inside the safe. You can use either an Analog (dial-type) Thermometer-Hygrometer, or a battery-powered Thermometer-Hygrometer with digital read-out. Both digital and analog units can be purchased for $10 to $15 from internet vendors. Some of the digital units have dual temp sensors, so you can monitor the temperature both inside and outside your safe. That lets you gauge how well your safe-warming system is working.
 
WARNING: As with all electrical products, use caution with rope lighting. Follow manufacturer’s instructions. Avoid placing ropes in direct contact with paper or other flammable objects. Monitor surface temperatures.
|


