For years, many shooters have coated bullets with Moly (molybdenum disulfide) or Danzac (tungsten disulfide or “WS2″). The idea was to reduce friction between bullets and barrel. In theory, this could lengthen barrel life and extend the number of rounds a shooter can fire between cleanings.
Moly and WS2 both have their fans, but in the last couple of years, some guys have switched to Hexagonal Boron Nitride (HBN), another dry lubricant. The advantage of HBN is that it won’t combine with moisture to create harmful acids. HBN is very slippery and it goes on clear, so it doesn’t leave a dirty mess on your hands or loading bench. Typically, HBN is applied via impact plating (tumbling), just as with Moly.
HBN Results — Both on Bullets and Barrel Bores
Many folks have asked, “Does Hexagonal Boron Nitride really work?” You’ll find answers to that and many other questions on gunsmith Stan Ware’s popular Bench-Talk.com Blog. There Paul Becigneul (aka Pbike) gives a detailed run-down on HBN use, comparing it to other friction-reducers. Paul also discusses the use of HBN in suspension to pre-coat the inside of barrels. Paul observes:
We coated our bullets … how we had been coating with WS2. Now our bullets have a slightly white sheen to them with kind of like a pearl coat. They are so slippery it takes a little practice to pick them up and not drop them on the trailer floor. What have we noticed down range? Nothing different from WS2 other than the black ring on your target around the bullet hole is now white or nonexistent. Our barrels clean just as clean as with WS2. Your hands aren’t black at the end of the day of shooting and that might be the most important part.
Interestingly, Becigneul decided to try a solution of HBN in alcohol, to pre-coat the inside of barrels. Paul had previously used a compound called Penephite to coat the inside of his barrels after cleaning. Paul explains:
If Penephite was used because it was slippery wouldn’t HBN be better? … We called Momentive again (our source for HBN), and talked about mixing HBN and 90% alcohol for a suspension agent to pre-lube our barrels. He though it sounded great but that the Kb>AC6111 Grade HBN would be better for this use. It would stand up in the alcohol suspension and cling to the barrel when passed through on a patch. We got some and mixed it in alcohol 90%. We use about one teaspoon in 16 ounces of alcohol.
We started using it this fall and what we have noticed is that now that first shot fired out of a clean and pre-lubed barrel can be trusted as the true impact point. We use tuners so now I got to the line, fire two shots judge my group for vertical, adjust the tuner as needed or not, and after tune has been achieved go to my record targets. This use has saved us in time at the bench and bullets in the backstop.
You really should read the whole article by Becigneul. He discusses the use of barrel lubes such as Penephite and “Lock-Ease” in some detail. Paul also provides links to HBN vendors and to the Material Safety Data Sheets (MSDS) for the various compounds he tested.
Good Source for Hexagonal Boron Nitride (HBN)
Paul Becigneul (aka PBike in our Forum) has been using HBN for many years with good results. He obtains his HBN from Momentive Performance Materials:
The National Shooting Sports Foundation (NSSF) has created a video with helpful tips on mounting scopes, and adjusting the position of scopes to suit the shooter. This video, hosted by Ryan Cleckner, a former U.S. Army Sniper instructor, is aimed primarily at “hard-holders” who shoot prone. The video should prove useful for tactical shooters, varmint hunters, and F-Class shooters. Ryan does explain that, if you plan to use your rifle in standing, sitting, and prone positions, you need to set the scope in a “happy medium” position that provides sufficient eye relief in all shooting positions.
Ryan has an interesting method for leveling a rail-mounted, flat-bottomed scope (i.e. one with a flat surface under the turret housing). He simply inserts a small metal bar between rail and scope, and aligns the straight edges along the bottom of the scope turret housing with the flats on the rail (see photo). Watch how he does this on the video — it’s pretty clever. One other highlight of the video is the segment where Ryan shows how to adjust the ocular on his Leupold scope to provide the best (sharpest) image of the reticle. Ocular/reticle adjustment is covered in minutes 11:00-13:00 of the video.
The video has some faults. Some of the advice, such as “always mount the scope as low as possible” is counter-productive for benchrest shooters who want to keep their heads OFF the stock. In addition, Ryan does not explain that, with a variable power scope, proper eye relief may change considerably with the level of magnification. If you have an 8-32X scope, for example, you can set everything up perfectly for 8X magnification, only to find that you need a LOT more eye relief at 32X. We recommend positioning the scope so it provides sufficient eye relief at the highest magnification you regularly use.
While many folks enjoy the convenience of an electronic powder scale/dispenser such as the RCBS Chargemaster, some hand-loaders still prefer to use a traditional balance beam. Balance beam scales are simple, compact, and don’t suffer from electronic “glitches”. Morever, even if you use a digital dispenser at home, when you’re doing load development at the range, a balance-beam scale may be more convenient. A scale doesn’t require electrical power, so you don’t need to bring battery packs or string long power cables. Just bring some kind of box to shelter your beam scale from the wind.
While designs like the RCBS 10-10 are decent performers as built, they can be made much more precise (and repeatable), by “tuning” of key parts. Forum member Scott Parker optimizes a variety of popular beam scales, including the Ohaus 10-10 (USA-made model), RCBS 10-10 (USA-made model), RCBS 5-10, Lyman M5, Lyman D5, and others. You send Scott your scale, he tunes the key components, tests for precision and repeatability, and ships it back to you. The price is very affordable ($65.00 including shipping in USA).
Scott tells us: “I have tuned several 10-10s. They all have turned out very sensitive, consistent and hold linearity like a dream. If only they came that way from the factory. The sensitivity after tuning is such that one kernel of powder registers a poise beam deflection. For repeatability, I remove the pan and replace it for the zero 10 times. The zero line and the poise beam balance line must coincide for each of those 10 tries. I then set the poises to read 250.0 grains. I remove and replace the pan 10 times with the calibration weight. For linearity, the poise beam balance line and the zero line should coincide within the line width. This is roughly one half a kernel of powder. For repeatability, the poise beam balance line must return to that same balance point ten times. I then adjust the poises back to zero and recheck the zero. I have a master’s degree in chemistry, thus I am very familiar with laboratory balances. Email me at vld223 [at] yahoo.com or give me a call at (661) 364-1199.”
The video above, created by British shooter Mark (aka 1967spud), shows a 10-10 beam scale that has been “tuned” by Scott Parker. In the video, you can see that the 10-10 scale is now sensitive to one (1) kernel of powder. Mark also demonstrates the’s scale’s repeatability by lifting and replacing a pan multiple times. You can contact Mark via his website, www.1967spud.com. To enquire about balance-beam scale tuning, call Scott Parker at (661) 364-1199, or send email to: vld223 [at] Yahoo.com.
Video tip from Boyd Allen. We welcome reader submissions.
TECH TIP by Robert Whitley,AR-X Enterprises LLC
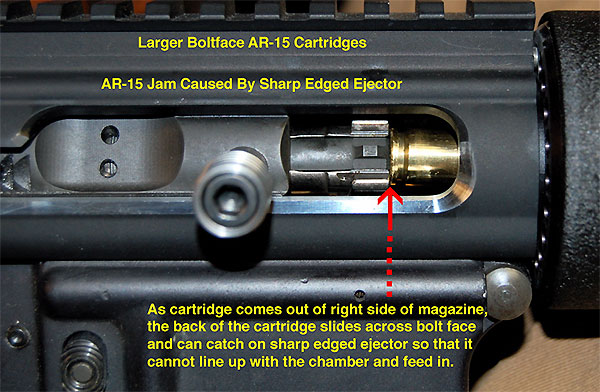
Over the years, while working with various AR-15 cartridges that require a larger bolt-face bolt (i.e. bigger than a 5.56 NATO/.223 Rem bolt-face, like those cartridges that use a 6.8 SPC bolt or the bolt face suitable for the 6.5 Grendel-based cartridges), I have found that there is an increased potential for a certain type of jam if a modification to the standard “Mil-Spec”, square-edged ejector is not made.
The original AR-15 square-edged ejector design was made for a much smaller-diameter bolt face and the smaller diameter 5.56 NATO/.223 Rem case, and it works perfectly in that application. However, as people have adapted the AR-15 platform to shoot bigger cartridges, some parts have been modified to accept the larger cartridges (i.e. bigger bolt-face bolts for the 6.8 SPC and the 6.5 Grendel, and different extractors), yet other parts have been all but ignored. One of these “ignored” parts has been the ejector. Most of the larger-bolt-face AR-15 bolts still use the standard “Mil-Spec”, square-edged 5.56 NATO/.223 Rem. ejector. That’s the problem. But there is a simple, reliable fix!
Chamfering AR Ejector for Improved Reliablity with 6mm, 6.5mm and 6.8mm Cartridges
With the larger bolt face and the larger-diameter AR cases, the old-style “Mil-Spec” ejector can cause infrequent but still annoying jams if the ejector is not modified. The jam can occur when a cartridge case feeds up and out of the right side of the magazine, and as it does so, the back of the case must slide across the bolt face and sideways over top of the ejector if it is to center up to the chamber and feed in. If the side of the case catches on the sharp-edged ejector you can get a jam. (See picture above).
Fortunately there is an easy fix for this. One way is to take the ejector out and spin it in a lathe or cordless drill and machine or grind it and round or chamfer the sharp edge. (See picture of rounded ejector next to square edged ejector).
Quick Fix Alternative — Bevel Your Ejector
Another “quick fix” is to leave the ejector in the bolt and chamfer the sharp edge with something like a Dremel tool. (See picture). This fix is easy to do and permanently resolves this potential feeding jam issue. There are no downsides to this modification if done right and I would recommend this modification for the ejectors in all larger bolt-face AR-15 bolts.
This gunsmithing tip provided by Robert Whitley of AR-X Enterprises LLC, 199 North Broad Street, Doylestown, PA 18901. Phone: (215) 348-8789. Website: 6mmAR.com.
Anschütz now has its own importation hub in the USA. This new facility, located in Trussville, Alabama, will operate as a direct extension of the parent company, J.G. ANSCHÜTZ GmbH & Co.KG of Germany. Having its own importation facility will help Anschütz supply rifles to the American market more efficiently. Steven Boelter, President of Anschütz North American (NA) operations, tells us that that the new Alabama facility will allow Anschütz to import a wider range of products and carry a larger standing inventory. That’s good for rimfire and air rifle customers.
The new importation/distribution center will soon be supported by an in-house Anschütz service center that will handle warranty repairs and custom upgrades. This will offer Anschütz after-sales service for all company products, as well as warranty support, repairs, spare parts, and tech info. (This new service center will operate as an adjunct to other existing target and air rifle service centers within the USA.) Learn more about the soon-to-be launched service center at www.anschutznorthamerica.com.
Anschütz NA does not sell directly to consumers, but if you are interested in a particular Anschütz product, you can contact the Anschütz’s staff in Alambama. They will answer your questions or connect you with a current Anschütz dealer. The established Anschütz distribution chain and main dealer network in the US will continue to operate as before.
Anschütz North America www.anschutznorthamerica.com
7661 Commerce Lane
P.O. Box 129
Trussville, AL 35173-2837
Phone: 205-655-7500
In response to a Bulletin article about Protective Eyewear, one of our Canadian readers posted a personal story. His account demonstrates the importance of wearing eye protection whenever you shoot — no matter what type of firearm you are using — even air rifles. We hope all our readers take this to heart. All too often at rifle matches we see shooters, even some top competitors, risking their vision by failing to wear eye protection.
Eye Protection — Lesson Learned by Nicholas from Canada
As a boy on a mixed farm on the plains the first shooting stick I owned was a Red Ryder BB gun. My Dad bought it for me as I showed a keen interest in the shooting and hunting sports. I was about 9 years old at the time.
We had literally thousands of sparrows in our large farm yard and they liked to roost on the steel railings in the barn loft. I took to slowly thinning out their ranks by flashlight at night as these little winged pests settled in the farm buildings.
One evening as I slayed sparrow after sparrow in the barn loft — with about a dozen farm cats following me to consume these easy meals, I fired at another bird centered in my flashlight beam.
However, my aim was a bit low — and the copper pellet hit the steel beam square on. Instantly I felt a sharp pain as the BB bounced back and hit me squarely between the eyes on the bridge of my nose – drawing blood from the partial penetration into the skin. A half inch either way and I’d have lost an eye!
Never, never, never shoot at any target with a steel background with any firearm, even a BB gun – is the hard lesson I learned, and wear the best shooting glasses that money can buy!
PLEASE REMEMBER THAT!!
Editor’s Comment: Among competitive pistol shooters, the use of safety eyewear is universal. You’ll never see Rob Leatham, Julie Golob, or Jerry Miculek competing without eye protection — for good reason. The handgun sports’ governing bodies effectively enforce mandatory eye protection policies. We wish the same could be said for competitive rifle shooting. We often see benchrest, High Power, and F-Class competitors shooting without eye protection. We’ve heard all the excuses, yet none of them trump the safety considerations involved.
We recommend that all shooters and hunters employ eye protection whenever they use firearms or are at a location where live fire is taking place. You only have two eyes. A tiny bullet fragment or ricochet is all it takes to cause permanent blindness in one or both eyes. As rifle shooters, we place our eyes a couple inches away from a combustion chamber operating at pressures up to 70,000 psi. I know quite a few guys who will religiously put on safety glasses when running a lathe or a drill press, yet the same guys won’t use eye protection when shooting their rifles — simply because it is “inconvenient”. That’s nuts. It doesn’t matter is you are a cub scout or a multi-time National Champion — you should wear eye protection.
Be wise — protect your eyes. To learn more about eyewear safety standards, and to learn about the latest options in ANSI Z87-certified protective eyewear, read our article on Eye Protection for Shooters.
Can you form a wildcat cartridge such as the 6 Dasher without expending primer, powders, and bullets? Absolutely. Using the hydro-forming method you can form improved cases in your workshop with no firing whatsoever, so there is no wear on your precious barrel. Watch this video to see how it’s done:
6 Dasher Case Hydro-Forming Demonstration:
Forum member Wes J. (aka P1ZombieKiller) has produced a helpful video showing how to form Dasher cases use the Hornady Hydraulic forming die kit. This includes a two-part die (body and piston), and a special shell holder. To form the case, you insert a primer in your virgin brass, top the case off with with a fluid (water or alcohol), then run the case up into the Hydro-forming die. A few stout whacks with a hammer and your case is 95% formed.
Hydro-Forming Procedure Step-by-Step:
1. Insert spent primer in new 6mmBR brass case.
2. Fill with water or alcohol (Wes prefers alcohol).
3. Wipe excess fluid off case.
4. Place case in special Hornady shell-holder (no primer hole).
5. Run case up into Hydraulic forming die.
6. Smack top piston of forming die 3-4 times with rubber mallet or dead-blow hammer.
7. Inspect case, re-fill and repeat if necessary.
8. Drain alcohol (or water) into container.
9. Remove primer (and save for re-use).
10. Blow-dry formed case. Inspect and measure formed case.
Wes achieves very uniform cartridge OALs with this method. He measured ten (10) hydro-formed 6 Dasher cases and got these results: two @ 1.536″; 2 @ 1.537″; and 6 @ 1.538″.
Three or Four Whacks Produces a 95%-Formed Case
With a Hornady hydro-forming die, hydraulic pressure does the job of blowing out the shoulders of your improved case. The process is relatively simple. Place a spent primer in the bottom of a new piece of brass. Fill the case with water, and then slip it into a special Hornady shell-holder with no hole in the middle. Then you run the case up into the forming die. Now comes the fun part. You gently insert a plunger (hydraulic ram) from the top, and give it three or four stiff whacks with a mallet (or better yet, a dead-blow hammer). Remove the plunger and you have a 95% formed case, ready to load.
Hornady supplies a shell holder made specifically for the hydro die; there’s no hole in the bottom of it. Just insert a spent primer into the primer pocket and you’re ready to go. The spent primer combined with the solid shell holder, keeps the water from seeping out of the primer pocket. The primer pushes out a little bit during this process, but it’s impossible for it to come out because of the way the shell holder is designed. The shell holder has a grove which allows the case to slide out of the shell holder even when the primer protrudes a bit.
Story tip from Body Allen. We welcome reader submissions.
Muzzle brakes are controversial. Some people swear by them, while others swear at them. Still, there’s no question that a good brake can reduce felt recoil up to 45%. And likewise, the best brakes, when installed properly, seem to have no negative effect on accuracy.
Roy Bertalotto has done considerable experimentation with muzzle brakes, testing dozens of brake designs on his own rifles over the past few years. Roy’s article, Adventures with Muzzle Brakes, discusses various aspects of muzzle brake design and performance. Roy doesn’t claim that his testing is definitive, but his article is definitely worth a read. Here are some of Roy’s interesting findings:
Exit Hole Diameter
“Best accuracy and effectiveness of the brake was obtained with a hole .020″ over bullet diameter. If the exit hole is too small, such as +.005″ over bullet diameter, accuracy suffers. If the depth of the exit hole is too shallow, the metal around the hole will erode very quickly.”
Hole Placement
“The most effective braking was with a brake 1″ in diameter with a 3/4″ exit hole on each side, just in front of the muzzle. The bullet passes through a cone of 35 degrees before it exits the brake. (Like the tank example), Incredible reduction of recoil. But loud and ugly. Very easy to make since you don’t need a spin fixture or a dividing head.”
Bottom Gas Venting Helps Accuracy
“In my tests, not having holes all around the brake effects accuracy a bit. I believe it does something to the bullet by the air pushed ahead of the bullet creating unequal turbulence in the bullet path. I’ve tried a few brakes where I drilled only holes on the top, test fired, and then completed holes on the bottom and in every case, accuracy improved.” Below are spiral-ported brakes crafted by Clay Spencer.
Brakes Work Best with High-Pressure Cartridges
“The higher the pressure of the particular round, the more effective the brake. I have over 20 rifles with brakes. The 220 Swift is the king of reduction. Followed very closely by the 25-06, 6mm Remington, any Weatherby small bore. With a proper brake and a hot handload under a 40 gr bullet, the Swift will move 1/2″ to the rear and 0 muzzle rise! Big boomers with low pressure like 45-70s and shot guns benefit the least.” [Editor’s Note: Roy is judging effectiveness by the percentage of recoil reduction rather than absolute levels of recoil. Obviously if you start with a heavier-recoiling round, the absolute amount of recoil energy reduction is greater. Roy is really talking about efficiency–brakes are most efficient when used with high-pressure cartridges.]
Installation is Key to Accuracy
Roy’s findings are fascinating and suggest that further study of muzzle brakes is warranted. But we can all agree that precision installation of the brake is essential for accuracy. A poorly-installed, mis-aligned brake will degrade accuracy, that is well-known.
Harrell’s Precision has made thousands of muzzle brakes, in many styles and port arrangements. The Harrell brothers offer some good advice for gunsmiths installing brakes: “Muzzle brakes aren’t magic, they reduce recoil by redirecting exiting gas. What’s important is that they are straight and the threads are perpendicular with the base. The only way to get the base and threads perpendicular is to thread, not tap, them on a lathe.”
Commentary by Robert Whitley
In recent years several major firearms component suppliers have promoted the idea of the “do-it-yourself” AR-15 build up. In one sense this is a good thing because it promotes peoples’ education and understanding of firearms, but the down side of this is some folks are assembling and modifying AR-15s without an understanding of the rifle and without the necessary skills and tools to do things properly. The net result of this “do-it-yourself” work can be an AR-15 that is non-functional, problematic or dangerous. Here are two examples of common issues with “do-it-yourself” modifications.
Opening Up the Ejection Port
One common modification for AR-15’s is the opening up of the ejection port. This is typically done to permit more room for ejection or loading of the rifle, and it is also typically done in conjunction with a side charging handle modification.
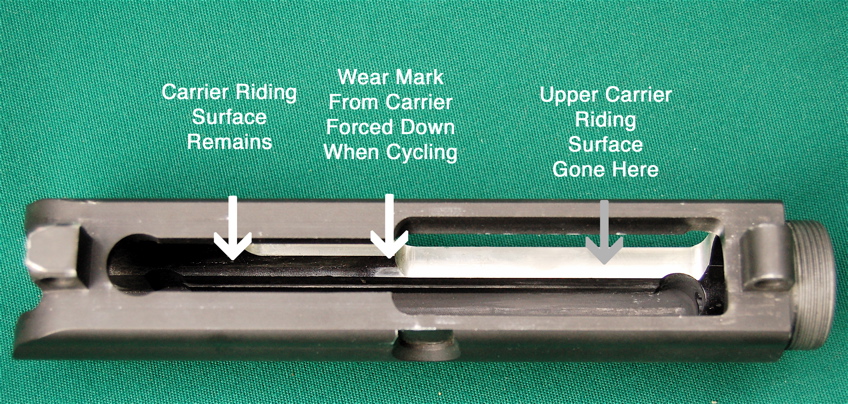
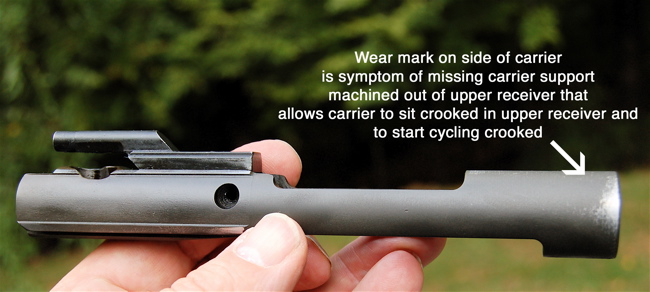
A common issue I have seen with this modification is that the person opening up the port removes the upper right hand carrier support and riding surface. The net result of this is that the carrier sits loose in the upper receiver when the bolt is in lock-up and this can have very detrimental effects on the function and accuracy of the AR-15. Below are more pictures of one that I saw recently.
Wrong Buffer Installed
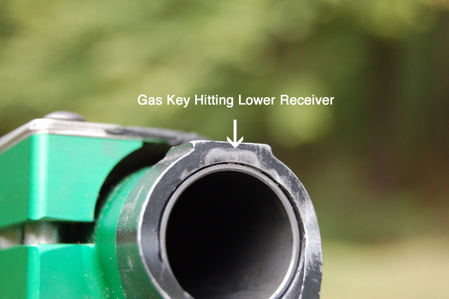
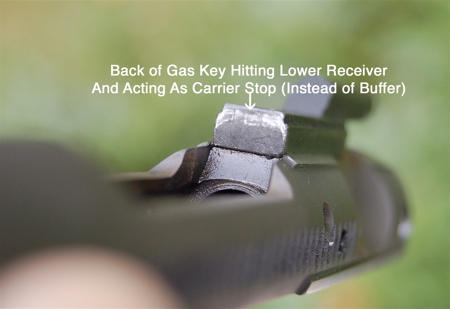
Another common mistake is the use of an improper buffer with the rifle (i.e. like using a carbine buffer in a standard rifle length buffer tube). There are many after market buffers being sold out there, but if the wrong buffer is used with the rifle, it can allow the bolt carrier to cycle too far back so that the rear of the carrier gas key becomes the stop for the carrier (i.e. when it smashes into the upper part of the lower receiver – OUCH!).
We have even seen situations where the gas key is snapped right off the carrier from this, and it completely disables the rifle and can also cause extensive damage to the firearm as well. Unfortunately we have seen this situation far too often and it is clear that a person needs to fully understand how the buffer assembly works if “do-it-yourself” work is going to be done to the buffer assembly, since everything done to the buffer assembly has an effect on the rifle, its function and accuracy.
While I applaud the person who is self-reliant and has a “can do” attitude, the other side of this is when it comes to a firearm, “do-it-yourself” work should only be done when and if one fully understands the rifle and how it functions and how the work will affect the rifle.
Robert Whitley
AR-X Enterprises, LLC
199 North Broad Street
Doylestown, PA 18901
(215) 348-8789 www.6mmAR.com
Want to shoot better scores at your next match? Here’s a smart, inexpensive do-it-yourself project from the good folks at Criterion Barrels. For less than one dollar in materials, in just a few minutes you can create a handy, effective mirage shield, custom-fitted to your favorite rifle.
All precision shooters should be familiar with mirage, a form of optical distortion caused primarily by variations in air temperature. Savvy shooters will use mirage as a valuable tool when gauging wind speed and direction. Natural mirage is unavoidable, but there are many techniques designed to limit its influence in long-range marksmanship.
A form of mirage can be produced by the barrel itself. Heat rising from the barrel may distort sight picture through your optics, leading to erratic results. Mirage caused by barrel heat can be reduced dramatically by a simple, light-weight mirage shield.
How to Make a Mirage Shield
A mirage shield is an extremely cost-effective way to eliminate a commonly-encountered problem. Making your own mirage shield is easy. Using old venetian blind strips and common household materials and tools, you can construct your own mirage shield for under one dollar.
Materials Required:
1. Vertical PVC Venetian blind panel
2. Three 1”x1” pieces adhesive-backed Velcro
3. Ruler or tape measure
4. Scissors or box cutter
5. Pencil or marker
1. Measure the distance from the end of the receiver or rail to the crown of the barrel.
2. Using a pencil and ruler, measure the same distance and mark an even line across the blind.
3. Cut across the line using scissors or a box cutter, shortening the blind to the required length. (Remember, measure twice, cut once!)
4. Expose the adhesive backing on the loop side of the Velcro. Center and apply the Velcro strips on the barrel at regular intervals.
5. Expose the adhesive backing of the fuzzy side of the Velcro.
6. Place the blind on the upper side of the barrel. Apply downward pressure. Once the Velcro has secured itself to the barrel, separate the two sides. Proceed to mold both sides of the Velcro to fit the contour of their respective surfaces.
7. Reaffix the blind. Barrel related mirage is now a thing of the past!
How to Remove and Re-Attach the Mirage Shield
Removal of your mirage shield is accomplished by simply removing the blind. You can un-install the Velcro by pulling off the strips and then gently removing any adhesive residue left behind using an appropriate solvent. (Simple cooking oil may do the job.) Caution: With fine, high-polish blued barrels, test any solvent on a non-visible section of the barrel. Before storing the gun, re-oil the barrel to remove active solvents and residual fingerprints.


Momentive Performance Materials
 The
The 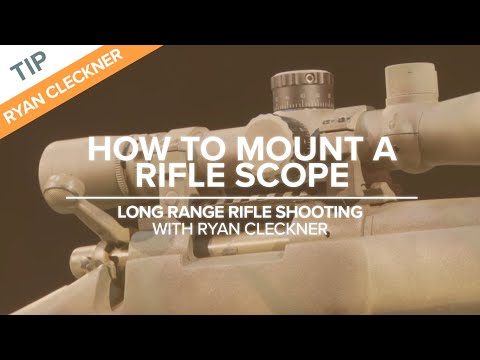



 In response to a Bulletin article about
  Eye Protection — Lesson Learned
 Editor’s Comment: Among competitive pistol shooters, the use of safety eyewear is universal. You’ll never see Rob Leatham, Julie Golob, or Jerry Miculek competing without eye protection — for good reason. The handgun sports’ governing bodies effectively enforce mandatory eye protection policies. We wish the same could be said for competitive rifle shooting. We often see benchrest, High Power, and F-Class competitors shooting without eye protection. We’ve heard all the excuses, yet none of them trump the safety considerations involved.
 Hydro-Forming Procedure Step-by-Step:
 Hornady supplies a shell holder made specifically for the hydro die; there’s no hole in the bottom of it. Just insert a spent primer into the primer pocket and you’re ready to go. The spent primer combined with the solid shell holder, keeps the water from seeping out of the primer pocket. The primer pushes out a little bit during this process, but it’s impossible for it to come out because of the way the shell holder is designed. The shell holder has a grove which allows the case to slide out of the shell holder even when the primer protrudes a bit.