|
|
July 1st, 2014
 A while back, Sinclair International’s Reloading Press Blog featured a “round-table” discussion of reloading techniques. Sinclair’s team of tech staffers were asked: “What do you feel is the one-most crucial step in precision reloading?” A while back, Sinclair International’s Reloading Press Blog featured a “round-table” discussion of reloading techniques. Sinclair’s team of tech staffers were asked: “What do you feel is the one-most crucial step in precision reloading?”
Here are their responses (along with comments from our Editors):
Phil Hoham: “I feel that when working up a load do not go too high or too low in your powder charge. Stay away from “suggested loads” you hear at the range, or on the internet. Always be sure to use a published reloading manual that presents not only minimums and maximums, but also pressure, velocity, and a proper range of powders used. Do not get distracted in the reloading process, and remain focused at all times during each step involved.”
AccurateShooter.com: Some loads presented on the Internet are OK as a starting point, but it is absolutely critical to understand that pressure maximums will vary considerably from one rifle to another (of the same chambering). For example, one 6mmBR rifle shooting 105gr bullets can max out with 30.0 grains of Varget powder, while another rifle, with the same chamber dimensions, but a different barrel, could tolerate (and perform better) with half a grain more powder. You need to adjust recommended loads to your particular rifle and barrel.

Pete Petros: “This could be a very broad topic, but if I were to pick one, it would be making sure to pay close attention, and weigh each and every powder charge to ensure that each load is exact and consistent. This is important not only for accuracy, but also for safety reasons.”
AccurateShooter.com: If you’re shooting beyond 200 yards, it is critical to weigh your loads with an accurate scale. Loads that are uniform (within a few kernels) will exhibit lower Extreme Spread and Standard Deviation. And remember, even if you stick with the same powder, when you get a new powder lot, you may have to adjust your load quite a bit. For example, .308 Palma shooters have learned they may need to adjust Varget loads by up to a full grain from one lot of Varget to the next.
Ron Dague: “I feel that the most important step(s) in reloading for accuracy are in the initial case prep. Uniforming the primer pocket to the same depth to ensure consistency in primer seating is a crucial step. Additionally de-burring the flash holes, each in the same way to clean up and chamfer the inside is important. It ensures that the ignition from the primer is uniform and flows out in the same consistent pattern. Doing so will create uniform powder ignition and tighten up your velocity Extreme Spread.”
AccurateShooter.com: With some brands of brass, primer pocket uniforming and flash-hole deburring is useful. However, with the best Lapua, Norma, and RWS brass it may be unnecessary, or worse, counter-productive. So long as your Lapua brass flash-holes are not obstructed or smaller than spec, it may be best to leave them alone. This is particularly true with the small flash holes in 220 Russian, 6BR, and 6.5×47 cases. MOST of the flash-hole reaming tools on the market have cutting bits that vary in size because of manufacturing tolerances. We’ve found tools with an advertised diameter of .0625″ (1/16″) that actually cut an 0.068″ hole. In addition, we are wary of flash-hole deburring tools that cut an aggressive inside chamfer on the flash-holes. The reason is that it is very difficult to control the amount of chamfer precisely, even with tools that have a depth stop.
Rod Green: “I feel that bullet seating is the most important step. If you had focused on making sure all prior steps (case prep, powder charge, etc.) of the process have been carefully taken to ensure uniformity, bullet seating is the last step, and can mean all the difference in the world in terms of consistency. Making sure that the bullet is seated to the same depth each time, and time is taken to ensure that true aligned seating can make the load.”
Bob Blaine: “I agree with Rod. I strongly feel that consistent bullet seating depth is the most important step in creating the most accurate hand loads. I have seen the results in both my bench and long range rifles. Taking the time to ensure exactness in the seating process is by far, the number one most important step in my book.”
AccurateShooter.com: Agreed. When loading match ammo, after bullet seating, we check every loaded round for base of case to ogive length. If it varies by more than 3 thousandths, that round is segregated or we attempt to re-seat the bullet. We measure base of case to bullet ogive with a comparator mounted on one jaw of our calipers. You may have to pre-sort your bullets to hold the case-base to ogive measurement (of loaded rounds) within .003″.
June 1st, 2014
When we first ran this story a while back, it generated great interest among readers. By popular request, we’re reprinting this story, in case you missed it the first time around. — Editor
 Precision shooters favor premium brass from Lapua, Norma, or RWS. (Lake City also makes quality brass in military calibers.) Premium brass delivers better accuracy, more consistent velocities, and longer life. Shooters understand the importance of good brass, but many of us have no idea how cartridge cases are actually made. Here’s how it’s done. Precision shooters favor premium brass from Lapua, Norma, or RWS. (Lake City also makes quality brass in military calibers.) Premium brass delivers better accuracy, more consistent velocities, and longer life. Shooters understand the importance of good brass, but many of us have no idea how cartridge cases are actually made. Here’s how it’s done.
The process starts with a brass disk stamped from strips of metal. Then, through a series of stages, the brass is extruded or drawn into a cylindrical shape. In the extrusion process the brass is squeezed through a die under tremendous pressure. This is repeated two or three times typically. In the more traditional “draw” process, the case is progressively stretched longer, in 3 to 5 stages, using a series of high-pressure rams forcing the brass into a form die. While extrusion may be more common today, RWS, which makes some of the most uniform brass in the world, still uses the draw process: “It starts with cup drawing after the bands have been punched out. RWS cases are drawn in three ‘stages’ and after each draw they are annealed, pickled, rinsed and subjected to further quality improvement measures. This achieves specific hardening of the brass cases and increases their resistance to extraordinary stresses.” FYI, Lapua also uses a traditional draw process to manufacture most of its cartridge brass (although Lapua employs some proprietary steps that are different from RWS’s methods).

Deep-Draw Ram Illustration from Demsey Mfg.

After the cases are extruded or drawn to max length, the cases are trimmed and the neck/shoulder are formed. Then the extractor groove (on rimless cases) is formed or machined, and the primer pocket is created in the base. One way to form the primer pocket is to use a hardened steel plug called a “bunter”. In the photos below you see the stages for forming a 20mm cannon case (courtesy OldAmmo.com), along with bunters used for Lake City rifle brass. This illustrates the draw process (as opposed to extrusion). The process of draw-forming rifle brass is that same as for this 20mm shell, just on a smaller scale.


River Valley Ordnance explains: “When a case is being made, it is drawn to its final draw length, with the diameter being slightly smaller than needed. At this point in its life, the head of the draw is slightly rounded, and there are no provisions for a primer. So the final drawn cases are trimmed to length, then run into the head bunter. A punch, ground to the intended contours for the inside of the case, pushes the draw into a cylindrical die and holds it in place while another punch rams into the case from the other end, mashing the bottom flat. That secondary ram holds the headstamp bunter punch.

The headstamp bunter punch has a protrusion on the end to make the primer pocket, and has raised lettering around the face to form the headstamp writing. This is, of course, all a mirror image of the finished case head. Small cases, such as 5.56×45, can be headed with a single strike. Larger cases, like 7.62×51 and 50 BMG, need to be struck once to form a dent for the primer pocket, then a second strike to finish the pocket, flatten the head, and imprint the writing. This second strike works the brass to harden it so it will support the pressure of firing.”
Thanks to Guy Hildebrand, of the Cartridge Collectors’ Exchange, OldAmmo.com, for providing this 20mm Draw Set photo. Bunter photo from River Valley Ordnance.
May 30th, 2014
See Results of Anti-Corrosion Product Test in Video
YouTube Link: http://youtu.be/uOB5eCReAQY
What anti-corrosion products really fight rust effectively? You’ll hear many opinions, but what do actual field tests reveal? One rifle shooter, who posts on YouTube as BlueonGoldZ, wanted to separate myth (and marketing claims) from reality, so he completed his own long-term rust test using metal samples. First he used ordinary tap water spray, and then he did a second, longer-duration test with a salt-spray solution. Nine different products were tested: Break Free CLP, Corrosion-X, Frog Lube, M-Pro 7, Outers, Pro-Shot Zero Friction, Rem Oil, Slip 2000, and Tetra Gun Triple Action CLP.

BlueonGoldZ initially examined each product for its “beading” properties with a normal tap water spray. But the main test involved many multiple weeks of exposure after a “dense” salt-water spray. (No rust formed after two weeks tap water exposure, so the test was accelerated with salt-water exposure).

The clear winners in the test, as shown by the screen shot above, were Corrosion-X (Best), and Frog-Lube (Second Best). The photo shows the test samples two weeks after being sprayed with salt water. The results are pretty dramatic — you can see with your own eyes what happened. We think this is a very useful bit of real-world research.
Results from Similar Long-Term Salt Exposure Test
Unfortunately, BlueonGoldZ’s test did NOT include Eezox, which we have found to be extremely effective (on a par with Corrosion-X). In another long-term test of corrosion preventatives, the two best rust fighters were Eezox and Corrosion-X in that order. Since that test was completed, Corrosion-X, already an excellent product, has been enhanced. CLICK HERE for Long-Term Salt Exposure Test Report.

May 28th, 2014
 While attending the CA Long Range Championship a while back, we had the opportunity to test the performance of a high-magnification (63X) spotting scope in near-ideal conditions (maybe the best I’ve ever witnessed). On the event’s last day we arrived at 5:45 am, literally as the sun was cresting the horizon. I quickly deployed our Pentax PF-100ED spotting scope, fitted with a Pentax SMC-XW 10mm fixed-power eyepiece. When used with the 100mm Pentax scope, this 10mm eyepiece yields 63X magnification. Befitting its $359.00 price, this eyepiece is extremely clear and sharp. While attending the CA Long Range Championship a while back, we had the opportunity to test the performance of a high-magnification (63X) spotting scope in near-ideal conditions (maybe the best I’ve ever witnessed). On the event’s last day we arrived at 5:45 am, literally as the sun was cresting the horizon. I quickly deployed our Pentax PF-100ED spotting scope, fitted with a Pentax SMC-XW 10mm fixed-power eyepiece. When used with the 100mm Pentax scope, this 10mm eyepiece yields 63X magnification. Befitting its $359.00 price, this eyepiece is extremely clear and sharp.
At the crack of dawn, viewing conditions were ideal. No mist, no mirage, no wind. The first thing this Editor noticed was that I could see metal nail heads on the target boards. That was astonishing. As soon as the first practice targets went up, to my surprise, I could see 6.5mm, 7mm, and 30-caliber bullet holes in the white at 1000 yards.
That’s right, I could see bullet holes at 1000. I know many of you folks may not believe that, but there was no mistaking when I saw a 7mm bullet cut the white line separating the Nine Ring and Eight Ring on the target in view. (I was watching that target as the shot was fired and saw the shot-hole form). And when I looked at the 30-cal targets, the bullet holes in the white were quite visible. In these perfect conditions I could also make out 3/8″ bolt heads on the target frames.

The Human Factor
When viewing the bullet holes, I was using my left naked eye (no safety glasses or magnification). I also had a contact lens in my right eye (needed for distance vision). To my surprise, while I could see the bullet holes without much difficulty with my left eye, things were fuzzier and slightly more blurry with the right eye, even when I re-focused the scope.
 Then I invited 3 or 4 shooters to look through the scope. One younger guy, with good eyes, said immediately: “Yeah, I can see the holes — right there at 4 o’clock and seven o’clock. Wow.” Some older guys, who were wearing glasses, could not see the holes at all, no matter what we did to the scope’s main focus and diopter adjustment. Then I invited 3 or 4 shooters to look through the scope. One younger guy, with good eyes, said immediately: “Yeah, I can see the holes — right there at 4 o’clock and seven o’clock. Wow.” Some older guys, who were wearing glasses, could not see the holes at all, no matter what we did to the scope’s main focus and diopter adjustment.
The lesson here — if you have to wear glasses or corrective contact lenses, just that extra bit of optical interference may make a difference in what you can see through the scope. Basically anything that goes between the scope eyepiece and your eyeball can degrade the image somewhat. So… you may be better off removing your glasses if you can still obtain good focus sharpness using the diopter adjustment and focus ring. I did the left vs. right eye test a half dozen times, and I could definitely see small features at 1000 yards with my naked eye that I could not see with my right eye fitted with a contact lens. (I did have to re-focus the scope for each eye, since one had a corrective lens while the other did not.)
Mirage Degrades Image Sharpness and Resolution
The “magic light” prevailed for only an hour or so, and then we started to get some mirage. As soon as the mirage appeared I was no longer able to see raw bullet holes, though I could still easily see black pasters on the black bulls. When the mirage started, the sharpness of the visible image degraded a huge amount. Where I could see bullet holes at dawn, by mid-morning I could barely read the numbers on the scoring rings. Lesson: If you want to test the ulimate resolution of your optics, you need perfect conditions.
 Chromatic Aberration Revealed Chromatic Aberration Revealed
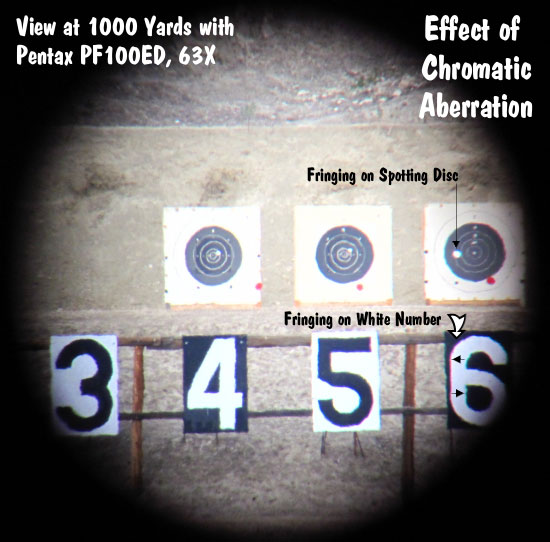
As the light got brighter and the mirage increased I started to see blue and red fringing at the edges of the spotting disk and the large numerals. This was quite noticeable. On one side of the bright, white spotting disc you could see a dark red edge, while on the other side there was a blue edge (harder to see but still present).
The photo below was taken through the Pentax spotter lens using a point and shoot camera held up to the eyepiece. The sharpness of the Pentax was actually much better than this photo shows, but the through-the-lens image does clearly reveal the red and blue fringing. This fringing is caused by chromatic aberration — the failure of a lens to focus all colors to the same point. Chromatic aberration, most visible at high magnification, causes different wavelengths of light to have differing focal lengths (see diagram). Chromatic aberration manifests itself as “fringes” of color along boundaries that separate dark and bright parts of the image, because each color in the optical spectrum cannot be focused at a single common point on the optical axis. Keep in mind that the Pentax does have “ED” or low-dispersion glass, so the effect would be even more dramatic with a cheaper spotting scope.
If you wonder why top-of-the-line spotting scopes (such as the $3900 Leica APO-Televid 82) cost so much, the answer is that they will deliver even LESS chromatic aberration at long range and high magnification. With their exotic apochromatic (APO), ultra-low-dispersion glass, a few ultra-high-end spotting scopes can deliver an image without the color edging you see in the photo above.
The Pentax PF-100ED is a heck of a spotting scope. Any scope that can resolve bullet holes at 1000 yards is impressive. But if you want the ultimate in optical performance, with minimal chromatic aberration, you may need to step up to something like the 88mm Kowa Prominar TSN-883 with Flourite Crystal lenses ($2450.00 body only), or the 82mm Leica APO ($3899.00 with 25-50X eyepiece).
EDITOR’s NOTE: The purpose of this report is to show what is possible… in IDEAL conditions. With this Pentax 100mm, as well as a Swarovski 80mm, we have often been able to resolve 6mm bullet holes at 600 yards. But again, that performance requires really good viewing conditions. By 10:00 am at my range, even with the 100mm Pentax at 75 power, seeing 6mm bullet holes is “iffy” at best. So don’t go out and mortgage the house to buy a $4000 optic with the hope that you’ll be able to spot your shots at 1000 yards. If conditions are anything less than perfect, you’ll be lucky to see bullet holes at 500 yards. The real solution for very long-range spotting is to set up a remote target cam that broadcasts a video picture to a screen at your shooting station.
May 21st, 2014
There is nothing more frustrating (or embarassing) than sending a live round into your expensive new chronograph. As the photo below demonstrates, with most types of chronographs (other than the barrel-hung Magnetospeed), you can fatally injure your expensive chrono if it is not positioned precisely.

 When setting up a chrono, we always unload the rifle, remove the bolt and bore-sight to ensure that the path of the bullet is not too low. When bore-sighting visually, set up the rifle securely on the sandbags and look through the bore, breech to muzzle, lining up the barrel with your aim point on the target. Then (during an appropriate cease-fire), walk behind the chronograph. Looking straight back through the “V” formed by the sky-screens, you should be able to see light at the end of the barrel if the gun is positioned correctly. You can also use an in-chamber, laser bore-sighter to confirm the visual boresighting (see photo). When setting up a chrono, we always unload the rifle, remove the bolt and bore-sight to ensure that the path of the bullet is not too low. When bore-sighting visually, set up the rifle securely on the sandbags and look through the bore, breech to muzzle, lining up the barrel with your aim point on the target. Then (during an appropriate cease-fire), walk behind the chronograph. Looking straight back through the “V” formed by the sky-screens, you should be able to see light at the end of the barrel if the gun is positioned correctly. You can also use an in-chamber, laser bore-sighter to confirm the visual boresighting (see photo).

Adjust the height, angle and horizontal position of the chronograph so the bullet will pass through the middle of the “V” below the plastic diffusers, no less than 5″ above the light sensors. We put tape on the front sky-screen supports to make it easier to determine the right height over the light sensors.
Use a Test Backer to Confirm Your Bullet Trajectory
You can put tape on the support rods about 6″ up from the unit. This helps you judge the correct vertical height when setting up your rifle on the bags. Another trick is to hang a sheet of paper from the rear skyscreen and then use a laser boresighter to shine a dot on the paper (with the gun planted steady front and rear). This should give you a good idea (within an inch or so) of the bullet’s actual flight path through the “V” over the light sensors. Of course, when using a laser, never look directly at the laser! Instead shine the laser away from you and see where it appears on the paper.

Alignment of Chronograph Housing
Make sure the chrono housing is parallel to the path of the bullet. Don’t worry if the unit is not parallel to the ground surface. What you want is the bullet to pass over both front and rear sensors at the same height. Don’t try to set the chrono height in reference to the lens of your scope–as it sits 1″ to 2″ above your bore axis. To avoid muzzle blast interference, set your chronograph at least 10 feet from the end of the muzzle (or the distance recommended by the manufacturer).

Rifles with Elevated Iron Sights
All too often rookie AR15 shooters forget that AR sights are positioned roughly 2.4″ above the bore axis (at the top of the front sight blade). If you set your bullet pass-through point using your AR’s front sight, the bullet will actually be traveling 2.4″ lower as it goes through the chrono. That’s why we recommend bore-sighting and setting the bullet travel point about 5-8″ above the base of the sky-screen support shafts. (Or the vertical distance the chronograph maker otherwise recommends). NOTE: You can make the same mistake on a scoped rifle if the scope is set on very tall rings, so the center of the cross-hairs is much higher than the bore axis line.

TARGET AIM POINT: When doing chrono work, we suggest you shoot at a single aiming point no more than 2″ in diameter (on your target paper). Use that aiming point when aligning your chrono with your rifle’s bore. If you use a 2″ bright orange dot, you should be able to see that through the bore at 100 yards. Using a single 2″ target reduces the chance of a screen hit as you shift points of aim. If you shoot at multiple target dots, place them in a vertical line, and bore sight on the lowest dot. Always set your chron height to set safe clearance for the LOWEST target dot, and then work upwards only.
Other Chronograph Tips from Forum Members:
When using a chronograph, I put a strip of masking tape across the far end of the skyscreens about two-thirds of the way up. This gives me a good aiming or bore-sighting reference that’s well away from the pricey bits. I learned that one the hard way. — German Salazar
A very easy and simple tool to help you set up the chronograph is a simple piece of string! Set your gun (unloaded of course) on the rest and sight your target. Tie one end of the string to the rear scope ring or mount, then pull the string along the barrel to simulate the bullet path. With the string showing the bullet’s path, you can then easily set the chronograph’s placement left/right, and up/down. This will also let you set the chrono’s tilt angle and orientation so the sensors are correctly aligned with the bullet path. — Wayne Shaw
If shooting over a chrono from the prone position off a bipod or similar, beware of the muzzle sinking as recoil causes the front of the rifle to drop. I “killed” my first chronograph shooting off a gravel covered firing point where I’d not given enough clearance to start with and an inch or two drop in the muzzle caused a bullet to clip the housing. — Laurie Holland
May 4th, 2014
 Harrell’s Precision sells “semi-custom” full-length bushing dies for the PPC and 6BR chamberings. While the Harrell brothers do not cut the die to spec, they carry a large selection of dies made with slightly different internal dimensions. When you send in your fired brass, the Harrells choose a die from inventory with just the right amount of sizing (diameter reduction) at the top and bottom of the case. Given the quality, and precise fit, Harrell’s full-length dies are a good value at $75.00 plus shipping. Harrell’s Precision sells “semi-custom” full-length bushing dies for the PPC and 6BR chamberings. While the Harrell brothers do not cut the die to spec, they carry a large selection of dies made with slightly different internal dimensions. When you send in your fired brass, the Harrells choose a die from inventory with just the right amount of sizing (diameter reduction) at the top and bottom of the case. Given the quality, and precise fit, Harrell’s full-length dies are a good value at $75.00 plus shipping.
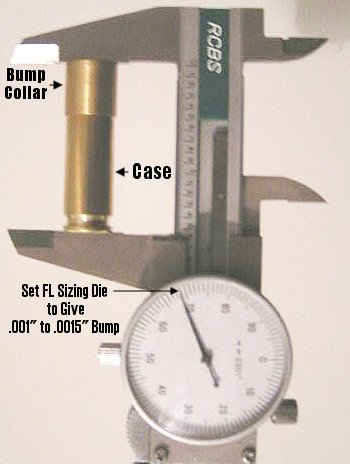
 Bump Measuring Collar Bump Measuring Collar
The Harrell brothers provide a nice bonus item with each full-length die — a neat, little shoulder bump measuring device as shown in the photo at right. Hornady/Stoney Point sells a stand-alone tool that does the same job, but the Harrell’s bump collar is simpler and faster. To measure your shoulder bump, simply place the Harrell’s bump collar over the upper section of your deprimed case (before sizing) and measure the OAL with your calipers. The collar should seat on the shoulder without any wobble. After taking the measurement, then size the case in your full-length die, replace the collar and repeat the measurement. You want to set your die so the shoulder moves back about .001″ to .0015″ for most applications. (With semi-auto guns you may want more bump — .003″ or more.)
When measuring for shoulder bump, you need to remove the primers first. Our friend Boyd Allen explains: “Use a decapping tool or die to remove the fired primer before taking the initial measurement. When working to thousandths, even the raised edge of a crater or a slightly raised primer can throw you off by a significant amount.”
May 3rd, 2014
 On German Salazar’s Rifleman’s Journal website, you’ll find an excellent 5-Part Series on barrel chambering. The Series, entitled The Voyeur’s Guide to Barrel Chambering, is not intended to be a “how-to” instructional treatise for gunsmiths. Instead, German’s 5-Part Guide is aimed at the end user — the shooter. German explains: “This Series isn’t intended for anyone who owns a lathe; instead it is for those of us who send an action off to get a new barrel installed. Those who have the equipment know what to do and how to do it and I have nothing to teach them. On the other hand, if you’ve ever wondered just what goes into barrel fitting, this is it.” On German Salazar’s Rifleman’s Journal website, you’ll find an excellent 5-Part Series on barrel chambering. The Series, entitled The Voyeur’s Guide to Barrel Chambering, is not intended to be a “how-to” instructional treatise for gunsmiths. Instead, German’s 5-Part Guide is aimed at the end user — the shooter. German explains: “This Series isn’t intended for anyone who owns a lathe; instead it is for those of us who send an action off to get a new barrel installed. Those who have the equipment know what to do and how to do it and I have nothing to teach them. On the other hand, if you’ve ever wondered just what goes into barrel fitting, this is it.”
PART I | PART II | PART III | PART IV | PART V

With well-written text and dozens of very high-quality images, German takes you through the chambering, threading, shoulder-fitting, and crowning processes from start to finish. The idea is to give the “barrel consumer” a clear idea of the processes involved when a barrel blank is converted into functional form, complete with chamber, threaded tenon, fitted breech, and crown.

We highly recommend German’s 5-Part Voyeur’s Guide to Barrel Chambering. German, with the aid of John Lowther (who ran the machines), did a great job. The series has already drawn much attention from our Forum members, along with praise. After reading the articles, John C. from Australia wrote: “Your Chambering articles… really are excellent [and] informative for those of us too scared to watch our gunsmith chamber one of our barrels lest we distract him at a crucial moment!”


We know you’ll learn something from reading through German’s 5-Part Series. And if you see a photo on German’s website that intrigues you, simply click on it to see a larger, higher-resolution version. All the images in the Voyeur Series on RiflemansJournal.com can be zoomed to larger formats.
April 28th, 2014
Gunsmiths often have to serve as gun “doctors” as well as gun builders. Gunsmith (and Hall-of-Fame shooter) Thomas “Speedy” Gonzalez was recently asked to fix a trigger problem. A customer was complaining about a trigger that was erratic and “mushy”. Speedy quickly diagnosed the problem. The Jewell trigger was clogged with gunk and sludge — left-over solvents and lubricants had gummed up the mechanisms. Here’s how the cleaning process unfolded…
Speedy: “Gee why would I want to blueprint my Jewell trigger….it has just got a little mushy lately. It may just need some adjustment. Yeah right — take a look at this”:

Speedy: “Should I go get a tetanus shot now?”

Gunsmith Mike Bryant comments: “I’ve seen a lot of Remington 700 triggers that were gummed up like [that] Jewell was. Also have seen lots of 700 triggers that had the weight-of-pull screw adjusted [by the owner] to where it had no compression on the spring. I wonder how many of the Remington accidental discharges involved triggers with one or the other of these conditions.”
Speedy: “What?! Powder in trigger as well… hmmmmmm.”

Clean up done with Iosso Lubricant/Cleaner. Speedy says this is the “Best parts cleaner I have ever found if you don’t have an ultra sonic cleaning tank. I just melted that crud off with a Q-Tip”.

Same Jewell trigger all happy now — clean as a whistle.

Trigger ready for final re-assembly, looking better than new. Thanks Speedy!

April 19th, 2014
 At long range, small bullet holes are much easier to see in the white than in the black. When you’re practicing at long range on high power targets, one way to enhance your ability to see your bullet holes is to print a “negative” version of the regulation bullseye target. At long range, small bullet holes are much easier to see in the white than in the black. When you’re practicing at long range on high power targets, one way to enhance your ability to see your bullet holes is to print a “negative” version of the regulation bullseye target.
How do you create a “negative” of a target image? Many image programs, including the FREE Irfanview software, have a “Negative” function in the pull-down menu. If you don’t see a “Negative” menu option in your program, look for a “substitute colors” option. Many printers also have a “reverse colors” function. If you can’t find a solution with your computer or printer, just take a normal bullseye target to a copy shop, and the staff can easily print you a set of targets with white centers in black fields.
Forum member Watercam uses a Pentax PF-80ED spotting scope. With his 80mm Pentax he can see 6mm bullet holes in the white at 600 yards (in very good conditions), but holes in the black are only visible out to 400 yards or so. Accordingly, Watercam uses a modified “reversed” black-to-white target for 600-yard practice.
Watercam told us: “The view through the Pentax is very sharp and contrasty with great color. Eye relief with the Pentax 10-60 power zoom is 18-22mm (much more than the Kowa zoom), so I can use glasses with no problem. With my 6mm and limited mirage I’m seeing defined, 6mm holes in the white out to 600. In the black, I can see bullets holes at about 400 with my eyes. I am printing reverse-color targets for training without a pit partner at the 600-yard line.”
 |
|
Brits Use New White-Field Target for F-Class
In the UK, ranges are now using a “reverse-style” target with a mostly white area. Laurie Holland says this allows shooters to see shots much more easily. Laurie reports: “Here’s a photo of the 500/600 yard F-Class match target we use in PSSA comps at Diggle Ranges with club members Chris Hull (L) and Terry Mann (R). We now use this target form at all ranges up to 1K for F-Class, and, yes you can often see your hits at 600 on the target before the markers pull it. Regards from England — Laurie”.

Day-Glo Stick-on Targets
If you’re not concerned with official scoring rings, you can use an all-white target with a bright, fluorescent target dot in the middle. A 2″- or 3″-diameter stick-on target dot is highly visible at 600 yards. With a high-quality scope, you can use the small black diamonds in the center for precise aiming. The Birchwood Casey Target Spots® assortment (item #33928-TSA) offers neon orange target dots in 1″, 2″, and 3″ diameters. This “value pack” includes 72-1″, 36-2″, and 24-3″ self-adhesive circles.

April 15th, 2014
When he chooses to measure his loads or sort bullets by weight, Forum Member Boyd Allen likes his trusty RCBS 10-10 scale. He finds that it works predictably, time after time, and it doesn’t suffer from the drift and calibration issues that plague some of the less-expensive electronic scales on the market.

To make it easier to see the balance point, Boyd has adapted a magnifying glass with a mirror. This makes the end of his balance beam easier to view from his normal position on the bench. Boyd explains: “This set-up uses a cheap magnifier with positioning arms that was probably designed to hold and magnify small objects while soldering them. I think that it came from Harbor Freight many years ago. The mirror lets you look at the scale as if is was at eye level, and of course the magnifier makes the image easier to see.”
|