|
|
April 11th, 2014
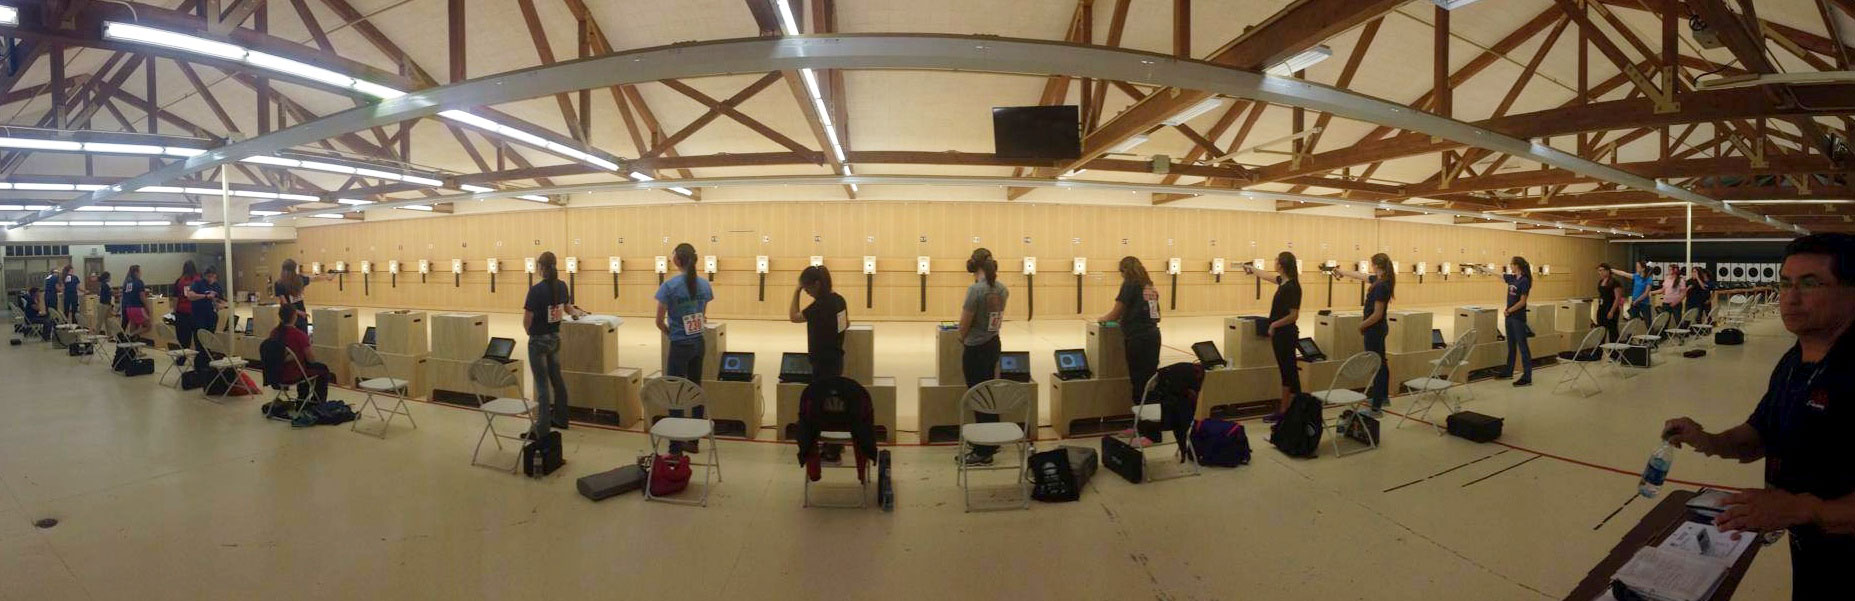
 The 2014 National Junior Olympic Shooting Championships (NJOSC) take place this month in Colorado Springs, Colorado. The prestigious event, which runs through April 26th, kicked off yesterday with air pistol matches. The 2014 National Junior Olympic Shooting Championships (NJOSC) take place this month in Colorado Springs, Colorado. The prestigious event, which runs through April 26th, kicked off yesterday with air pistol matches.
Following the pistol competition, Women’s Rifle takes to the range April 16-20, and then the NJOSC will conclude with Men’s Rifle, April 22-26. Both rifle weeks will include both Air Rifle and Three-Position (smallbore) competition.

For the first time in the history of the National Junior Olympics, all competitors will shoot on electronic targets. USA Shooting completed a massive range upgrade to improve lighting and enhance the spectator experience by incorporating more than 70 new electronic targets. This is cutting-edge technology that allows both real-time scoring and even live video streaming on the internet. Shown below are the target print-outs for Air Pistol.

In our dreams we could hope for electronic scoring at high power and long-range centerfire events. Wouldn’t it be cool to have scores appear instantaneously, in real time? In addition, after firing a relay you could get a print-out that would show the exact placement of your shots in the scoring rings. That would be handy for analyzing your wind calls. But best of all, with electronic targets, shooters would no longer have to pull pit duty in the hot sun! Over time we may see more of this technology for centerfire competition. We’re told that the new 500-acre, $20 million CMP Talladega Marksmanship Park, being built in Alabama, will have some electronic scoring capabilities.
USA Shooting Video Streaming of Junior Olympics Events
On its YouTube channel, USA Shooting will provide Live and recorded events from the USA Shooting Olympic Training Center Ranges in Colorado Springs. As we write this, the NJOSC 2014 Men & Women Air Pistol Day 2 Air Pistol Relays are streaming. CLICK Here for NJOSC Videos and Streamed Events.

April 11th, 2014
This Article Originally Appeared in Sinclair International’s The Reloading Press.
Pre-Season Gun Maintenance,
by Ron Dague, Sinclair International
 I give my rifles a pre-season check before the shooting season starts. This starts with a general inspection starting with the butt-plate or recoil pad and making sure that all the screws and adjustable parts (on an adjustable butt-plate) move freely up or down and side to side. If you got caught in rain some of these screws and adjustable parts may not move when needed. I disassemble parts as needed and put rust preventative or a light oil and/or grease on threads and sliding parts. On rifles with recoil pads and fixed butt-plates, make sure the screws are tight and that holes in the stock aren’t stripped out. Make sure there are no cracks in the stock and around the butt-plate. If the recoil pad is glued-on, just make sure it hasn’t come loose. I give my rifles a pre-season check before the shooting season starts. This starts with a general inspection starting with the butt-plate or recoil pad and making sure that all the screws and adjustable parts (on an adjustable butt-plate) move freely up or down and side to side. If you got caught in rain some of these screws and adjustable parts may not move when needed. I disassemble parts as needed and put rust preventative or a light oil and/or grease on threads and sliding parts. On rifles with recoil pads and fixed butt-plates, make sure the screws are tight and that holes in the stock aren’t stripped out. Make sure there are no cracks in the stock and around the butt-plate. If the recoil pad is glued-on, just make sure it hasn’t come loose.
Next I take the action out of the stock and check for cracks and wear marks. I look at the bedding to make sure that oils and cleaning solvents have not damaged the bedding. While the action is out of the stock, I look for any surface rust or dirt/dust in the recoil lug area and magazine well. Clean as needed and repair or re-bed if needed.
Trigger Assembly and Action
 With the barreled action out of the stock, it is a good time to spray out the trigger with cleaner. I use Ronson oil or lighter fluid. [Editor’s Note: Some trigger-makers advise against using any kind of lubricant, grease or oil — so plain lighter fluid is preferred.] After the trigger is cleaned you may want to check the trigger pull weight. If you don’t feel comfortable doing this, take it to a gun smith and have it checked. It is worth every penny to not have a trigger issue and/or a safety malfunction. I also take the bolt apart and clean the firing pin spring and bolt housing with Gun Scrubber or automotive brake cleaner. Then lube the firing pin-spring and firing pin with light oil. I use Kel Lube and/or Butch’s gun oil. Put a small dab of gun grease on the [bolt locking lugs] and cocking ramp. With the barreled action out of the stock, it is a good time to spray out the trigger with cleaner. I use Ronson oil or lighter fluid. [Editor’s Note: Some trigger-makers advise against using any kind of lubricant, grease or oil — so plain lighter fluid is preferred.] After the trigger is cleaned you may want to check the trigger pull weight. If you don’t feel comfortable doing this, take it to a gun smith and have it checked. It is worth every penny to not have a trigger issue and/or a safety malfunction. I also take the bolt apart and clean the firing pin spring and bolt housing with Gun Scrubber or automotive brake cleaner. Then lube the firing pin-spring and firing pin with light oil. I use Kel Lube and/or Butch’s gun oil. Put a small dab of gun grease on the [bolt locking lugs] and cocking ramp.
I will also spray the outside of the action and barrel and give that a light coating of oil for rust prevention. I clean the action with Sinclair’s action cleaning tool. Don’t forget to clean the bore. Even though you didn’t fire the rifle, this makes sure nothing obstructs your barrel.
Checking Metal Fixtures and Fasteners
 Next I look at the trigger guard and hinged floor plate and make sure it works as designed. Make sure there are no cracks in the trigger guard from an accidental drop. Check guard screws and /or action screws for tightness and tighten to proper spec. There are torque specs for this, but on wood stocks the wood can crush and this should be checked throughout the year as weather change can affect this. My entire collection of rifles are bedded and I just tighten them just snug with screw driver or Allen wrench. The rimfire rifles have a spec of 55 to 74 inch/lbs and I think would carry over to center fire as well. I would caution you about torque wrenches as you need a good quality wrench, and read the directions on how to use it. You can over torque if not careful. Check the swivel studs and bipod to make sure there tight as well. You may want to take scope off and check the base screws and check the rings. Next I look at the trigger guard and hinged floor plate and make sure it works as designed. Make sure there are no cracks in the trigger guard from an accidental drop. Check guard screws and /or action screws for tightness and tighten to proper spec. There are torque specs for this, but on wood stocks the wood can crush and this should be checked throughout the year as weather change can affect this. My entire collection of rifles are bedded and I just tighten them just snug with screw driver or Allen wrench. The rimfire rifles have a spec of 55 to 74 inch/lbs and I think would carry over to center fire as well. I would caution you about torque wrenches as you need a good quality wrench, and read the directions on how to use it. You can over torque if not careful. Check the swivel studs and bipod to make sure there tight as well. You may want to take scope off and check the base screws and check the rings.
Test Fire the Rifle After Maintenance
After all cleaning and is done and everything is reassembled, take a few rounds out to the range and test fire to make sure everything works as it should. Don’t forget to run 3-5 rounds through the magazine at least two times for function. I look at this as preventive maintenance on the rifle. If you give it a look over you shouldn’t have any trouble during the rifle matches or hunting trip.
Ron Dague
Certified Reloading Instructor
Certified Range Safety Officer
Email: rond [at] sinclairintl.com
Phone: 800-717-8211
April 6th, 2014
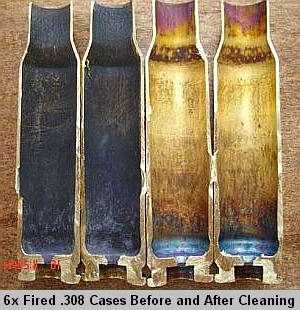
As a cartridge case is reloaded multiple times, burnt powder residue and carbon builds up on the inside of the case. Unless the case interior is cleaned in some fashion, eventually you’ll see a reduction in case capacity. One of our Forum members from Australia wonders about the effects of reduced case capacity: “If the capacity of the case decreases as the crud builds up, then it effectively reduces the chamber size. Wouldn’t that change the pressure produced from that of an equivalent clean case?”
Ultrasonic Cleaning Example:
Interesting Test of Case Capacity Changes
Forum member Fred Bohl has actual test results that can help answer the above question. Fred proved that, over a 20-reload cycle, the case capacity of uncleaned cases did, indeed, decline a small amount. However, surprisingly, this did not seem to affect the actual chronographed velocity of the load. ES did increase, but Fred believes the higher ES was due to changes in case-neck tension, rather than due to the slight reduction in case capacity.
Fred reports: “Back when beginning to use ultrasonic case cleaning, part of the motivation was to get the inside clean based on the assumption that allowing burnt residue to build up inside cases would affect capacity, and, ultimately, performance. An experiment was done to test this hypothesis. The load used, 30.5 grains of RL15 behind 107gr SMKs in a 6mmBR, was selected for best group and lowest ES in prior load development. It turned out to be 92% of initial case capacity and neither “full” or compressed. (I would suspect that different powders, load weight, and total case capacity might produce very different results.)
We took 30 cases of identical initial capacity and tracked three lots of 10 each:
LOT 1: No Internal cleaning
LOT 2: Cleaned with media in tumbler
LOT 3: Cleaned with Ultrasound machine
Each case (in each lot) was shot and reloaded 20 times. The simplified results after 20 reloads of each lot were as follows:
Lot 1 (not cleaned) – 0.3 to 0.4 gr. loss of capacity, 5 to 8 fps greater ES.
Lot 2 (tumble cleaned) – 0.1 to 0.3 gr. loss of capacity, 4 to 6 fps greater ES.
Lot 1 (ultrasonic cleaned) – no loss of capacity, no detectable change in ES.
FINDINGS
There was no detectable correlation of velocity change to the lots. An oddity was that on very hot days Lot 1 velocities were, occasionally, slightly higher. [Editor’s note: That does suggest that the carbon build-up inside the uncleaned cases might cause a slight increase in pressure that shows up on hot days. Fred has posted that “A local shooter reported doing the 20 reload, no clean test on a .308 that gave a loss of capacity of 2.0 grains, doubled ES and signficant velocity changes. However, I don’t have any details on his load weight or powder.”]
NOTE: From results of another ongoing test, I believe the above differences in ES are probably due more to variance in bullet grip tension than case capacity. The ultrasound cleaned cases (LOT 3) did maintain the lowest ES, but we are not 100% sure of the reasons why. More consistent bullet seating might be the reason.
[Editor’s comment: Jason found that with his ultrasonically-cleaned cases, the inside of the necks got so “squeaky clean” that he needed to use dry lube in the necks. Jason uses the $10.95 dry lube kit from Neconos.com. This applies ultra-fine Moly powder to the neck using small carbon steel balls]

April 6th, 2014
by Bill Gravatt
(This article was written when Bill was President of Sinclair International, Inc.)
Chamber casting is an easy task for the handloader to perform. A chamber casting is valuable if you run across a firearm that you believe has a custom barrel on it and you want to find out the dimensions of the chamber. Some gunsmiths will chamber a barrel and not mark it properly with the neck dimension or the exact cartridge name or specifications. We also get calls from some customers that have military firearms without cartridge stampings on the barrel; this will help these shooters identify their chambering.

Another reason to make a chamber casting would be for a die manufacturer to manufacture custom dies for you. A chamber casting is often required when fired cases are not available. Some reloaders will make a chamber casting that shows them the exact configuration of the throat and leade so they can determine what bullets to try. Shooters using cast bullets will make a cast so they can choose a mould that better fits their throat taper and grove/lands diameter.
A product called Cerrosafe is the most common, reliable, and the safest material to use for making chamber castings. Cerrosafe is a metal alloy that has some unique properties which make it ideal for chamber casting. First, it has a relatively low melting point of 158 to 190° Fahrenheit. This makes it easy for the handloader to melt the Cerrosafe in his home shop. Second, it shrinks slightly during cooling which allows it to be extracted from the chamber easily. It then re-expands to the chamber’s original size after about one hour at room temperature. After cooling for about 200 hours, the chamber cast will expand to about .0025″ larger than the actual chamber size. Most good reloading die makers are used to working from Cerrosafe chamber casts.
As we said, using Cerrosafe is fairly easy and comes with complete instructions.
Making a Cerrosafe Chamber Cast — Step by Step:
1. First, clean and dry the chamber and barrel thoroughly.
2. Disassemble the firearm as necessary to gain access to the chamber.
3. Insert a tight fitting cleaning patch with a jag into the bore from the muzzle end to form a plug for the Cerrosafe. The patch should be positioned in the bore, just forward of the throat by approximately ½” to 1”.
4. Heat a Cerrosafe ingot in a small ladle. A heavy cast iron bullet caster’s ladle works fine or a plumber’s ladle. Any source of heat will do (a small propane torch will work fine).
5. Pour the Cerrosafe into the chamber until a little mound forms at the rear of the chamber. Too much and it can become more difficult to remove the cast from the chamber. If this happens, simply heat the barrel a little and re-melt the Cerrosafe. Don’t worry, your barrel gets a bit hotter than 190 degrees during firing.
6. The chamber can be difficult to access, so some people find it easier if they make a pouring tube out of steel, brass, or aluminum tubing to funnel the Cerrosafe into the chamber.
7. After the Cerrosafe has hardened, the chamber casting can be pushed out of the chamber coming from the muzzle end using a cleaning rod or a wooden dowel. It is recommended that you push it out within a half-hour of casting the chamber. We usually push our cast out within a few minutes. If the cast does not push out easily, insert a cleaning rod from the muzzle and tap the rod handle with the palm of your hand to start the cast out of the chamber. You can put a paper towel in the action to catch the cast or lay the rifle on the bench with a towel or bench mat underneath it to catch the cast as it falls from the action. This will prevent damage to the cast.
8. Take your measurements shortly after one hour of cast, and then put the casting away until you need it again. A medicine container or something similar makes a great container. If you are going to keep the cast be sure to mark the cast or the storage container so you know which rifle it came from. If you have no need to keep the cast you can re-melt the Cerrosafe and use it again when you need to make another cast. |
This article originally appeared in Sinclair International’s The Reloading Press Blog.
April 1st, 2014
Ever wonder why fine wine is always stored on its side? That’s not just for looks, or easier access when the sommelier (wine steward) visits the wine cellar. Wine bottles are stored horizontally, at a slight angle, to prevent the wine from oxidizing:
“By intentionally storing a wine on its side, you will help keep the cork in constant contact with the wine. This will keep the cork moist, which should keep the cork from shrinking and allowing the enemy of wine, oxygen, to seep into the bottle. When oxygen comes into contact with wine the result is not good – the wine starts to oxidize and the aromas, flavors and color all begin to spoil“. — About.com

Ammunition Should Also Be Stored Horizontally
So what does wine have to do with shooting? Well, it may surprise you, but over time, our cartridges can spoil, just like wine can — though not for the same reason. We don’t have the issue of oxygen seeping past the bullet (the “cork” as it were). However, when ammunition is stored nose-up or nose down, problems can arise. In a nose-up or nose-down configuration, over a long period of time, the powder column will compress, and the powder kernels can actually break down. This can lead to erratic ignition and/or dangerous pressures.

To avoid the problems associated with powder column compression and kernel break-down during long-term storage, take the time to orient your cartridges like wine bottles, i.e. placed flat on their side. Of course, this really isn’t necessary if you burn through your ammo relatively quickly. But, if you are storing cartridges “for the long haul”, take the time to arrange them horizontally. That may require a little extra effort now, but you’ll reap the rewards down the road.
This tip courtesy Anette Wachter, www.30CalGal.com.
March 30th, 2014
 G. Salazar regularly reviewed important shooting books on his RiflemansJournal.com website. One of the notable treatises reviewed by German is Modern Exterior Ballistics by Bob McCoy, the respected expert from the U.S. Army Ballistics Research Laboratory. G. Salazar regularly reviewed important shooting books on his RiflemansJournal.com website. One of the notable treatises reviewed by German is Modern Exterior Ballistics by Bob McCoy, the respected expert from the U.S. Army Ballistics Research Laboratory.
Salazar tells us: “We hope to cover a very wide range of books related to accurate rifles; some will be familiar to experienced students of the rifle, some will be quite obscure. There is no specific time frame for the books, so you may see something from the 19th century one month and a new book hot off the press the next. The only common factor is that these will all be books that have appeal to the serious student of rifle accuracy.” Here is a segment of Salazar’s review of Modern Exterior Ballistics:
Modern Exterior Ballistics – Robert L. McCoy
Review by G. Salazar
 Bob McCoy is widely and properly regarded as the dean of modern ballisticians and this book is his most accessible work. For those who are not familiar with McCoy’s work, I can think of no better introduction than these words, written after McCoy’s death, which appear as a dedication to the book over the signatures of 54 of his fellow ballisticians at the U.S. Army Ballistics Research Laboratory: Bob McCoy is widely and properly regarded as the dean of modern ballisticians and this book is his most accessible work. For those who are not familiar with McCoy’s work, I can think of no better introduction than these words, written after McCoy’s death, which appear as a dedication to the book over the signatures of 54 of his fellow ballisticians at the U.S. Army Ballistics Research Laboratory:
“This book on exterior ballistics represents the life work and passion of Bob McCoy. It was his wish to leave a historical perspective as well as an accurate technical treatise for both the engineering community and the sporting arms industry. Bob was in fact an aerospace engineer, but he always referred to himself as a ‘ballistician’. He was very proud to have worked for and served the American people for 30 years at the U.S. Army Ballistic Research Laboratory while truly enjoying his passion. Bob was one of the most respected members of the staff of the U.S. Army Ballistics Research Laboratory and had an international reputation in aeroballistics. We will always remember his professionalism, his enthusiasm, his boisterous laugh, his passion for ballistics, and most of all, his friendship. We his students, his co-workers, his peers, and his friends dedicate this book to the memory of the last true ballistician of the 20th century.”
CLICK HERE to read full review….
March 28th, 2014
 If you own a modern smart-phone, you have a shooting coach in your pocket. What we mean is that the video-recording capability of your smart phone can help improve your shooting. Have you ever watched yourself shooting, under match conditions? Well you may be shocked (and surprised) by what you see. Video reveals all. If you are flinching, you’ll see it. If you’re not returning your rifle to the same place on the rests after each shot, you’ll see it. If you are not maintaining a consistent cheek weld from shot to shot, you’ll see it. If you own a modern smart-phone, you have a shooting coach in your pocket. What we mean is that the video-recording capability of your smart phone can help improve your shooting. Have you ever watched yourself shooting, under match conditions? Well you may be shocked (and surprised) by what you see. Video reveals all. If you are flinching, you’ll see it. If you’re not returning your rifle to the same place on the rests after each shot, you’ll see it. If you are not maintaining a consistent cheek weld from shot to shot, you’ll see it.
If you are a serious competitive shooter (or aspire to be one), you should take a camera to the range next time you practice. Have a friend film you while you are shooting in “match-like conditions”, i.e. with time limits and a specific course of fire. After the filming session, review the video carefully.
Our IT guy, JayChris, has improved his shooting skills by filming his practice sessions and watching for gun-handling errors or other mistakes. Recently Jay won the F-Open division at the TCSA (Rattlesnake) match. Jay says his progress has been aided by video analysis:
“Video-tape yourself in match conditions (or under mock match conditions when practicing). I have video from my first season of shooting at a long range match some years ago. I can compare that to video shot in 2014. Going back to year one, I could see how much moving around I was doing. The video camera is a useful tool. I video myself every so often at the practice range, just to make sure I’m consistent. When reviewing the video, I’ve caught myself dropping a shot right after re-settling into a new position where I didn’t even notice I was doing it while shooting.”
Video analysis has helped our IT Guy, JayChris, shoot better and make fewer mistakes.

Watch Your Position on Video
Jay continues: “Watching myself and other shooters on video has shown me how important it is to establish a comfortable shooting position. I used to move all over the place between shots. I spent some time getting a feel for a position where I could eject and load without breaking my cheek/shoulder weld, and that I could hold through a 20-shot string. It’s probably not as super critical as sling shooting positions, but I think it makes a big difference. It also helps ensure that your view through the scope remains the same. If you have parallax, changing your cheek weld has consequences. This includes making sure your rifle is set on the bags at a comfortable height — too high or too low and you are straining yourself and adding muscle tension into the equation.”
Use Video To Analyze Mistakes After Matches
Video can help you identify inconsistent holds and gun-handling mistakes. A video review can be part of the regular “post-mortem” you should do after every match. Bryan Litz says: “After each match, carefully analyze how you lost points and make a plan to improve. Beginning shooters will lose a lot of points to fundamental things like sight alignment and trigger control. At every step along the way, always ask yourself why you’re losing points and address the issues.”
Video can help you spot problems (such as inconsistent head position or bad trigger technique) that cost you points. We had one friend who was complaining about “mysterious horizontal” at matches. A post-match video session revealed that he was yanking the trigger to the side, rather than pulling straight back. He then consciously worked on his trigger control and his scores improved noticeably.
 Video Equipment — What You Need Video Equipment — What You Need
If you own a digital point-and-shoot camera made within the last four years, chances are you can shoot video. It may not be HD video, but it will suffice for the task of analyzing your shooting technique. Apple iPhones and iPads (and some Android phones) can take excellent video as well, but you’ll have to figure out a mounting system if you’re out by yourself. If you don’t currently own any device that can shoot video, consider one of the choices below. You can get a great camera for under $250.00 these days. The selections below all feature wide-angle capability, so you can position the camera close to the shooter. That’s important when shooting at crowded ranges. The Panasonic Lumix ZS20 has built-in GPS functionality, so you can tag your photos/videos with latitude and longitude.
One tip — you do NOT need to record at 1920×1080 Full HD resolution. It’s nice that some of the latest cameras (including the GoPro) offer this resolution, but 1920×1080 files will be HUGE, and older computers may have trouble playing back the video. For your range movies (to be viewed on a computer), we suggest you record at 720p HD.
Recommended Cameras with Video Capability
March 28th, 2014
Serious shooters spend lots of time in the reloading room. If you want to produce great ammo, start with a good, solid bench with a very rigid working surface and plenty of storage space. Here we present three sets of FREE workbench plans. Any one of these bench designs can be a good summer do-it-yourself project for those with basic word-working skills.
Easy-to-Build Basic Bench
Simpson, maker of Strong-Tie fasteners, offers FREE Workbench Plans for a sturdy, 48″-wide bench with a pegboard backing and both upper and lower shelves. A complete list of fasteners and cut lengths is provided. For use as a loading bench with mounted presses, double-up the bench-top for extra ridigity. Without much difficulty, the plans can be adapted to build a wider bench if you prefer. The same downloadable document also contains plans for an 80″-high 6-shelf unit, a 72″-high heavy-duty shelving unit (with 4 shelves), and a 48″-wide heavy-duty table.

FREE Strongtie Bench Plans (.pdf file).
Corner Bench with Swinging Doors
The next design is rather unique — a corner bench with swing-out cabinets. This reloading bench is based on plans by M. L. McPherson as published in the October 1993 American Rifleman. The compact footprint that makes good use of corner space that is usually poorly utilized. This set of plans originally came from Ray-Vin.com. The folks who started Ray-Vin have retired.
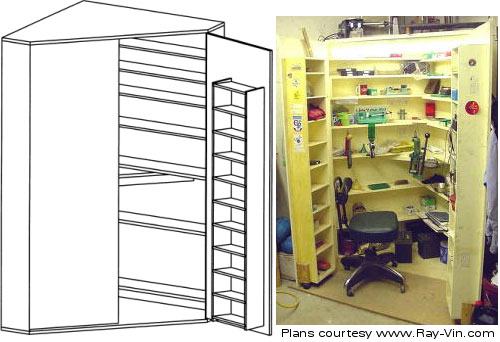
FREE Corner Bench Plans (330kb .pdf file)
Classic NRMA Bench with Cabinets
The last bench design is a large, versatile bench with a full set of enclosed overhead cabinets. A National Reloading Manufacturers Association (NRMA) design, this bench requires many hours to build, but it will house all your reloading gear and provide a very stable platform for your presses.This bench was designed to be as versatile as possible to meet the needs of most reloaders. However, the bench design can easily be customized. For instance, it can be made larger or smaller to meet space requirements or quantities of equipment and components. As it is currently designed, the work area is about waist-high for a 6’2″ person. This can be adjusted to fit your height simply by making the legs longer or shorter.

FREE NRMA Reloading Bench Plans (2.42 megabyte .pdf file).
March 26th, 2014
 On our main AccurateShooter.com site, you’ll find an excellent article by GS Arizona on the Basics of Neck Turning. If you’re new to the neck-turning game, or are just looking for good tips on improving your neck-turning procedures, you should read that article. Below we offer some highlights and photos from the article, but you’ll need to read the whole story to view all the illustrations and follow all the procedures step by step. On our main AccurateShooter.com site, you’ll find an excellent article by GS Arizona on the Basics of Neck Turning. If you’re new to the neck-turning game, or are just looking for good tips on improving your neck-turning procedures, you should read that article. Below we offer some highlights and photos from the article, but you’ll need to read the whole story to view all the illustrations and follow all the procedures step by step.
Why Should You Consider Neck Turning?
Let’s assume that your rifle doesn’t have a tight neck chamber that requires neck turning; if you have a tight neck chamber, of course, the answer to the question is “because you have to”. For the rest of us, and that includes the vast majority of Highpower shooters, neck turning isn’t a requirement, but it can be a useful way to bring your ammunition a small but meaningful step closer to that pot of gold at the end of the rainbow: perfection. I’m not talking about a theoretical improvement, but a real one, an improvement that lies in equalizing and optimizing the neck tension of your loaded rounds. Inconsistent neck tension is a real contributor to increased muzzle velocity variance which itself is a significant factor in increased elevation dispersion at long range. So there’s our basic reason for neck turning: to equalize and optimize neck tension in order to reduce elevation dispersion.
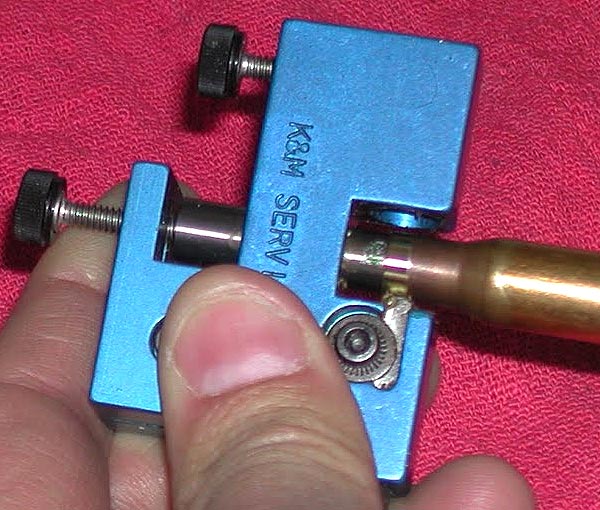
The Tools of the Trade
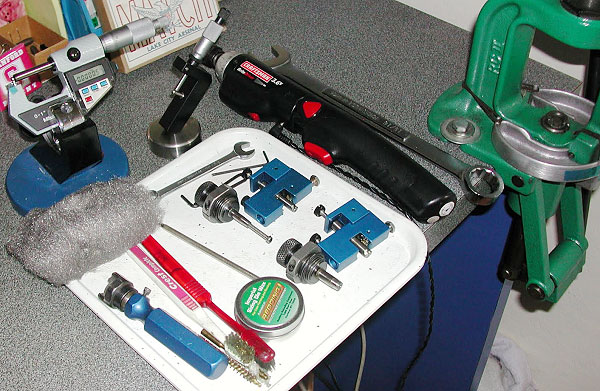
Here you see everything I use and a bit more. The press, a cordless screwdriver (always plugged in, turning is tough on the old battery), a couple of K&M neck turners (one set up for 6mm, the other for .30 caliber) an expander for each size, some Imperial lube, an old toothbrush or two to keep the cutter clean, a handle with a caseholder (for those emergencies when the screwdriver dies and there’s just one more case to go!), steel wool and a tubing micrometer finish the list of tools. Hey, I left the dial calipers out of the picture! They’re always handy, keep them around, but they are useless for measuring neck thickness, so don’t try. I usually use an Optivisor magnifier while I turn necks, very handy for a clear view of what’s happening on the neck.
Expanding the Neck
Put some lube on the inside of the case neck and run it into the expander. Really, this isn’t hard. I prefer to expand each case immediately before turning it as opposed to expanding all the cases and then turning them. Brass is somewhat springy and will tend to go back toward its original size; therefore, by expanding and turning immediately, you are more likely to have all cases fit the mandrel with the same degree of tightness and to get a more consistent depth of cut.
Cutter Adjustment for Cut Depth and Length
All the tools I’ve seen have pretty good adjustment instructions. The only thing they don’t tell you is that you should have five to ten spare cases to get it right initially. Anything of the right diameter will do while you learn, for instance, just use that cheap surplus .308 brass to do initial setup and save the precious .30-06 for when you know what you’re doing. Be patient and make your adjustments slowly; you’ll need to set the cutter for thickness as well as length of cut (just into the shoulder). The depth of cut (brass thickness) takes a bit of fiddling, the length of the cut is generally easy to set.
The Finished Product — A Perfectly Uniform Neck
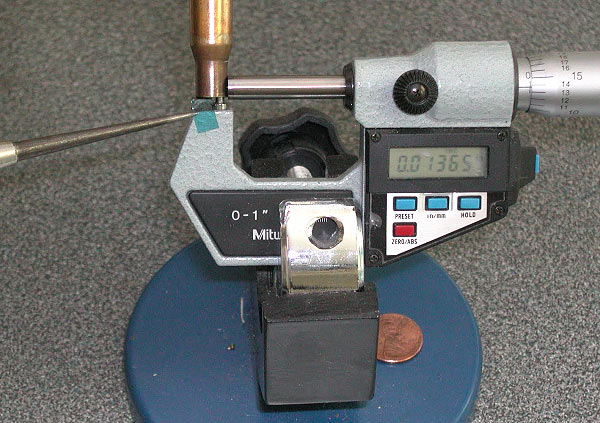
If you read the whole article, and follow the procedures using quality tools, you should get very good results — with a little practice. To demonstrate, here’s an example of my finished, neck-turned brass. You’ll see there is a perfect, 0.0125″ thick neck. It’s very uniform around the circumference, usually I only see 1 or 2 ten-thousandths variance. Now, with the necks uniformed like this, we can select the bushing size that will give us our preferred neck tension and experiment with various levels of tension, secure in the knowledge that all of the cases will actually have the desired neck tension.
March 16th, 2014
Most long-range benchrest stocks are three inches wide because that used to be the max width under the rules for Light Gun Class. Many folks may not realize that the IBS, the NBRSA, and the Williamsport organizations have all modified their Light Gun rules to allow wider forearm widths in registered competition. A wider stock provides increased stability and resists rotation (torquing) as the gun is fired. If you’re building a new Light Gun, you may want to consider a 4″-wide or 5″-wide forearm. Do check the rules of your local club or regional organization to ensure the wider width is allowed in the matches you attend. And if you plan to shoot F-Class as well, stick to 3″. Under F-Class (Open) rules, “the width of the rifle’s forend shall not exceed 76mm (approximately 3 inches)”.
Wider Forearm Stock Options
Most stock-makers still only offer a 3″-wide forearm width with their Light Gun long-range benchrest stocks. However, there are some other options. On request, Joel Russo, Russo Rifle Stocks, can cut a stock with 4″-wide forearm, but that’s not a standard pattern.
If you want a 4″-5″ wide version of the popular MBR Tooley-style long-range stock, Bill Shehane offers a ‘Big Dawg’ version of his MBR Tracker stock. This features a longer, deeper, and wider fore-end for added stability and more resistance to torque with the heavy calibers. Along with having a wider forearm, the Big Dawg stock is cut 4″ longer than a standard Shehane ST-1000 Tracker. This provides a “longer wheelbase” for better balance with very long (30″+) barrels. (The ST-1000 itself is 3″ longer than most benchrest stocks.) The Big Dawg is available with a 4″-wide or 5″-wide forearm, and will handle barrels up to 40″ in length and 1.5″ in diameter. In the top photo, taken by Forum member Preacher, you see a 4″-wide Big Dawg next to a normal ST-1000 Tracker. (Both stocks are symmetrical; there is distortion caused by wide-angle lens.)


This color pattern is what Bill calls “Prairie Dog Camo”, a Rutland laminate in orange and dark gray, with olive ‘accent’ layers. The price for a ‘Big Dawg’ in Rutland laminate is $625. In African Obeche wood (any color choice), the price is $855.00. For more info, contact Bill Shehane at (704) 824-7511, or visit his website, www.ScopeUsOut.com.
Wide Stocks for Rimfire Benchrest
Ultra-wide stocks are also legal in many rimfire benchrest disciplines. Shown below is a rimfire rifle built with a 4″-wide Shehane Big Dawg stock. This gun is used in ARA Unlimited competition. Extra-wide stocks like this can also be used in the IR 50/50 Unlimited Class and RBA Unlimited Class.
Why use a wide stock for rimfire where recoil is not an issue? The extra width definitely provides more stability in the bags. This is noticeable when cycling the action during the loading process — the gun shows less “wiggle” when opening and closing the bolt. The larger mass of wood also, potentially, provides additional vibration damping. A wider stock design carries more weight (per inch of length) and more mass is distributed outboard. Initial testing shows that the wide stocks work well for rimfire shooters who like to grip their gun — the gun feels “planted” with less wobble when the stock is gripped or cheeked by the shooter.

|