|
|
March 16th, 2014

The editors of American Rifleman have introduced a new Q&A Blog covering basic Do-It-Youself projects — ways to set-up, modify or assemble your firearms to make them work best for you. The editors explain the tools, tips and techniques they have used through the years to efficiently complete such projects. These short articles cover small projects, not serious gunsmithing tasks. Here are the four latest entries for the month of March.
|
March 12, 2014
Want to shoot heavy bullets out of an M1 Garand without bending your op rod or damaging your gas plug? All you need is a socket wrench.
Read More >> |
|
March 10, 2014
If you were thinking about using the same torque wrench that you use to snug up your car wheels … STOP!
Read More >> |
|
March 09, 2014
Those brand-new rings you just bought won’t clamp onto the rail on your gun? Here’s why.
Read More >> |
|
March 04, 2014
This short article explains the benefits of a gunsmithing screwdrivers, and explains how to select a set for your needs.
Read More >>
|
Resource Find by EdLongrange. We welcome reader submissions.
March 12th, 2014
 NRA Media recently released a series of informative videos about the Science of Shooting. These videos feature high production values, with super-slow motion segments, as well as helpful computer graphics to illustrate the principles covered. NRA Media recently released a series of informative videos about the Science of Shooting. These videos feature high production values, with super-slow motion segments, as well as helpful computer graphics to illustrate the principles covered.
The videos are narrated by our friend Jessie Duff, a top action pistol shooter (and the first women ever to achieve USPSA Grand Master status). Jessie is assisted by talented shooters such as Top Shot Season 4 Champion Chris Cheng.
There are eight (8) videos in the Firearm Science Video Series. Here are two videos, with links to the rest below.
RECOIL — The Physics of Recoil Explained
While this video focuses on handguns, the principles involved apply to all firearms. The force of recoil is affected by the mass of the firearm, and by the speed and weight of the projectile. On a revolver, as shown in the video, there are various phases of recoil. Grip, and “compensation” porting can change the perceived force of recoil (though the energy is constant for any given ammunition specification).
VELOCITY — Calculating the Speed of a Bullet
This video shows a conventional chronograph with front and rear light sensors. The bullet first trips the front sensor and then the rear sensor as it flies over the unit. The difference in sensor time is used to calculate bullet speed. This is not the only kind of chrono in common use today. The popular MagnetoSpeed chrono works by tracking the bullet as it passes over two magnetic sensors mounted on a bayonet-style fixture on the barrel. Steinert Sensing Systems offers an Acoustic Chronograph that works by measuring the bullet’s supersonic shock-wave. This system has a much larger “sweet spot” than most optical chronographs. Last (but certainly not least) is the brand new Doppler Radar chronograph from MyLabradar.com. This can measure the speed of a bullet without the need to send the round directly over sensors.

Interestingly, this video also explains how, in the days before electric lamps, digital processors, and radar, scientists used a mechanical “Ballistic Pendulum” to calculate bullet velocity using Newtonian physics. The Ballistic Pendulum was first used in the mid 1700s. We have come a long way since then.
Other Firearm Science Videos
March 9th, 2014
There’s a very cool rifle for sale in our Forum Marketplace. Rick F. (aka “Greyfox”) just posted a listing for his Gene Beggs-built skeleton-style benchrest rifle. What makes this rig so highly desirable is the Cobra Drop Port action. A shorter version of Jerry Stiller’s popular Viper action, the Cobra drop port is highly coveted, and very hard-to-find (people have been waiting for years for new Vipers and Cobras). The gun employs a skeleton design, with the rear triangle attached directly to the action and an aluminum bag-rider secured to the barrel. It may seem radical, but this Editor has shot a Gene Beggs benchgun of this design. I can tell you it was extremely accurate and handled great on the bags. Here is the description of Greyfox’s rifle:
Stiller Cobra Drop Port, Right Bolt. Chambered in 220 Beggs .250 NK, 1:14″ twist, Jewell trigger, Beggs skeleton stock, Beggs Tuner. Built by Gene Beggs. Will shoot in .1s and .2s (can be verified). Includes 125 pieces of formed, fired brass, and sizing die. Scope and rings in photos are not included. $1900 insured & shipped in CONUS. CLICK HERE for details.
Even if you are not a benchrest competitor, this would make a wicked Prairie dog rifle to be shot off a portable bench. Having shot a Beggs “Tinkertoy” rifle with Gene himself, this Editor can tell you the “stockless” concept can work, and the Drop Port action is a joy to use (I own a Viper-action benchgun myself). The Greyfox rifle is a .220 Beggs so it is ultra-easy to form brass from the parent .220 Russian case. Whoever buys this unique, easy-to-shoot rifle will get a heck of a lot of accuracy for $1900.00.


See this Rifle in Action at the 2013 UBR Nationals
Note How Cartridge Drops Out Bottom of Action When Bolt is Retracted:

 220 Beggs 220 Beggs
Simple, Accurate, Efficient
We were impressed with the 220 Beggs cartridge. It’s basically a plain 220 Russian with a sharper radius at the neck-shoulder junction. Gene Beggs has commissioned a 220 Beggs reamer with matching seating and full-length sizing dies. The little cartridge achieves 3600+ fps with a 52gr bullet, pushed by Benchmark powder.
From what we could tell during our visit with Gene Beggs in Texas, the 220 Beggs is easy to load for, and performs exceptionally well with either turned (.250″) or no-turn necks. The recoil was noticeably less than a 6mm PPC, making the gun a joy to shoot. This round, we felt, could also be an outstanding varmint cartridge. The velocity is there, and we don’t think any other 22-caliber varmint cartridge is going to beat it for inherent accuracy.
Photo shows bag-rider on Gene Beggs’s own .220 Beggs rifle that we shot in Texas.
February 26th, 2014
Accurate, modular, and supremely versatile, the AR15 is America’s favorite semi-auto rifle. But let’s face it, the AR is a maintenance hog. The AR’s gas tube blows carbon and soot right into the middle of the bolt assembly where it cakes on to the metal. The AR bolt also has many tiny parts, and small recesses, which must be cleaned regularly. This author has seen numerous ARs fail simply because there was gunk (dried lube, carbon, brass shavings) in the ejector slot or extractor spring recess.

 A Clean AR is a Happy AR — Whether You Run ‘Wet’ or ‘Dry’ A Clean AR is a Happy AR — Whether You Run ‘Wet’ or ‘Dry’
There are various schools of thought when it comes to maintaining an AR. Some folks prefer to run their AR “dry” with minimal lube on the lugs and friction surfaces. Other shooters prefer to run their ARs “wet”, with lots of lube. But whatever your preference, you need to clean your AR regularly. And nothing is more important than the AR’s bolt/carrier assembly. Because it is involved in feeding, firing, and extracting, the AR-15 bolt/carrier assembly can be considered the most critical portion of the AR-15 from a maintenance standpoint.
Bolt Take-Down Guide on Top Quark Blog
The editor of the Top Quark Blog has created an excellent illustrated AR15 Bolt Take-Down Guide that shows how to disassemble an AR15 bolt and carrier for regular cleaning. Even if you’re an experienced AR15 shooter, you can learn something from this page (sample at right), and you may want to bookmark it for future reference. The photos are large and clear and there are helpful hints for each step of the process.
The author knows his stuff and offers some important insights. For example, he notes that “Extractor springs in most AR15 bolt assemblies are fairly weak, and this can lead to various extraction-related failures. One of the few high points about Colt assemblies is their usage of higher-strength extractor springs. You can tell the difference by looking at the inner plastic insert. ‘Normal’ springs feature a blue plastic insert, Colt strong springs have a black insert.”
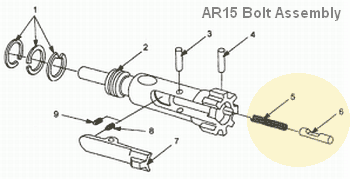
There is one notable oversight on this page — the author doesn’t cover disassembly and cleaning of the ejector assembly. This is actually quite important. A few small brass shavings, combined with carbon and lube in the ejector slot, WILL cause malfunctions. In fact, when this editor is called to diagnose problem ARs, the first things I look at (after swapping magazines) are the ejector recess and the slot for the extractor. Clogged ejectors are responsible for fail-to-ejects and other jams. It is essential that you keep the ejector hole clean. Old, gooey lube residues mixed with carbon and tiny brass shavings in the ejector recess will create all sorts of problems. As shown in the diagram below, it is simple to remove the ejector (#6) and ejector spring (#5), by drifting the ejector retaining pin (#4).
February 5th, 2014
 A while back, while in Arizona, we headed out to the Ben Avery Shooting Facility, located about 27 miles north of downtown Phoenix on I-17. We were impressed by Ben Avery’s vast range complex, which includes a Clay Target (shotgun) center, 1000-yard High Power range, 100-300 yard Benchrest range, rifle and pistol silhouette ranges, handgun ranges, smallbore range, Running Boar range, and a large, 53-bay, 200-yard main range. A while back, while in Arizona, we headed out to the Ben Avery Shooting Facility, located about 27 miles north of downtown Phoenix on I-17. We were impressed by Ben Avery’s vast range complex, which includes a Clay Target (shotgun) center, 1000-yard High Power range, 100-300 yard Benchrest range, rifle and pistol silhouette ranges, handgun ranges, smallbore range, Running Boar range, and a large, 53-bay, 200-yard main range.
At the main range we ran into Forum Member Troy D., who had a brand-spanking new 6mmBR rifle built by Lester Bruno of Bruno Shooters Supply. While breaking-in his new 28″ Krieger barrel, Troy was using Sierra 70gr Blitz-Kings. Accuracy was impressive — the 70 grainers ripped tight, little knots in the high 2s, low 3s. Though his rifle has an 8-twist barrel, Troy was testing the 70s in preparation for a prairie dog trip next week. From what we saw, those p-dogs should be worried. Troy’s gun was a tack-driver with the Sierra Blitz-Kings.

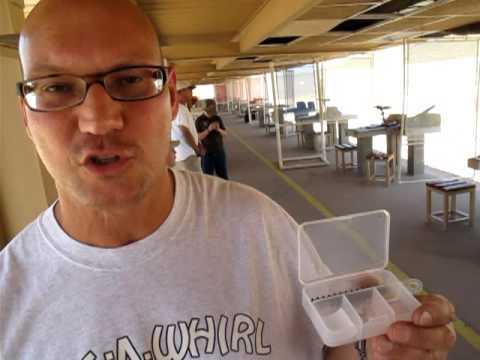
Troy’s Compact Storage Box (Just $1.50!)
While Troy was cleaning between groups, we noticed he was using a compact little box to hold his jags, brushes and patches. The box was the perfect size for these items. Troy explained: “If you’re just taking one rifle to the range, you don’t need to take a big gear box with stuff for all your guns. Apart from solvent, bore guide, and cleaning rod, this little box holds all I really need to clean my rifle.” Troy sourced the box at Cabela’s for $1.50.

January 11th, 2014
 In our Shooters’ Forum, you’ll find a lengthy thread about accuracy problems with a Savage LRPV, chambered in 6mmBR. The gun would repeatedly split groups at 100 yards, and at 300 yards, the “flyers” would open up the groups to 1.5 MOA or larger. Interestingly, the factory test target (at right) showed a split group — not a good sign. In our Shooters’ Forum, you’ll find a lengthy thread about accuracy problems with a Savage LRPV, chambered in 6mmBR. The gun would repeatedly split groups at 100 yards, and at 300 yards, the “flyers” would open up the groups to 1.5 MOA or larger. Interestingly, the factory test target (at right) showed a split group — not a good sign.
The gun’s owner, forum member LR_Shooter, tried a variety of tweaks: “I did this, done that… [changed] torque, tang floated, bedded action, recut chamber, and [adjusted firing pin]”. But nothing really helped. Frustrated, LR_Shooter asked his fellow Forum members for help. Much advice was proffered, including the novel idea of removing the middle action screw in the Savage 3-screw target action. Some of the advice proved helpful, but none of the suggested remedies produced a major improvement. This rifle, out of the box, tossed flyers and no amount of tweaking (or changes in shooting technique) really cured the basic problem. That is, until, the factory barrel got replaced…

New Criterion Pre-Fit Barrel Works Wonders
LR_Shooter acquired a Criterion pre-fit barrel from Jim Briggs at Northland Shooters Supply (NSS). These pre-fits are designed for easy installation with the standard Savage barrel nut. Wouldn’t you know it, with a new 30″ heavy-contour barrel on the LRPV, the gun started shooting way better. No more crazy fliers, no more split groups, no more excessive vertical. And the improvement came without any other major modifications. LR_Shooter reports: “I got a replacement barrel from Jim at NSS. It is a 30″ bull Criterion barrel. So far, without playing with torque screws and having my old setup… I’m very satisfied with the barrel I got. Now I have no problem getting [groups] under 0.25 MOA. Finally this thing can shoot!” The targets below, shot with the new Criterion barrel, speak for themselves. The left target was shot at 100 yards, while the target on the right was shot at 300 yards (very impressive).
Targets Shot with Savage LRPV Fitted with Criterion Barrel

Read Thread on Savage Accuracy Issues Fixed By Criterion Barrel
Moral of the Story — Sometimes A New Barrel Really Is the Right Solution
All of us have struggled at times with a rifle that won’t live up to expectations. This Editor personally struggled for over a year with a .260 Rem Savage with a factory tube. The gun tended to split groups and the POI walked as the barrel heated. I tried one powder/primer combination after another, working through a variety of seating depths over many months. I was persistent. Out of stubbornness, I just believed that sooner or later I’d find the magic load.
Well folks, sometimes there’s really nothing you can do about a sub-par barrel. It is what it is. To really improve a gun’s accuracy (particularly a gun with a factory tube), you may need to open your wallet and get a quality aftermarket barrel. Spending months trying one recipe after another may simply be an overwhelming waste of powder, bullets, and your precious time.
Albert Einstein supposedly said: “Insanity is defined as doing the same thing over and over again, and expecting different results.” Well that sort of describes my efforts with my .260 Rem. Once I had enough evidence that my barrel split groups no matter what load combo (and seating depth) I tried, it was time to pony up for a new barrel. When I did finally screw on a nice PacNor 3-groove Supermatch, that Savage suddenly became a true tack-driver. As re-chambered in 6mmBR with the Pac-Nor, in calm conditions, my Savage will now consistently shoot in the twos with heavy bullets, and it can sometimes dip down into the ones with Berger 80gr flat-base bullets. The moral of the story here is simple — don’t waste weeks or months chasing your tail with a barrel that just won’t deliver (after a reasonable amount of testing). Save up for a custom barrel, get it chambered properly, and stop your cycle of frustration.
Contact Information for Northland Shooters Supply:
E-mail: briggs.j-b@q.com (that is Q.com not G.com)
Phone: (763) 682-4296
Fax: (763) 682-6098
Mailing address:
P.O. Box 333
Buffalo, MN 55313
December 30th, 2013
Sometimes simpler is better when it comes to targets for fun shooting and load testing. While we normally use test targets from our Downloadable Target Page, it’s sometimes easier to just use high-visibility adhesive target dots.
 Hi-Viz Stick-On Dots in Assorted Colors and Diameters Hi-Viz Stick-On Dots in Assorted Colors and Diameters
You can order 1″ target dots in bulk from Data-Labels.com. Many colors are available including fluorescent (hi-viz) Red, Green, Orange, and Yellow. These are bright and easy to see even in fading afternoon light. A pack of twenty (20) sheets (1260 dots total) costs just $5.97 (that works out to $4.74 per thousand). For the 1″-diameter stick-on dots you get 63 dots per sheet. Larger, 1 2/3″-diameter fluorescent dots are also available from Data-Labels.com in 20-sheet packs for $5.97, with 24 large dots per sheet (480 dots total). If you want larger, 2″-diameter dots, sheets with 400 Hi-Viz dots are currently on sale for $5.97 per 20-pack.
If you prefer smaller, 3/4″-diameter circles, Staples.com sells packs with 1008 adhesive dots for $3.64 to $8.39 per pack. Colors include Neon Red (item 538041), Neon Orange (item 538116), Neon Yellow (item 538090), and Neon Green (item 538066), as well as dark blue, light blue, yellow, and dark green. We recommend the Neon Red for most uses, or the Neon Yellow for use on a black background. For $4.41 Staples sells a “Rainbow Pack” (item 297705) with four assorted colors: red, light blue, green, and yellow.

Half-Inch Fluorescent Dots for 100-200 Yards
For close-range work, you may prefer 1/2″-diameter dots. Forum member Steve has found these at Uline.com. The 1/2″ dots are available in a wide variety of colors including fluorescent Red, Pink, Yellow, and Green. Price is $12 for a roll of 1000 dots (item S-2063).
December 26th, 2013
 Here’s an important reminder for readers who have digital keypad entry systems on their gun safes. If you have a safe with an electronic keypad, you should replace the battery every year as a precautionary measure. Here’s an important reminder for readers who have digital keypad entry systems on their gun safes. If you have a safe with an electronic keypad, you should replace the battery every year as a precautionary measure.
I have one safe with a Sargent & Greenleaf (S&G) keypad. I went to get into the safe yesterday. Punched in the combination, but all I got was a rapid “beep, beep, beep, beep” after I finished the last combination entry. I tried again to ensure I entered the combination correctly (I did). But again, the locking system responded with multiple rapid beeps indicating something was wrong. And the safe would not open. Now I was worried….
I popped out the battery holder (which slides in from the bottom of the keypad housing on the door). I removed the battery and tested it with a volt-meter. The year-old Duracell 9v only registered 6.1 volts.
Low voltage was the problem. I went down to the store and got a couple new 9V batteries. I tested the new batteries and both measured 9.4 volts output. I slipped one of the new 9V batteries into the keypad housing, punched in the combination and everything worked OK again. Eureka.
Most electronic locks for safes WILL “remember” the combination for a period of time even when the battery is low (and the keypad’s “brain” should retain the combination when you remove the battery for replacement). However, a dead battery, or extended periods of low voltage can give you problems. Don’t rely on wishful thinking…
If the battery on your safe is more than a year old, or if it is not giving you the right voltage, replace it today!
|
My Sargent & Greenleaf (S&G) keypad takes one (1) 9v battery. The version below takes two. Note how the battery compartment slides in from the bottom:
 |
December 23rd, 2013
Effective hearing protection is a must whenever you are shooting firearms or when you are in the vicinity of gun-shots. For ultimate protection, we recommend a good set of tapered foam earplugs, topped by ear-muffs. However, there are situations when you may prefer lighter-weight hearing protection that can be quickly removed. For example, if you are standing well behind the firing line as an observer, or if you are working as a rangemaster or waddie some distance away from the shooters.
In addition to traditional ear plugs and ear-muffs, new band-style protectors provide a third sound-blocking option. Howard Leight, a top name in the sound-protection business, now offers the “Quiet Band”, a device with soft foam plugs attached to a plastic band worn around the neck. This “Quiet Band” product is comfortable, easy to deploy, and surprisingly effective.

 Three Quiet Band Models Three Quiet Band Models
There are three (3) types of Leight Quiet Band® sound protectors. We prefer the QB2 Supra-aural model (item QB2HYG, NRR 25). As shown in the photos, the NRR 25-rated QB2 positions cone-shaped foam pads next to the ear openings and holds them there with light pressure from the orange-colored band. There is also an Inner-aural version (item QB1HYG, yellow band, NRR 27), and a Semi-aural model (item QB3HYG, red band, NRR 21). Our preferred QB2 Supra-aural (orange band) model is just as comfortable as the QB3 (red band) version, and offers much better protection. The QB1 Inner-aural (yellow band) model requires that you place the ear buds in the ear canal, so it’s not really any easier to use than conventional earplugs. That’s why we like the QB2 Supra-aural model best of all. Other users agree. Here’s what two QB2 owners had to say:
 “I first saw these used by Hickok45 on YouTube and he talked positively about them. I got two and gave them a try. At first, I didn’t think they were going to work very well. After some fiddling, I found they work pretty darn good. With my ears, they fit the best if the band starts on top of my head, I insert the plugs then rotate the band behind my head. PRESTO, perfect fit. Shooting the 9mm and 12 gauge out back was comfortable with no ringing afterward. [They are] small and easy to transport — just throw in the range bag. Yet, they are big enough to keep around your neck out of the way[.] I can sit these Howard Leights down on the shooting bench without worrying about them getting dirty since the band is curved, placing the plugs in the air. I highly recommend them to anybody needing banded hearing protection.” — Tom W. “I first saw these used by Hickok45 on YouTube and he talked positively about them. I got two and gave them a try. At first, I didn’t think they were going to work very well. After some fiddling, I found they work pretty darn good. With my ears, they fit the best if the band starts on top of my head, I insert the plugs then rotate the band behind my head. PRESTO, perfect fit. Shooting the 9mm and 12 gauge out back was comfortable with no ringing afterward. [They are] small and easy to transport — just throw in the range bag. Yet, they are big enough to keep around your neck out of the way[.] I can sit these Howard Leights down on the shooting bench without worrying about them getting dirty since the band is curved, placing the plugs in the air. I highly recommend them to anybody needing banded hearing protection.” — Tom W.
|
“Great for woodworkers — These are lightweight AND very effective at reducing noise. When not in use the band hangs loosely around your neck, out of your way completely. Very cost effective for a great product!” — Sheri D.
Quiet Bands Are Much Less Expensive Than Earmuffs
Quiet Band® sound protectors can be purchased from many online vendors for under $6.00 per set, which includes a spare pair of ear buds. Amazon.com has the Leight QB2 Supre-Aural for just $3.57 per set, while Enviro Safety Products currently sells the QB2 for $4.20 per set. Replacement ear buds are available and sold by the pair. You can also buy a Ten-Unit Bulk Pack of QB2 Quiet Bands for $35.52 with free shipping. If you help run shooting matches (or training programs), you may want to buy these in bulk and provide them to Range Officers and pit workers. |
|
December 19th, 2013
Since 2010, Lapua has shipped its quality cartridge brass in sturdy blue plastic boxes. Here’s a handy tip for you — don’t toss the plastic boxes when you load up your brass! These are double-duty containers. If you’re not familiar with “Blue Box” Lapua brass, you may not realize that the boxes are designed to serve as 50-round carriers for your loaded ammo and fired cases. (Yes we know some folks who’ve been tossing out their blue boxes without knowing how the boxes work as caddies.)
Snapped in place under the box lid is a rectangular plastic grid that fits in the bottom of the box. Pop the grid loose and slide it into the box with the smooth side facing up. Side supports molded into the lower section hold the grid in place.

Voilà, instant Ammo Box! Each grid contains holes for fifty (50) loaded rounds or empty cases. The convertible plastic container/ammo box is a great idea that Lapua executed very nicely. Now you have even more motivation to purchase your cartridge brass from Lapua.

|


