For many cartridge types, Hornady Superformance ammunition provides enhanced velocity compared to some other types of factory-loaded ammo. However, Hornady has found that there may be issues when Superformance ammo is shot in gas-operated guns with barrels under 20″, or with barrels fitted with suppressors. This is because the gas returning from the barrel port may cause the bolt to begin unlocking prematurely. Hornady has published the following information concerning the uses of Superformance ammo in direct impingment and gas piston self-loading rifles.
Internal Ballistics of Superformance Ammo in Semi-Auto Guns
Superformance™ ammunition is tested and is safely within SAAMI pressure guidelines. Gas operated (direct impingement or gas piston) firearms are perfectly safe to use with Superformance ammunition. However, Hornady ballisticians have conducted testing with a variety of guns (including guns equipped with suppressors), and our findings conclude that some systems work far better with Superformance ammunition than others.
It is recommended that to get the best functioning with Superformance ammunition in gas operated/gas piston semi-automatic or select fire guns, rifle length gas systems with 20 inch or longer barrel lengths are best for reliable firing and extraction. Any other configuration — particularly shorter barrels/gas systems — are best served with the installation of an adjustable gas system, ESPECIALLY if a suppressor is to be installed.
Due to the longer duration of peak pressure produced by Superformance, the post peak/declining port pressure at common carbine and mid-length gas port locations is still higher than that produced by standard propellant. This has a tendency to flood the system with a larger volume of gas, at a higher velocity, that tries to open the bolt of the gun too fast. It’s a timing issue. The cartridge case is still swollen from the application of pressure during firing while the gun is simultaneously trying to extract the cartridge case before it has had an opportunity to settle back to its original size, or more simply: the gun is still in the process or firing while it’s trying to extract the cartridge case.
If the firearm and the ammunition are not in sync, there can be what is commonly identified as “pressure signs” on the cartridge case. This is exhibited by the movement/marring of the head of the cartridge case, cratered primers, flat primers, ripped or ruptured cartridge cases, “popped primers”, and/or any combination of these effects. If any of these “pressure signs”; are apparent, stop firing immediately. If an adjustable gas system is installed, it is advisable to reduce the amount of gas flowing through the system by closing the gas port until the gun operates correctly.
With the installation of an adjustable gas system, gas pressure can be metered to a point that enough gas is applied to open the bolt, but at a slower rate to allow the cartridge case to return to its original diameter prior to the movement of the bolt, and thus allow for proper extraction.
Pressure VS Gas Port Location
Due to the longer duration of peak pressure produced by Superformance™, the post peak/declining pressure at common carbine and mid-length gas port locations is still higher than that produced by standard propellant. However, there is very little difference in port pressure between Superformance™ and standard propellants at the rifle length port location.
Superformance and Suppressors
The use of suppressors on rifles creates yet another dynamic in firearms design that is not commonly understood or communicated. Consider the suppressor on a firearm the same as a muffler on a car. The suppressor works as a filter for the gas (noise) that is escaping the barrel during firing. As a “filter”, it takes longer for the gas to leave the confines of the firearm, and thus, it creates back pressure. This back pressure, ESPECIALLY in a gas operated firearm forces an extensive amount of gas back through the firearm’s operating system that may create too much thrust too early during the firearm’s cycle of operation.
To counteract this back pressure, the use of an adjustable gas system is advised. By metering the gas system to ensure that it will cycle the firearm correctly and not flood the system with gas/pressure, the gun will work properly and will still benefit dramatically from the increased velocity potential of Superformance ammunition.
Gunsafes can be fitted with either an electronic keypad-style lock, or a conventional dial lock. In our Gunsafe Buyer’s Guide, we explain the important features of both dial and electronic lock systems. Many safe-makers will tell you that consumers prefer electronic locks for convenience. On the other hand, most of the locksmiths we’ve polled believe that the “old-fashioned” dial locks, such as the Sargent & Greenleaf model 6730, will be more reliable in the long run.
Here is the opinion of RFB from Michigan. He is a professional locksmith with over two decades of experience servicing locks and safes of all brands and types:
What a Professional Locksmith Says:
For the convenience of quick opening, the electronic locks can’t be beat. However, for endurance and years of trouble-free use, the electronics can’t compare with the dial lock.
I’ve earned my living, the past 22 years, servicing locks of all types. This includes opening safes that can’t otherwise be opened. I do warranty work for several safe manufacturers (including Liberty). What I’ve learned in all those years is that manual dial locks have very few problems. The most common is a loose dial ring which can shift either left or right, which will result in the index point being in the wrong place for proper tumbler alignment. This is simple to fix.
Electronic locks, however, can have all kinds of issues, and none (except bad key-pad) are easy to fix, and when one goes bad, it must be drilled into to open it. IMO, it’s not a matter of ‘if’ an electronic lock will ultimately fail, but a matter of ‘when’ it will fail. Over the past 10 years or so, since electronics have become more and more prevalent, I’ve had to drill open bad electronic locks vs. bad manual dial locks on a ratio of about 20-1.
My professional opinion is to get the manual dial lock, unless you’ve got a good friend who is a locksmith/safecracker.
How Secure is Your Lock?
RFB tells us that both dial and electronic locks offer good security, provided it’s a good quality lock made by LaGard, Sargent & Greenleaf, Amsec, or Kaba/Ilco. However, RFB warns that “Some of the ‘cheaper’ locks (both manual and electronic) however, are very simple to bypass.
An electronic lock that’s glued or ‘stuck’ to the door with double-sided tape, and has its ‘brain’ on the outside of the lock in the same housing as the keypad, and merely sends power to an inner solenoid via a pair of wires through the door, is a thief’s best friend. The good ones have the brain inside the safe, inaccessible from the outside.
No amateur can ‘manipulate’ either a good manual or electronic lock. Both give you a theoretical one million possible combinations. I say ‘theoretical’ because there are many combinations that cannot, or should not, be used. You wouldn’t set your combo on a dial lock to 01-01-01 etc., nor would you set an electronic to 1-1-1-1-1-1, or 1-2-3-4-5-6.”
Tips for Dial Locks
RFB notes that “The speed, and ease of use, of a manual dial lock can be improved upon, simply by having your combo reset using certain guidelines. Avoid high numbers above 50. Having a 1st number in the 40s, 2nd number anywhere from 0-25, and 3rd number between 25 and 35 will cut dialing time in half, without compromisuing security. (For mechanical reasons I won’t get into here, the 3rd number of a good manual dial lock cannot — or should not — be set to any number between 95 & 20).”
Tips for Electronic Locks
Electronic locks can have the combination changed by the user much more easily than dial locks. But, RFB explains: “That can be a double-edged sword. More than a few times I’ve had to drill open a safe with an electronic lock that has had the combo changed incorrectly by the user, resulting in an unknown number that nobody can determine. Also, don’t forget that electronic locks have a ‘wrong-number lock-out’. I would NOT rely on the normal quickness of an electronic 6-number combo in an emergency situation. If for any reason (panic etc.) you punch in the wrong number several times, the lock will shut down for a 5-minute ‘penalty’.
LaGard electronic locks all come from the assembly line set to 1-2-3-4-5-6. Most safe companies (Granite-Winchester is one) leave it at that, and either the retailer or the end user must reset it. My local Walmart store had those same Winchester safes on display, and one day I was in the sporting goods section near the safe display, and another customer asked the Walmart employee if she could open the safe so he could look inside. She said “no, sorry, I don’t have the combination handy”. I walked over, never said a word… just punched in 1-2-3-4-5-6, turned the handle opening the door, and walked away… again not saying a word. They both just looked at me… dumbfounded that I could open it like that.
To get the most life out of that LaGard [or other electronic lock], you should change the battery at least once a year, whether it needs it or not. Low voltage won’t necessarily shut down the lock, but using it in a low voltage situation is bad for the electronics, and eventually will cause lock failure. C’mon, how much does a 9-volt Duracell cost? A few bucks is a good investment.”
IMPORTANT: If you do nothing else to maintain your digital-lock safe, replace the battery every year. And get a fresh battery (with a release date) from the store — don’t just pull a battery out of a storage bin, even if it’s never been used. Old batteries can degrade, even when in storage.
Safe Warranties — What is NOT Covered
RFB cautions that “With most gunsafes the ‘free repair/replacement’ warranty covers the lock only… not the door of the safe, which will have some holes drilled through it to remove that bad lock. The only proper way to repair those holes is to weld them. I don’t know about you, but most of my customers don’t like welding done inside their home, and the safe must be moved outside. Warranties typically won’t cover that moving cost if your safe is in a difficult to move outside location. Trust me, I’ve been there, done that.”
If you are considering purchasing a sound moderator (aka “suppressor” or “can”) for one or more of your rifles, a video from Surefire explains the many benefits of modern suppressors. Sound moderators not only reduce the audible sound coming from a firearm, but they also reduce flash signature, dust signature, and recoil.
In the video below, Surefire highlights the features and benefits of its line of quick-attach suppressors. These are crafted from special alloys that are “stronger at 1000° F than stainless steel is cold.” While the video focuses on the use of suppressors by military and police personnel, these devices are also beneficial for hunters and competitive tactical shooters.
Noise Reduction
A shot from a .308 Win rifle can be as loud as 167 db to the shooter. Notably, the noise level can be just as great to someone positioned one meter away (Source: 1999 Finish Suppressor Trials). What’s worse is that popular muzzle brakes can INCREASE shooters’ noise exposure by 5 to 10 db. The noise level at which hearing damage can occur is about 140 db. A quality modern suppressor can reduce .308 Win rifle shot noise levels to 130 db or less.
Flash Signature Reduction
For a varminter, a quality suppressor can reduce the visible muzzle flash from a rifle by 90% or more. That’s important when hunting at night. The bright flash can both spook game and temporarily degrade the hunters’ night vision. Using a suppressor can help the shooter maintain his night-adapted vision.
Recoil Reduction
Recoil reduction is a real benefit. In 1992, Finland’s National Board of Labor Protection tested a variety of suppressors on both bolt-action hunting rifles and select-fire military rifles. The study concluded that recoil reduction was significant: “Suppressors reduced recoil energy by 20 to 30 percent, or about as must as muzzle brakes, making powerful bolt-action hunting rifles considerably less painful to shoot (especially repeated shots in training).”
Dust Signature
When firing prone, a rifle with a muzzle brake kicks up a large cloud of dust. (Watch video at 3:00). In a military situation, this dust signature can reveal the shooter’s position — with potentially disastrous consequences. For a tactical competitor, the dust may prevent recognition of a hit while impeding a rapid second-shot. For the varminter, the dust cloud is a nuisance that may prevent him from seeing his hits, while sending critters scurrying back into cover.
Message to Politicians — Suppressors Will Save Tax Dollars
Here is an interesting finding from the 1992 Finland Suppressor Project: “The unit price of a mass-produced suppressor may be reduced to $50 to $70 (1992 prices). [This low cost] will make cost-effectiveness of the suppressor far better than that of any shooting range [sound-proofing]… and, actually, also better than the cost-effectiveness of hearing protection, especially when several persons are present while just one of them is shooting at a time.” Too bad most politicians can’t seem to understand these points. They still view suppressors as evil tools employed by gangsters, rather than proven safety devices that will reduce noise pollution.
Is the “price of noise” something we really need to consider from a public policy standpoint? Absolutely. In 2004 the Veterans Administration paid out $633.8 million in compensation to 378,982 vets whose main disability is hearing loss. Only a small fraction of those vets saw combat; most damaged their hearing during weapons training activities.
Forum Member Okey developed a cool, low-budget, long-range target cam system that displays target views on a large, flat-screen TV. Initial testing shows the system works very well. The TV monitor is installed in a Shooting Shack that allows year-round shooting, even in cold weather. The big monitor allows shooters to easily see their groups from any shooting position in the shack.
Okey tells us: “Here’s a system my buddy and I put together. He is the brains behind it. I had the charge card. This is a home-made wireless target cam for long range shooting. It runs off a motorcycle or car battery. It uses a plain old camcorder camera, and a 2.4 GHz wireless digital link. The goal was to design something that has at least a 1000-yard range with good battery life. The transmitter puts out less than a watt, and runs on 12 volts. The camera runs on 7 volts, so there’s an on-board voltage regulator. The system draws a little less than one amp, so battery life estimate is simply the amp-hour rating of the battery. Everything was done to permit fairly rough handling, but it’s obviously not bullet-proof. It will last until somebody puts a 6mm hole in it.”
Back at the shack, there’s a high-gain receiving antenna, the receiver, and a wall-mounted flat TV. Okey notes: “Since the transmitter is fairly low power, we needed lots of antenna gain. We cobbled the system together and tested it at 100 yards before the conversion to DC power. It had lots of headroom, and should perform well without adding any more antenna gain. The system has worked well at 600 yards, with a reliable signal and good image. Look below for the image of the targets at 600 yards. We had the image zoomed to eight sheets of paper and could still see the hits.”
Recommended Equipment Sources
The 700mW 2.4 GHz A/V transmitter and receiver were sourced from ProtectionDepot.com. Combo price for both transmitter and receiver was a reasonable $179.00 (NOTE: it is $159.99 ON SALE right now, November 2013). The 2.4 gHZ, 24 dBi antenna cost only $57.99 from L-Com.com.
Ten bucks off an order of $25.00 or more? Now that’s a deal. Applied Ballistics LLC is making this limited-time one-week special offer as a way of thanking its Facebook followers. Bryan Litz explains: “To show our appreciation and celebrate reaching 2,500 likes, we are offering everyone $10 off your entire purchase of $25 or more. This offer is good today (November 4, 2013) through Sunday, November 10, 2013.” To get your onetime discount, simply enter offer Code ‘FBLike’ when shopping via the Applied Ballistics Webstore. NOTE: You do NOT need to be registered with Facebook to qualify for the ten-dollar discount. This deal is for everybody. Can’t complain about that.
A year ago, SAAMI released an important video concerning ammo and fire. With professional fire-fighters standing by, over 400,000 rounds of ammo were incinerated in a series of eye-opening tests. If you haven’t had the chance to view this video yet, you should take the time to watch it now.
The Sporting Arms and Ammunition Manufacturers’ Institute (SAAMI) has produced an amazing 25-minute video that shows what actually happens to sporting ammunition involved in a fire. This video shows the results of serious tests conducted with the assistance of professional fire crews. We strongly recommend you watch this video, all the way through. It dispels many myths, while demonstrating what really happens when ammunition is burned, dropped, or crushed.
Watch SAAMI Ammunition Testing Video
Video Timeline
2:10 Impact Test (ignited outside firearm)
3:40 65-foot Drop Test
5:08 Bullet Impact (.308 Win firing)
7:55 Blasting Cap Attacks
9:55 Bulldozer and Forklift Tests
12:20 Boxed Ammo Bonfire
15:37 Bonfire without Packaging
17:21 Retail Store Simulation Burn
20:55 Truck Trailer Burn
Over 400,000 rounds of ammunition were used in the tests. Some of the footage is quite remarkable. Testers built a bonfire with 28,000 rounds of boxed ammo soaked in diesel fuel. Then the testers loaded five pallets of ammo (250,000 rounds) in the back of a semi-truck, and torched it all using wood and paper fire-starting materials doused with diesel fuel.
The video shows that, when ammo boxes are set on fire, and ammunition does discharge, the bullet normally exits at low speed and low pressure. SAAMI states: “Smokeless powders must be confined to propel a projectile at high velocity. When not in a firearm, projectile velocities are extremely low.” At distances of 10 meters, bullets launched from “cooked-off” ammo would not penetrate the normal “turn-out gear” worn by fire-fighters.
We are not suggesting you disregard the risks of ammo “cooking off” in a fire, but you will learn the realities of the situation by watching the video. There are some amazing demonstrations — including a simulated retail store fire with 115,000 rounds of ammo in boxes. As cartridges cook off, it sounds like a battery of machine-guns, but projectiles did not penetrate the “store” walls, or even two layers of sheet-rock. The fire crew puts out the “store fire” easily in under 20 seconds, just using water.
Additional Testing: Drop Test, Projectile Test, Crush Test, Blasting Cap Test
Drop Test
The video also offers interesting ammo-handling tests. Boxes of ammo were dropped from a height of 65 feet. Only a tiny fraction of the cartridges discharged, and there was no chain-fire. SAAMI concludes: “When dropped from extreme heights (65 feet), sporting ammunition is unlikely to ignite. If a cartridge ignites, it does not propagate.”
Rifle Fire Test
SAAMI’s testers even tried to blow up boxes of ammunition with rifle fire. Boxes of loaded ammo were shot with .308 Win rounds from 65 yards. The video includes fascinating slow-motion footage showing rounds penetrating boxes of rifle cartridges, pistol ammo, and shotgun shells. Individual cartridges that were penetrated were destroyed, but adjacent cartridges suffered little damage, other than some powder leakage. SAAMI observed: “Most of the ammunition did not ignite. When a cartridge did ignite, there was no chain reaction.”
Bulldozer Crush Test
The test team also did an amazing “crush-test” using a Bulldozer. First boxes of loaded ammo, then loose piles of ammo, were crushed under the treads of a Bulldozer. A handful of rounds fired off, but again there was no chain-fire, and no large explosion. SAAMI observed: “Even in the most extreme conditions of compression and friction, sporting ammunition is unlikely to ignite. [If it does ignite when crushed] it does not propagate.”
Blasting Cap Test
Perhaps most amazingly, the testers were not able to get ammunition to chain-fire (detonate all at once), even when using blasting caps affixed directly to live primers. In the SAAMI test, a blasting cap was placed on the primer of a round housed in a large box of ammo. One cartridge ignited but the rest of the boxed ammo was relatively undamaged and there was no propagation.
Mirage shields are useful for all shooters, not just hard-core competitors. A mirage shield helps you see your target better, without distortion caused by heat waves coming off your barrel. This isn’t rocket science — it’s a simple, inexpensive way to see better and shooter more accurately. We’ve advocated that varmint shooters give mirage bands a try on those hot summer groundhog and prairie dog expeditions. And we observed that practically every shooter at the 2013 World F-Class Championship was using a mirage shield of some kind.
Forum member Fabian from Germany, whose Sako 6BR was featured as a Gun of the Week, has devised a clever and inexpensive mirage band option. Fabian is a radiologist by trade. He notes that many X-ray machines require a daily test film for calibration. These are normally just discarded in the trash, so you can get them for free.
Fabian explains: “I’m a radiologist, so I handle medical x-ray films every day. Modern X-ray machines use laser-based printers and they need to print a test-film every day. One x-ray film is about 43×35 cm (16.9″ x 13.7″). Made from polyester, the films are very stable and only 0.007″ inches thick. They are light-weight, semi-transparent, and very stable. Using normal scissors, you can easily cut four mirage shields from a single sheet of film. Then glue on some velcro to attach to your barrel. Try it, you will not be disappointed.”
If you’re not into making your own mirage shield, aka “mirage band” or “mirage shade”, you can also purchase these from Sinclair International. Two Velcro-attached sizes are offered, 18″ long (item 749-000-423WS) and 24″ inches long (item 749-000-426WS). Both sizes are priced at a reasonable $4.95.
We can predict, with some certainty, how long a light bulb will last (in use), or a shingle roof, or even a nuclear reactor. But how about barrels? Is there a way to reliably estimate barrel life based on known characteristics? This article explains one effort to quantify barrel life…
How long will a barrel last before the accuracy “goes south”? There are so many variables involved (powder type, bore diameter, bullet coatings etc.) that it’s hard to predict. You might say “Well, my buddy has a .243 and he got 1500 rounds before the throat was shot out” — those kind of comparisons can be useful, but they’re not very scientific, and they won’t help much if you’ve got a gun in a new chambering (such as the 6.5×47) for which long-term test results are lacking.
Is there a more reliable way to predict barrel life — one that will work for a broad range of calibers? Well, Forum member MikeCr has developed an Excel spreadsheet that accounts for a number of variables, and gives a pretty good estimate of useful barrel life, whether you’re shooting a .223 Rem or a 338 Lapua Magnum. Mike’s program predicts barrel life using five variables: 1) Bullet Diameter; 2) Powder Charge weight; 3) Powder Heat Potential (KJ/kg); 4) Pressure (in psi); and 5) Bullet Coating (yes/no). Mike provides a table with Heat Potential ratings for most popular powder types. The user needs to know the pressure of his load. This can be estimated with QuickLOAD.
You can download the lastest version of Mike’s spreadsheet below. You’ll need Excel or an Excel viewer to open the file.
Shown below is Mike’s Spreadsheet, with variables for a 6BR shooting 105gr “naked” bullets with 30.3 grains of Hodgdon Varget powder. The formula predicts 2401 rounds of barrel life. That corresponds pretty well to what we’d expect for a 6BR — about 2500 rounds.
Mike observes: “There has been alot of discussion lately related to cartridge design and resulting barrel life. This is a really important factor to consider amongst a myriad of choices. Barrel life is controversial, and subjective. There are no clear-cut standards for comparison. But a few years ago, I put together a spreadsheet based on Bart Bobbit’s rule of thumb. It worked pretty good, only occasionally failing some tests when validated against posted barrel lives.
According to Ken Howell, I had to account for pressure. And Henry Child’s powder temperature testing provided another piece needed. So, I’ve tweaked it here and there to pass more tests. From 223rem to 300 UltraMagnum. Another element added, but turned off is shot interval. I would need way more tests to lock in on this. But everyone knows, the faster you shoot, the worse the barrel life.
Anyway, another factor hard to define is ‘accurate’ barrel life. This cannot be quantified without standards. Barrels are replaced when expectations are no longer met. I feel that a [barrel] passes peak potential in a finite period due to throat erosion. But that don’t mean it’s toast, if it still shoots well enough. It’s just as likely that many of us never see that peak potential anyway. It’s a slippery thing. Point-blank BR competitors will toss a barrel when it leaves the 1s. I could get another 4000 rounds from it, and be content with its performance, I’m sure.”
NOTE: Mike says: “This spreadsheet may show a lower barrel life than you prefer. But it pretty well spotlights cartridges to stay away from if you plan much time at the range or in dog town.”
Editor’s Comment: We want to stress that Mike’s spreadsheet is a helpful tool, but it is not a definitive “take-it-to-the-bank” indicator of barrel life. Mike cautions that predicting barrel life involves so many different factors (including how hot the barrel is run), that the task is a bit like predicting tread life on car tires. Still, the spreadsheet is very helpful. It can certainly warn us that some chamberings (such as the 6-284) are likely to be barrel burners. That can help you make a smart decision when choosing a chambering for your next rifle.
Would you like a handgun safe that opens instantly when you wave your hand over it? Science fiction? No, with modern RFID technology, this is now a reality. The Gun Box, a sleek, metal-boded handgun safe, employs the latest technology to offer instant access with high security. The basic RF Gun Box opens in response to a personalized RFID chip in a wristband or ring. The Biometric Gun Box offers both Fingerprint-scan and RFID (radio) opening. The premier-level Gun Box has both RFID and Biometric access PLUS a built-in, battery-powered GPS transmitter that tracks the unit’s location if the Gun Box is ever “lifted” by a thief. The top-of-the line model’s internal accelerometer even allows the Gun Box to notify the owner if it is moved, tilted, or opened.
Watch the Video to See How the Gun Box Works (this is pretty amazing).
We like it when an inventor comes up with a “better mousetrap”, or in this case, a better handgun safe. Ryan Hyde, the Utah-based inventor of the Gun Box, is seeking “crowd-funding” donations to move his innovative product to the next level (full production). The Gun Box is seeking $100,000 via its Indiegogo Campaign with funding options ranging from $10 to $390. You can pre-order a Gun Box, or just donate some cash in return for a T-shirt or other swag.
A next-generation gun safe, The Gun Box has many unique features:
RFID and/or fingerprint access (no traditional key or passcode).
Alert notifications when Gun Box is opened, moved, or tampered.
Strong, die-cast aluminum alloy shell 0.15 to .20 inches thick
(3-5 times thicker than most).
If you’ve read our feature story on Ultrasonic Cleaning by Jason Baney, you’ve seen the remarkable results that can be achieved with this method. Ultrasonic cleaning has many advantages over traditional tumbling methods of case cleaning. There is no dust or media residue to remove from the brass, and when done right, the cases come out clean and shiney, inside and out, even the primer pockets.
In its Benchtalk Archives, Brownell’s has an excellent article discussing Ultrasonic Case Cleaning. Brownell’s staff compares results, with measured dwell times from 5 to 75 minutes, using both Mpro-7 and HCS 200 cleaning solutions. Tests are performed with once-fired and 5X-fired Tactical 20 (Tac20) cases, as well as once-fired .260 Rem Cases. The article also compares the results from ultrasonic cleaning vs. tumbling in walnut media. Below are Brownell’s results for Tac20 cases with the HCS 200 (non-acidic solution). Go to Brownell’s article for MPro7 results and Rem 260 results.
HCS 200 Cleaning Solution Test
Procedure — Solution was de-gassed for 15 minutes, then 63 Tac20 cases were placed in a single layer, in stainless steel mesh basket. The temperature of the starting solution was 102° F. When the cases were removed the temperature was 110° F.
Once-Fired Tactical Twenty Cases (HCS 200) — Observations 5 minutes: The exterior of the cases are not significantly brighter/cleaner. The primer pockets and case interiors are still dirty. 10 minutes: Exterior of the cases are brighter. 70% of the cases show some degree of cleaning of the primer pockets. Little difference seen inside the case, but case mouths are cleaner. 15 minutes: Case brightness is about the same. Still only 70% of the primer pockets are clean, but a larger portion of each is cleaner. A Q-tip swabbed inside the cases shows that carbon/powder residues are loosening up. 20 minutes: Case exteriors are brightening up. 80-85% of the primer pockets are about 90% clean. The insides of the cases and case mouths are cleaner. 25 minutes: Cases are brighter/cleaner than even new brass. 80-85% of the cases have almost completely clean primer pockets. The inside of the cases are 80-90% clean. 30 minutes: The insides of the cases and case mouths appear to be completely clean. 87% of the primer pockets are virtually 100% clean. 13% of the cases had stubborn primer pocket residue that could not be completely removed. 60 minutes: Eight cases (13%) were placed in the tank for another 30 minutes to try to remove the remaining residue in their primer pockets. Six out of the eight cases were completely clean.
Five-Times Fired Tac20 Cases — Observations 30 minutes: Based on the above observations, I didn’t begin to observe these 5-time fired cases until after 30 minutes: The exterior cases are bright/clean. Brighter than new cases. The primer pockets on 75% of the cases are 75% clean. The remaining cases had primer pockets that were only 25% clean. The inside of the cases appear to be clean. 65 minutes: 25% of the primer pockets were 95% clean, 25% of the primer pockets were 90% clean, 25% of the primer pockets were 85% clean; and 25% were 80% clean. 75 minutes: 75% of the primer pockets were 90% clean.
How Does Ultrasonic Cleaning Work? The Brownell’s article explains: “Ultrasonic cleaning uses high-frequency sound waves (generally between 20-80 kHz) to remove a variety of contaminants from objects immersed in a liquid. The result of these high-frequency sound waves is a process called cavitation. These high frequency bursts of ultrasonic energy produce a three-dimensional wave of alternating positive and negative pressure areas as the sound wave passes through the solution. During negative pressure, microscopic cavitation bubbles form and will continue to grown until they reach resonant size. As the positive sound wave passes, the pressure rises rapidly and implodes these tiny bubbles. Before these minuscule bubbles implode they store a tremendous amount of energy. These bubbles can be as hot as 10,000 degrees and have as much as 50,000 lbs per square inch of pressure. This sounds alarming, but you have to remember that these bubbles are microscopic in nature and pose no harm to anything, unless you are a carbon /powder residue deposit on a cartridge case!
When this cavitation bubble implodes near your brass case, it transforms the bubble into a jet about 1/10th of its size. This jet of energy can travel as fast as 400 km/hour. At 43 kHz, as is the frequency for our L & R HCS 200 ultrasonic cleaner, this is happening 43,000 times per second. This micro-burst of extreme energy is responsible for removing contaminants from the surface of your cartridge brass. Ultrasonic cleaning can reach into crevices and inaccessible areas and remove surface debris that can’t be cleaned by any other process.”


 Gunsafes can be fitted with either an electronic keypad-style lock, or a conventional dial lock. In our
  Tips for Dial Locks
 LaGard electronic locks all come from the assembly line set to 1-2-3-4-5-6. Most safe companies (Granite-Winchester is one) leave it at that, and either the retailer or the end user must reset it. My local Walmart store had those same Winchester safes on display, and one day I was in the sporting goods section near the safe display, and another customer asked the Walmart employee if she could open the safe so he could look inside. She said “no, sorry, I don’t have the combination handy”. I walked over, never said a word… just punched in 1-2-3-4-5-6, turned the handle opening the door, and walked away… again not saying a word. They both just looked at me… dumbfounded that I could open it like that.


 Flash Signature Reduction
 Forum Member Okey developed a cool, low-budget, long-range target cam system that displays target views on a large, flat-screen TV. Initial testing shows the system works very well. The TV monitor is installed in a Shooting Shack that allows year-round shooting, even in cold weather. The big monitor allows shooters to easily see their groups from any shooting position in the shack.


 The Sporting Arms and Ammunition Manufacturers’ Institute (

 We are not suggesting you disregard the risks of ammo “cooking off” in a fire, but you will learn the realities of the situation by watching the video. There are some amazing demonstrations — including a simulated retail store fire with 115,000 rounds of ammo in boxes. As cartridges cook off, it sounds like a battery of machine-guns, but projectiles did not penetrate the “store” walls, or even two layers of sheet-rock. The fire crew puts out the “store fire” easily in under 20 seconds, just using water.


 How long will a barrel last before the accuracy “goes south”? There are so many variables involved (powder type, bore diameter, bullet coatings etc.) that it’s hard to predict. You might say “Well, my buddy has a .243 and he got 1500 rounds before the throat was shot out” — those kind of comparisons can be useful, but they’re not very scientific, and they won’t help much if you’ve got a gun in a new chambering (such as the 6.5×47) for which long-term test results are lacking.


 If you’ve read our feature story on
 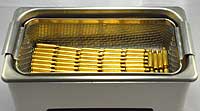 The Brownell’s article explains: “Ultrasonic cleaning uses high-frequency sound waves (generally between 20-80 kHz) to remove a variety of contaminants from objects immersed in a liquid. The result of these high-frequency sound waves is a process called cavitation. These high frequency bursts of ultrasonic energy produce a three-dimensional wave of alternating positive and negative pressure areas as the sound wave passes through the solution. During negative pressure, microscopic cavitation bubbles form and will continue to grown until they reach resonant size. As the positive sound wave passes, the pressure rises rapidly and implodes these tiny bubbles. Before these minuscule bubbles implode they store a tremendous amount of energy. These bubbles can be as hot as 10,000 degrees and have as much as 50,000 lbs per square inch of pressure. This sounds alarming, but you have to remember that these bubbles are microscopic in nature and pose no harm to anything, unless you are a carbon /powder residue deposit on a cartridge case!
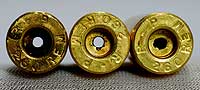 When this cavitation bubble implodes near your brass case, it transforms the bubble into a jet about 1/10th of its size. This jet of energy can travel as fast as 400 km/hour. At 43 kHz, as is the frequency for our L & R HCS 200 ultrasonic cleaner, this is happening 43,000 times per second. This micro-burst of extreme energy is responsible for removing contaminants from the surface of your cartridge brass. Ultrasonic cleaning can reach into crevices and inaccessible areas and remove surface debris that can’t be cleaned by any other process.”


