We know you guys like taking photos of your rifles at the range. And, if you’re selling a rifle, scope, front rest, or rear bag, you need good photos to post in our Forum classifieds. Here’s a basic photography tip that can help you produce dramatically better photos. Use your camera’s ability to add “fill flash” even in daylight.
There’s plenty of light on a bright day. But bright light also means strong shadows. The shadows can leave parts of your subject literally in the dark. Daylight flash will help fill in those dark spots. In addition, if you are on a covered firing area, and want to include the range in your photo, you can benefit from using flash. This will prevent the foreground subject from being too dark while the downrange background is much too bright.
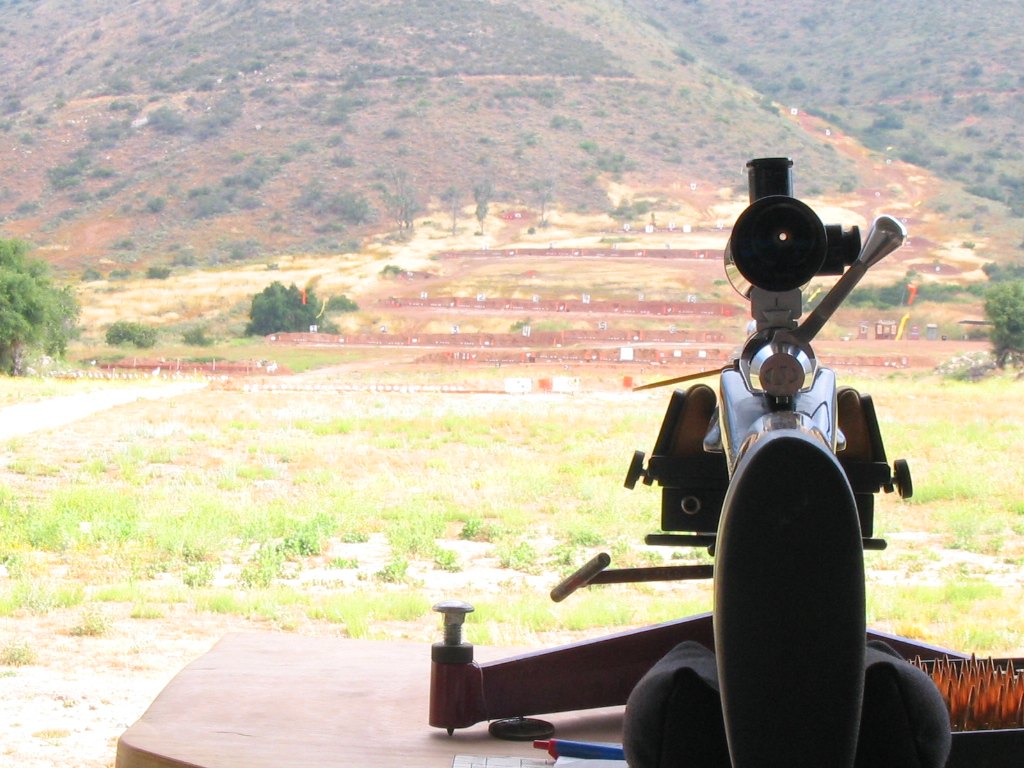
Photo without Flash
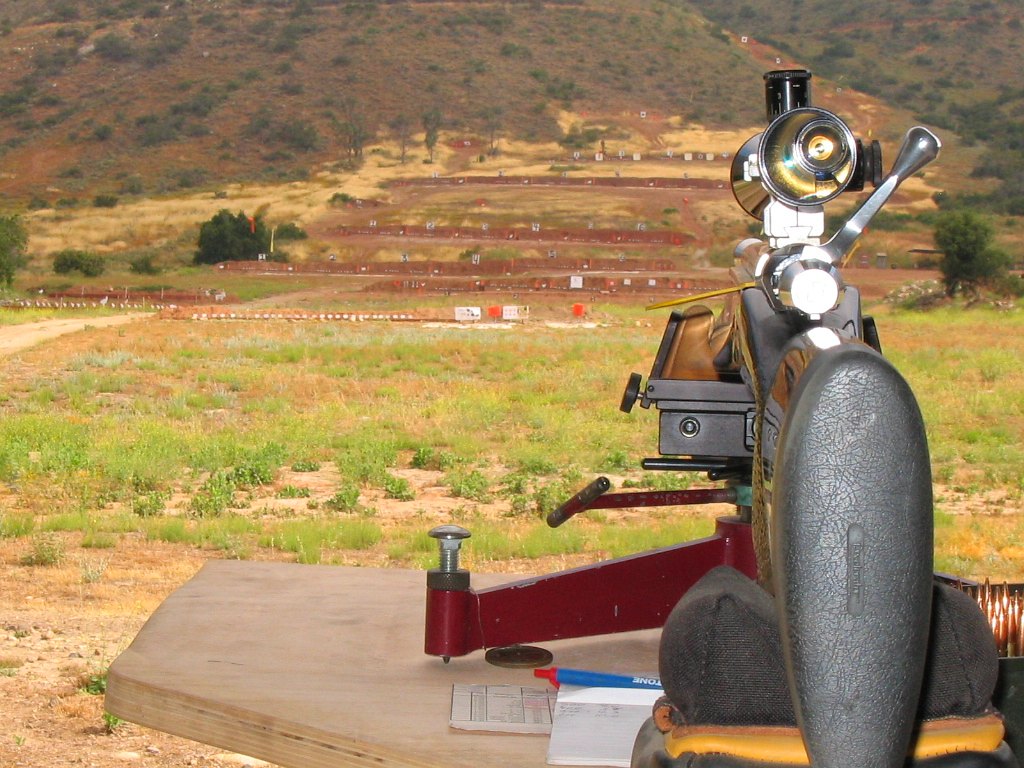
The photo above was taken without flash. As you can see, the rifle is too dark so details are lost. At the same time, the background (downrange) is over-exposed and washed out. The second photo below is taken with daylight flash. The difference is dramatic. Now you can see details of the rifle, while the background is exposed properly. Note how much easier it is to see the the targets downrange and the colors of the front rest. NOTE: these two photos were taken at the same time — just seconds apart.
Photo with Daylight “Fill-Flash”
Be sure to click on the larger versions of each photo.
How to Activate Daylight Flash
Most digital cameras have daylight flash capability. Some cameras have a separate setting for “auto fill flash”. On other cameras, you’ll have to set the camera to aperture priority and stop down the aperture to force the flash to fire. Read your camera’s manual. On many Canons, a menu that lets you set the “flash output”. For “fill flash” we like to set the flash at 30% to 50% output. This fills in the shadows sufficiently without “killing contrast” or creating too much reflection on shiny metal. Below is a photo taken with 30% flash output. Note the rich colors and how the exposure is balanced between foreground and background. Without flash the sky and target area would be “washed out”.
Here’s another tip for Canon owners. If you like deep, rich colors, use the “Vivid” setting in the effects menu. This punches up saturation and contrast.
Wipe-Out foam bore cleaner is a product we’ve used with great success on many rifles. With sufficient dwell time, it removes both carbon and copper fouling. You can combine it with Wipe-Out Accelerator or Patch-Out liquid to speed up cleaning time. Many shooters, including this editor, find that bore-brushing has been virtually eliminated with the regular use of Wipe-Out. (With some barrels however, you may still have to brush or use a bore paste if you notice stubborn carbon build-up in the throat area.)
Out standard procedure with Wipe-Out is to insert an O-ring-sealed cleaning rod guide into the chamber and then squirt through the muzzle in short puffs. Put a towel or rag on the comb of your stock and watch for a little bit of foam to exit the rod guide. We usually wait 30 minutes for the bubbles to dissipate, then do a second foam application. Be sure to clean off any excess foam before it drips on your stock.
Applying Wipe-Out from Breech
You can also apply Wipe-Out from the breech. To allow breech-first application, Wipe-Out cans now come with a short plastic tube and a plastic tip that fits in your chamber. These can also be purchased separately for $2.50. However, we’ve found the plastic tip is too big for some chambers and it is not always easy to get a good, secure seal even if it does fit. Jason Baney has come up with a solution. READ Jason’s Wipe-Out Article.
Use Fitted Tubing for Breech-First Applications of Wipe-Out
You can apply Wipe-Out through the breech very effectively if you use fitted, plastic tubing. While this works well for bolt-actions, breech application is particularly handy for the Garand, M1A and other semi-autos. Jason Baney has written a short article describing this process. In a nutshell, you need one piece of tubing that fits the chamber tightly and then connects with a second, smaller diameter tube that attaches to the Wipe-Out can. This avoids any “over-spray” of foam in the action area, providing a clean, simple solution. Just squirt for a second or so, and wait for white foam to come out of the muzzle. Be sure to keep Wipe-Out off fine wood stocks.
Well, yes, that headline is a come-on. But there’s truth in the promise. The “miracle device” to which we refer is a simple wind indicator aka “windflag”. Remarkably, many shooters who spend $3000.00 or more on a precision rifle never bother to set up windflags, or even simple wood stakes with some ribbon to show the wind. Whether you’re a competitive shooter, a varminter, or someone who just likes to punch small groups, you should always take a set of windflags (or some kind of wind indicators) when you head to the range or the prairie dog fields. And yes, if you pay attention to your windflags, you can easily cut your group sizes in half. Here’s proof…
Miss a 5 mph Shift and Double Your Group Size
The table below records the effect of a 5 mph crosswind at 100, 200, and 300 yards. You may be thinking, “well, I’d never miss a 5 mph let-off.” Consider this — if a gentle 2.5 mph breeze switches from 3 o’clock (R to L) to 9 o’clock (L to R), you’ve just missed a 5 mph net change. What will that do to your group? Look at the table to find out.
Values from Point Blank Ballistics software for 500′ elevation and 70° temperature.
Imagine you have a 6mm rifle that shoots half-MOA consistently in no-wind conditions. What happens if you miss a 5 mph shift (the equivalent of a full reversal of a 2.5 mph crosswind)? Well, if you’re shooting a 68gr flatbase bullet, your shot is going to move about 0.49″ at 100 yards, nearly doubling your group size. With a 105gr VLD, the bullet moves 0.28″ … not as much to be sure, but still enough to ruin a nice small group. What about an AR15, shooting 55-grainers at 3300 fps? Well, if you miss that same 5 mph shift, your low-BC bullet moves 0.68″. That pushes a half-inch group well past an inch. If you had a half-MOA capable AR, now it’s shooting worse than 1 MOA. And, as you might expect, the wind effects at 200 and 300 yards are even more dramatic. If you miss a 5 mph, full-value wind change, your 300-yard group could easily expand by 2.5″ or more.
Forest of Windflags at World Benchrest Championships in France in 2011
If you’ve already invested in an accurate rifle with a good barrel, you are “throwing away” accuracy if you shoot without wind flags. You can spend a ton of money on fancy shooting accessories (such as expensive front rests and spotting scopes) but, dollar for dollar, nothing will potentially improve your shooting as much as a good set of windflags, used religiously.
Birchwood-Casey brand Shoot-N-C targets are great for fun shooting. When your bullet passes through the target, a large yellow splash of color surrounds the bullet hole. This is ideal for plinking at short range without optics. Even when using a powerful scope, the color splash on the high-contrast background helps you see your hits at long range. We’ve been able to see Shoot-N-See bullet hits at 800 yards with a 42-power scope.
The only problem with official Shoot-N-See targets is the price. A 30-sheet pack of 8″ Bullseye Shoot-N-C targets costs about $22.00 plus shipping.
Well folks, put your money back in your wallet. In the YouTube Video below, SebalHP shows how to make your own color-splash targets for pennies per target. All you need are sheets of neon (day-glow) poster paper, cheap bulk packing tape, and a can of spray paint. (You can even speed up the process if you can find full size laminating sheets at an office supply store — these replace the tape.)
Making the targets is easy. Simply place the plastic tape over the neon paper. Then spray with matte black paint. Of course do your painting outdoors, in a well-ventilated area! When the paint is dry, cut target to desired size. Watch the video and see how simple it is.
One of the easiest ways to build a portable target stand is to use PVC pipe and connectors. Utah .308 Shooter “Cheese” has created a simple yet sturdy target frame, and he’s shared his design so you can build a similar frame easily and at low cost. The components are wood furring strips, 2″-diameter PVC pipes (and connections), and a 2’x3′ sheet of cardboard. The PVC base can be glued together, or, for easier transport and storage, you can leave some or all of the connections free. “Cheese” tells us: “I didn’t glue any of it together so I could disassemble it, shove it in a bag and take it anywhere.”
“All the parts are just pushed together and not glued. That way I can break it down and carry it all in a bag. Also, if a buddy (not me!) happens to shoot the stand, I can easily replace just the damaged piece. The last 6 inches of the furring strips are wittled-down a bit so they can be pushed into the upright pipes with a little friction. The cardboard is 2 x 3 feet, and I use a staple gun to attach it to the furring strips. Then I just staple the target onto the cardboard and go at it.
Of course you can modify the dimensions as desired. I chose the black ABS pipe over white PVC simply for cost — black ABS is a little cheaper. You can also glue some or all of the parts together, it’ll just be larger for transporting. In windy conditions, the thing likes to come apart. Duct tape might work well.
For weight, I thought about filling the two end pipes with sand and gluing test caps on each of their ends. The test caps still allow the pipes to slip into the elbows.”
Add Anchors or Internal Weight for Stability
On a very windy day, a PVC stand can shake or even topple over. There are a couple solutions to this. Some people fill the PVC pipe sections with sand to add weight, or you can put short sections of Re-BAR inside the long legs. One GlockTalk forum member noted: “I built [a frame] almost identical to this. I also take four pieces of wire coathanger bent into an inverted “U” shape to anchor the frame to the ground. It is so light that wind will knock the stand over [without anchors].”
Assembly Diagram with Dimensions
The photo below shows all the components of the base, with dimensions. The overall maximum assembled dimensions are roughly 26″ wide, 41″ deep, and 66″ tall (the cardboard is 2 x 3 ft).
You can find photos of a similar home-made PVC target stand (with a slightly different rear section) on the Box of Truth website. This also employs a PVC tubing base with wood uprights. We’ve also seen all-PVC target stands, but we’ve found that it is easier to attach the cardboard to wood strips than to PVC pipe. Also, if the upper section is wood, you can fit different height targets, while using the same base.
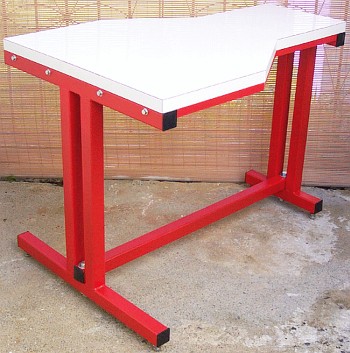
Building your own portable shooting bench is a great do-it-yourself project. You can build a sturdy bench for well under $100 in materials. Compare that to some deluxe factory-built benches which may cost $500.00 or more.
FREE Bench Plans on the Web
You’ll find a wide assortment of home-built shooting bench designs (both portable and fixed) on the internet. Renovation Headquarters has links to FREE Plans and building instructions for fourteen (14) different shooting benches. There are all-wood shooting bench designs as well as benches that combine a wood top with a metal sub-frame or legs.
Reader Jim Jewell has used the eHow bench design shown above. He recommends it highly. Jim reports: “A colleague and I built two of the eHow permanent wood, sturdy benches for our Pt. Phillips Rod and Gun Club in PA, which had outdated benches. I want to tell you that these benches are very stable and a real bargain. The benches cost precisely $100.00 each using the bill of materials and pressure treated wood. The bill of materials, with careful cutting, using a Chop saw, resulted in almost no scrap wood if carefully measured and cut. The plans are terrific and the benches are great platforms for bench-rest shooting. I made only one modification — I left a 6″ wing on both sides of the table to mount a spotting scope. Further we added a base of dry QuickCrete or similar fast setting concrete mix material. Add it dry, make sure the table is level and fill in the 6″ hole. The hole and QuickCrete add maximum stability. The QuickCrete sucks moisture from the ground, hardens in situ, and adds stability to the bench.
I can’t recommend this design highly enough. It is dirt cheap for clubs on a budget, goes together quickly, the table is very stable and there is no waste if you make precise measurements and cuts. A bag of QuickCrete is enough for two tables adding about $2.00 to the cost of each table. We plan on building new tables for the whole club for under $1000. After about a year, with a completely water-free wood in the bench I recommend a coat of Thompson’s Water Seal and these benches should last a long time.”
Heavy Wood Bench That Converts to Three Sections for Transport
In addition to the fourteen benches mentioned above, here is an interesting break-down bench design. Call it a “semi-portable” bench. The legs and frame are made from stout 4×4 post segments so the bench is fairly heavy. However, this bench can break down into three (3) sections for easier transport to and from the range. Dado-cut channels assure proper top alignment. This might be a good choice if you plan a multi-day excursion to a location without fixed benches. This three-leg bench design can be made from easy-to-locate materials. Note: The dimensions of this bench are are larger than typical fixed benches to accommodate 50 BMGs and other big rifles. CLICK HERE for more details.
Do you like the bench in the illustration at the beginning of this story (top right)? This is a prototype design by Chris Byrne of the Anarchangel Blog. For more details, CLICK HERE.
If you have a match, hunting, or tactical rifle that needs a little more “stiction” in the grip or fore-arm areas, particularly in wet or humid conditions, consider adding a non-slip coating to the stock. This is easily done with inexpensive materials. R+D Precision has a simple do-it-yourself procedure for adding texture to your stock. Be forewarned — this is basically a permanent addition to your stock, so you might want to practice first. Also the application of the bedding compound will change the color of the stock, so you may want to re-finish the stock.
Marking the Area to Texture with Steel-Bed or Similar Material
Tape off the area you want to put the texture. Spread a very thin coat of the Steel-Bed on the stock, just enough to cover the area. This can be done using Marine-Tex or Steel-Bed. Other products could be used but Steel-Bed is proven, and it’s what R+D prefers for the job.
Best Method for Applying Texture
Here is the secret to adding texture: Using the tongue depressor that is in the kit or something similar, BOUNCE the flat part of the stick on the still-wet bedding to get the textured effect. Once the bedding has dried for about an hour, and still kind of tacky, remove the tape, pulling at a sharp angle to leave a nice sharp edge. If the bedding has a sharp raised area where the tape was, wet your finger and rub along the edge and it will knock off the edge but still give that nice sharp transition.
Burris Signature Rings with polymer inserts are an excellent product. The inserts allow you to clamp your scope securely without ring marks. Moreover, using the matched offset inserts you can “pre-load” your scope to add additional elevation. This helps keep the scope centered in its elevation range while shooting at long range. Additionally, with a -20 insert set in the front and a +20 insert set in the rear, you may be able to zero at very long ranges without using an angled scope base — and that can save money. (To move your point of impact upwards, you lower the front of the scope relative to the bore axis, while raising the rear of the scope.)
Insert Elevation Values and Ring Spacing
People are sometimes confused when they employ the Burris inserts. The inset numbers (-10, +10, -20, +20 etc.) refer to hundredths of inch shim values, rather than to MOA. And you need the correct, matched top/bottom pair of inserts to give you the marked thousandth value. Importantly, the actual amount of elevation you get with Burris inserts will depend BOTH on the insert value AND the spacing between ring centers.
Forum member Gunamonth has explained this in our Shooters’ Forum:
Burris inserts are [marked] in thousandths of an inch, not MOA. To know how many MOA you gain you also need to know the ring spacing. For example, with a -20 thou insert set in the front and a +20 thou insert set in the rear, if the ring spacing is 6″, the elevation change will be approximately +24 MOA upwards.
Here’s how we calculate that. If you have a 2 X 0.020″ “lift” over a distance of 6 inches (i.e. 0.040″ total offset at 0.5 feet) that’s equivalent to 0.080″ “lift” over 12 inches (one foot). There are 300 feet in 100 yards so we multiply 0.080″ X 300 and get 24″ for the total elevation increase at 100 yard. (Note: One inch at 100 yards isn’t exactly a MOA but it’s fairly close.)
Here’s a formula, with all units in inches:
Total Ring Offset
——————– X 3600 = Change @ 100 yards
Ring Spacing
(.020 + .020)
—————– X 3600 = 24 inches at 100 yards
6
NOTE: Using the above formula, the only time the marked insert offset will equal the actual MOA shift is when the center to center ring spacing is 3.60″. Of course, you are not required to use 3.60″ spacing, but if you have a different spacing your elevation “lift” will be more or less than the values on the inserts.
Many parts of the country are experiencing a heat wave right now. It was 117° F in Las Vegas yesterday. Unfortunately, this is “prime time” for shooting matches, so competitors may have no choice but to shoot in very hot weather. When ambient temperatures soar into the 100s, you need to be especially careful about barrel heat. Bad things can happen if your barrel gets too hot. First, with some barrels, the point of impact (POI) will shift or “walk” as the barrel heats up excessively. Second, even if the POI doesn’t change, the groups can open up dramatically when the barrel gets too hot. Third, if the barrel is very hot, the chamber will transfer heat to your loaded cartridge, which can lead to pressure issues. Finally, hot barrels wear out faster. This is a very real concern, particularly for varmint shooters who may shoot hundreds of rounds in a day. For this reason, many varminters switch among various guns, never letting a particular barrel get too hot.
How do you monitor your barrel temperature other than guessing by “feel”? BAR-L Benchrest strips visually display heat readings from 86 to 140 degrees F. Think of these strips as compact, unbreakable thermometers. These adhesive-backed strips can be used to monitor barrel heating. Put a strip on the side of the barrel and the barrel’s temp will be indicated by a stripe that changes from black to green. These strips are easy to read. The green box displays the current temperature of the barrel in both °F and °C. We recommend using the Benchrest strip (86F to 140F), shown in the middle. There is also a “General Purpose” strip that reads to 196 degrees (bottom row).
Installation: Before placing the temp strips on your barrel, clean and degrease the barrel with alcohol for better adhesion. Once in place, the plastic-covered strips should provide years of service. Note, we do not recommend use with high-polished blued barrels.
Value-Priced Temp Strip 10-packs
If you have many rifles, McMaster.com (a large industrial supply house) offers the handy reversible, 7 temperature, 86F to 140F strip (item 59535K13) for $10.71 per pack of ten (10) strips. That’s an excellent value.
Another source for BAR-L Temp Strips is Neconos.com. This vendor offers Bar-L temp strips for $9.00, or $25.00 for a 3-pack. From the Neconos Online Catalog, search for “Bar-L” to find the Temp Strips. Three temp ranges are offered: 32F to 86F (Moderate Zero); 86F to 140F (Benchrest): and 86F to 194F (Gen’l Purpose).
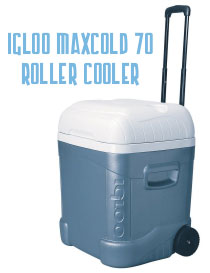
Controlling Ammunition Temperature is Important Too Keeping your loaded cases at a controlled temperature is vital for maintaining good ES and case life. At a late summer varmint match we observed pressure signs with cases that had been sitting in direct sunlight for about 15 minutes. As we were running a “moderate” RL15 load, the pressure indications were surprising. Testing over a chronograph, cases that had been sitting in direct sunlight showed velocities up to 70 fps higher than those that had been kept in the shade. Using QuickLoad’s temperature function, we calculated from the rise in velocities that case pressures had increased by over 4,000 psi–just from 15-20 minutes in direct sunlight! Accordingly, you’ll want to keep your ammo out of the sun, in an insulated container. The Igloo Ice Cube MaxCold 70 Roller Cooler can hold enough ammo for a multi-day varmint safari or a week at Camp Perry. It’s large enough to also store water bottles and cold beverages.
When evaluating firearm finishes, one should consider hardness, chemical resistance, lubricity, abrasion resistance, and color. However, none of these factors are as critical as corrosion protection. The average firearm owner deals with corrosion more than any other finish-related problem. Accordingly, when selecting an exterior finish for the metal components of your guns, you should look for a product with superior corrosion resistance. Thanks to Cerakote, we now have some science to help you make that decision….
How well do various firearm finishes resist corrosion?
Watch the video below to find out.
Eight Gun Finishes Tested — With Surprising Results
Eight (8) various finishes are tested, including Blueing, Cerakote, DuraCoat, FailZero, Ion Bond, KG Gun Kote, NiBX, and Phosphate (Parkerizing). Eight metal firearm components (each with a different finish) are placed into the salt chamber to see how long it takes for each finish to show initial signs of corrosion. To provide a baseline for comparison, a “naked” 416 stainless steel barrel was also placed inside the test chamber. The test was started, and for each coating, the time was recorded when corrosion started to appear. FYI, if you thought “stainless steel” can’t rust, think again. The stainless barrel sample (along with the blued metal sample) showed visible corrosion after just 24 hours!
After 24 Hours in Salt Chamber
After 48 Hours in Salt Chamber
After 172 Hours in Salt Chamber
Salt Chamber Testing — 5% Salt Concentration at 95°F
According to ASTM B117-03, the Corrosion Test provides a controlled corrosive environment which has been utilized to produce relative corrosion resistance information for specimens of metals and coated metals exposed in a given test chamber. The salt chamber is set to a temperature of 95 degrees Fahrenheit with a 5% salt concentration. Salt Chamber testing is used to draw a comparison between metals and finishes and does not correlate to a specific number of hours of real world use.
Story tip by EdLongrange. We welcome reader submissions.


 We know you guys like taking photos of your rifles at the range. And, if you’re selling a rifle, scope, front rest, or rear bag, you need good photos to post in our Forum classifieds. Here’s a basic photography tip that can help you produce dramatically better photos. Use your camera’s ability to add “fill flash” even in daylight.



 Applying Wipe-Out from Breech

 Well, yes, that headline is a come-on. But there’s truth in the promise. The “miracle device” to which we refer is a simple wind indicator aka “windflag”. Remarkably, many shooters who spend $3000.00 or more on a precision rifle never bother to set up windflags, or even simple wood stakes with some ribbon to show the wind. Whether you’re a competitive shooter, a varminter, or someone who just likes to punch small groups, you should always take a set of windflags (or some kind of wind indicators) when you head to the range or the prairie dog fields. And yes, if you pay attention to your windflags, you can easily cut your group sizes in half. Here’s proof…
 Birchwood-Casey brand Shoot-N-C targets are great for fun shooting. When your bullet passes through the target, a large yellow splash of color surrounds the bullet hole. This is ideal for plinking at short range without optics. Even when using a powerful scope, the color splash on the high-contrast background helps you see your hits at long range. We’ve been able to see Shoot-N-See bullet hits at 800 yards with a 42-power scope.
 One of the easiest ways to build a portable target stand is to use PVC pipe and connectors. Utah .308 Shooter “Cheese” has created a simple yet sturdy target frame, and he’s shared his design so you can build a similar frame easily and at low cost. The components are wood furring strips, 2″-diameter PVC pipes (and connections), and a 2’x3′ sheet of cardboard. The PVC base can be glued together, or, for easier transport and storage, you can leave some or all of the connections free. “Cheese” tells us: “I didn’t glue any of it together so I could disassemble it, shove it in a bag and take it anywhere.”
 Building your own portable shooting bench is a great do-it-yourself project. You can build a sturdy bench for well under $100 in materials. Compare that to some deluxe factory-built benches which may cost $500.00 or more.


 Many parts of the country are experiencing a heat wave right now. It was 117° F in Las Vegas yesterday. Unfortunately, this is “prime time” for shooting matches, so competitors may have no choice but to shoot in very hot weather. When ambient temperatures soar into the 100s, you need to be especially careful about barrel heat. Bad things can happen if your barrel gets too hot. First, with some barrels, the point of impact (POI) will shift or “walk” as the barrel heats up excessively. Second, even if the POI doesn’t change, the groups can open up dramatically when the barrel gets too hot. Third, if the barrel is very hot, the chamber will transfer heat to your loaded cartridge, which can lead to pressure issues. Finally, hot barrels wear out faster. This is a very real concern, particularly for varmint shooters who may shoot hundreds of rounds in a day. For this reason, many varminters switch among various guns, never letting a particular barrel get too hot.
 Keeping your loaded cases at a controlled temperature is vital for maintaining good ES and case life. At a late summer varmint match we observed pressure signs with cases that had been sitting in direct sunlight for about 15 minutes. As we were running a “moderate” RL15 load, the pressure indications were surprising. Testing over a chronograph, cases that had been sitting in direct sunlight showed velocities up to 70 fps higher than those that had been kept in the shade. Using QuickLoad’s temperature function, we calculated from the rise in velocities that case pressures had increased by over 4,000 psi–just from 15-20 minutes in direct sunlight! Accordingly, you’ll want to keep your ammo out of the sun, in an insulated container. The


