Three-gun match competitor Zak Smith employs a simple, handy means to store his elevation and wind dift data — a laminated data card. To make one, first generate a come-up table, using one of the free online ballistics programs such as JBM Ballistics. You can also put the information in an Excel spreadsheet or MS Word table and print it out. You want to keep it pretty small.
Below is a sample of a data card. For each distance, the card includes drop in inches, drop in MOA, drop in mils. It also shows drift for a 10-mph cross wind, expressed three ways–inches, MOA, and mils. Zak explained that “to save space… I printed data every 50 yards. For an actual data-card, I recommend printing data every 20 or 25 yards.” But Zak also advised that you’ll want to customize the card format to keep things simple: “The sample card has multiple sets of data to be more universal. But if you make your own data card, you can reduce the chance of a mistake by keeping it simple. Because I use scopes with MILS, my own card (photo below left) just has three items: range, wind, drop in MILS only.”
Once you have the card you can fold it in half and then have it laminated at a local office store or Kinko’s. You can keep this in your pocket, tape it to your stock, or tie the laminated card to your rifle. If you regularly shoot at both low and high elevations, you may want to create multiple cards (since your ballistics change with altitude). To learn more about ballistic tables and data cards, check out the excellent “Practical Long-Range Rifle Shooting–Part 1″ article on Zak’s website. This article offers many other insights as well–including valuable tips on caliber and rifle selection.
Scope-Cover Mounted Ballistics Table Another option is to place your ballistics card on the back of the front flip-up scope cover. This set-up is used by Forum member Greg C. (aka “Rem40X”). With your ‘come-up’ table on the flip-up cover you can check your windage and elevation drops easily without having to move out of shooting position. Greg tells us: “Placing my trajectory table on the front scope cover has worked well for me for a couple of years and thought I’d share. It’s in plain view and not under my armpit. And the table is far enough away that my aging eyes can read it easily. To apply, just use clear tape on the front objective cover.”
Updated Links for JBM Ballistics Program
With the release of version 5.1 of the JBM program, some URLs for the calculations pages have changed. You may want to update your bookmarks with the following web addresses:
Here’s a tip that can help you score higher at matches and get more predictable results when weighing loads with an electronic scale. Kelly Bachand, a top prone shooter and electrical engineering major at the Univ. of Washington, tells us that all digital scales can drift. Therefore Kelly recommends re-calibrating electronic scales often. In addition — and this is key — Kelly recommends that you shoot the ammo in the exact order in which it was loaded. Arrange your loaded ammo in a box in the order of loading and shoot it first-loaded to last-loaded. (Or, if you prefer, shoot it last-loaded to first-loaded.) The important thing is to maintain the order and not mix everything up. That way, if your scale drifts, the effect of drift on charge weight will be incremental from one loaded round to the next, so point of impact change should be negligible. Conversely, if you shoot your last-loaded round right after your first-loaded round, the effect of scale drift is at its maximum, so powder charge varience is maximized. And that can produce a different point of impact (POI) on the target.
Tips on Loading with Electronic Scales by Kelly Bachand
If you use a digital scale to measure powder charges, recalibrate the scale often. I like to do this about every 25 rounds or so. Additionally, most electronic scales rely on eddy currents for their precision. Eddy currents are easily disrupted by static electricity so keep a cloth or ground strap nearby to remove any static currents should the scale start acting up; I usually just use a fabric softener sheet that has gone through the dryer once.
Shoot Ammo in Order of Loading
I shoot my rounds in the same order or reverse order as I load them. If the charge weight varies due to scale drift during use, the difference will be gradual if I shoot in the same order as production (or reverse order). I should be able to adjust for the slight varience in charge weight without having any wildly high or low shots (see the charts below for a graphical demonstration). I usually load my ammunition just 100 rounds at a time. Give yourself plenty of time and remember that you will make your best ammunition when you are fully awake and alert.
This graph demonstrates the effect a .01% (that’s 1/100th of 1 percent) difference in scale measurement would have over the course of 100 rounds assuming the desired load is somewhere between 46 and 47 grains. The final round made would have almost 1% less (or more) powder than the first, that’s almost an 0.5 grain difference from the first. If shot back to back, these rounds will invariably have different points of impact on the target.
This graph demonstrates the same .01% difference in scale measurement but this time with a recalibration every 25 rounds. By recalibrating the scale every 25 rounds the furthest a weighed charge ever gets from the original is less than 0.25%. Again if the charge being weighed is between 46 and 47 grains then the 26th round made would vary from the 1st by .12 grains. Even that small difference would likely show on target.
Either way it is important to note that if the bullets are shot in the same (or reverse) order as they are made, the biggest difference from bullet to bullet in this example is less than .01 grains.
We are often asked: “What size neck bushing is best for Lapua 6mmBR brass in a ‘no-turn’ chamber?” The questioner planned to purchase a Redding Type ‘S’ full-length sizing die with neck bushings. The quick answer is that one should probably get both 0.265 and 0.266 bushings and see what works best. With the current “blue box” Lapua brass, a loaded 6BR round with an unturned neck will typically run about 0.268″ (depending on the bullet). A 0.266″ neck bushing, after springback, will give about 0.0015″ tension which can work well in a bolt gun. In a gas gun, we recommend running .003″ (or more) neck tension.
Alternative to Bushings — Honed Full-Length dies
Conventional, non-bushing full-length sizing dies can create ultra-accurate ammo with very low run-out. For some applications, we prefer a non-bushing FL die over a bushing die — so long as the neck tension is correct. But many FL dies have an undersized neck diameter so you end up with excess neck tension, and you work the brass excessively. Forster offers a simple, inexpensive solution — honing the neck diameter to whatever size you want.
If you purchase a Forster non-bushing, full-length sizing die, Forster will hone the neck dimension to your specs for about $10.00 extra. This way you can have a FL die that provides the right amount of tension for your particular load. Forster dies are relatively inexpensive so you can afford to have a couple of FL dies with necks honed to different diameters — such as 0.265″ and 0.266″ for a no-turn 6mmBR. The die itself is very affordable — currently Sinclair Int’l charges $33.95 for a Forster 6mmBR full-length sizing die (item FP6BRFL).
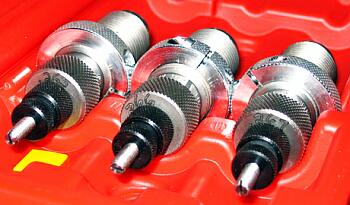
Forster FL dies, necks honed to .265″, .266″, and .267″.
Steve Rasmussen of IowaHighPower.com gave this a try. In fact, he had three dies made — each with a different neck dimension. Here’s his report: “My original Forster 6BR FL die sized the necks down a lot, less than 0.260″, .256″ if I recall correctly. I sent my die in and asked if they could supply two more FL dies (for three total) to have the necks honed to 0.265″, 0.266″, and 0.267″. The cost was $10 for my supplied die and $38.50 plus $10.00 honing fee for each additional die. Return shipping was $11.00 via USPS Priority Mail.”
The table below shows the neck diameter range of ten (10) sized cases using each die. Brass springback after sizing runs 1 to 1.3 thousandths. Steve was using the older, “brown box” Lapua brass with thicker necks so he needed the .267″ bushing. The older Lapua 6mmBR brass measures about 0.2695″ with bullet in place. Steve explained: “My loaded rounds are running 0.2697-0.2699 using [brown box] Lapua 6BR brass. So far the dies are working well. I sized 80 cases with the 0.266″ necked die. The shoulder is running 0.4582″ and 0.300″ up from the base is 0.4684″. I spun 20 of ‘em and 16 had a runout of one thousandth (0.001) and the other 4 at 1.5 thousandths (0.0015).” That shows that these honed Forster FL dies produce exceptionally straight sized cases.
Larry Racine is a respected gunsmith based in New Hampshire. He is also a two-time member of the U.S. Palma Team, and a five-time New Hampshire State Highpower rifle champion. Larry, who runs LPR Gunsmithing, has developed a brilliantly simple means of switching rifle barrels with an ordinary spanner or open-end wrench. With this set-up you can switch barrels in the field in seconds without the need for a barrel vice.
For most barrels, Larry mills a hex with six flats on the end of the barrel. This allows a shooter to change barrels quickly at home or on the line with a simple box-head wrench or a socket wrench. Larry says: “You don’t even have to take the barreled action out of the gun. Just set the buttstock on the ground, between your feet, put a wrench on it, hit it with the palm of your hand — and off comes the barrel.” For barrels fitted with a muzzle brake, Larry has a slightly different system. He mills two flats behind the brake so you can use an open-end wrench to do the job.
With either a hex on the end, or two flats for a brake-equipped rifle, the system works with any medium- to heavy-contour barrel with a muzzle-diameter of at least 0.700″. This will even work for high-power rigs using clamp-on sights or bloop tubes. Larry explains: “A lot of us here in New England use clamp-on front sights. The barrel will be turned to 0.750 for the sight, with the hex on the end. A bloop tube can go right over the end, no problem.”
Larry has used this system over the past few years to win a number of matches. In one 600-yard 3 by 20 prone match, Larry used three different barrels, with three different chamberings, on the same Savage rifle. Larry changed the barrels on the line.
Larry was able to do this because the system has little to no loss of zero from one installation of a given barrel to the next installation of that barrel. This lets the shooter start the match with confidence that the first sighter will be on paper. Larry reports that the simple system works great: “To date we have used this system on Savage, Remington, Winchester, RPA, and Nesika actions.”
Racine’s system is very affordable. If Larry does the chamber work on your barrel he charges $45.00 extra to mill a hex or two flats on your barrel. If you only want the hex or flats done, Larry charges $55.00. For more info, visit LPRGunsmith.com or call Larry at (603) 357-0055.
Though it is a 20-year-old design, the Oehler Model 35P Chronograph remains one of the best chronographs on the market. By employing three screens instead of two, the 35P takes two (2) measurements of each shot — adding an extra measure of reliability. It has very simple controls, so you don’t need to bring a 100-page manual to the range. The Model 35P features an integrated printer that conveniently records every shot and calculates Average Velocity, SD and ES for your strings. We like having the “hard-copy” output from our tests. This way we can simply staple the our paper record to the target and nothing gets lost.
Model 35P is Back in Production Oehler Research decided to phase out the model 35P Proof Chronograph a few years back. But consumer demand never abated. In fact, the prices of used units started to climb. So Ken Oehler decided to bring back the model 35P, and we’re glad he did. In the video below Ken explains that the Model 35P is back in regular production, now that his company has found a source for printer components. The Model 35P, complete with printer, skyscreens, and mounting rail costs $575.00. Ken told us “If we knew how to make them cheaper, we would … but we make ‘em so they work.”
If you already own or use a Model 35P, be sure to watch the video through to the end. In the last minute, Ken Oehler demonstrates how to position the metal support that holds the paper roll. Putting this support in place can be tricky to say the least. But the video shows how to accomplish the task quickly, without losing your temper.
Another helpful tip, provided by Ken’s wife, will help you feed the paper into the machine. Simply take the end of the paper and fold both left and right sides in toward the middle, forming a ‘V’ (like the nose of a paper airplane). This will then advance much easier through the printer’s internal spools when you load new paper.
Winter is coming and that means cold temps and wet weather. Heck it’s even raining in California this week. When it’s cold and damp out, you need to pro-actively guard against rust and corrosion on your valuable tools and firearms. As temperatures drop, moisture can condense from the air, causing guns to rust, even if they are stored in a safe.
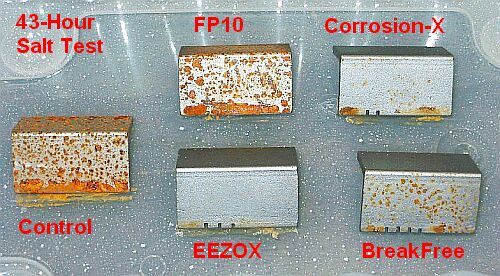
We recommend that you use a proven corrosion inhibitor to protect your firearms during winter storage. We did extensive testing and recommend three products to combat rust: BoeShield T-9, Corrosion-X, and Eezox. These are all excellent products, but this Editor’s first choice is Eezox, because it cleans as well as protects, and because Eezox does not leave a sticky or waxy coating on your arms. Eezox is also ideal for fine, blued firearms. After 2-3 light applications it provides a dry protective finish that allows high polish blueing to shine through.
Eezox is available in small drip bottles, 4-oz. cans, and 4-, 6-, and 18-oz. aerosol spray cans. We typically apply Eezox to a patch from an aerosol can, then wipe down the firearm. Let the Eezox dry, then reapply. This will give you outstanding protection. Just make sure you wipe down ALL the metal surfaces, which may require removing the barreled action from the stock. We’ve seen examples of guns that rusted on the underside of the action because the owner had only bothered to wipe down the barrel and exposed section of the action. You can purchase Eezox from gun stores ($8.99 for 7 oz. can average price), or Warren Custom Outdoor.
Foam Cases Are Rust Magnets — Use Bore Stores
Just about the worst thing you can do in the winter (short of leaving your rifle outside in the rain) is to store firearms in tight, foam-padded cases. The foam in these cases actually collects and retains moisture from the air, acting as the perfect breeding ground for rust.
Those plastic-shelled cases with foam interiors are for transport, not for long-term storage. Don’t repeat the mistake of a wealthy gun collector I know. He stored four valuable Colt Single Action Army (SAA) revolvers in individual foam-padded plastic cases, and locked these away in his gun safe. A year later, every one of his precious SAAs had rusted, some badly.
For storing long guns in your safe, we strongly recommend Bore Stores. These synthetic fleece gun sacks are coated with silicone and corrosion inhibitors. The thick fleece also protects your guns from nicks and scratches. Rifle-size Bore Stores can be purchased for $13.00 – $18.00 from Brownell’s, or MidwayUSA, or direct from the manufacturer Big Spring Enterprises, which can also craft custom sizes on request.
The August 2011 digital edition of Shooting Sports USA is available online — free for the reading. This issue contains a “must-read” expert symposium on the subject of Eye Dominance, as it affects both rifle and pistol shooting. No matter whether you have normal dominance (i.e. your dominant eye is on the same side as your dominant hand), or if you have cross-dominance, you’ll benefit by reading this excellent article. The physiology and science of eye dominance is explained by Dr. Norman Wong, a noted optometrist. In addition, expert advice is provided by champion shooters such as David Tubb, Lones Wigger, Dennis DeMille, Julie Golob, Jessie Duff, and Phil Hemphill.
Development of the 6.5 Creedmoor Cartridge
Also in the August Edition of Shooting Sports is a feature on the 6.5 Creedmoor cartridge. This story covers the origin of the cartridge and its performance both as a match cartridge and as a hunting round. Hornady Chief Ballistician Dave Emary explained: “the original intent of the cartridge was as an across-the-course match cartridge. We envisioned it as an off-the-shelf round that would produced the accuracy and ballistics to compete in all match disciplines right out of the box. At the same time we realized that the same characteristics would make an exceptional hunting cartridge with the right bullets.”
6.5 Creedmoor Brass No Longer Washed After Annealing
Here’s an interesting update on Hornady 6.5 Creedmoor brass and loaded ammo. In a move to improve case quality and neck uniformity, Hornady recently changed the 6.5 Creedmoor production process, eliminating the case-washing step after annealing. So now you will see annealing coloration on 6.5 Creedmoor brass, just like on Lapua brass. Dennis DeMille of Creedmoor Sports wanted to improve the consistency/uniformity of 6.5 Creedmoor case-necks. At Dennis’ suggestion, Hornady conducted tests which showed that the “standard industry practice” of washing brass could potentially alter the necks in undesirable ways. Bottom line, unwashed annealed brass was determined to have an accuracy edge over washed brass. Looking at these results, Hornady decided to forgo the post-anneal washing process. As a result, the latest 6.5 Creedmoor brass now displays the distinctive coloration left by neck/shoulder annealing. Learn something new every day, eh?
Serious shooters dream of having a backyard range where they can practice, test loads, and shoot for fun with friends. For most of us, having even a 50-yard backyard range is impossible. And those lucky shooters who do have their own range can typically go out to 100 yards, but that’s it. It takes plenty of open land to set up even a 200-yard range, and then you still need the side of a mountain for a backstop, or many acres of additional clear land behind the berm, for safety reasons.
Mother of All Backyard Ranges
AccurateShooter Forum member J.R. (aka Huntinco) has put us all to shame. He is building the “mother of all backyard ranges” at a secret location in northern Utah. How long is J.R.’s range going to be? 500 yards? Nope — think WAY longer. J.R. has laid out a facility that is a full 1600 yards from firing line to the final target bay. Plus there are pits every 100 yards out to 1600 yards.
J.R.’s range is not just a strip of vacant land with a few target stands. The range will boast a full-featured shooting facility when it’s completed. J.R. is constructing a finished, covered “all-weather” shooting house with seven indoor shooting stations (and more benches outside). He explains: “I poured a 12×90 pad. I’m enclosing 45 feet and just putting a roof over the other 45 feet. On the enclosed part there are six, 6′-wide shooting stalls, with one on the end that’s 12′ wide. Shooting windows are 5′ wide and 4′ high. One small problem is that, the way the property lays out, only the 12′-wide stall can shoot 100 yards. All the rest will start at 200 yards.”
Interior Finishing Suggestions Are Welcome
J.R. hasn’t finished the interior of his shooting facility yet, so he is soliciting ideas as to how the inside should be laid out: “I need your input because I have never been to a range. I just shoot here on my place. Please help me with [your input] on the inside layout.”
Those of you who have suggestions for J.R., please place a comment here. And no, we won’t reveal where this beautiful range is being built. But we do give J.R. a hearty pat on the back for making his “dream range” a reality. CLICK HERE to view more photos.
UPDATE — Here are photos of the Shooting house, interior and exterior. Nice job J.R.!
Every Wednesday night, the popular Shooting USA TV series airs on the Outdoor Channel. The hour-long broadcast covers all aspects of shooting — from cowboy action to the National Matches at Camp Perry. No matter what gun game you play, you’ll probably find something of interest on Shooting USA. However, we know that many cable providers do not offer the Outdoor Channel in an affordable package, so many of you can’t watch the weekly broadcasts.
But here’s some good news — many of Shooting USA’s most popular video segments are now streamed on the internet. Just log on to MyOutdoorTV.com to access dozens of Shooting USA features. Leading off this week is a video that shows how to field-strip and clean an AR, followed by tips on zeroing the rifle with iron sights. Use the scrolling menu (on the right) to find other stories. Topics include: the Camp Perry National Matches, High Power Silhouette, 3-gun Competition, IDPA, the Bianchi Cup, SASS End of Trail. You’ll also find some informative gunsmithing videos. Watching Shooting USA videos online is a good option for readers who lack cable access to the Outdoor Channel.
If you want to get started with turning case necks, check out our article on Neck Turning Basics, authored by German Salazar. As German explains, one of the keys to achieving a smooth, consistent cut on your case-necks is to use quality lube and lubricate both the inside of the case necks and the neck-turning mandrel. German uses Imperial Die Wax, the old standby. This works very well, as German demonstrates, but we know that many reloaders prefer to use a liquid lube, as they find that it is easier to apply and remove.
Dozens of different liquid neck-turning lubes have been used successfully, including blends of Mobil 1 motor oil and STP, as well as various “secret recipes”. This Editor’s preferred lube for “skim” neck-turning, where only a single light pass is required, is Prolix Xtra-T lube. This is a thick, blue-colored lubricant that contains a bit of paraffin. It is VERY slippery, yet because of the paraffin it stays in place on the mandrel (arbor). It comes in a 1.25 oz. plastic bottle with a handy extended “needle-nose” applicator tip. The long-nosed tip makes it easy to apply lube inside a case neck, or to very precisely add a small drop right ahead of the cutter tip on the neck-turning tool. Xtra-T lube is also a good general purpose lubricant that nicely fills the gap between a grease and a typical oil, and it works well on pistols too. In consistency, Xtra-T lube is similar to molasses. It flows like a thick oil, but it has good adhesion because of the paraffin component in the blend.
I’m not suggesting Xtra-T is the ultimate “miracle” neck-turning lube. There are many other good options. But Xtra-T applies easily, stands up to heat, stays where you put it, and works great as a general-purpose lube as well. You’ll find Prolix Xtra-T lube in many shooting supply stores or you can order directly from www.ProlixLubricant.com. The small bottle with applicator tip costs $6.99.


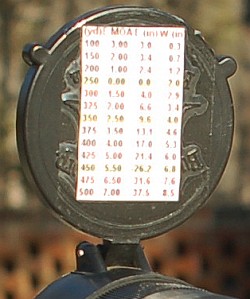 Another option is to place your ballistics card on the back of the front flip-up scope cover. This set-up is used by Forum member Greg C. (aka “Rem40X”). With your ‘come-up’ table on the flip-up cover you can check your windage and elevation drops easily without having to move out of shooting position. Greg tells us: “Placing my trajectory table on the front scope cover has worked well for me for a couple of years and thought I’d share. It’s in plain view and not under my armpit. And the table is far enough away that my aging eyes can read it easily. To apply, just use clear tape on the front objective cover.”
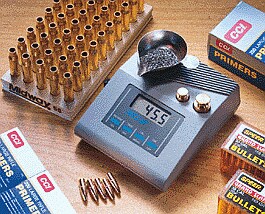 Here’s a tip that can help you score higher at matches and get more predictable results when weighing loads with an electronic scale. Kelly Bachand, a top prone shooter and electrical engineering major at the Univ. of Washington, tells us that all digital scales can drift. Therefore Kelly recommends re-calibrating electronic scales often. In addition — and this is key — Kelly recommends that you shoot the ammo in the exact order in which it was loaded. Arrange your loaded ammo in a box in the order of loading and shoot it first-loaded to last-loaded. (Or, if you prefer, shoot it last-loaded to first-loaded.) The important thing is to maintain the order and not mix everything up. That way, if your scale drifts, the effect of drift on charge weight will be incremental from one loaded round to the next, so point of impact change should be negligible. Conversely, if you shoot your last-loaded round right after your first-loaded round, the effect of scale drift is at its maximum, so powder charge varience is maximized. And that can produce a different point of impact (POI) on the target.

 We are often asked: “What size neck bushing is best for Lapua 6mmBR brass in a ‘no-turn’ chamber?” The questioner planned to purchase a Redding Type ‘S’ full-length sizing die with neck bushings. The quick answer is that one should probably get both 0.265 and 0.266 bushings and see what works best. With the current “blue box” Lapua brass, a loaded 6BR round with an unturned neck will typically run about 0.268″ (depending on the bullet). A 0.266″ neck bushing, after springback, will give about 0.0015″ tension which can work well in a bolt gun. In a gas gun, we recommend running .003″ (or more) neck tension.
 Larry Racine is a respected gunsmith based in New Hampshire. He is also a two-time member of the U.S. Palma Team, and a five-time New Hampshire State Highpower rifle champion. Larry, who runs
  If you already own or use a Model 35P, be sure to watch the video through to the end. In the last minute, Ken Oehler demonstrates how to position the metal support that holds the paper roll. Putting this support in place can be tricky to say the least. But the video shows how to accomplish the task quickly, without losing your temper.

 Those plastic-shelled cases with foam interiors are for transport, not for long-term storage. Don’t repeat the mistake of a wealthy gun collector I know. He stored four valuable Colt Single Action Army (SAA) revolvers in individual foam-padded plastic cases, and locked these away in his gun safe. A year later, every one of his precious SAAs had rusted, some badly.


 6.5 Creedmoor Brass No Longer Washed After Annealing


 If you want to get started with turning case necks, check out our article on


