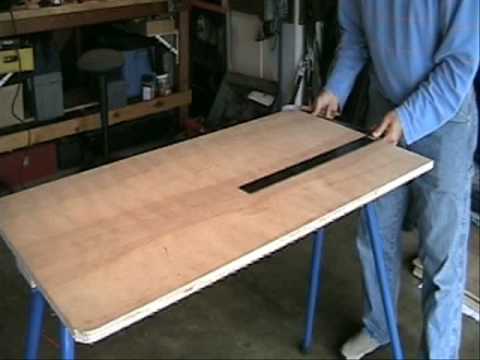
Are you looking for a stable and affordable shooting bench for your next varmint safari? Well, why not build your own? Clemdog, a talented wood-worker and avid varmint-hunter, has designed a sturdy, portable bench you can build for $75.00 in materials. The bench is made from plywood attached to Rugged Buddy sawhorse legs which fold open and engage securely with patented snap-locks. These tubular steel legs cost about $60.00 per set. Clemdog’s bench can also be built with banquet table legs. These are cheaper, but heavier (and some extra assembly work is required).
Clemdog Shows How to Build Your Own Bench
Clemdog has created a nice video that shows, step-by-step, how to build his portable shooting bench. Clemdog writes: “I am amazed at the number of shooting tables on the market today. I’ve seen them in catalogs at prices ranging from $75 to almost $500. While I’m sure it’s a pleasure to shoot from one of the high-end benches, I wouldn’t want to drop the cash on one, nor would I want to assemble and disassemble one each time I repositioned. The vast majority of the lower-end tables or benches are so rickety that it would be difficult to shoot accurately from them. If you have a saw and a drill, or can borrow one, here’s how you can make your own portable shooting and reloading bench for [about $75.00].” Just watch the video below:
Instructions for Table Fabrication
Clemdog says: “Start with a 3/4″ plywood panel, available at Home Depot or other lumber yards for about $15. Pay a few bucks more for a birch or other nice veneer, it will look fantastic if you varnish the table. The panels come 48″ x 24″. You will also need some wood glue, and about 15 #10 wood screws, about 1-1/4″ long. Check out my video on how to build the bench using a set of folding Rugged Buddy 34″ sawhorse legs. If you opt for standard banquet table legs, you will need about 20″ of scrap 2×4 and four to six 3″ lag bolts with washers and nuts to bolt the 2x4s to the table top.”
At the end of his video, Clemdog offers some sound advice: “Don’t buy a crappy bench, or spend hundreds of dollars on a bench. Build your own. It will be a fun project and it will last you for years.” For more info, visit Clemdog’s personal webpage, which also hosts a series of reloading videos.
Many of our readers are now using smart-phones for ballistic calculations. Now there is a new App for the iPhone which makes mildot target ranging simple and easy. Mil-Dot Rangefinder 2.0 does all the math for you. Just input the size of the target, and the program calculates range instantly, in yards and meters. The standard edition costs just $1.99 while the “Pro” version is $9.99. We think that, if you’re going to really use this program in the field, it’s well worth paying ten bucks for the Pro version. The Pro edition gives you a full-featured ballistics calculator with windage/elevation corrections. That calculator alone is worth the extra money, and the Pro version offers many other features, which are listed below:
Target ranging (yards and meters)
US Army and USMC mil-dot reticles
Target Info display
Advanced ballistics calculator
Fast windspeed/direction adjustment
Range card (ballistics chart)
Point of impact indicator
Bullet drop compensator
Windage/elevation corrections
Time to target
Shot energy/velocity at target
Multiple Ballistic Profiles
This is a very powerful program. We suspect it will take most users a few days before they really understand all its functions and options. To see a more detailed demonstration of the Mil-Dot Rangefinder App, click on the YouTube video below. There’s no voice-over, so the video can be hard to follow. But at least the video showcases the flexibility of the program and the wide variety of functions it offers. Credit The Firearm Blog for spotlighting this useful App.
You have to hand it to the Texans. Forum member Paul Scott (aka “FTRinTexas”), has created a sturdy double-gun case from a surplus Stinger Missile transport box. Measuring roughly 63″ x 11″ x 13″, the aluminum Stinger box is big enough to fit two, long-barreled match rifles side by side, stowed vertically, toaster-style. There’s even room inside for a spotting scope and other accessories. With a little effort (and some after-market foam), the Stinger box can be converted into a very practical (and rugged) gun case.
The converted Stinger box is also an attention-getter according to Paul: “Other guys at the range definitely do a double-take when you haul a missile case out of your truck! They’re kind of disappointed when I open the lid and they see there are only rifles inside.”
Advantages of Side-by-Side (Vertical) Rifle Cases
For wide-forearm rifles with big scopes, we have always liked the vertical storage (drop-in style) cases such as the Plano AirGlide. Vertical placement allows the gun’s weight to rest on the stock with no side-pressure applied to the scope turrets. We’ve asked Plano to make a double-gun case of a similar design, but that’s not going to happen any time soon.
There are companies that make large, metal-bodied safari cases that stow two rifles vertically, side-by-side. These cases are super-secure, but they are also very expensive. Cabela’s side-by-side Safari Case costs $399.00, and it will only hold rifles up to about 50″ overall length. Ziegel Engineering makes a beautiful two-rifle, top-loading Expedition case, but it costs $639.95, and is also limited to a 50″ rifle OAL.
The Stinger Solution — Inexpensive, Rugged Side-By-Side Storage
Paul Scott was clever to source a Stinger Box and transform it into a side-by-side double rifle case. With over five FEET (61.5″) of internal length, the box will secure guns with barrels up to 38″ with ease. And the Stinger box is wide enough to hold two F-Class guns side-by-side with plenty of clearance. Stinger boxes come with an O-ring seal, air relief valve, and handles on each end. Hasp locks are easily added, as are wheels (just slide an axle through the lower “bumper” flange on the box end.)
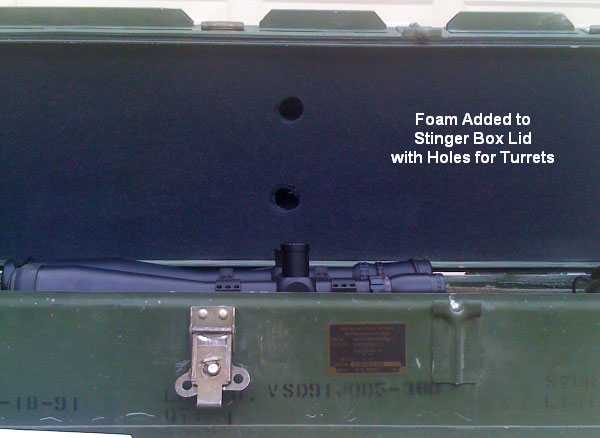
As received from Uncle Sam, a surplus Stinger storage box needs some modification to work as a double rifle case. Paul removed most of the internal foam padding from the lower section, and then used an electric knife to carve cradles to support the two rifles under the forearms and buttstocks. The original hard foam blocks in the Stinger box lid were replaced with closed cell foam like that used in Pelican cases. Paul found that the new foam in the lid would press down on the scopes’ elevation knobs, so he cut round holes in the top foam to provide additional turret clearance.
As you can see in the photos, Paul had enough room forward of the rifles to stow his spotting scope and disassembled spotting scope stand. Paul simply placed another layer of foam in the bottom of the box and then cut the foam to fit the equipment. Another foam layer can be placed over the spotting scope and stand to prevent slippage during shipment.
If you are interested in making your own double-gun case from a Stinger box, email PScott [at] pegasustexas.com . Paul has a few extra Stinger boxes he may be willing to sell for around $175 each. Each of these Stinger Missile containers cost Uncle Sam $2066.00 originally! The photo below shows the Stinger transport box before modification.
If you use an AR-platform rifle for varminting, multi-gun matches, or Service Rifle competition, one simple upgrade you can make to enhance reliability is to replace the mil-spec gas rings with a one-piece McFarland™ bolt gas ring. The McFarland ring is a single spiral of spring steel that loops around the bolt three times and leaves no path for gas leakage. With conventional gas rings, you need to correctly rotate each ring so the “gap” does not line up, thereby allowing gas blow-by that can cause cycling problems. The one-piece ring is an inexpensive, “set and forget” solution that eliminates the need to monitor your ring position on the bolt body.
The one-piece McFarland gas ring is recommended by Fulton Armory and other AR experts. Installation is simple and the one-piece rings last a very long time. One AR user comments: “Ever since I tried single rings I would never change back to mil-spec rings. I’ve experienced more consistent recoils and cyclic rates of fire. And, as to wear — I haven’t worn one out yet.” On Brownells.com, two gunsmiths offered these reviews:
“Easy install, zero chance of a gap, one less thing to worry about in the bolt carrier group. This item should greatly improve gas pressure consistency. This is a ‘must have’ item.” — Jake, SC
“The concept is simple and sound. The one-piece gas ring removes the possibility of gaps lining up. It installs easily, holds great tension, and is cheap. Doesn’t get much better.” — Lane, TN
The McFarland™ one-piece bolt gas ring can be purchased from Brownells for $3.99 (item 100-001-257) or from Fulton Armory for $2.99 (item FA-AR-300-109). Purchase three or four at once to save on shipping costs — that should be enough for a decade of AR shooting.
Coating bullets with a friction-reducing compound such as Molybdenum Disulfide (Moly) offers potential benefits, including reduced barrel heat, and being able to shoot longer strings of fire between bore cleanings. One of the effects of reduced friction can be the lessening of internal barrel pressures. This, in turn, means that coated bullets may run slower than naked bullets (with charges held equal). To restore velocities, shooters running coated bullets are inclined to “bump up” the load — but you need to be cautious.
Be Careful When Increasing Loads for Coated Bullets
We caution shooters that when your start out with coated bullets in a “fresh barrel” you should NOT immediately raise the charge weight. It may take a couple dozen coated rounds before the anti-friction coating is distributed through the bore, and you really start to see the reduced pressures. Some guys will automatically add a grain or so to recommended “naked” bullet charge weights when they shoot coated bullets. That’s a risky undertaking.
Instead we recommend that you use “naked” bullet loads for the first dozen coated rounds through a new barrel. Use a chronograph and monitor velocities. It may take up to 30 rounds before you see a reduction in velocity of 30-50 fps that indicates that your anti-friction coating is fully effective.
We have a friend who was recently testing moly-coated 6mm bullets in a 6-6.5×47. Moly had not been used in the barrel before. Our friend had added a grain to his “naked” bullet load, thinking that would compensate for the predicted lower pressures. What he found instead was that his loads were WAY too hot initially. It took 30+ moly-coated rounds through the bore before he saw his velocities drop — a sign that the pressure had lowered due to the moly. For the rounds fired before that point his pressures were too high, and he ended up tossing some expensive Lapua brass into the trash because the primer pockets had expanded excessively.
LESSON: Start low, even with coated bullets. Don’t increase your charge weights (over naked bullet loads) until you have clear evidence of lower pressure and reduced velocity.
Procedure After Barrel Cleaning
If you shoot Moly, and clean the barrel aggressively after a match, you may want to shoot a dozen coated “foulers” before starting your record string. Robert Whitley, who has used Moly in some of his rifles, tells us he liked to have 10-15 coated rounds through the bore before commencing record fire. In a “squeaky-clean” bore, you won’t get the full “benefits” of moly immediately.
To learn more about the properties of dry lubricants for bullets, read our Guide to Coating Bullets. This covers the three most popular bullet coatings: Molybdenum Disulfide (Moly), Tungsten Disulfide (WS2 or ‘Danzac’), and Hexagonal Boron Nitride (HBN). The article discusses the pros and cons of the different bullet coatings and offers step-by-step, illustrated instructions on how to coat your bullets using a tumbler.
We’ve been upgrading some pages for the website, including this new layout for the AccurateShooter.com Daily Bulletin. We’ve noticed that some features of this page (and on other websites) may not display optimally with earlier versions of Microsoft’s Internet Explorer browser. If, for example, some of the navigation tools don’t work, a browser upgrade will fix that. If you’re still running IE 6.0 or 7.0, we strongly recommend you upgrade to Internet Explorer 8.0. You can also use another type of browser, such as Firefox or Chrome. But for our readers who prefer IE, we advise upgrading to version 8.0.
Compared to IE 7.0, Internet Explorer 8.0 will display most websites faster (with fewer faults) when running XP or Vista, AND it will definitely provide a better browsing experience with the new Windows 7 operating system. Internet Explorer 8.0 also provides enchanced security for all Windows OS types (XP, XP Home, Vista, Windows 7). Internet Explorer 8.0 can be downloaded and used for FREE.
Has your Windows PC running XP started to slow down? Are you running out of hard drive space? If so, there is a simple procedure for removing accumulated “temp” files that can clog your system when running Windows XP. If you’ve been using your computer for a couple years or more, there could be thousands of temp files hogging space on your hard drive, though they have no function anymore.
Here’s the procedure for deleting unnecessary temp files.
First click on the “Start” button. Next select “Run” from the Menu.
When the “Run” window appears, type in “%temp%” (without quote marks), and click “OK”.
A folder window called “Temp” will appear. All the files and folders in that window can be highlighted and sent to the Recycle Bin. WARNING: If you find some important data files (such as family photos or your IRS tax returns), you may want to move these to another place on the hard drive BEFORE you empty the Recycle bin. But in reality, it’s normally safe to delete any file that displays when you peform the Run > %temp% command. If a file in that temp folder is being used by an active program, Windows won’t let you delete it.
On this editor’s three-year old computer, running Windows XP, there were nearly 18 Gigabytes of temp files that I was able to delete. That freed up a lot of space on my hard-drive, and my computer runs faster now.
Note, there are also unused files in the “Temp” sub-folder in your Windows folder on your C:/ Drive. But you need to be a bit more careful deleting those files — so we won’t explain that process here. Just be aware that there may be many more Gigabytes of useless files stored in your computer.
This may surprise you. We’ve learned that the time interval between neck-sizing operation and bullet seating can have dramatic effects on neck tension (as measured by the force required to seat bullets). Controlling neck tension on your cases is a very, very important element of precision reloading. When neck tension is very uniform across all your brass, you’ll see dramatic improvements in ES and SD, and your groups will shrink. Typically you’ll also see fewer fliers. Right now, most reloaders attempt to control neck tension by using different sized neck bushings. This does, indeed, affect how firmly the neck grips your bullets. But time of loading is another key variable.
James Phillips discovered that time is a critical factor in neck tension. James loaded two sets of 22 Dasher brass. Each had been sized with the SAME bushing, however the first group was sized two weeks before loading, whereas the second group was neck-sized just the day before. James noticed immediately that the bullet seating effort was not the same for both sets of cases — not even close.
Using a K&M Arbor press equipped with the optional Bullet-Seating Force Gauge, James determined that much more force was required to seat bullets in the cases which had been neck-sized two weeks before. The dial read-out of seating force for the “older” cases was in the 60s, while the seating force for the recently-neck-sized cases was in the 20s. (These numbers loosely correspond to the amount of force required to seat the bullet). Conclusion? In the two weeks that had elapsed since neck-sizing, the necks continued to get tighter and stiffen.
When we first posted this information, it spawned some debate. Many people said they have observed the same thing, but the question is why? Something seems to happen over time that makes the necks less “springy”. Our theory is that, over time, the necks (as sized) are taking a “set” and seem to lose elasticity or the ability to stretch. When they are freshly sized, the neck material seems to be more ductile and expands more readily as the bullet is seated.
In a comment to this post, Steve Blair offered this explanation of how case necks can change over time: “When [metal] material is cold worked, the lattice stresses induced may not be uniform and immediately realized. The grain structure can continue to change for some time, becoming harder and less ductile as the lattice deforms further. Seating a bullet in a case neck provides ongoing radial stress to which the metal will respond over time.”
Concerning the seating force numbers (20 vs. 60) — keep in mind that the K&M simply has a dial read-out activated by a Belleville washer stack with a link rod. This isn’t an ultra-precise measure of force. But you CAN feel the difference between a 20 dial position and a 60. If you use the K&M you’d see what I mean -– the needle tends to swing back and forth as the bullet is seating. What you want to watch for is the max reading and “spikes” in the seating force. I think what is going on is the resistance to seating goes up as the brass becomes less elastic over time.
Lesson learned: For match rounds, size ALL your cases at the same time. If you want to reduce neck tension, load immediately after sizing.
Whether or not you accept the notion that case-neck bullet seating resistance rises with time (you’ll need to do your own experiments), it makes sense to size all your match cases at the same time, and then seat all the bullets you need for a match at the same time. If, for example, you need 200 rounds for an upcoming match, you don’t want to size all 200 cases and seat 100 bullets the same day, and then load the remaining 100 rounds three weeks later. Almost certainly you’ll find some difference in neck tension. That variance in neck tension may show up on the target.
This brings up another point — to minimize velocity variances from round to round, it makes sense to shoot the ammo you load in the same order it was loaded (or exact inverse order). That way, if you have some scale drift over time, causing small changes in powder charges, the shot-to-shot variation is reduced.
Chip Lohman, Managing Editor of Shooting Sports USA Magazine, has authored an excellent article on barrel maintenance and cleaning. Chip’s article, Let the BARREL Tell You — Match Barrel Care, Part I, appears in the January 2010 edition of Shooting Sports USA, which is FREE online, in a digital e-zine format.
Chip Lohman is a talented writer, an NRA-Certified Instructor, and an active shooter. Like most writers, he maintains a healthy sense of curiosity. The debate about the proper care of a match barrel is a hot one, spiked with folklore and old wives’ tales, Lohman said. He and his staff set out to set the record straight: “We tried to interject some science into the discussion of cleaning a match barrel,” he explained. In his article, Lohman writes:
Why worry about a little barrel fouling when the throat is subjected to a brutal 5,600° F volcano at 55,000 PSI? To investigate these and other questions about taking care of a match barrel, we spoke with a dozen experts and share their knowledge in this first of a series of articles.
After listening to folks who shoot, build barrels or manufacture cleaning solvents for a living, we concluded that even the experts each have their own unique recommendations on how to care for a match barrel. But they all agree on one thing— the gun will tell you what it likes best. Because the life expectancy of a match barrel is about 1,500 to 2,500 rounds, the objectives of cleaning one should include: preserve accuracy, slow the erosion and remove fouling—all without damaging the gun. This article doesn’t claim that one cleaning method is better than the next. Rather, we set out to interject a little science into the discussion and to share some lessons learned from experts in the field.
At the request of AccurateShooter.com, respected Benchrest ace Lou Murdica tested the brand new, early production Norma 6PPC brass. Lou shot 30 cases (both turned and unturned) over the past few days, and he endorses the Norma brass without hesitation. Lou says “the Norma PPC brass is great brass. Without a doubt this will be highly competitive brass in the short-range benchrest group”. Lou did observe that the necks on the Norma brass were slightly thinner than on Lapua 220 Russian brass, but that really doesn’t matter. With a slight neck turn, Lou declares, “the Norma PPC brass is as good as any out there.”
Lou said, based on his testing, the Norma brass holds pressure well, and the accuracy is outstanding. Lou shot five 5-round groups, as in a match course of fire, and his largest group was “around 0.148″ at 100 yards.
If you’re a short-range benchrester, definitely watch this video and listen to Lou. He thinks this new Norma brass will “change the game”. Note — Lou said most PPC shooters can shoot the Norma cases with no change in their powder recipes. So you won’t lose any velocity using Norma’s new brass. Lou was very impressed with Norma’s new offering, enough so that he declared: “I would go right for the Norma right now if I could put a bunch in my hand.”


 Many of our readers are now using smart-phones for ballistic calculations. Now there is a new App for the iPhone which makes mildot target ranging simple and easy.
 You have to hand it to the Texans. Forum member Paul Scott (aka “FTRinTexas”), has created a sturdy double-gun case from a surplus Stinger Missile transport box. Measuring roughly 63″ x 11″ x 13″, the aluminum Stinger box is big enough to fit two, long-barreled match rifles side by side, stowed vertically, toaster-style. There’s even room inside for a spotting scope and other accessories. With a little effort (and some after-market foam), the Stinger box can be converted into a very practical (and rugged) gun case.
 There are companies that make large, metal-bodied safari cases that stow two rifles vertically, side-by-side. These cases are super-secure, but they are also very expensive. Cabela’s side-by-side


 This may surprise you. We’ve learned that the time interval between neck-sizing operation and bullet seating can have dramatic effects on neck tension (as measured by the force required to seat bullets). Controlling neck tension on your cases is a very, very important element of precision reloading. When neck tension is very uniform across all your brass, you’ll see dramatic improvements in ES and SD, and your groups will shrink. Typically you’ll also see fewer fliers. Right now, most reloaders attempt to control neck tension by using different sized neck bushings. This does, indeed, affect how firmly the neck grips your bullets. But time of loading is another key variable.
 Using a K&M Arbor press equipped with the optional Bullet-Seating Force Gauge, James determined that much more force was required to seat bullets in the cases which had been neck-sized two weeks before. The dial read-out of seating force for the “older” cases was in the 60s, while the seating force for the recently-neck-sized cases was in the 20s. (These numbers loosely correspond to the amount of force required to seat the bullet). Conclusion? In the two weeks that had elapsed since neck-sizing, the necks continued to get tighter and stiffen.
 Chip Lohman, Managing Editor of Shooting Sports USA Magazine, has authored an excellent article on barrel maintenance and cleaning. Chip’s article,
 At the request of AccurateShooter.com, respected Benchrest ace Lou Murdica tested the brand new, early production Norma 6PPC brass. Lou shot 30 cases (both turned and unturned) over the past few days, and he endorses the Norma brass without hesitation. Lou says “the Norma PPC brass is great brass. Without a doubt this will be highly competitive brass in the short-range benchrest group”. Lou did observe that the necks on the Norma brass were slightly thinner than on Lapua 220 Russian brass, but that really doesn’t matter. With a slight neck turn, Lou declares, “the Norma PPC brass is as good as any out there.”