|
|
December 6th, 2009
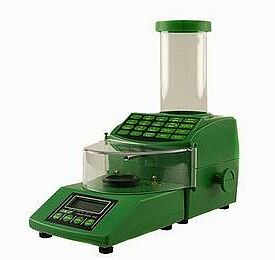 The RCBS ChargeMaster 1500 electronic powder scale and dispenser is the most popular product of its kind on the market. In our original Electronic Powder Dispenser Comparison Test, the ChargeMaster normally dispensed most kinds of powder faster than competitive units from Lyman and PACT. However, after the initial release of the ChargeMaster 1500, RCBS “tweaked” the software a bit to achieve more consistent charge-throws. This slowed down the process somewhat. Some owners have wanted to speed up their ChargeMaster. This IS possible with a relatively simple reprogramming. Most of the internal parameters of the Chargemaster can be modified, under guidance from the tech staff at RCBS. The RCBS ChargeMaster 1500 electronic powder scale and dispenser is the most popular product of its kind on the market. In our original Electronic Powder Dispenser Comparison Test, the ChargeMaster normally dispensed most kinds of powder faster than competitive units from Lyman and PACT. However, after the initial release of the ChargeMaster 1500, RCBS “tweaked” the software a bit to achieve more consistent charge-throws. This slowed down the process somewhat. Some owners have wanted to speed up their ChargeMaster. This IS possible with a relatively simple reprogramming. Most of the internal parameters of the Chargemaster can be modified, under guidance from the tech staff at RCBS.
Gunsmith and Forum member NAT Lambeth reports: “I thought My RCBS ChargeMaster 1500 Combo was fast enough. But I still called RCBS and asked for the programing changes to see if I could speed it up. It was a lot easier than I thought. My 1500 Combo was taking from 15-30 seconds to dispense the powder to the tenth of a grain. I reprogrammed the numbers and now it takes between 7 and 15 seconds to dispense to a tenth. This effectively doubled my loading speed. I only changed the HSB_A1, HSB_B1, and BSP_C1 settings.”
Key ChargeMaster Parameters with Default Settings
HSB_A1 (15.68) Grains under target weight to go from full to high speed
HSB_B1 (3.42) Grains under target weight to go from high to slow speed
BSP_C1 (1.08) Grains under target weight to go from slow to final trickle speed
Nat cautions that you should talk to a RCBS tech before attempting to re-program your ChargeMaster: “You will benefit from talking to the RCBS tech. I have now gone back and played with the numbers a couple of times. (The numbers given to me by the tech at RCBS were still a little conservative.) I think each machine may have its own likes and dislikes. If you get too aggresive with lowering your numbers it will over-throw your intended load.”
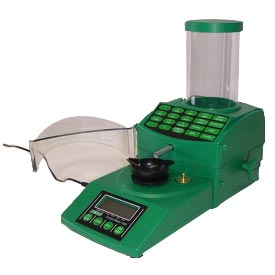 Source for ALL the Parameters Source for ALL the Parameters
There is an extensive discussion of RCBS ChargeMaster programming on the South Africa Hunting Rifle Shooting Assn. (SAJSV) Forum. In this SAJSV Forum ARTICLE, Jaco Brink lists virtually all the programming codes. Importantly, Jaco also provides the default values for various parameters. This is very important, because the ChargeMaster does not have a “return to default” option. Once you change any value, if you want to return to the original value you must enter it manually. Jaco cautions: “I have to advise you to only make changes to your scale if you are confident to do so, and remember that there is not a ‘return to default’ setting in the scale. If all else fails return your scale to the default settings [I have listed].”
CLICK HERE for list of RCBS ChargeMaster Default Programming Values
Use a McDonald’s Straw to Reduce “Over-Throws”
Jaco Brink provided another useful tip to avoid “over-throws” (excess charge weight): “The RCBS employee advised me to take a McDonnell’s straw (because it is thicker than a normal straw), cut off about a half inch piece and put it into the tube where the powder exits. This caused the last [few kernels] of an extruded powder to cluster less, and reduced the amount of overthrows dramatically.”
CLICK HERE for more ChargeMaster 1500 optimization TIPS.
October 24th, 2009
We are often asked “Can I get more velocity by switching primer types?” The answer is “maybe”. The important thing to know is that changing primer types can alter your load’s performance in many ways — velocity average, velocity variance (ES/SD), accuracy, and pressure. Because there are so many variables involved you can’t really predict whether one primer type is going to be better or worse than another. This will depend on your cartridge, your powder, your barrel, and even the mechanics of your firing pin system.
Interestingly, however, a shooter on another forum recently did a test with his .308 Win semi-auto. Using Hodgdon Varget powder and Sierra 155gr Palma MatchKing (item 2156) bullets, he found that Wolf Large Rifle primers gave slightly higher velocities than did CCI-BR2s. Interestingly, the amount of extra speed (provided by the Wolfs) increased as charge weight went up, though the middle value had the largest speed variance. The shooter observed: “The Wolf primers seemed to be obviously hotter and they had about the same or possibly better ES average.” See table:
| Varget .308 load |
45.5 grains |
46.0 grains |
46.5 grains |
| CCI BR2 Primers |
2751 fps |
2761 fps |
2783 fps |
| Wolf LR Primers |
2757 fps |
2780 fps |
2798 fps |
| Speed Delta |
6 fps |
19 fps |
15 fps |
You can’t extrapolate too much from the table above. This describes just one gun, one powder, and one bullet. Your Mileage May Vary (YMMV) as they say. However, this illustration does show that by substituting one component you may see significant changes. Provided it can be repeated in multiple chrono runs, an increase of 19 fps (with the 46.0 grain powder load) is meaningful. An extra 20 fps or so may yield a more optimal accuracy node or “sweet spot” that produces better groups. (Though faster is certainly NOT always better for accuracy — you have to test to find out.)
WARNING: When switching primers, you should exercise caution. More speed may be attractive, but you have to consider that the “speedier” primer choice may also produce more pressure. Therefore, you must carefully monitor pressure signs whenever changing ANY component in a load.
Plenty of CCI-BR2 and Wolf Large Rifle Primers in Stock
If you’re looking for either the CCI BR-2 or Wolf Large Rifle Primers, Wideners.com currently has both in stock. The CCI BR2 primers (item CCIBR2) cost $42.50 per 1000. The Wolf LR Primers (item QQQLR KVB-7) cost $29.50 per 1000 OR $142.00 per 5000.
October 17th, 2009
LINK: Advanced Ballistics Program for I-Phones and I-Pods
Apple’s I-Phone and I-Pod offer a superb user interface with serious computing power. Here’s a very trick software App (good enough for the U.S. military) that runs ballistic calcs and even has a bullet database.

September 27th, 2009
 Forum Member Dave B., aka “Gunamonth”, is a chemist/physicist with decades of experience working with the ultrasound process. He has achieved great results cleaning cases via ultrasound. Dave tried a variety of solutions and he favors a mix of water and Citranox®. This achieved the best results, and did not require a separate neutralizing step if you rinse the cases thoroughly after. Citranox, mixed 1:75 or 1:100 with water (distilled H20 is best), is inexpensive to use. Phospate-free Citranox® contains a blend of organic acids, anionic and non-ionic surfactants and alkanolamines. For more information on using Citranox®, check out THIS FORUM THREAD. Forum Member Dave B., aka “Gunamonth”, is a chemist/physicist with decades of experience working with the ultrasound process. He has achieved great results cleaning cases via ultrasound. Dave tried a variety of solutions and he favors a mix of water and Citranox®. This achieved the best results, and did not require a separate neutralizing step if you rinse the cases thoroughly after. Citranox, mixed 1:75 or 1:100 with water (distilled H20 is best), is inexpensive to use. Phospate-free Citranox® contains a blend of organic acids, anionic and non-ionic surfactants and alkanolamines. For more information on using Citranox®, check out THIS FORUM THREAD.
Dave notes: “I had a lot of communication with the technical VP of Alconox about trying to clean fired cases with an ultrasonic unit. He sent me a copy of his ultrasonic cleaning manual and recommended a product called Citranox®. So far I’ve been very impressed. With once- or twice-fired brass they clean up very quickly. The worst cases I tried were 6 Dashers that had been fired ten times with Varget and never cleaned. The worst fouling was in the bottom of the case around the flash hole. They took longer and I used a more concentrated cleaning solution but they did come out clean. The price is reasonable. I paid $35 a gallon and for once- or twice-fired cases I dilute the cleaner 100 to 1. There is much less chemical reaction with the brass than there is with vinegar. No weird colors, just shiny bright. I even used it with hot water, which speeds up the cleaning process. No need to neutralize. Just rinse in running water and they’re squeaky clean. The cleaner is mostly detergents with a little citric acid. Even at a 1:75 ratio my $35 worth of cleaner will make 75 gallons of solution. It doesn’t seem to be reusable but 75 gallons is a whole lot of solution when I only use about two cups at a time.”
The price has gone up a bit since Dave acquired his Citranox, but Amazon.com sells Citranox for $40.00 per gallon, or you can buy a gallon of Citranox from LabSafety Supply for $46.40.
September 3rd, 2009
When developing a load for a new rifle, one can easily get consumed by all the potential variables — load weight, seating depth, neck tension, primer options, neck lube, and so on. When you’re fully focused on loading variables, and the results on the target are disappointing, you may quickly assume you need to change your load. But we learned that sometimes the load is just fine — the problem is the trigger puller, or the set-up on the bench.

Here’s an example. We were recently testing two new Savage F-Class rifles, both chambered in 6mmBR. Initial results were promising, but not great — one gun’s owner was getting round groups with shots distributed at 10 o’clock, 2 o’clock, 5 o’clock, 8 o’clock, and none were touching. We could have concluded that load was no good. But then, another shooter sat down behind the rifle and put the next two shots, identical load, through the same hole. Shooter #2 had his own issues with the bag and rest and eventually produced a 6-shot group that was a vertical line, with 2 shots in each hole but at three different points of impact. OK, now we can conclude the load needs to be tuned to get rid of the vertical. Right? Wrong. Shooter #3 sat down behind the gun and produced a group that was pretty much a horizontal line with almost no vertical. Hmmm… what gives?

Well each of the three shooters had a different way of holding the gun and adjusting the rear bag. Shooter #1, the gun’s owner, used a wrap-around hold with hand and cheek pressure, and he was squeezing the bag. All that contact was moving the shot up, down, left and right. Shooter #2 was using no cheek pressure, and very slight thumb pressure behind the tang, but he was experimenting with different bag positions. His hold eliminated the side push, but variances in bag position and down pressure caused the vertical string. When he kept things constant, the gun put successive shots through the same hole. Shooter #3 was using fairly heavy cheek pressure. This settled the gun down vertically, but it also side-loaded the rifle. The result was almost no vertical, but a lot of horizontal.
A “Second Opinion” Is Useful
Conclusion? Before you spend all day fiddling with a load, you might want to adjust your shooting style and see if that affects the group size and shape on the target. Additionally, it is nearly always useful to have another experienced shooter try your rifle. In our test session, each time we changed “drivers”, the way the shots grouped on the target changed significantly. We went from a big round group, to vertical string, to horizontal string. Interestingly, all three shooters were able to diagnose problems in their shooting styles, and then refine their gun-handling. As a result, in a second session, we all shot that gun better, and the average group size dropped from 0.5-0.6 inches into the threes.
That’s right, we cut group size in half, and we didn’t alter the load one bit. Switching shooters demonstrated that the load was good and the gun was good. The skill of the trigger-puller(s) proved to be the limiting factor in terms of group size.
August 5th, 2009
RELOADING TIP: Andris Silins has come up with a simple way to measure length to the lands in your rifle:
“Here’s what I did to find length to lands for seating my bullets. I made four cuts into the neck of fire-formed brass. Then I pressed the bullet in lightly and chambered the entire gauge. As the cartridge chambers, the bullet slides back into the case to give you length to lands. It took less than five minutes to get it cut and working. A little light oil in the barrel just past the chamber helps ensure the bullet does not get stuck in the lands. It works great and is very accurate.
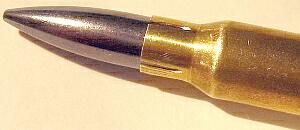
I made the cuts using a Dremel with a cut-off wheel. You can adjust tension two ways. First, you can make the cuts longer or shorter. Longer cuts = less tension. If you used only three cuts insted of four you would get more tension. The trick is to be gentle when you open and close the bolt. If you ram the bolt closed you may wedge the bullet into the lands. When you open the bolt it helps to keep a finger or two near by to guide the case out straight because the ejector wants to push it sideways.”
July 21st, 2009
Benchrest shooter Bill Gammon offers a nice product that helps prevent solvents and oils from marring the finish of a fine wood stock, or a painted fiberglass stock. The STOKBOOT also prevents solvents from softening the bedding, while guarding against nicks and scratches. Gammon’s STOKBOOT fits over the rifle stock during cleaning of the barrel. The quilt on the outside soaks up the solvent before it reaches the stock and holds it until it evaporates. A twin layer of vinyl on the inside stops any solvents from getting through, but Gammon cautions that you should not leave the STOKBOOT on overnight, because solvents could soak through. The basic colors are Red, Wine, Black, Blue, and Green. Typical retail price is about $16.00.

Gammon explains how he came up with the STOKBOOT: “My wife Barbara and I started this business in 1992 as a means to support a very expensive sport, namely Bench Rest. My wife had been in the sewing business for many years. Her experience included sewing, layout, cutting, and management, so it was only logical that the next step was opening our own business. I had complained about having to use a rag over my stock to prevent solvents that I was using from ruining the paint job on the stock, and also seeping into the bedding area and softening up the bedding. So between her expertise in the sewing world and my practical knowledge, we came up with our first STOKBOOT.”

Currently, Gammon offers wholesale orders. His STOKBOOTs are available through popular shooting sports vendors including: Borden Rifles, Kinneman’s Products, Russ Haydon’s Shooters’ Supply, Sinclair International. European dealers are Reloading Solutions for the UK, and Heinz Henke Online in Germany.
July 11th, 2009
One of our writers is shooting in the SoCal Precision Rifle Competition (SCPRC) match this weekend. When assembling his gear for this tactical match we realized there was a problem. He needed to carry 10 rounds “at the ready”, but his rifle lacked detachable magazines. He didn’t want to depend on ammo stored in a backpack or carried in a belt caddy. To quickly access the ammo on his belt or in his pack he would have to get up out of firing position. Our challenge was to figure out the most efficient way to stow 10 rounds on the gun itself.
Elastic Ammo Sleeves
To secure the needed 10 rounds on the gun, we looked at a variety of options. First we tried some slide-on elastic sleeves. These were cheap ($4-$6), but the elastic sleeve tended to slide forward on the buttstock, and as it moved forward it could also rotate. Plus these elastic sleeves held only 9 rounds max. One too few. Shown in the photos are the $4.99 Cabela’s 8-round “Bullet Band” and the Allen 9-round ammo carrier ($3.49 on sale at MidwayUSA). Yes our writer could carry an extra round in his pocket, but we figured there was a better solution.
8-Round Eagle Ammo Carrier
Next we looked at the Eagle Industries Gunstock Ammo Carrier. With THREE velcro-secured straps, including one around the back, this holder was secure. It didn’t slide forward or rotate on the butt-stock. However it cost $28.00 locally, and it only held 8 rounds. Too much money for too little capacity….

Plastic Ammo Caddy Solution — 10 Rounds, Zero Dollars
We then came up with a very simple solution. Federal ammunition comes in sturdy, TEN-round plastic ammo caddies that protect the bullet tips. The caddies have plastic loops at either end so that you can carry the unit on a belt (or other strap). These cartridge-holders cost nothing — people toss them into the trash at ranges.

 Using strapping tape — one strand through the loops on the backside, and another layer over the top — we had our “field expedient” 10-round ammo carrier for an all-up cost of $0.00. Zip. Nada. (Duct-tape works as well, but the strapping tape is a cleaner install. See photo right.) Using strapping tape — one strand through the loops on the backside, and another layer over the top — we had our “field expedient” 10-round ammo carrier for an all-up cost of $0.00. Zip. Nada. (Duct-tape works as well, but the strapping tape is a cleaner install. See photo right.)
Ugly? Yes — but hey, it works.
Another option with the plastic caddy is body-mounting. Using the belt loops, you can sew the cartridge-holder to an elastic (fabric) arm brace and just slip it on your forearm. That gives you a 10-round, easy-access ammo carrier for under $5.00.
Gunstock Ammunition Carrier (Plus Plastic Caddy in Pocket)
OK, even if it IS a cheap, functional solution, some of you guys will NEVER duct-tape a plastic cartridge holder to your $4500.00 tactical wondergun. It’s just not… how shall we say… “Tacti-Cool”. We know that some Tac shooters are acutely image-conscious. For them it would be a major fashion faux pas to duct-tape an ammo caddy to an Accuracy Int’l or GAP Crusader.

If you don’t mind dropping $40.00 or so, there is a solution that gives you a proper tactical set-up, PLUS 15 rounds on the rifle. This, ultimately, is what our writer chose. He purchased an Eagle Industries Stock Pack ($39.09). This features a padded, suede cheekpad, and secure elastic straps at the rear and bottom. Our writer now can mount five (5) rounds on the outside of the pack. In addition, he carries ten (10) more rounds on his Federal plastic cartridge holder, stowed in the Stock Pack’s zippered pocket.
July 5th, 2009
When he chooses to measure his loads or sort bullets by weight, Forum Member Boyd Allen likes to use his trusty RCBS 10-10 scale. He finds that it works predictably, time after time, and it doesn’t suffer from the drift and calibration issues that plague some of the less expensive electronic scales on the market.

To make it easier to see the balance point, Boyd has adapted a magnifying glass with a mirror. This makes the end of his balance beam easier to view from his normal position on the bench. Boyd explains: “This set-up uses a cheap magnifier with positioning arms that was probably designed to hold and magnify small objects while soldering them. I think that it came from Harbor Freight many years ago. The mirror lets you look at the scale as if is was at eye level, and of course the magnifier makes the image easier to see.”
May 28th, 2009
Three-gun match competitor Zak Smith employs a simple, handy means to store his elevation and wind dift data — a laminated data card. To make one, first generate a come-up table, using one of the free online ballistics programs such as JBM Ballistics. You can also put the information in an Excel spreadsheet or MS Word table and print it out. You want to keep it pretty small.

Below is a sample of a data card. For each distance, the card includes drop in inches, drop in MOA, drop in mils. It also shows drift for a 10-mph cross wind, expressed three ways–inches, MOA, and mils. Zak explained that “to save space… I printed data every 50 yards. For an actual data-card, I recommend printing data every 20 or 25 yards.” But Zak also advised that you’ll want to customize the card format to keep things simple: “The sample card has multiple sets of data to be more universal. But if you make your own data card, you can reduce the chance of a mistake by keeping it simple. Because I use scopes with MILS, my own card (bottom photo) just has three items: range, wind, drop in MILS only.”

Once you have the card you can fold it in half and then have it laminated at a local office store or Kinko’s. You can keep this in your pocket, tape it to your stock, or tie the laminated card to your rifle. If you regularly shoot at both low and high elevations, you may want to create multiple cards (since your ballistics change with altitude). To learn more about ballistic tables and data cards, check out the excellent “Practical Long-Range Rifle Shooting–Part 1″ article on Zak’s website. This article offers many other insights as well–including valuable tips on caliber and rifle selection.
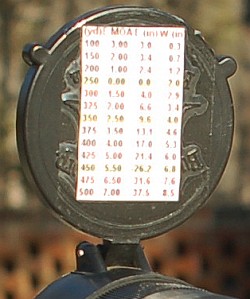
Another option is to place your ballistics card on the back of the front flip-up scope cover. This set-up is used by Forum member Greg C. (aka “Rem40X”). With your ‘come-up’ table on the flip-up cover you can check your windage and elevation easily without having to move up off the rifle and roll the gun over to look at the side of the stock. Greg tells us: “Placing my trajectory table on the front scope cover has worked well for me for a couple of years and thought I’d share. It’s in plain view and not under my armpit. And the table is far enough away that my aging eyes can read it easily. To apply, just use clear tape on the front objective cover.”
|


