|
|
May 28th, 2009
Three-gun match competitor Zak Smith employs a simple, handy means to store his elevation and wind dift data — a laminated data card. To make one, first generate a come-up table, using one of the free online ballistics programs such as JBM Ballistics. You can also put the information in an Excel spreadsheet or MS Word table and print it out. You want to keep it pretty small.

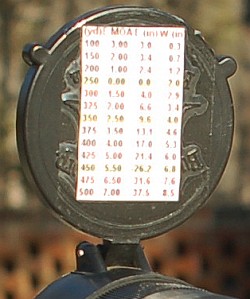
Below is a sample of a data card. For each distance, the card includes drop in inches, drop in MOA, drop in mils. It also shows drift for a 10-mph cross wind, expressed three ways–inches, MOA, and mils. Zak explained that “to save space… I printed data every 50 yards. For an actual data-card, I recommend printing data every 20 or 25 yards.” But Zak also advised that you’ll want to customize the card format to keep things simple: “The sample card has multiple sets of data to be more universal. But if you make your own data card, you can reduce the chance of a mistake by keeping it simple. Because I use scopes with MILS, my own card (bottom photo) just has three items: range, wind, drop in MILS only.”

Once you have the card you can fold it in half and then have it laminated at a local office store or Kinko’s. You can keep this in your pocket, tape it to your stock, or tie the laminated card to your rifle. If you regularly shoot at both low and high elevations, you may want to create multiple cards (since your ballistics change with altitude). To learn more about ballistic tables and data cards, check out the excellent “Practical Long-Range Rifle Shooting–Part 1″ article on Zak’s website. This article offers many other insights as well–including valuable tips on caliber and rifle selection.
Another option is to place your ballistics card on the back of the front flip-up scope cover. This set-up is used by Forum member Greg C. (aka “Rem40X”). With your ‘come-up’ table on the flip-up cover you can check your windage and elevation easily without having to move up off the rifle and roll the gun over to look at the side of the stock. Greg tells us: “Placing my trajectory table on the front scope cover has worked well for me for a couple of years and thought I’d share. It’s in plain view and not under my armpit. And the table is far enough away that my aging eyes can read it easily. To apply, just use clear tape on the front objective cover.”
May 18th, 2009
 Mark your calendars for Wednesday, May 20th, when a “must-watch” episode of ShootingUSA television is broadcast. On the 20th, Sergeant Grant Singley and other members of the USAMU Service Rifle Team explain wind-reading for long range competition. This should be a very informative segment, enhanced with on-screen graphics illustrating key points. Mark your calendars for Wednesday, May 20th, when a “must-watch” episode of ShootingUSA television is broadcast. On the 20th, Sergeant Grant Singley and other members of the USAMU Service Rifle Team explain wind-reading for long range competition. This should be a very informative segment, enhanced with on-screen graphics illustrating key points.
Sgt. Singley notes: “A 5-mph crosswind at 600 yards will move an 80gr .223 bullet about 15 inches. You can see that being able to accurately read the wind will greatly enhance your success on the rifle range.” The USAMU uses a clock method to estimate wind value based on the direction. Then you add in the measured (or estimated) velocity for the vector value (wind strength and angle).
Sgt. Singley recommends the use of a wind meter, such as a Kestrel, to gauge wind speed. But observed conditions will also indicate wind velocity. Sgt. Singley explains: “Zero-to-three mph, is hardly felt on the shooters face, but smoke will drift. Three-to-five mph is felt lightly on the shooter’s face. Five-to-eight mph keeps leaves in constant movement. Eight-to-12 mph will blow dust and loose paper, and 12-to-15 mph winds cause small trees to sway.”
Using Mirage to Estimate Wind Speed and Direction
Long-range shooters also need to learn how to read mirage. Mirage is the reflection of light through layers of air that have a different temperature than the ground. These layers are blown through by the wind, and can be monitored through a spotting scope, to detect direction and speed. You can see what appear to be waves running across the screen. This is the mirage. The waves appear to be running right to left, which indicates a wind coming out of the right. To clearly see the mirage through a spotting scope, you bring the target into focus, then adjust the focus about a quarter turn counter-clockwise.”
Graphics copyright 2009 ShootingUSA, used with permission.
April 27th, 2009
 We’ve learned that many first-time visitors to AccurateShooter.com may come in via a link to the Daily Bulletin rather than through our home page. As a result, they may not be aware that there is a wealth of other content available to our readers. Our Shooters’ Forum, with nearly 8,000 registered members, is one of the best places on the web to discuss precision shooting and advanced reloading. We also offer FREE Forum Classifieds. On the editorial side, AccurateShooter.com offers hundreds of pages of content, with thousands of photos. Our Cartridge Guides are considered definitive sources of tech info for popular match calibers, and our Guns of the Week articles provide in-depth reports on outstanding custom rifles, most of which have competition pedigrees. In addition, we offer videos, gear reviews, book reviews, an event calendar, and even FREE downloadable targets. We’ve learned that many first-time visitors to AccurateShooter.com may come in via a link to the Daily Bulletin rather than through our home page. As a result, they may not be aware that there is a wealth of other content available to our readers. Our Shooters’ Forum, with nearly 8,000 registered members, is one of the best places on the web to discuss precision shooting and advanced reloading. We also offer FREE Forum Classifieds. On the editorial side, AccurateShooter.com offers hundreds of pages of content, with thousands of photos. Our Cartridge Guides are considered definitive sources of tech info for popular match calibers, and our Guns of the Week articles provide in-depth reports on outstanding custom rifles, most of which have competition pedigrees. In addition, we offer videos, gear reviews, book reviews, an event calendar, and even FREE downloadable targets.
If you’re a new visitor to AccurateShooter.com, you should check out all that we have to offer. There are hundreds of informative articles to read … and they’re all free.
 AccurateShooter.com Features: AccurateShooter.com Features:
 Shooter’s FORUM Shooter’s FORUM
FREE Classified Ads
ARTICLES Archive
CARTRIDGE Guides
FREE Targets
GUNS of the Week
TECH Articles
Gun VIDEOS
Gear Reviews
Book Reviews
Event CALENDAR
COMPETITION Resources
April 25th, 2009
 Ever wondered what twist rate is required to stabilize a particular bullet? Or would you like to see how changes in spin rates (rpm) affect bullet stability? Well thanks to our friends from Canada, you’ll find helpful formulas online that answer many questions about external ballistics. Ever wondered what twist rate is required to stabilize a particular bullet? Or would you like to see how changes in spin rates (rpm) affect bullet stability? Well thanks to our friends from Canada, you’ll find helpful formulas online that answer many questions about external ballistics.
The Ballistics Page for the Canadian National Firearms Association (NFA) website offers a variety of useful programs and data charts created by Peter Cronhelm. These include:
Caliber Twist Rate Chart
Greenhill Formula Twist Calculator
Bullet Stability Calculator (requires MS Excel)
Ballistic Coefficients Chart (MS Word), (Or DOWNLOAD HERE.)
Ranging Ballistics Computer (Scroll to bottom of page.)
This exterior ballistics computer works in conjunction with range data as well as computing a conventional drop and windage chart. Using an FFP (Final Firing Point) and multiple TRP’s (Target Reference Points) the system will simultaneously calculate Drop and Windage data for up to 30 TRP’s 360 degrees around the FFP. Windage is corrected for the TRP direction compared to the primary wind direction. The spreadsheet consists of six individual pages. Each page performs a distinct function and contains all the information required to complete a shot at a target or targets. The entire system can be used in any laptop or handheld computer capable of running MS Excel or Excel CE.
CLICK HERE to download Ranging Ballistics Computer (requires MS Excel)
Rimfire Ammo Comparison Table
Canada’s NFA even provides a detailed table with bullet weights and velocities for over 100 varieties of 22LR Rimfire ammunition from Aguila, CCI, Eley, Federal, Fiocchi, Lapua, PMC, Remington, RWS, and Winchester. This Rimfire Ammo Table is a “must-have” resource for any smallbore shooter. Shown below is the section for Lapua:

April 9th, 2009
Now through April 30, 2009, MidwayUSA has the Hornady (formerly Stoney Point) Lock-N-Load Overall Length Gauge (item 570611) on sale for $25.99. That’s $4.50 off the regular price. Note, in addition to the Gauge itself, you’ll need a threaded modified case for each caliber you shoot, and we recommend having a comparator body with caliber-specific insert. The comparator allows you to measure from base of case to bullet ogive (rather than bullet tip).
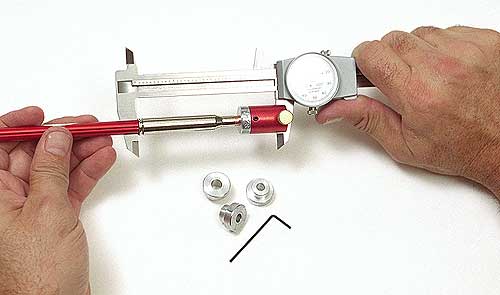
OAL Gauge shown with Comparator to allow measurement from bullet ogive.
This Editor personally uses the Hornady Overall Length Gauge to find the distance to the lands for all his centerfire rifles. With practice, using the right technique, you can achieve measurements that are very repeatable. Here’s my method:
1. After screwing the modified case securely to the gauge, insert the case (with a bullet in neck) into the chamber. Make sure the modified (threaded) case goes ALL the way into the chamber. (Note: a heavily-fouled chamber can interfere with the seating of the modified case.)
2. Slide the gray pusher rod gently forward until you feel the first, slight resistance, then stop.
3. Now with the tip of your finger, tap the gray rod gently two or three times. This should give you a good, repeatable bullet contact with the lands, without going into the rifling.
4. You do NOT want to push hard on the gray rod. This will cause the bullet to engage the rifling. That will cause the bullet to stick, and you will end up with inconsistent length-to-lands measurements.
Some folks complain that this tool is not particularly repeatable. Well, if you use and practice the technique above, I think you’ll find the opposite is true. Using the Hornady OAL Gauge with a Berger bullet in a 6PPC, I recently measured length to lands five times in a row, with a couple witnesses to the procedure. Each of the measurements was consistent within .0007″ as recorded with a set of Mitutoyo Digital calipers. The key is using the same technique and pressure every time. CLICK HERE for a complete review of the Hornady OAL Gauge, with many photos
April 5th, 2009
[This item last appeared a year ago in our Daily Bulletin, generating considerable interest among readers. By popular request, we’re reprinting this story, in case you missed it the first time around. — Editor]
Precision shooters favor premium brass from Lapua, Norma, or RWS. (Lake City also makes quality brass in military calibers.) Premium brass delivers better accuracy, more consistent velocities, and longer life. Shooters understand the importance of good brass, but many of us have no idea how cartridge cases are actually made. Here’s how it’s done.
The process starts with a brass disk stamped from strips of metal. Then, through a series of stages, the brass is extruded or drawn into a cylindrical shape. In the extrusion process the brass is squeezed through a die under tremendous pressure. This is repeated two or three times typically. In the more traditional “draw” process, the case is progressively stretched longer, in 3 to 5 stages, using a series of high-pressure rams forcing the brass into a form die. While extrusion may be more common today, RWS, which makes some of the most uniform brass in the world, still uses the draw process: “It starts with cup drawing after the bands have been punched out. RWS cases are drawn in three ‘stages’ and after each draw they are annealed, pickled, rinsed and subjected to further quality improvement measures. This achieves specific hardening of the brass cases and increases their resistance to extraordinary stresses.” FYI, Lapua also uses a traditional draw process to manufacture most of its cartridge brass (although Lapua employs some proprietary steps that are different from RWS’ methods).

After the cases are extruded or drawn to max length, the cases are trimmed and the neck/shoulder are formed. Then the extractor groove (on rimless cases) is formed or machined, and the primer pocket is created in the base. One way to form the primer pocket is to use a hardened steel plug called a “bunter”. In the photos below you see the stages for forming a 20mm cannon case (courtesy OldAmmo.com), along with bunters used for Lake City rifle brass. This illustrates the draw process (as opposed to extrusion). The process of draw-forming rifle brass is that same as for this 20mm shell, just on a smaller scale.


River Valley Ordnance explains: “When a case is being made, it is drawn to its final draw length, with the diameter being slightly smaller than needed. At this point in its life, the head of the draw is slightly rounded, and there are no provisions for a primer. So the final drawn cases are trimmed to length, then run into the head bunter. A punch, ground to the intended contours for the inside of the case, pushes the draw into a cylindrical die and holds it in place while another punch rams into the case from the other end, mashing the bottom flat. That secondary ram holds the headstamp bunter punch.

The headstamp bunter punch has a protrusion on the end to make the primer pocket, and has raised lettering around the face to form the headstamp writing. This is, of course, all a mirror image of the finished case head. Small cases, such as 5.56×45, can be headed with a single strike. Larger cases, like 7.62×51 and 50 BMG, need to be struck once to form a dent for the primer pocket, then a second strike to finish the pocket, flatten the head, and imprint the writing. This second strike works the brass to harden it so it will support the pressure of firing.”
Thanks to Guy Hildebrand, of the Cartridge Collectors’ Exchange, OldAmmo.com, for providing this 20mm Draw Set photo. Bunter photo from River Valley Ordnance, RVOW.com.
April 5th, 2009
Sinclair International recently launched its enhanced and upgraded website. The revamped site is faster to navigate, and you’ll find it much easier to find new products and bargain specials. Congrats to Bill Gravatt and the folks at Sinclair Int’l for a job well done.

One great feature newly integrated into Sinclair’s website is The Reloading Press, a regularly-updated Blog with product info and authoritative technical articles on reloading and precision shooting. Here are some of the valuable “how-to” articles you’ll find on Sinclair’s Blog:
Determining Bullet Seating Depth
Setting Up a Full-Length Sizing Die
Shooting Non-Benchrest Rifles from the Bench
Basics of Reloading for the AR15
Methods and Benefits of Sorting Cases by Weight

The Reloading Press is a valuable addition to the online resources available to precision shooters. We commend Sinclair for investing the time and effort to provide this material at no cost to Sinclair’s customers. Click one of the links above and check it out yourself.
March 28th, 2009
 Harrell’s Precision sells “semi-custom” full-length bushing dies for the PPC and 6BR chamberings. While the Harrell brothers do not cut the die to spec, they carry a large selection of dies made with slightly different internal dimensions. When you send in your fired brass, the Harrells choose a die from inventory with just the right amount of sizing (diameter reduction) at the top and bottom of the case. Given the quality, and precise fit, Harrell’s full-length dies are a good value at $70.00 plus shipping. Harrell’s Precision sells “semi-custom” full-length bushing dies for the PPC and 6BR chamberings. While the Harrell brothers do not cut the die to spec, they carry a large selection of dies made with slightly different internal dimensions. When you send in your fired brass, the Harrells choose a die from inventory with just the right amount of sizing (diameter reduction) at the top and bottom of the case. Given the quality, and precise fit, Harrell’s full-length dies are a good value at $70.00 plus shipping.
 Bump Measuring Collar Bump Measuring Collar
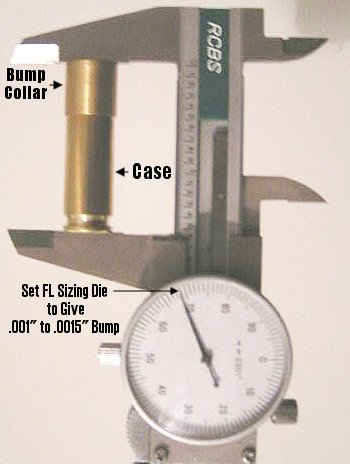
The Harrell brothers provide a nice bonus item with each full-length die — a neat, little shoulder bump measuring device as shown in the photo at right. Hornady/Stoney Point sells a stand-alone tool that does the same job, but the Harrell’s bump collar is simpler and faster. To measure your shoulder bump, simply place the Harrell’s bump collar over the front of your deprimed case (before sizing) and measure the OAL with your calipers. Then size the case in your full-length die, replace the collar and repeat the measurement. You want to set your die so the shoulder moves back about .001″ to .0015″ for most applications. (With semi-auto guns you may want more bump.)
When measuring for shoulder bump, you need to remove the primers first. Our friend Boyd Allen explains: “Use a decapping tool or die to remove the fired primer before taking the initial measurement. When working to thousandths, even the raised edge of a crater or a slightly raised primer can throw you off by a significant amount.”
March 26th, 2009
 April is just around the corner. Many shooters in the Northern latitudes are getting ready to start their shooting season. That means collecting all the gear they’ll need at the range. It’s easy to forget small, critical items, so we’ve provided a checklist of the small “extras” you should pack before you head out to the range. In addition to rifle, rests, ammo, targets, and cleaning gear, here are a dozen essentials you should include in your range bag. April is just around the corner. Many shooters in the Northern latitudes are getting ready to start their shooting season. That means collecting all the gear they’ll need at the range. It’s easy to forget small, critical items, so we’ve provided a checklist of the small “extras” you should pack before you head out to the range. In addition to rifle, rests, ammo, targets, and cleaning gear, here are a dozen essentials you should include in your range bag.
 • Shell-holder — Use the shell-holder to gauge if you are getting excessive case expansion from hot loads. If a fired case doesn’t slip into the shell-holder easily, your load is definitely TOO HOT. • Shell-holder — Use the shell-holder to gauge if you are getting excessive case expansion from hot loads. If a fired case doesn’t slip into the shell-holder easily, your load is definitely TOO HOT.
• Extra earplugs — Always use ear protection when shooting. We bring a 35mm film canister with extra sets of foam earplugs.
 • Hex wrench or screwdriver for action screws — Action screws can work loose with time. Always bring the appropriate hex wrench or screwdriver whenever you go to the range. • Hex wrench or screwdriver for action screws — Action screws can work loose with time. Always bring the appropriate hex wrench or screwdriver whenever you go to the range.
• Small wrench for scope rings — Check the tension of your scope base and ring fasteners before you go. Bring along a small Torx wrench for the ring screws (or other tool that fits your fasteners).
• Normal and under-sized jags — It is often wise to use one-caliber undersize jags when applying solvent with cotten patches. You should have a couple sizes in your range kit.
 • Extra batteries — Bring extra batteries for all your electronic gear — which can include chronograph, windmeter, digital camera, GPS etc. • Extra batteries — Bring extra batteries for all your electronic gear — which can include chronograph, windmeter, digital camera, GPS etc.
• Small notebook and pen or pencil — Use the notebook to record chron data, log group sizes, and make notes about wind and weather conditions.
• Adhesive dots — Bring a few sheets of adhesive dots (sold at office supply stores). Use small white or black dots as target pasters. Use larger red or orange dots as aiming points (target centers).
 • Folding chair or camp stool — This comes in handy if you’re spotting for another shooter, or if you reload away from the firing line. • Folding chair or camp stool — This comes in handy if you’re spotting for another shooter, or if you reload away from the firing line.
• Water bottle — You can’t shoot well if you’re dehydrated. Bring at least two quarts of water with you and keep a bottle at the bench.
• Surveyors’ Tape and wood stakes — You can make inexpensive wind indicators using surveyors’ tape attached to the top of wood stakes.
 • Small plastic ruler — Use this to measure your group sizes. A transparent (see-through) ruler works best. Rulers are also useful for drawing lines on targets. • Small plastic ruler — Use this to measure your group sizes. A transparent (see-through) ruler works best. Rulers are also useful for drawing lines on targets.
This list is not intended to be exclusive. There are many other items you may wish to include. We invite our readers to add other “essentials” to the list. The important thing is to plan ahead, packing your key items before you drive to the range.
February 28th, 2009
Readers often ask “What’s the difference between a Weaver scope rail and a Picatinny Rail?” The answer is not as simple as it seems. The dimensions of a Picatinny Rail should be consistent (from one rail-maker to another), since there IS a government spec. Conversely, there is some variance in “Weaver-style” rails. The width of the groove is the most important difference between Picatinny Rails and weaver rails. “Mil-spec” Picatinny rails will have a grove width of 0.206″ while Weaver rails typically have a narrower, 0.180″ groove width.
Brownell’s has a helpful GunTech Article that discusses the Picatinny Rail vs. Weaver Rail. That article explains:
“What are the differences between the ‘Picatinny’ and the ‘Weaver’ systems? The profile of the two systems is virtually identical. Depending on the quality of the machining done by the manufacturer, the two systems should be indistinguishable from the profile. The key difference lies in the placement of the recoil grooves and with width of the grooves. MIL-STD-1913 (Picatinny) grooves are .206″ wide and have a center-to-center width of .394”. The placement of these grooves has to be consistent in order for it to be a true ‘Picatinny’MIL-STD system. Weaver systems have a .180” width of recoil groove and are not necessarily consistent in a center-to-center measurement from one groove to the next.

In many instances, a Weaver system has a specific application that it is machined for, so interchangeability is not necessarily an issue. A MIL-STD-1913 system must adhere to the specifications listed above in order for it to be considered MIL-STD, since the military desires uniformity in the recoil grooves to allow for different systems to be mounted on the weapon with no concern for compatibility.
Now, what does this mean to you? Boiled down, it means that accessories designed for a Weaver system will, in most cases, fit on a ‘Picatinny’ system. The reverse, however, is probably not the case. Due to the larger recoil groove, ‘Picatinny’ accessories will not fit a Weaver system. There are, of course, exceptions to every rule, but for a good rule-of-thumb, [full-width] ‘Picatinny’ won’t fit Weaver, but Weaver will fit ‘Picatinny’.”
|


