|
|
February 28th, 2009
 The Ballistic Coefficient (BC) of a bullet is an index number used to describe the bullet’s aerodynamic drag relative to a reference standard. While bullet manufacturers commonly include BCs in their product descriptions, often times those numbers are merely a mathematical calculation, rather than the result of actual testing. Also, since the true drag of a bullet changes over the course of its trajectory, using a single BC is a fairly primitive way to predict how that bullet will actually perform over a long distance. The Ballistic Coefficient (BC) of a bullet is an index number used to describe the bullet’s aerodynamic drag relative to a reference standard. While bullet manufacturers commonly include BCs in their product descriptions, often times those numbers are merely a mathematical calculation, rather than the result of actual testing. Also, since the true drag of a bullet changes over the course of its trajectory, using a single BC is a fairly primitive way to predict how that bullet will actually perform over a long distance.
Lapua is now using Doppler radar to provide a more sophisticated model of bullet flight. Lapua has issued drag coefficients for its bullets based on radar testing. Importantly, Lapua didn’t just calculate drag coefficients off bullet blueprints. Instead, Lapua used radar to measure bullet velocities at various points along the bullet flight path (trajectory). This provides Cd (Coefficient of Drag) values that can be used with advanced ballistic software such as QuickTARGET to calculate trajectories with great reliability and precision.

Lapua’s engineers explain: “With our Cd-data measured by continuous Doppler radar measurements you can calculate the trajectory of your bullet much more accurately than using the simplified one-number BC. Typically-used simple ballistic coefficient (BC) describes only ballistic performance of the bullet compared to old standard ‘G1′ bullet. Ballistic Coefficient is essentially a measure of drag force compared to G1 projectile. The higher the BC value, the less drag and better ballistic performance.
The BC changes during a projectile‘s flight and stated BCs are always averages for particular velocity ranges. Knowing how a BC was established is almost as important as knowing the stated BC value itself. For the precise establishment of bullet trajectory, Doppler radar-measurements are required. The normal shooter however, has no access to such expensive professional measurement devices.

The radar-measured Cd factor describes the aerodynamic drag at particular points of trajectory. A Cd table (see above) shows this factor as a function of velocity (Mach number). Special software is required (e.g. Quick Target Unlimited) to utilize this data to [generate a] ballistic table. During the Doppler radar measurements the complete location information versus time is recorded.”
Long-Range Tests Show Lapua’s Bullet Drag Models Work Well
One of our sources has been working with Lapua’s radar-derived ballistic data for over a year. His task was to see how calculated trajectories using Lapua’s stated Cd values for particular bullets compared to observed bullet flights at long range. Using the data for the Lapua 250gr Scenar, this tester found the predicted trajectory “dead on to 1600 meters (about a mile) and only a few click off [at] 2000 meter (1.25 mile) distances”.
Bullet Ballistic Info for Download
CLICK HERE for explanation of Doppler-derived Cd with sample charts.
CLICK HERE for Cd-data for Lapua bullets.
February 26th, 2009
 One of the easiest ways to build a portable target stand is to use PVC pipe and connectors. Utah .308 Shooter “Cheese” has created a simple yet sturdy target frame, and he’s shared his design so you can build a similar frame easily and at low cost. The components are wood furring strips, 2″-diameter PVC pipes (and connections), and a 2’x3′ sheet of cardboard. The PVC base can be glued together, or, for easier transport and storage, you can leave some or all of the connections free. “Cheese” tells us: “I didn’t glue any of it together so I could disassemble it, shove it in a bag and take it anywhere.” One of the easiest ways to build a portable target stand is to use PVC pipe and connectors. Utah .308 Shooter “Cheese” has created a simple yet sturdy target frame, and he’s shared his design so you can build a similar frame easily and at low cost. The components are wood furring strips, 2″-diameter PVC pipes (and connections), and a 2’x3′ sheet of cardboard. The PVC base can be glued together, or, for easier transport and storage, you can leave some or all of the connections free. “Cheese” tells us: “I didn’t glue any of it together so I could disassemble it, shove it in a bag and take it anywhere.”
“All the parts are just pushed together and not glued. That way I can break it down and carry it all in a bag. Also, if a buddy (not me!) happens to shoot the stand, I can easily replace just the damaged piece. The last 6 inches of the furring strips are wittled-down a bit so they can be pushed into the upright pipes with a little friction. The cardboard is 2 x 3 feet, and I use a staple gun to attach it to the furring strips. Then I just staple the target onto the cardboard and go at it.
Of course you can modify the dimensions as desired. I chose the black ABS pipe over white PVC simply for cost — black ABS is a little cheaper. You can also glue some or all of the parts together, it’ll just be larger for transporting. In windy conditions, the thing likes to come apart. Duct tape might work well. For weight, I thought about filling the two end pipes with sand and gluing test caps on each of their ends. The test caps still allow the pipes to slip into the elbows.”
Add Anchors or Internal Weight for Stability
On a very windy day, a PVC stand can shake or even topple over. There are a couple solutions to this. Some people fill the PVC pipe sections with sand to add weight, or you can put short sections of Re-BAR inside the long legs. One GlockTalk forum member noted: “I built [a frame] almost identical to this. I also take four pieces of wire coathanger bent into an inverted “U” shape to anchor the frame to the ground. It is so light that wind will knock the stand over [without anchors].”
Assembly Diagram with Dimensions
The photo below shows all the components of the base, with dimensions. The overall maximum assembled dimensions are roughly 26″ wide, 41″ deep, and 66″ tall (the cardboard is 2 x 3 ft).

You can find photos of a similar home-made PVC target stand (with a slightly different rear section) on the Box of Truth website. This also employs a PVC tubing base with wood uprights. We’ve also seen all-PVC target stands, but we’ve found that it is easier to attach the cardboard to wood strips than to PVC pipe. Also, if the upper section is wood, you can fit different height targets, while using the same base.
February 3rd, 2009
 If you’re using a body die or a full-length sizing die, try using Ballistol (in the aerosol can) as a lube. It works GREAT without the tacky or gooey residue left by most case lubes. It will also clean off carbon residues on the neck as you lube the case. Just spray a little on a cotton patch (or your fingertips) and wipe each case before you run it up into the die. If you are using a steel neck bushing, be sure to wipe the neck as well. You can usually do a 6-10 BR-sized cases before you need to re-apply Ballistol on the patch. Ballistol is non-toxic, non-petroleum based, and will not harm your skin. It is very slippery, but can easily be removed with a rag or paper towel. Try it–you may retire your One-Shot. Derived from Pine Oil, Ballistol can also be used to protect wood stocks. If you’re using a body die or a full-length sizing die, try using Ballistol (in the aerosol can) as a lube. It works GREAT without the tacky or gooey residue left by most case lubes. It will also clean off carbon residues on the neck as you lube the case. Just spray a little on a cotton patch (or your fingertips) and wipe each case before you run it up into the die. If you are using a steel neck bushing, be sure to wipe the neck as well. You can usually do a 6-10 BR-sized cases before you need to re-apply Ballistol on the patch. Ballistol is non-toxic, non-petroleum based, and will not harm your skin. It is very slippery, but can easily be removed with a rag or paper towel. Try it–you may retire your One-Shot. Derived from Pine Oil, Ballistol can also be used to protect wood stocks.
Use Heavier Lube for Case-Forming
Note, for heavy case-forming or necking up case necks, we still recommend a thicker lubricant, such as Imperial die wax. But for normal case sizing, after your neck has been expanded, Ballistol will do the job, and you won’t need to tumble the brass afterwards. All you need is a very thin layer of Ballistol, and this easily wipes off with a paper towel.
 Neck-Turning Lubes Neck-Turning Lubes
For lubing the neck-turning tool mandrel while turning case necks, many folks use a blend of STP® Oil Treatment and Mobil 1 lube. Chuckw2 reports: “Try STP and Mobile 1 Synthetic oil in a 50/50 mixture. Very slick, but it sticks so you will need to tumble your cases after turning.” STP is a very thick lubricant, that flows and clings almost like honey. Jason reports the STP blend comes off easily in an ultra-sound bath, using a bit of detergent. STP is also now available in a convenient 7-ounce tube, so you don’t have to buy a large bottle. Another even cheaper option is assembly lubricant. For turning his case necks, RStreich uses assembly lube from an auto parts store. He notes: “The brand I have is reddish in color and kind of sticky like honey. It’s far better than the Imperial die wax I was using before.”
December 29th, 2008
Available for under $200.00 including front bag, the Caldwell Fire Control front rest is a remarkable value. It makes the co-axial, joystick design more affordable than ever. We used the Fire Control front rest when testing our Ultimate Varminter 20 Practical AR. Once we removed some sand from the tri-lobe front bag, the rest worked quite well. The Fire Control rest is currently on sale at MidwayUSA for $179.99, item 956104.
While most Fire Control owners are happy with the product, many have wanted to replace the tri-lobe front bag with a more conventional front bag from Protektor or Edgewood. This isn’t as easy as it looks because the width of the Fire Control top is too narrow for most standard 3″-wide front bags. On a “special order” basis, Protektor has crafted some narrower leather front bags that fit pretty well, but some shooters have decided to “upgrade” the entire front assembly.
Forum member Doug M., aka “DrJeckyl”, has come up with an elegant solution that allows a Sinclair Int’l RT-3 Rest Top to be fitted to the Fire Control Rest. Doug notes: “The Caldwell Fire Control is a nice rest for the money, but it comes up short in the rest top department. The Sinclair RT-3 fits perfect with minor modifications.” Shown below are the main components:

To adapt the Sinclair RT-3, Doug merely had to drill a couple holes in the RT-3 baseplate, and adapt a spacer to get the height correct: “The Caldwell factory top has a raised mounting portion so a 1/8″ piece of stock will be needed as a spacer to the flat-bottom RT-3. The spacer needs to be cut to the same length as the movable portion on the rest. And you should plan the mounting accordingly so the left thumbscrew clears the vertical height column at full left position (there is a cutaway in the rest under the thumbscrew that allows for easy access to the screw).” We have labeled the photo with dimensions, but Doug cautions you should measure your own original plate to insure the drill locations are correct for your unit.

Below you’ll see the completed installation, with the RT-3 installed on the Fire Control rest. Doug says it works very well. For more information on this Fire Control rest top conversion, with Doug’s measurments for the hole-spacing and his specs on the fasteners, go to the original thread in our Shooter’s Forum.
LINK to Fire Control Rest Top Conversion Forum Thread

December 19th, 2008
We recently had a discussion with the barrel-makers at Bartlein Barrels. They confirmed that they have seen many, many more barrels harmed by crown damage caused by improper cleaning than by anything else. If you use a bronze brush, Bartlein recommends that you remove the brush after it passes through the muzzle. This is because the bristles take a set (pointing to the breech) during the out-stroke. In other words the bristles angle back as you push towards the muzzle from the breech. If you drag the brush backwards at the muzzle, you force these bristles to reverse direction abruptly right as they cross the delicate crown. In time, that can damage the crown. John Krieger of Krieger Barrels also advises his customers not to pull a bronze brush backwards across the crown.

Response to Skeptics
Whenever we’ve published similar advice, given by guys who are producing some of the most accurate barrels in the world, some readers get extremely angry. They say, “You’re crazy! I’ve was pullin’ triggers when you were still in diapers. I’ve got Hall of Fame points and I say there’s no way a phosphor bronze brush can ever do anything to steel. You’re full of it.” Well, these guys are entitled to their opinion. But here’s our response. Number one, we’re just telling you what the barrel-makers are telling US. Don’t kill the messenger. Number two, many of the guys who say bronze brushes can’t affect the crown are the same guys who feel they need to recrown their barrels every 400-500 rounds (Do we see a connection?). Third, if you don’t think a softer material can affect steel, look at the steel ferrules of a well-used fishing rod — there the steel is worn away by plastic. (With time, water will wear away granite.) Lastly, this Editor can tell you I’ve seen the damage myself, first-hand, using a magnifying glass on much-brushed benchrest barrels. Right at the muzzle, the top edge of the lands had sharp, jagged edges that looked like little shark’s teeth, or the edge of a serrated knife. By contrast, a new barrel will have a nice, smooth straight edge along the top of the lands at the muzzle.

Be Careful with Jags
Bartlein’s experts also told us to be careful about the jags you use. Dewey-style jags in particular can cause problems. These have a long shaft with multiple rings with diamond-pattern “teeth”. The teeth are designed to grip a patch. The problem is that the lower rings may be exposed below the patch fabric, so the teeth can grind directly on the rifling and/or crown. Bartlein says Dewey-style metal jags can damage a crown very quickly if any of the toothed rings are exposed, metal-on-metal. Tim North of Broughton barrels also advises against using the Dewey-style jags with toothed rings. Interestingly, Dewey uses the same type of diamond-shaped teeth on the bottom of its “Crocogator” primer pocket tool, so you know those knurled teeth can scrape.
October 21st, 2008
How long will a barrel last before the accuracy “goes south”? There are so many variables involved (powder type, bore diameter, bullet coatings etc.) that it’s hard to predict. You might say “Well, my buddy has a .243 and he got 1500 rounds before the throat was shot out” — those kind of comparisons can be useful, but they’re not very scientific, and they won’t help much if you’ve got a gun in a new chambering (such as the 6.5×47) for which there is not a lot of historical data.
Is there a more reliable way to predict barrel life — one that will work for a broad range of calibers? Well, Forum member MikeCr has developed an Excel spreadsheet that accounts for a number of variables, and gives a pretty good estimate of useful barrel life, whether you’re shooting a .223 Rem or a 338 Lapua Magnum. Mike’s program predicts barrel life using five variables: 1) Bullet Diameter; 2) Powder Charge weight; 3) Powder Heat Potential (KJ/kg); 4) Pressure (in psi); and 5) Bullet Coating (yes/no). Mike provides a table with Heat Potential ratings for most popular powder types. The user needs to know the pressure of his load. This can be estimated with QuickLOAD.
You can download the lastest version of Mike’s spreadsheet below. You’ll need an Excel viewer to open the file.
Click to Download Spreadsheet: Barrel Life Spreadsheet (Lastest Version)
Shown below is Mike’s Spreadsheet, with variables for a 6BR shooting 105gr “naked” bullets with 30.3 grains of Hodgdon Varget powder. The formula predicts 2401 rounds of barrel life. That corresponds pretty well to what we’d expect for a 6BR — about 2500 rounds.
 
Mike observes: “There has been alot of discussion lately related to cartridge design and resulting barrel life. This is a really important factor to consider amongst a myriad of choices. Barrel life is controversial, and subjective. There are no clear-cut standards for comparison. But a few years ago, I put together a spreadsheet based on Bart Bobbit’s rule of thumb. It worked pretty good, only occasionally failing some tests when validated against posted barrel lives.
According to Ken Howell, I had to account for pressure. And Henry Child’s powder temperature testing provided another piece needed. So, I’ve tweaked it here and there to pass more tests. From 223rem to 300 UltraMagnum. Another element added, but turned off is shot interval. I would need way more tests to lock in on this. But everyone knows, the faster you shoot, the worse the barrel life.
Anyway, another factor hard to define is ‘accurate’ barrel life. This cannot be quantified without standards. Barrels are replaced when expectations are no longer met. I feel that a [barrel] passes peak potential in a finite period due to throat erosion. But that don’t mean it’s toast, if it still shoots well enough. It’s just as likely that many of us never see that peak potential anyway. It’s a slippery thing. Point-blank BR competitors will toss a barrel when it leaves the 1s. I could get another 4000 rounds from it, and be content with its performance, I’m sure.
NOTE: This spreadsheet may show a lower barrel life than you prefer. But it pretty well spotlights cartridges to stay away from if you plan much time at the range or in dog town.”
Editor’s Comment: We want to stress that Mike’s spreadsheet is a helpful tool, but it is not a definitive “take-it-to-the-bank” indicator of barrel life. Mike cautions that predicting barrel life involves so many different factors (including how hard/hot the barrel is run), that the task is a bit like predicting tread life on car tires. Still, the spreadsheet is very helpful. It can certainly put shooters on notice that some chamberings (such as the 6-284) are likely to be a barrel burners. That can help you make a smart decision when choosing a chambering for your next rifle.
October 16th, 2008
Confused about the meaning of a term such as “meplat”, “magnaflux” or “obturate”? Need to know the OAL of an unusual Wildcat such as the .218 Donaldson Wasp? Well CCI and MidwayUSA offer handy answers on the web. CCI’s Shooters’ Glossary is a very complete collection of gun-related and reloading terms. MidwayUSA’s GunTEC Dictionary contains short descriptions of hundreds of cartridges, plus definitions of thousands of shooting-related words and phrases. How many of you knew that “Maggie’s Drawers” is “a colloquial term used for the red flag once used by pit workers to signal a missed shot at high-power rifle competitions”?

Consulting the dictionary, we learned that “Magnus Force” was not a Tom Selleck TV show. Rather, “Magnus Force is the movement of a bullet in the direction it is rotating (and downward) due to the lower air pressure surrounding it. The low pressure pocket is caused by the effect of the bullet’s fast rotation on the surrounding air.” MidwayUSA’s GunTEC dictionary even includes short “bios” of notable firearms inventors and marksmen, including J.M. Browning, Fredrich von Martini, and Peter Paul Mauser. A serious shooting buff could spend hours browsing the GunTEC dictionary, learning new facts (and a ton of obscure trivia.)
October 13th, 2008
Planning an important fall hunt? Here’s a product that will help you pick the most effective bullet for use on big game. The Bullet Test Tube (BTT), an innovative product from Ballistic Technology, allows hunters to test the terminal performance of hunting bullets. This $69.95 unit contains a re-usable wax-like compound that simulates how a bullet penetrates and expands when shot into a game animal. With the BTT, you can measure the wound channel volume (with water), then split the medium in half to measure the wound channel’s length and width. To re-use the BTT, simply melt the wax-like core material in a standard 1.5 gallon crock-pot or large pan and pour it into a replacement cardboard target mold.
Click the screen below to watch a YouTube Video that demonstrates the whole process. (If you are at work, turn down the audio volume first.)

To learn more about the Bullet Test Tube, read this Product FAQ. The Bullet Test Tube has earned the NRA Publications 2007 Golden Bullseye Award and Field & Stream’s 2006 “Best of the Best” Accessories Award. The product is available through major vendors including Cabelas.com, MidwayUSA.com, and Sinclair International.
If you wish to capture the bullet after it passes through the test medium, add the Xtender accessory which slips on the end. This allows hunters to examine bullet integrity as well as wound cavity. Sinclair Int’l prices the Bullet Test Tube at $61.25, while the Xtender is an additional $57.60.
September 28th, 2008
For two years, Forum member John Skowron (John708) has been campaigning a 6BRX, built by Nat Lambeth (RustyStud). You’ll find the full history of John’s 6BRX project in this Forum Thread. With this rifle, John was the overall 1000-yard winner at Butner in February 2007.
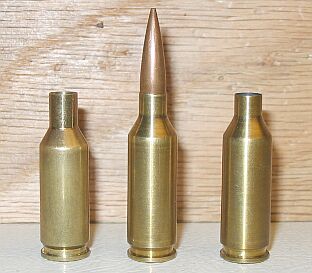
The 6mm BRX is based on the 6mm BR cartridge. The shoulder is moved forward, but the shoulder angle and case taper is the same as the parent cartridge. This way you can use standard dies for most purposes (although it is a good idea to have a custom full-length die so you can size the entire case body). Many of our readers have been interested in the 6mm Improved (BRX, Dasher etc.), but they’ve wondered about case durability and barrel life. John has answers for those questions:
6BRX Case Life
Case life running the Berger 105s at 3000+ fps is 14-15 reloads. Brass was discarded when the primer pockets became too loose. The 6BRX brass OAL after fireforming is 1.56″. Max OAL for the 6BRX is 1.58″. The brass never stretched enough to require trimming before discard. Another plus for the 6BRX and Lapua brass. By the way don’t even bother with Remington-brand 6BR brass. The primer pockets were so loose after my standard fire-forming load I had to trash all the cases. Stick with the good stuff, Lapua.
6BRX Barrel Life
Here are Skowron’s comments as his round count increased:
2750 Rounds: I now have 2570 rounds through my 6mm BRX. I was just at the range today doing an accuracy test. I shot two 10-shot groups at 100 yards, one with 105gr Bergers, and the other with 107gr Sierras. Both were identical 0.44″ 10-shot groups. Not bad for a rifle with 2500+ rounds through it.
2900 Rounds: I now have 2900 rounds through my 6mm BRX. I was doing some load testing with the new 6mm Berger bullets. I compared them with my existing comp. load in my 6mm BRX. The 105gr Bergers, jammed .015″ into the lands, with 31.5 grains of Varget and Fed 205s are still shooting .45″ 10-shot groups at 100 yards. Velocity is 3060 fps. I don’t know how long this Broughton barrel will last, but I’m amazed that it’s lasted this long.
2950-3044 Rounds: I had virtually no throat erosion until I reached 2900 rounds. After 2900 rounds throat became noticeably rougher on cleaning and groups opened up. 10-shot groups with match ammo were now .53″ (compared to low fours before). At 2950 rounds the groups ran .58″. At 3044 rounds, the groups opened up to .7″. That’s not enough accuracy for LR work.
CONCLUSION: Barrel life with competitive accuracy was 2900 rounds with this gun.
Achieving this barrel life goal pretty much completes my 6mm BRX project. I’m now shooting a cartridge that has the same or better barrel life than the 260 Rem, it’s more accurate, with essentially equal wind drift. [Editor’s Note: Richard Schatz recently won the NBRSA 1000-yard Nationals with a 6 Dasher, a similar 6BR Improved cartridge, but with a 40° shoulder. Richard’s barrel had over 2000 rounds through it.]
September 17th, 2008
 Well, yes, that headline is a come-on. But there’s truth in the promise. The “miracle device” to which we refer is a simple wind indicator. Well, yes, that headline is a come-on. But there’s truth in the promise. The “miracle device” to which we refer is a simple wind indicator.
Remarkably, many shooters who spend $3000.00 or more on a precision rifle don’t bother to set up windflags when they shoot. Whether you’re a competitive shooter, a varminter, or someone who just likes the satisfaction of drilling small groups, a set of windflags is something you should take to the range every time. And yes, if you pay attention to your windflags, you can easily cut your group sizes in half. Here’s proof…
Miss a 5 mph Shift and Double Your Group Size
In the following table we show the effect of a 5 mph crosswind at 100, 200, and 300 yards. You may say to yourself, “well, I’d never miss a 5 mph let-off.” Consider this — if a gentle 2.5 mph breeze switches from 3 o’clock to 9 o’clock, you’ve just missed a 5 mph net change. What will that do to your group? Look at the table below to find out.

Values from Point Blank Ballistics software for 500′ elevation and 70° temperature.
Imagine you have a 6mm rifle that shoots half-MOA consistently in no-wind conditions. What happens if you miss a 5 mph shift (the equivalent of a full reversal of a 2.5 mph crosswind)? Well, if you’re shooting a 68gr flatbase bullet, your shot is going to move about 0.49″, nearly doubling your group size. With a 105gr VLD, the bullet moves 0.28″ … not as much to be sure, but still enough to ruin a nice small group. What about an AR15, shooting 55-grainers at 3300 fps? Well, if you miss that same 5 mph shift, your low-BC bullet moves 0.68″. That pushes a half-inch group well past an inch. If you had a half-MOA capable AR, now it’s shooting worse than 1 MOA.

If you’ve already invested in an accurate rifle with a good barrel, you are “throwing away” accuracy if you shoot without wind flags. You can spend a ton of money on fancy shooting accessories (such as expensive front rests and spotting scopes) but, dollar for dollar, nothing will potentially improve your shooting as much as a good set of windflags, used religiously.
Which Windflag to buy? Click here to view many windflag designs.
Video from Carbon River Windflags
Aussie Windflag photo courtesy BenchRestTraining.com (Stuart and Annie Elliot).
|


