There are three readily-available 17-caliber rimfire rounds now on the market: 17 HMR, 17 WSM, and 17 Mach 2(aka 17 HM2). Aguila also made a .17 rimfire, the .17 PMC/Aguila, but it never became popular. What should be your choice? The 17 HMR is a very popular round, available from multiple manufacturers — CCI, Hornady, and now Norma. The 17 Mach 2 (HM2) is making a resurgence, as it is less expensive than 17 HMR and it can be shot from rifles converted from .22 LR since it shares the .22 LR cartridge OAL. Finally the 17 WSM is, without question, the performance leader among .17-Cal rimfire rounds.
17 HMR — Still the Market Leader in 17-Cal Rimfires
The 17 HMR (Hornady Magnum Rimfire) is popular and well-established. Ammo with a variety of bullet weights and designs is available. Most 17 HMR ammo is priced from $10-$12 per box, and you can get some better deals during sales.
You can buy quality 17 HMR rifles from many makers at all price levels. The Savage A17 with laminated thumbhole stock is a good choice. There were some early issues with the A17, but Savage improved the magwell and now this rifle is very reliable and accurate, particularly with the CCI-brand A17 ammo.
The laminated thumbhole stock version of the Savage A17 is a great carry-around varminter.
Ruger now makes a .17 HMR version of the Ruger Precision Rifle. If you prefer a modular chassis type rig, this is a great option:
Here is a semi-auto 17 HMR fitted with a suppressor. Even with the cameraman just 20 feet away, you can barely hear the shot, and recoil is non-existent. (NOTE: be sure to turn on the sound icon). Varminter Magazine says: “No ground squirrels were spooked during these shots. Quiet is an understatement!”. This may be the ultimate stealth varminter set-up.
17 Mach 2 (17 HM2) — Best Bang for the Buck?
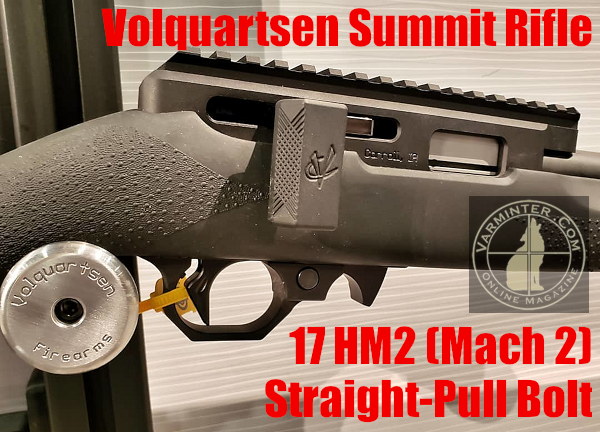
The 17 Mach 2 (17 HM2) is making a comeback. Now leading manufacturers are offering this efficient little rimfire cartridge in some nice rifles. Both Anschutz and Volquartsen will offer new 17 Mach 2 rifles in 2019. Check out this Volquartsen Summit from SHOT Show. It offers a slick, straight-pull toggle bolt, like you’d find on Olympic biathlon rifles.
Considering that 17 HMR ammo costs $14 to $16 per 50ct box, the 17 Mach 2 is an excellent value by comparison. You can now get 50 rounds of CCI 17 Mach 2 for just $8.99 at Midsouth. Grab it while you can.
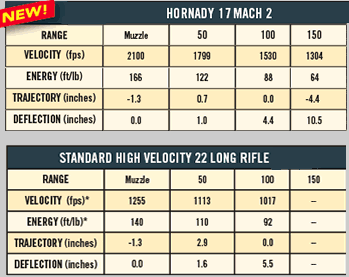
The Mach 2 propels the same 17gr V-Max bullet as the 17 HMR, but the Mach 2 runs about 16% slower — 2100 fps vs. 2500 for the 17 HMR. For many shooters, it makes sense to use the 17 Mach 2 rather than a 17 HMR. You save money, barrel life is a little longer, and the 17 Mach 2 is still a much more potent cartridge than the .22 LR. Check out this comparison, and note how the 17 Mach 2 has a much flatter trajectory than the .22 LR:
Hornady’s 17 Mach 2 has a 2100 FPS muzzle velocity vs. 1255 FPS for .22 LR.
17 WSM — More Speed, More Energy, and Flatter Trajectory
The 17 WSM (“Winchester Super Magnum”) is the fastest, flattest-shooting rimfire round you can buy. It totally stomps the .22 LR, and even offers significantly better ballistics than the popular 17 HMR. Check out this comparison of three rimfire magnmum cartridges (17 WMS, 17 HMR, and 22 WMR):
And now lead-free 17 WSM ammo is available. This “unleaded” version is impressively flat-shooting. With a 100-yard zero, it drops only 4.3 inches at 200 yards. Compare that with a .22 LR which can drop 18 inches or more from 100 to 200 yards (based on 1150 fps MV).
CLICK HERE for 17 WSM lead-free ammo test article.
The Applied Ballistics Facebook Page features great, interesting new content posted multiple times each week. This resource features videos, test results, accuracy tips, and samples from Bryan Litz’s excellent books on ballistics and the three volume series on Modern Advancements in Long Range Shooting. Here are some highlights from Applied Ballistics’ Facebook posts from the past two weeks. Plus there’s a discount code, READ2026, that can save you 25% on Applied Ballistics books purchased in the month of March.
.22 LR Super Slow Motion Video — Watch the Bullet!
Watch .22 LR Rimfire Projectile Exiting Rifle Muzzle
This video, filmed with an ultra-high-speed camera, shows the milliseconds in time as a .22-caliber bullet travels the first 11 inches after leaving a .22 LR rifle barrel. Applied Ballistics states: “Notice that the bullet is fully obturated to the internal bore dimension — the step/rebate that exists on the unfired bullet where it meets the case gets expanded (obturated) and doesn’t exist on the fired bullet.”
How Important is Case Fill Ratio — You May Be Surprised
Conventional reloading practice is to select a powder that gives you a good case fill, meaning 90%-100% fill ratio for the cartridge and bullet you’re using. But why?
Some say that a higher fill ratio is good because it prevents the powder from settling differently in the case (which could lead to inconsistent ignition and greater MV SD). This explanation sounds good, and went unchallenged for a long time. However, Applied Ballistics has done some interesting testing that sheds new light on the density issue.
Modern Advancements in Long Range Shooting – Vol. 2 contains the results of Applied Ballistics tests of five different cartridge types — .223 Rem to .338 Lapua — loaded with different powders to produce fill ratios of 80%, 90%, and 100%. The testers wanted to see if 100% fill ratios actually gave better results (lower MV SDs) than the lower fill ratios.
Results of testing 3 different loads in 5 different cartridges — The highest MV SD was in fact measured in an 80% fill ratio load. However, the lowest MV SD was also measured for a different 80% load! Seems like the more we learn, the more questions we have. An informative Applied Ballistics podcast covers the Fill Ratio test. Visit Thescienceofaccuracy.com to access this and interesting podcasts.
EDITOR’s NOTE: There were multiple comments from Facebook readers stating that fill ratios 90% and above worked more consistently for them. And the reloading manuals warn against very low fill ratios.
Get 25% Off Applied Ballistics Books in March 2026
Applied Ballistics, through its Science of Accuracy webstore, is currently offering big savings on its popular books — considered to be the best print resources about rifle accuracy/ballistics ever published. This month you can save 25% on all Applied Ballistics book titles by respected expert (and past national champion) Bryan Litz. Use Code READ2026 to get 25% of one or more of these books.
Get 25% OFF Applied Ballistics Books! Use code: READ2026 at checkout.
We like well-executed DIY (Do-It-Yourself) projects. You can save money with DIY projects, and often create something unique and special that can’t be purchased from any vendor. That’s the case with this very cool double shooting bench built by Jacob D., a pilot and 6.5 Creedmoor shooter. The design of the bench is smart — it allows two right-handed shooters, but it can also handle a right-hander and a left-hander. (The lefty sets up in the right half of the bench.)
Jacob, who flies for Arizona’s Mesa Airlines, built his own side-by-side benchrest shooting bench. He then posted photos of this on the 6.5 Creedmoor Group Facebook Page. We like this — very nice work Jacob!
Jacob writes: “Sighting in my new Ruger Precision Rifle with Leupold VX3i LRP 6.5-20x50mm and Burris tactical rings, using my benchrest table I built. Very happy with the combo!”
There is plenty of room for two shooters and two rifles on Jacob’s big and sturdy DIY shooting bench.
Montana-based PROOF Research has released a revealing video showcasing carbon fiber firearms technology and the company’s barrel-making process. Viewers will find the 8-minute film an intriguing introduction to composite barrel-making, which employs aerospace carbon fiber wrapped around a steel barrel core. The video showcases the high-tech machines used at PROOF’s production facilities.
This video shows how PROOF Research employs aerospace-grade, high-temperature composite materials to build match-grade carbon fiber-wrapped barrels.
Dr. David Curliss, General Manager of PROOF Research’s Advanced Composite Division, and former head of the U.S. Air Force High Temperature Composites Laboratory, explains how aerospace expertise helps in the development of PROOF’s firearms-related products: “We are able to provide premier materials for PROOF Research for firearms barrels applications as well as the aerospace market. We’re probably the only firearms technology company that has composite materials in orbit around the earth.”
PMA Tool offers lightweight yet sturdy cleaning cradles that are handy, affordable, and easy to transport. PMA’s popular single-gun cradle, priced at $135.95, is ideal for benchrest and F-Class rigs. It measures about 17″ in length and weighs about one pound. You can choose among 2.25″, 3″, 4″, 5″, and 6″-wide saddles (U-shaped padded supports) to match your forearm width.
PMA also offers excellent double cradles for $189.95. These twin cradles have 2.5″, 3″, or 4″ saddles, or a combo of 3″ / 2.25″ front saddles. All these cradle types secure your rifle(s) in a muzzle-down position that allows easy cleaning and prevents solvents from running back into the action. The front saddles and all contact surfaces are covered by thick silicone rubber padding which grips the rifle securely yet protects the stock and components from scratches.
These cradles are most commonly sold with a 3″-wide front saddle for Benchrest and F-Open style stocks, or a 2.25″-wide front saddle for rifles with narrower fore-ends such as those found on F-TR, Hunter Class, and varmint stocks. In addition, you can get 4″-wide cradle for the big, long range benchrest rifles.
Double Rifle Cradle is a Smart, Versatile Design
PMA’s double rifle cleaning cradle was was designed from the ground up to work perfectly for two rifles side-by-side. Using the same tie bar and protective saddles found on the single cradel, PMA widened the base and created new uprights to support the saddles, making the cradle as narrow and light as possible, while retaining all the protective and non-slip features from our single unit.
This PMA Tool double cradle unit is available with twin 3″ front saddles, double 2.5″ front saddles or combination 3″ / 2.25″ front saddle configurations to accommodate different classes of benchrest rifles.
Initial radar testing shows an interesting stability trend for slugs vs. pellets: drag is minimized for pellets in slower-twist barrels, while drag of slugs is minimized for a faster twist. Also, consistency of drag/BC is best when drag is minimized (BC maximized).
Show below are test data for .300 caliber 44.5 grain Slug and .300 caliber 44.8 grain Pellet, both shot from an air rifle around 800 FPS. Experienced air rifle shooters told us to expect this so it’s nice to see the measurements supporting this trend!
So why is fast twist good for slugs while bad for pellets and vice versa? Air rifle pellets with a skirt are mostly drag-stabilized, not spin-stabilized. So, they don’t need much if any spin at all to fly point forward; the skirt catches the air like the fins of a rocket. As such, spinning the pellets faster only becomes a problem of dynamic stability. If I had any suggestion after looking at this data, it would be to try an even slower twist for pellets, perhaps a 1:60″ (one turn in 5 feet) or even 1:120″.
Slugs are spin-stabilized so it reasons that more spin suppresses yaw and maximizes BC, to a point. Based on these results, it appears the slug is reaching max stability/BC with the 1:22″ and the 1:18″ provides no further benefit. Again, these are just initial findings, we’re eager to explore further in the coming weeks! To view our recent Air Rifle projectile testing, with full 8-minute video, CLICK HERE.
All shooters, even rimfire enthusiasts, should always wear ear protection when at the range. A typical rifle gunshot is very loud — in the region of 140 to 170 decibels (the pain threshold is 130-140 db). Without ear protection, you can permanently damage your hearing during a single shooting session. We all know older shooters who are partially deaf, or who suffer from Tinnitus, because they didn’t use earplugs or muffs when they were younger.
How Humans Hear Sounds — Amazing Video Reveals All
The human sense of hearing involves multiple delicate internal membranes, bones, organs, and nerves. Shooters understand the importance of protecting their hearing, but they may not understand the bio-mechanics of human hearing. We hear sounds through Auditory Transduction. Sound waves vibrate the ear drum (tympanic membrane), but that is only the beginning. These vibrations are passed along via tiny rocker-arm-like bones to be “processed” in a spiral chamber, the cochlea.
This remarkable VIDEO explains how humans hear sounds. We strongly recommend you take the time to watch and learn. The hearing you save may be your own!
Click Speaker Icon to turn on the video’s soundtrack.
Vibrations moving through the cochlea are separated into frequencies and then sent as neural messages to the brain. It is an astonishingly complex process, one that truly seems miraculous when you examine the bio-engineering involved. In the Video above, the process of human Auditory Transduction is explained and illustrated with 3D animation. You really should watch this amazing video. By the end you will have a new-found appreciation for your ability to hear.
⏺ Dual-function electronic muffs — great for range communications
Every shooter should own a pair of Electronic muffs, even if you prefer shooting with earplugs and/or standard muffs. Electronic muffs are great when you are spotting for other shooters or are working near the firing line. They let you hear ordinary conversations while still providing vital hearing protection. You can also wear ear-plugs under muffs for extra sound attenuation.
Plugs PLUS Ear-Muffs — The Benefits of “Doubling-Up” Your Hearing Protection
According to OHS Online: “The combined attenuation of an ear plug and an ear muff is not simply the algebraic sum of the performance of each individual protector. This is due to an acoustic and vibratory interaction between the ear muff and the ear plug that causes them to behave together as a system rather than as independent hearing protectors.
Generally speaking, when you combine two hearing protectors, ear muffs over ear plugs, you can expect an increase [in noise reduction] of between 3 and 10 dB over the higher-performing hearing protector. OSHA [now advises] 5 dB as the [typical] benefit offered by combining hearing protectors.” Source: OHSonline.com
Readers who have just recently discovered the Daily Bulletin may not realize that AccurateShooter.com has hundreds of reference articles in our archives. These authoritative articles are divided into multiple categories, so you can easily view stories by topic (such as competition, tactical, rimfire, optics, shooting skills etc.). One of the most popular categories is our Technical Articles Collection. On a handy index page (with thumbnails for every story), you’ll find over 120 articles covering technical and gunsmithing topics. These articles can help you with major projects (such as stock painting), and they can also help you build more accurate ammo. Here are six popular selections from our Technical Articles archive.
Stress-Free Pillar Bedding. Richard Franklin explains how to do a top-quality bedding job, start to finish.
Gun Safe Buyers Guide. Our comprehensive Safe Buyers Guide examines the key features to consider in a safe — Wall Thickness, Volume, Shelving, Fire Rating, Lighting, Weight and more. We also explain the Pros/Cons of Dial vs. Digital (Keypad) locking systems.
Savage Action Tuning. Top F-TR shooter Stan Pate explains how to enhance the performance of your Savage rifle by optimizing the torque settings of the action screws.
Complete Precision Case Prep. Jake Gottfredson covers the complete case prep process, including brass weight sorting, case trimming, primer pocket uniforming, neck-sizing, and, case-neck turning.
Stock Painting Instructions. Step-by-step guide for stock painting by expert Mike Ricklefs. Mike shows both simple coverage and fancy effects.
Ultrasonic Case Cleaning. This article reviews the recommended process for cleaning cartridge brass with ultrasonic cleaning machine. We cover the right liquid solutions, processing times, and case drying options.
While many AccurateShooter.com readers load their own competition centerfire rifle ammunition, we all still need factory ammo for our rimfire rifles in .17 and .22 calibers. And most of the 65+ million American handgun owners rely on factory-made ammunition for their pistols and revolvers.
Today’s video collection showcases state-of-the-art ammunition factories in Europe and the United States. You can see the extremely accurate Lapua .22 LR ammo being produced, as well as excellent centerfire ammunition being made by Norma, Remington, Sellier & Bellot and other makers.
From the creation of lead bullet cores to the final packing of ammunition, you can see it all in these videos. Watch primers being made, brass being annealed, bullets being jacketed, tips being inserted, and every phase of production. Weighing and testing procedures are also revealed.
Modern Ammo Production in Multiple Facilities
This 11.5-minute video shows highly automated bullet and ammunition production in multiple facilities in Europe and the USA. You can see bullets produced from start to finish beginning with lead smelting. Then watch pistol and rifle cartridges being made on modern, computer-controlled assembly lines. Watch from start to finish. Here are some notable highlights:
00:10 — Lead Melting Pots and Billet Caster
01:20 — Lead made into strings and then formed into bullets
01:50 — Brass alloy sheets fed into machine and then punched (2:10-2:35).
03:35 — Lead pistol cores being produced
04:15 — Pistol ammo being packaged
06:15 — Ammo loaded into belts
07:15 — Completed primers being shuttled then loaded into brass (Second factory)
07:20 — Bullets being seating into rifle ammunition
07:32 — Cartridge case-neck treatment
07:42 — Robot arm loads finishes cartridges into boxes
08:04 — Cups being pressed (Third Factory S&B)
08:45 — Cartridge case draw
09:06 — Priming pistol cases
09:20 — Bullet production and weight control (10:02)
10:08 — Cartridge assembly and cartridge sealing (10:38)
11:00 — Pistol ammo packaging
Lapua Rimfire Ammunition Production in Germany
This video shows Lapua rimfire ammo production in Schönebeck, Germany. The video shows quantities of the excellent X-ACT .22 LR ammunition being produced and packaged. Starting at the one-minute mark, you can see the ammo being inspected with advanced scanning machines. Then at 1:16 time-mark you can see the ammo accuracy-tested in a tunnel, with results displayed on a computer screen (1:27).
Norma Ammunition Production in Sweden
In this video, the RecoilTV team lead by EIC Iain Harrison ventures to Sweden to visit the Norma ammunition production plant in Huvudentré, Sweden. Demand for Norma ammo has risen dramatically. A Norma marketing manager notes that production has doubled in the last three years.
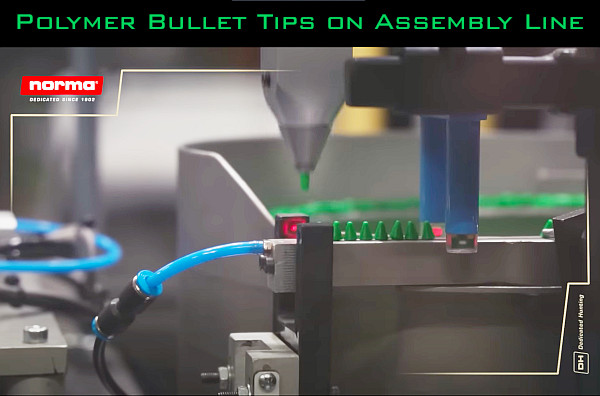
This second Norma ammunition video shows close-ups of the production process and the machinery used for centerfire ammo. This was filmed at the Norma factory in Åmotfors, Sweden, which has operated continuously for over 120 years. Among the many interesting highlight is a sequence showing how polymer bullet tips are inserted. See 6:50 time-mark.
Sellier & Bellot Ammunition Factory in Czech Republic
In this video, Larry Vickers of Vickers Tactical tours a Sellier & Bellot ammunition plant in the Czech Republic. This video shows details of primer production as well as bullet-making, brass-making, and production-line cartridge manufacturing.
Remington Ammunition Plant Re-Opened by Vista Outdoors
This video shows ammo production at the re-opened Remington ammunition plant in Lonoke, Arkansas. “This is one of the largest ammunition manufacturing plants in the world” said Mark Keefe, NRA Publications editorial director. “It was set up in 1969 by DuPont, who owned Remington at the time. They do it all here. Cases, bullets, centerfire rifle, centerfire pistol, rimfire and shotshell.” It’s great to see this plant back in production after Remington Ammunition filed for bankruptcy in 2020 and the assets of the Remington conglomerate were auctioned off. Ultimately, Vista Outdoor, owner of Federal, CCI and Speer, purchased the assets of Remington Ammunition and got the Lonoke plant running again, better than ever.
This article is Copyright 2024 AccurateShooter.com. Republication on any other site gives rise to statutory penalties and compensatory damages.
What’s a “Wallet Group”? It’s a singularly spectacular proof target that entitles its bearer to bragging rights. The wallet group may or may not have been shot in competition, and, by definition, it may not be repeatable. But it exists as incontrovertible proof that, at least once, the stars aligned, and the wind gods smiled on the shooter.
Five Shots in 0.178 MOA at 1000 Yards
A few years ago, Forum member and F-Class shooter Gary Wood was testing his 6.5-284 rifle at the 1000-yard range in Coalinga, California, getting ready for an upcoming long range match. In practice, Gary nailed a witnessed 1.859″ five-shot group, with four of the five shots well under an inch. Use this as proof to win those club-house arguments about whether it is possible to shoot “in the ones” at 1000 yards. Gary’s group worked out to 0.178 MOA!
Gary reports: “I was load testing with 5-shot groups. Each group was shot on a new F-Class center and pulled by Ret. Master Chief Jerry Pullens and spotted by an other long-range shooter. The second 5-shot load group looked really small … by our reckoning four out of five shots measured under an inch. I was amazed. What’s more, when I shot the group, the 4th shot blew the spindle out of the 3rd shot. My spotter saw that in his scope and Jerry Pullens told me about it afterwards”.
As measured with the OnTarget Software, using a scan of the target, Gary plotted the group size at 1.859″ total for five shots, or 0.178 MOA. Gary noted: “I had everyone sign the target which I saved and photographed.” Yes, Gary, this may be the wallet group to end all wallet groups. You should have that target framed.
Gary’s Load and 6.5-284 Rifle Specs
Gary was running a stout load of Hodgdon H4350 and CCI BR-2 primers, pushing moly-coated 142gr Sierra MKs, in Lapua 6.5-284 brass. The rifle features an F-Class, single-shot Surgeon action with a Bartlein 5R barrel chambered with a no-turn neck. Gary says “The barrel only has 70 rounds through it… yep, I think it will shoot.” Gary did all of the gunsmithing and barrel work himself.
Did Gary have any special reloading tricks? Apparently not: “Other than weighing the cases and the powder very carefully, there really were no magical reloading secrets used. The Sierra 142s were moly-coated straight from the box of 500, but they were not weighed or checked for bearing surface. The powder was dropped with a RCBS ChargeMaster then checked with an Acculab scale (to under a tenth). The Lapua cases were not neck-turned, but I did weight-sort them. The five cases for the small group weighed: 195.05, 195.03, 195.03, 195.03, 195.01.”


 Some say that a higher fill ratio is good because it prevents the powder from settling differently in the case (which could lead to inconsistent ignition and greater MV SD). This explanation sounds good, and went unchallenged for a long time. However, Applied Ballistics has done some interesting testing that sheds new light on the density issue.


 All shooters, even rimfire enthusiasts, should always wear ear protection when at the range. A typical rifle gunshot is very loud — in the region of 140 to 170 decibels (the pain threshold is 130-140 db). Without ear protection, you can permanently damage your hearing during a single shooting session. We all know older shooters who are partially deaf, or who suffer from