|
|
June 25th, 2008
 Most rear sand-bags (from Edgewood, or Protektor, or SEB) are optimized for use on the bench with low-profile stock designs like the McMillan Edge or Kelbly Klub. If you use these bags when shooting from the ground F-Class style or with bipod, you may find the rifle is too low to the ground for comfort. Yes you can suck in your belly and crank down your front rest, but it makes more sense to elevate the rear bag. Jason Baney has a simple solution that costs under $4.00 in materials. Most rear sand-bags (from Edgewood, or Protektor, or SEB) are optimized for use on the bench with low-profile stock designs like the McMillan Edge or Kelbly Klub. If you use these bags when shooting from the ground F-Class style or with bipod, you may find the rifle is too low to the ground for comfort. Yes you can suck in your belly and crank down your front rest, but it makes more sense to elevate the rear bag. Jason Baney has a simple solution that costs under $4.00 in materials.

Get a small 12″x12″ section of 1″ thick plywood and trim it to fit the base of your bag, leaving maybe 1/2″ extra on all sides. Then get some rubberized, waffle-pattern GRIP-IT shelf-liner from your local home improvement center, and attach it to the underside of the wood. Alternatively, if you want a more rigid base (with less ‘give’) for hard, flat ground, use high-durometer unlined Neoprene, available from industrial supply shops. Glue a layer of shelf liner or Neoprene on the bottom and top of the plywood. This will give good grip on your shooting mat and provide a stable, non-slip surface for the base of your sandbag. If you need more elevation, just use a thicker piece of wood, or sandwich two pieces together. NOTE: We’ve used the shelf liner with zero problems on a concrete bench, but some folks say the shelf liner is too squishy for serious BR work. If you’re concerned about that, use the hard neoprene instead.
 If you need a riser with more mass, Dave Dohrmann sells high-durometer Neoprene riser pads in 1/2″ through 1″ thicknesses, starting at $22.00. Dave offers risers cut to fit both Protektor and Edgewood footprints. Call Dave at 864-884-0155 or email dbugholes[@]aol.com. With textured surfaces top and bottom, Dave’s heavy pads work equally well to elevate your bag on the bench. If you need a riser with more mass, Dave Dohrmann sells high-durometer Neoprene riser pads in 1/2″ through 1″ thicknesses, starting at $22.00. Dave offers risers cut to fit both Protektor and Edgewood footprints. Call Dave at 864-884-0155 or email dbugholes[@]aol.com. With textured surfaces top and bottom, Dave’s heavy pads work equally well to elevate your bag on the bench.
June 16th, 2008
Your editor wins the dunce of the week award, but he learned an important lesson. This weekend I shot the Varmint Silhouette match at Ojai, California. In preparation for the match, I (wisely) went to a range on Thursday to chronograph my match load and confirm my 100-yard, no-wind zero. All went well there, and after three sighters I put three rounds into 0.260″ right at point of aim. So far, so good.
| Editor moves his scope AFTER zeroing. End result? Zero shifts 2 MOA up and 11.5 MOA right. Yikes! |
 But, while testing, I noted that the scope, having been positioned for prone shooting, was much too far forward. It needed to be moved back about an inch for comfortable shooting at the bench. But, while testing, I noted that the scope, having been positioned for prone shooting, was much too far forward. It needed to be moved back about an inch for comfortable shooting at the bench.
No problem I think… I take the gun home, get my Leupold Torx wrench and loosen the rings. Now, I use Burris Signature rings, the ones with the plastic inserts that provide elevation preload: +10 in the rear and a -10 in the front. These are net values, created with pairs of +05 (thicker) and -05 (thinner) half-ring inserts. In the back the thicker +05 insert is on the bottom and thinner -05 on top, while in the front the thicker insert is on the top with the thinner on the bottom.
First thing I note when moving the scope is that it was hard to set the inserts in exactly the same spot (though I tried). I also note that the inserts seemed to flatten out or squeeze down more when I re-tensioned the ring bolts.
I figured I might have to make a minor correction to my zero at the range, so I wasn’t too concerned. Boy was I wrong.

Windage off Six Feet at 600 Yards
At the match, I dialed in my 600-yard come-up and aimed at a steel gong we use for sighter shots. Normally I can “certify” my 600-yard zero in three shots. This time, my spotter couldn’t even see the hits. “WTF”, I think… Then another shooter notes that my bullets are impacting about SIX FEET to the right of the Gong and about a foot too high.
I had to dial in 46 clicks (11.5 MOA) of left windage to get back on the Gong. At 600 yards, one MOA is 6.282 inches. My 600-yard Point of Impact had shifted 72″ to the right — a full six feet! That’s huge. That’s like being off a foot at 100 yards.

LESSON LEARNED: If you make ANY change to your scope, you should re-zero.
SIGNATURE RING LESSON LEARNED: If you are running the Burris Signature Rings, with plastic inserts, the change in POI when you move the scope can be extreme — way more than you’d expect with conventional rings. The plastic inserts take a different “set” each time you tension the rings, even if you do your best to maintain the inserts’ orientation in the rings. No matter how careful you are, those plastic inserts aren’t going to hold the scope in exactly the same place.
So, if you don’t want to win the Dunce Award like I did, make sure you re-test your scope’s zero AFTER you move the fore-and-aft position, and EVERY time you re-tension Burris Signature Rings. It’s worth noting that the ring set in question is five years old and it held zero perfectly until I decided to move the scope back. This was done because my club recently built benches at the 600-yard line so we now shoot from the bench rather than prone, F-Class style.
May 31st, 2008
Summer’s here, and that means hot weather and lots of mirage. A quality mirage shield reduces the amount of optical distortion caused by heat waves rising from the barrel directly in front of the scope. On a hot day, after many rounds through the barrel, the benefit of a mirage shield can be quite dramatic. Benchrest shooters have used mirage shields for many years. Mirage shields can be just as beneficial for the serious varmint shooter. But, curiously, most varminters we know don’t employ mirage shields. We think they should. A mirage shield is a low-cost accessory that helps you get more hits and fewer misses.
As our friend Boyd Allen observed: “Varminters should use mirage shields. Think about it. You’ve invested thousands of dollars in a fancy varmint rifle and quality scope. You may have spent hundreds of dollars traveling to the varmint fields and spent dozens of hours loading up your ammo. Without a mirage shield on your barrel, once that barrel gets hot, you WILL get mirage effects that can make you miss a shot. A mirage shield costs just a few dollars. It really doesn’t make sense to go out to the varmint fields without one, if you plan on shooting lots of rounds. Barrel heat mirage can cause you to miss that critter, even if you have the most accurate rifle in the world.”
Dan Lilja offers a nice, wide mirage shield for $10. Dan notes: “Our benchrest mirage shield also works very well for field varmint rifles if there is a lot of action and the barrel is getting hot. The shield deflects image-distorting heat waves that come off of a hot barrel. The heat flows out past the edge of the shield and out of the line-of-sight of the rifle scope. These shields are 18” long, made of thin painted steel (like window blind material) and can be easily trimmed to length.”

Sinclair International also offers a 2″-wide venetian-blind style Mirage Shade, that costs just $4.25. It is available in two lengths, 18″ for BR barrels (item 06-7200), and 24″ for longer varmint barrels (item 06-7300). The Sinclair Shade is made of aluminum and can easily be trimmed to a shorter length. Like the Lilja shield, the Sinclair Mirage Shade attaches with adhesive-backed Velcro fasteners.

May 29th, 2008
Here’s an inexpensive tip that can help you load straighter ammo, with slightly better measured concentricity (i.e. less run-out) on the case necks and bullets. Simply use a rubber O-Ring on the underside of the die locking ring. This allows the die to self-align itself (slightly) to the case that is being sized. Without the O-Ring, if the flat surface on the top of your press is not perfectly square with the thread axis, your die can end up slightly off-angle. This happens when the bottom of the locking ring butts up tight against the top of the press.
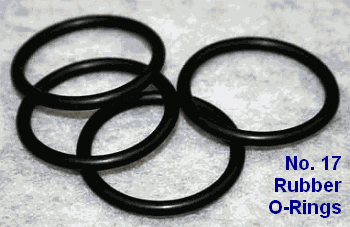
Top prone shooter German Salazar has tried this trick and he says it works: “Go to your local hardware store and get a #17 O-Ring (that’s the designation at Ace Hardware, don’t know if its universal). Slip the O-Ring on the die and re-adjust the lock ring so that the O-Ring is slightly compressed when the die is at the correct height. Size and measure a few more cases. You will probably see a slight improvement in neck concentricity as the die can now float a bit as the case enters and leaves it. This isn’t going to be a dramatic improvement, but it’s a positive one.”
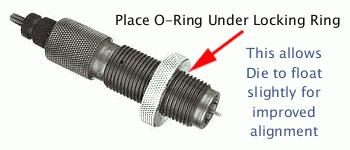
Lee Precision makes die lock rings with built-in O-Rings. Lee’s distinctive lock ring design allows the same kind of self-alignment, which is good. However, Lee lock rings don’t clamp in place on the die threads, so they can move when you insert or remove the dies — and that can throw off your die setting. By using an O-Ring under a conventional die lock ring, you get the advantages of the Lee design, without the risk of the lock ring moving.
May 19th, 2008
Gunsmith Nat Lambeth, nlambeth [at] embarqmail.com, recently had a client bring in a Custom-Shop Remington that wouldn’t even hold one Minute of Angle (MOA) at 100 yards. Nat was able to correct flaws in the factory action and then fit a new barrel. Remarkably, after action truing and barrel replacement, the gun shot like a house on fire. After working his magic, Nat shot a 0.111″ 5-shot group with the gun.
Nat tells us: “I had a customer bring in a Remington 700. This rifle was supposed to have been from the custom shop. It was a stainless model 700 with a 5R Mil Spec barrel in a HS Precision stock. The customer paid a premium price for this rifle. The customer complained the rifle ‘won’t shoot groups under 1.5″ at 100 yards’, and he wanted a new barrel. He had 400 rounds down the tube. The barrel looked to be in good shape with maybe a scratch 8 inches from the muzzle.

Blue-Printing the Receiver
I removed the barrel from the receiver and looked at the internal bolt lug engagement surfaces. Only one lug seemed to be contacting. I put the bolt in a V-Block and measured the rearward bolt lug surfaces. The right or bottom lug had .019″ more reaward surface than the left or upper lug. This would have taken me two days to lap out so I set up the bolt in a truing jig and turned the bolt .020. I then put the action in a action truing jig and machined the inside lug surfaces until I got one even surface. I lapped the lugs until I had 80% bi-lateral contact, then re-faced the bolt and action face.
New Broughton Barrel
I dialed in a new 26″ Broughton 1:10, 5C barrel. It was indicated on both ends until a .0001″ indicator needle was not moving. The barrel was turned, threaded, and chambered in the same setup using thinbit tooling, a PT&G 95 Palma reamer with a .3004 bushing. The chamber was cut within .0015″ with a Lambeth/Kiff Micrometer Adjustable Reamer Stop. The factory recoil lug was replaced with a precision-ground lug.
The barrel was removed from the lathe and the muzzle was cut 1.250 shorter in a bandsaw. The barrel was re-mounted in the lathe and the muzzle dialed in the steady rest. The crown was faced with a piloted, PT&G facing tool then faced with a piloted, 79° counter bore .100″.
Stock Work
The rifle stock was re-inletted and glassed in for two inches. Then the barrel free-floated.
A Tack-Driver is Born
I thoroughly prepped 22 pieces of used 308 Federal Gold match brass, which were then loaded with 42.5 grains of H4895, CCI BR2 primers, and Hornady 168 HPBT bullets. After cleaning the barrel, I fired one test round with no problems and cleaned the barrel again. I then installed a Leupold 6.5-20AO scope in Farrell bases and rings. I bore-sighted the rifle by eye with the bolt removed at 50 yards.

After some sighters to set Point of Aim, I sat down and did 5 shots for record at 100 yards. Those five shots went into one ragged hole. (See Target Below — this editor measures the group as 0.111″ center to center using OnTarget Software.) Another customer who was there at the range, then shot a 5-shot group that went into 0.312″. That’s an 0.2115″ average for the two groups. I then was able to shoot a couple more groups in the ‘teens.”

Conclusion
Nat proved that attention to detail DOES make a difference, and that truing an action, improving the bedding, and fitting a superior barrel can make a HUGE difference in accuracy. Now, mind you, we’re not suggesting that you can take a factory .308 and make it into a gun that will win the Super Shoot. Nat’s 0.111″ group was exceptional. Still this demonstrates that major gains can be had by action blue-printing combined with bedding work and a new barrel.
May 17th, 2008
 Using wet patches or wet brushes is an inefficient way to really saturate the tight bores of 17s, 20s, and 22s. Even with a cotton bore mop, most of the solvent will be squeezed out before it gets to the end of the bore, where most copper fouling occurs. Here’s a simple solution. Get a small plastic “wash bottle” and fill it with your preferred solvent. Then stick the tapered nozzle right in the chamber. The tapered end will press fit in the throat, sealing off the chamber. With the barrel slightly nose-down, give the bottle a couple good squirts until the solvent mists out the muzzle. In just a few seconds, this will put more solvent in the bore than a half-dozen wet patches. Alternatively, plug the chamber and squirt solvent in from the muzzle. It’s also much easier to saturate a bore brush (without spilling solvent on your stock), by using the wash bottle. You can get these bottles from USPlastic.com or lab supply stores. Using wet patches or wet brushes is an inefficient way to really saturate the tight bores of 17s, 20s, and 22s. Even with a cotton bore mop, most of the solvent will be squeezed out before it gets to the end of the bore, where most copper fouling occurs. Here’s a simple solution. Get a small plastic “wash bottle” and fill it with your preferred solvent. Then stick the tapered nozzle right in the chamber. The tapered end will press fit in the throat, sealing off the chamber. With the barrel slightly nose-down, give the bottle a couple good squirts until the solvent mists out the muzzle. In just a few seconds, this will put more solvent in the bore than a half-dozen wet patches. Alternatively, plug the chamber and squirt solvent in from the muzzle. It’s also much easier to saturate a bore brush (without spilling solvent on your stock), by using the wash bottle. You can get these bottles from USPlastic.com or lab supply stores.
April 24th, 2008
Forum member Skeeter has put together a new 6mm Dasher falling block varmint rifle. The Dasher case is based on the 6mm BR Norma cartridge with the shoulder blown forward about 0.100″ and out to 40°. This gives the Dasher roughly 3.5 grains added capacity compared to the standard 6BR.
Skeeter needed to form 300 cases for an upcoming varmint holiday. Skeeter decided to fire-form his brass without bullets. This method avoids barrel wear* and saves on components. There are various ways to do this, but Skeeter chose a method using pistol/shotgun powder, some tissue to hold the powder in place, Cream of Wheat filled to within an 1/8″ of top of the neck, and a “plug” of tissue paper to hold it all in place. Shown below are cases filled with a pistol/shotgun powder charge topped with Cream of Wheat and then a tissue paper plug.


To ensure the case headspaced firmly in his Dasher chamber, Skeeter created a “false shoulder” where the new neck-shoulder junction would be after fire-forming. After chamfering his case mouths, Skeeter necked up all his cases with a 0.257″ mandrel (one caliber oversized). Then he used a bushing neck-sizing die to bring the top half of the neck back down to 0.267″ to fit his 0.269″ chamber. The photo below shows how the false shoulder is created.

After creating the false shoulder, Skeeter chambered the cases in his rifle to ensure he could close the bolt and that he had a good “crush fit” on the false shoulder, ensuring proper headspace. All went well.

The next step was determining the optimal load of pistol powder. Among a variety of powders available, Skeeter chose Hodgdon Titewad as it is relatively inexpensive and burns clean. The goal was to find just the right amount of Titewad that would blow the shoulder forward sufficiently. Skeeter wanted to minimize the amount of powder used and work at a pressure that was safe for his falling block action.
Working incrementally, Skeeter started at 5.0 grains of Titewad, working up in 0.5 grain increments. As you can see, the 5.0 grain charge blew the shoulder forward, but left it a hemispherical shape. At about 7.0 grains of Titewad, the edge of the shoulder and case body was shaping up. Skeeter decided that 8.5 grains of Titewad was the “sweet spot”. He tried higher charges, but the shoulder didn’t really form up any better. It will take another firing or two, with a normal match load of rifle powder and a bullet seated, to really sharpen up the shoulders. Be sure to click on the “View Larger Image” link to get a good view of the cases.


The process proved to be a success. Skeeter now has hundreds of fire-formed Dasher cases and he hasn’t had to put one bullet through his nice, new match-grade barrel. The “bulletless” Cream of Wheat method allowed him to fire-form in a tight-necked barrel without neck-turning the brass first. The only step now remaining is to turn the newly Dasher-length necks down about .0025″ to fit his 0.269″ chamber. (To have no-turn necks he would need an 0.271″ or 0.272″ chamber).
Skeeter didn’t lose a single case: “As for the fire-forming loads, I had zero split cases and no signs of pressure in 325 cases fire-formed. Nor did I have any misfires or any that disbursed COW into the action of the firearm. So the COW method really worked out great for me and saved me a lot of money in powder and bullets.” To learn more about Skeeter’s fire-forming process, read this Dasher Fire-Forming Forum Thread.
*Skeeter did have a fire-forming barrel, but it was reamed with a .269 chamber like his 10-twist Krieger “good” barrel. If he fire-formed with bullets, he would have to turn all 300 necks to .267″ BEFORE fire-forming so that loaded rounds would fit in the chamber. Judging just how far to turn is problematic. There’s no need to turn the lower part of the neck that will eventually become shoulder–but how far down the neck to turn is the issue. By fire-forming without bullets now he only has to turn about half the original neck length, and he knows exactly how far to go.
April 19th, 2008
Do you have a Wilson case trimmer but can’t afford the $84.00 to add the handy Micrometer upgrade (Sinclair Int’l item 05-4500)? Well Boyd Allen has come up with a clever use of a standard set of calipers that lets you set the cut length precisely within .001″. Just open the jaws of your caliper and put one jaw on the outboard end of the ring (with set screw) that holds the threaded length-adjusting rod. Set the other caliper jaw on the flat face at the end of the threaded rod that contacts the case rim. If you have a sample case set to the correct cut length, use that to set the position of the threaded rod. Then use your calipers to measure that length. This way you can repeat the cut length each time, or adjust the trimmed case precisely in .001″ increments.

If you change from one cartridge to another, just use your calipers to re-set the desired cut length. Alternatively, ReedG notes you can use the inside caliper jaws and measure directly from the end of the threaded rod to the cutter face. That’s a bit trickier, but it measures actual trim length.
April 5th, 2008
We’ve known some serious varminters who will invest $4,000.00 in a custom rifle, pay thousands more for spotting scope and laser rangefinder, and spend countless hours loading ultra-precise ammo. Yet, when they head off to the prairie dog fields, they’ll omit an essential piece of gear that will make the difference between a hit and a miss.
 We’re talking about windflags. Many casual shooters, varmint hunters, and even some “tactical” shooters disdain windflags as gadgets suited only for the accuracy-obsessed benchrest crowd. In fact, windflags are just as important for the varminter as for the benchrest competitor. We’re talking about windflags. Many casual shooters, varmint hunters, and even some “tactical” shooters disdain windflags as gadgets suited only for the accuracy-obsessed benchrest crowd. In fact, windflags are just as important for the varminter as for the benchrest competitor.
You may think that you can easily notice a major wind shift. But consider this, a change from a light 2.5 mph left breeze to a 2.5 mph right is a 5 mile per hour switch. That is enough to make you miss a prairie dog even at just 200 yards. Here’s a chart that shows the effect of a 5 mph full-value (i.e. 90-degree) wind change at various distances. The values assume a typical .250-BC varmint bullet launched at 3500 fps at a 3″-wide critter (center hold).

You don’t need to spend a lot of money on windflags. Even a bit of surveyors’ tape on a post is better than nothing. As Forum member Catshooter explains, a simple windflag, placed at your shooting station, helps minimize the effect of cross-winds. If you align your shooting position so the breeze is at your back you can shoot with greater confidence even in high winds. Watch the way the windflag blows, and shoot at the dog mounds that are directly downwind.
Our friend Boyd Allen offers another tip: “When you go varminting, be sure to bring some kind of portable target stand. Accuracy or zero problems are much easier to diagnose and remedy if you can set up a target at 100 yards. A simple wood, A-Frame design, hinged at the top, works well, stores flat, and is easy to build.”
Windflag photo courtesy Flying Fish Fundamentals, makers of single-and dual-vane wind flags.
March 29th, 2008
Butch Lambert, who distributes the Elliott “Aussie” BRT wind flags, gave us some expert advice on wind flags. Butch writes: “Chatting with the top shooters in our sport about flags gave me some surprising insights. You do not want your flags balanced. The weight should be biased to the vane side. That will help take the twitch out of your flags. It will take the windshield wiper effect out. The Aussie propellers are used for velocity reading only at very low wind velocity. They are mainly to let you see a pickup or a let up. The sailcloth tails are attached with a clip that does not allow the tail to twist and it also holds the shape of the flag in a V so that it doesn’t flop in the wind. Daisy wheels slow response of the vane, puts a shake in your wind flag, and hides the vane on any tailwind.” If you have more questions about wind flags, contact Butch at ShadeTree Engineering.

|


