|
|
March 25th, 2008
The last half-inch or so of your barrel is absolutely critical. Any damage (or abnormal wear) near the crown will cause a significant drop-off in accuracy. Here are ways you can check the end of your barrel, using a common Q-Tip.
Use Q-Tip for Barrel Inspection
To find out if you have a burr or damage to your crown, you can use an ordinary Q-tip cotton swab. Check the edges of the crown by pulling the Q-tip gently out past the edge of the crown. If you have a burr, it will “grab” the cotton and leave strands behind.
Larry Willis has another way to use a Q-Tip: “Here’s a neat trick that will surprise you with how well it works…
Just insert a Q-Tip into your barrel (like the picture below), and it will reflect enough light so that you can get a real good look at the last half inch of rifling and the crown of your barrel. In most cases you’ll find that this works much better than a flashlight. Since then, I’ve used this method about a jillion times. Q-Tips are handy to keep in your cleaning supplies anyway. This is a good way to judge approximately how well you are cleaning your barrel when you’re at the range. It’s also the best way to examine your barrel when you’re in the field.”
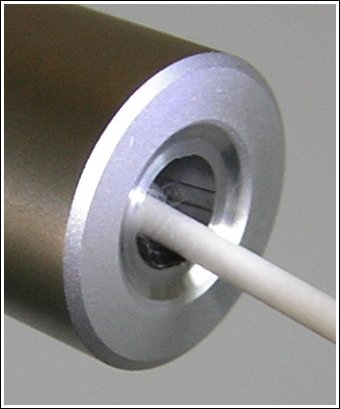
Larry Willis is the inventor of the unique Innovative Technologies Belted Magnum Collet Resizing Die. Larry explains how this die works, and offers many other useful reloading tips on his website, LarryWillis.com.
March 21st, 2008
David Tubb of Superior Shooting Systems pioneered the use of Boron Nitride to coat bullets. Hexagonal Boron Nitride (aka “White Graphite” or “HBN”) is an extremely slippery substance with high load-bearing properties. David believes Boron Nitride reduces bullet jacket friction and fouling in the bore. With boron nitride-coated bullets, it is believed that a shooter can fire longer shot strings before cleaning is required. Boron Nitride coating performs much the same function as moly-coating, but David (and others) believe HBN does the job better, and adheres to the bullet better than plain moly. And unlike moly, HBN has no potential corrosive properties.
 You have to make you own decision as to whether bullet coatings are advantageous to you. The majority of shooting matches are still won by “naked” bullets. However, if you are a long-term moly user, you may want to investigate the benefits of boron nitride coatings. You have to make you own decision as to whether bullet coatings are advantageous to you. The majority of shooting matches are still won by “naked” bullets. However, if you are a long-term moly user, you may want to investigate the benefits of boron nitride coatings.
Superior Shooting Systems will coat your naked bullets with Boron Nitride for $0.05 (five cents) per bullet with a 1000-bullet minimum order. If you want to save dollars and coat your own bullets, the process is similar to that for moly-coating — impact plate the bullets by tumbling with Boron Nitride powder. Boron Nitride powder is available in bulk from LowerFriction.com. This Canadian firm sells powdered boron nitride in three sizes, .070 micron, 0.5 micron and 1.5 micron. The 0.5 micron size seems to work best for bullet coating. Current price is $79.00 US per pound, plus shipping. Call 1 + (416) 509-4462 to order.
Smaller quantities of a Boron Nitride bullet lubricant are offered by 21st Century Ballistic Solutions (“21stCBS”). This company offers a proprietary Boron Nitride blend specially formulated for easy application and excellent adhesion. 21stCBS has done extensive testing with both varmint and match rifles. They believe the Boron Nitride coating significantly reduces both copper and carbon barrel fouling. This allows up to 120+ rounds to be fired with no significant reduction in accuracy. The 21stCBS product applies easily in a vibratory tumbler–you don’t need steel shot or ball bearings to get the Boron Nitride to adhere to your bullets. Cost of the 21stCBS “custom blend” is $10.25 shipped for one (1) ounce of product, enough to coat 1000+ bullets. For more info, or to order, contact Mike Brenner, Mikeb@21stcenturyballisticsolution.com, (641) 485-0047 or (641) 753-3670. Mike also notes that the Boron Nitride does a great job of reducing friction when applied to leather benchrest front and rear sandbags.
 Aerosol Boron Nitride Lubricant Aerosol Boron Nitride Lubricant
We haven’t tried it, so we can’t confirm its effectiveness, but a new Aerosol spray coating is available that contains Boron Nitride. Produced by Slide Products in Illinois, Hi Temp 1800 was designed as a metal lubricant and mold release. The Boron Nitride retains its friction-reducing qualities even at very high temperatures.
We’ve been told that some shooters are experimenting with this spray-on Boron Nitride product. If it works with bullets, that will simplify the application process, since you won’t need a tumbler. But we caution that right now, spray on Boron Nitride is “experimental” at best. Cost is $87.20 for a case of 12 cans. For more info, or to order, call Slide Products, Toll Free 1-800-323-6433, or (847) 541-7220. Samples are available on request.
March 10th, 2008
How much does it cost you to send a round downrange? Ask most shooters this question and they’ll start adding up the cost of components: bullets, powder, and primers. Then they’ll figure in the cost of brass, divided by the number of times the cases are reloaded.
For a 6BR shooting match bullets, match primers, and 30 grains of powder, in brass reloaded a dozen times, this basic calculation gives us a cost per shot of $0.46 (forty-six cents):
Bullet $0.30 (Berger 105 VLD)
Primer $0.03 (Fed 205m)
Powder $0.08 (Varget @ $18.00/lb)
Brass $0.05 (Lapua priced at $60/100, 12 reloads)
Total $0.46 per round
$1.00 Per Shot True Cost? Yikes!
OK, we’ve seen that it costs about $0.46 per round to shoot a 6BR. Right?
Wrong! — What if we told you that your ACTUAL cost per round might be closer to double that number? How can that be? Well… you haven’t accounted for the cost of your barrel. Every round you fire down that tube expends some of the barrel’s finite life. If, like some short-range PPC shooters, you replace barrels every 700 or 800 rounds, you need to add $0.60 to $0.70 per round for “barrel cost.” That can effectively double your cost per round, taking it well past the dollar per shot mark.
Calculating Barrel Cost Per Shot
In the table below, we calculate your barrel cost per shot, based on various expected barrel lifespans.
 As noted above, a PPC barrel is typically replaced at 700-800 rounds. A 6.5-284 barrel can last 1200+ rounds, but it might need replacement after 1000 rounds or less. A 6BR barrel should give 2200-3000 rounds of accurate life, and a .308 Win barrel could remain competitive for 4,000 rounds or more. As noted above, a PPC barrel is typically replaced at 700-800 rounds. A 6.5-284 barrel can last 1200+ rounds, but it might need replacement after 1000 rounds or less. A 6BR barrel should give 2200-3000 rounds of accurate life, and a .308 Win barrel could remain competitive for 4,000 rounds or more.
The table below shows your barrel cost per shot, based on various “useful lives.” We assume that a barrel costs $500.00 total to replace. This includes $300.00 for the barrel itself, $160.00 for chambering/fitting, and $40.00 in 2-way shipping costs. Yes, you may have a smith that works for less, but these are typical costs shooters will encounter when ordering a rebarreling job.

The numbers are interesting. If you get 2000 rounds on your barrel instead of 1000, you save $0.25 per shot. However, extending barrel life from 2000 to 3000 rounds only saves you $0.08 per round.
NOTE: We assume component costs of $0.46 per round based on our 6BR example. If you shoot a larger caliber that burns more powder, and uses more expensive bullets and/or brass, your total cost per round will be higher.

How to Reduce Your TRUE Cost per Round
What does this tell us? First, in figuring your annual shooting budget, you need to consider the true cost per round, including barrel cost. Second, if you want to keep your true costs under control, you need to look at ways to extend your barrel life. This can be accomplished in many ways. First, you may find that switching to a different powder reduces throat erosion. Second, if you’re able to slow down your shooting pace, this can reduce barrel heat, which can extend barrel life. (A varminter in the field is well-advised to switch rifles, or switch barrels, when the barrel gets very hot from extended shot strings.) Third, modifying your cleaning methods can also extend the life of your barrel. Use solvents that reduce the need for aggressive brushing, and try to minimize the use of abrasives. Also, always use a properly fitting bore guide. Many barrels have been prematurely worn out from improper cleaning techniques.
March 8th, 2008
With any precision rifle you have a ton of money tied up in the action, trigger, stock, and optics. If you want to shoot a different caliber, you can buy a complete new gun of course. But if you want to get the most out of your existing investment, switching barrels is a very cost-effective alternative. For example, the SAKO Quad, shown below, comes from the factory with four different rimfire barrels, each with a different chambering:

There are also reasons to have multiple barrels in the same caliber, as Forum member Donovan explains:
“I switch barrels very often in my 1000-yard gun. One barrel is for fire-forming only, and a second is a dedicated test barrel. I have four more competition barrels; they all have different accuracy potentials. I change barrels at the range with a barrel vise and an action wrench. I use 40-lbs of torque on oiled threads. Each barrel has it’s own POI (Point of Impact) and is simple to re-zero the scope for each by simply having a POI Log.
I also have a second stock for varminting/hunting. This stock has a 2-1/4″ rounded fore-end, and is is five pounds lighter [than my comp stock]. Now my ‘highly accurate’ bench gun can go into the field for hunting off hand or for bi-pod use. So guess you could say I have a ‘switch barrel /switch stock’ gun.
Buy using one gun for multiple purposes, I save barrel life on the best competition barrels. I get more use out of my $1300.00 scope and $175 trigger. Importantly, by switching barrels and stocks, I retain the same action and trigger feel (with the exact same scope, heights, over all lengths, etc.).”
One Gun, One Hundred Barrels
Forum Member Hammer may be the king of switch barrels. He tells us: “I’ve played with switch-barrel rifles for over 30 years. I have had them on Montana, Remington, Ruger, Sako, Savage, and Weatherby actions. As stated by Donovan, there are real economies to having a single rifle share top-of-the-line scopes, triggers, and stocks, while switching between calibers just by changing the barrel. On a single barreled action, I may employ multiple stocks ranging from lead-weighted benchrest stocks to ultra-lightweight synthetic stocks.
There are also economies to having multiple barrels in the same caliber. I have been in the prairie dog towns and switched amongst a dozen barrels while some barrels cooled and soaked in cleaning solvent.
The rifle in the two pictures below has multiple bolt assemblies. This allows a single rifle to shoot cartridges ranging from the 14-221 Walker to the 470 Capstick. Currently, I have over 100 barrels for it. I can switch barrels in the field in less than five minutes.”


How to Get the Most from Your Switch-Barrel Rifles
Hammer offers this advice: “Quick-detachable scope rings allow easy changing of scopes based on the shooting situation. For example, on one Savage have five scopes — a 4X Leupold, a 6-24X Sightron, a 8-32X Bushell 4200, a Nightforce, etc taking advantage of different scope reticles, different field-of-views, different weights, etc. Scope settings for a given barrel and load are easily determined and returned to given a good scope with click settings. Some return well enough that you don’t even check them on paper in the prairie dog towns, just use the next prairie dog as the confirmation. Would always check the scope setting, maybe with a collimator tool, before going after big game.
Some switch-barrel rifle setups require a barrel wrench, some use a barrel wrench and an action wrench, some use a barrel vise and an action wrench, and some use other tools. The John Dustin Rifle barrel wrench can be carried in your pocket. None that I use require a sophisticated tool for measuring barrel tension or tightness, though some others might recommend it. Hand tight is my approach.
The rifle below is a left-hand Montana 1999 with 300 Wby, 375 H&H, and 458 Lott barrels allowing one rifle to be a complete three-gun set for Africa. The barrels can be changed in the field (though not between shots at charging cape buffalo). I Have a Sako setup made by John Dustin that allows field changing in under a couple of minutes.

Hammer freely admits that while switch barrels are fun, “switch barrels cannot be defended as a necessity. We really only need two rifles — a 22 long rifle and a 460 Wby — and I haven’t found a way to switch easily from rimfire to centerfire in a bolt action.”
January 30th, 2008
 In the wintertime, it’s common to encounter problems with static electricity when throwing your powder charges. The static can cause powder kernels to cling to the surface of reloading components, and can cause powder clumping. Clumped or sticky powder may make your measure bind or grab in the middle of the cycle, which can throw off your charge weight. Here are a couple simple ways you can minimize the effects of static electricity and improve the consistency of your powder measuring. In the wintertime, it’s common to encounter problems with static electricity when throwing your powder charges. The static can cause powder kernels to cling to the surface of reloading components, and can cause powder clumping. Clumped or sticky powder may make your measure bind or grab in the middle of the cycle, which can throw off your charge weight. Here are a couple simple ways you can minimize the effects of static electricity and improve the consistency of your powder measuring.
 Ground Your Powder Measure — If you’re throwing powder charges in the fall or winter and have problems with bridging or sticking powder, use a ground wire. Bullet-smith Victor Johnson (Johnson Precision Bullets) tells us: “I have a 25-foot piece of real small wire with alligator clips on each end. It’s that long so I can run it down the hall to a water pipe. Use the wire tie from a bread bag to hold it in a small roll to put in the range box. When using it at the range use a 6″ nail from the co-op or Lowe’s / Home Depot and just push it into the ground.” Ground Your Powder Measure — If you’re throwing powder charges in the fall or winter and have problems with bridging or sticking powder, use a ground wire. Bullet-smith Victor Johnson (Johnson Precision Bullets) tells us: “I have a 25-foot piece of real small wire with alligator clips on each end. It’s that long so I can run it down the hall to a water pipe. Use the wire tie from a bread bag to hold it in a small roll to put in the range box. When using it at the range use a 6″ nail from the co-op or Lowe’s / Home Depot and just push it into the ground.”
Use Bounce Dryer Sheets — A quick pass with the thin cloths used in dryers will eliminate “static cling” on your plastic reloading parts like powder throwers, powder funnels, and reloading press guides. Thanks to Doc76251 for this tip.
January 13th, 2008
Accurate, modular, and supremely versatile, the AR15 is America’s favorite semi-auto rifle. But let’s face it, the AR is a maintenance hog.
 There are various schools of thought when it comes to maintaining an AR. Some folks prefer to run their AR “dry” with minimal lube on the lugs and friction surfaces. Other shooters prefer to run their ARs “wet”, with lots of lube. But whatever your preference, you need to clean your AR regularly. And nothing is more important that the AR’s bolt/carrier assembly. Because it is involved in feeding, firing, and extracting, the AR-15 bolt/carrier assembly can be considered the most critical portion of the AR-15 system. There are various schools of thought when it comes to maintaining an AR. Some folks prefer to run their AR “dry” with minimal lube on the lugs and friction surfaces. Other shooters prefer to run their ARs “wet”, with lots of lube. But whatever your preference, you need to clean your AR regularly. And nothing is more important that the AR’s bolt/carrier assembly. Because it is involved in feeding, firing, and extracting, the AR-15 bolt/carrier assembly can be considered the most critical portion of the AR-15 system.
The editor of the Top Quark Blog has created an excellent illustrated AR15 Bolt Take-Down Guide that shows how to disassemble an AR15 bolt and carrier for regular cleaning. Even if you’re an experienced AR15 shooter, you can learn something from this page (sample at left), and you may want to bookmark it for future reference. The photos are large and clear and there are helpful hints for each step of the process.
The author knows his stuff and offers some important insights. For example, he notes that “Extractor springs in most AR15 bolt assemblies are fairly weak, and this can lead to various extraction-related failures. One of the few high points about Colt assemblies is their usage of higher-strength extractor springs. You can tell the difference by looking at the inner plastic insert. ‘Normal’ springs feature a blue plastic insert, Colt strong springs have a black insert.”
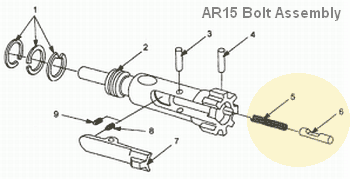
There is one notable oversight on this page — the author doesn’t cover disassembly and cleaning of the ejector assembly. This is actually quite important. A few small brass shavings, combined with carbon and lube in the ejector slot, WILL cause malfunctions. In fact, when this editor is called to diagnose problem ARs, the first things I look at (after swapping magazines) are the ejector recess and the slot for the extractor. Clogged ejectors are responsible for fail-to-ejects and other jams. It is essential that you keep the ejector hole clean. Old, gooey lube residues mixed with carbon and tiny brass shavings in the ejector recess will create all sorts of problems. As shown in the diagram below, it is simple to remove the ejector (#6) and ejector spring (#5), by drifting the ejector retaining pin (#4).
January 13th, 2008
This do-it-yourself project comes from ace silhouette shooter Larry Medler. He devised a hand-crank system for turning case necks that offers the best of both worlds — the speed and “muscle” of powered neck-turning with the “feel” afforded by manual methods. The flywheel, salvaged from an old grape crusher, delivers plenty of RPM when needed, but Larry still has total control over the neck-turning speed and torque.

Larry explains: “My neck turner is a home-made model with a 15.5″ crank flywheel. This arrangement almost makes turning necks fun. I’ve learned that the secret to neck turning is how easy it is to turn the case. If it takes too much force or effort you’re probably not going to do a good job. However, when you turn by hand you have the best feel for the cutting process. So I wanted a system that reduced the effort required, but still retained good “feel”. My hand crank system fits the bill — it makes cutting easy, but you still have good sensitivity throughout the process.

The case holder was made for 308 Winchester cartridges. The case holder fits into a rubber heater hose that connects to a 0.5-inch rod. The rod is fed through two bearing blocks which mount on a frame on my work bench. The rod is turned using a crank on the grape crusher flywheel. This system works great for neck turning. It is easy to crank and you still have a feel for how the cutter is working. While I now use an electric screwdriver to power other case prep tools, at one time I attached a variety of tools to this simple crank system.
I recently upgraded to a K&M Neck Turner (from a Sinclair previously). K&M makes a great tool. It’s easy to make very small adjustments to the cutting depth. I use the K&M case-holder that came with the neck turner for triming cases. It grips a little better than the Sinclair case-holder and both are easier to use than the Lee case-holder.”

You’ll find more helpful, illustrated tips on uniforming cartridge brass on Larry Medler’s Case Prep and Loading web page.
January 6th, 2008
Few, if any, gun safes come with adequate factory-installed lighting. Even if you have overhead lamps in the room where your safe resides, you’ll still find that the inside of your safe is dark, making it difficult to find small items. By adding interior lighting to your gun safe, you’ll lessen the chance of “bumping and grinding” your precious firearms as you move them in and out of the safe.
 Here is a simple, do-it-yourself project that costs very little money. String LED lighting is now available at low cost. Called “rope lights” or “string lights”, these are strings of LEDs in lengths of plastic tubing. Gunsafe vendors sell strings for up to $35.00 per coil, but you can buy the same products at discount chains for under $5.00. Brian J. from Virginia reports: “I just went to Wally World’s Christmas clearance section and picked up two strands of Rope Lights for $3.50 each!” He then installed the strings behind the shelves of his gunsafe, as you can see in the photos. Here is a simple, do-it-yourself project that costs very little money. String LED lighting is now available at low cost. Called “rope lights” or “string lights”, these are strings of LEDs in lengths of plastic tubing. Gunsafe vendors sell strings for up to $35.00 per coil, but you can buy the same products at discount chains for under $5.00. Brian J. from Virginia reports: “I just went to Wally World’s Christmas clearance section and picked up two strands of Rope Lights for $3.50 each!” He then installed the strings behind the shelves of his gunsafe, as you can see in the photos.


LEDs draw very little electrical power and have a very long life-span so you can leave your Rope Lights running continuously in winter. These will provide some warming of the air in the safe, which helps prevent rust by raising the dew point. We still recommend that you use a GoldenRod or similar warming unit, placed at the bottom of your safe, plus desiccant packs to actually absorb moisture.
 As you can see, Rope Lights provide a great lighting solution that illuminates even the small dark corners of internal shelving units. Rope Lights are easy to install. Just string the lights behind your shelves. Most safes come with a pre-drilled hole in the bottom for a dehumidifier. Just slip your Rope Light power cord through this hole and plug it into the wall. As you can see, Rope Lights provide a great lighting solution that illuminates even the small dark corners of internal shelving units. Rope Lights are easy to install. Just string the lights behind your shelves. Most safes come with a pre-drilled hole in the bottom for a dehumidifier. Just slip your Rope Light power cord through this hole and plug it into the wall.
For more tips on how to illuminate your safe and protect its contents from rust and corrosion, read our Gun Safe Buyers’ Guide. The most comprehensive Gun Safe Resource on the web, this article covers a multitude of topics including lock selection (electronic vs. manual), fire-proofing, door hinge design, water-proofing, wall construction, rust prevention, and gun safe installation.
Gun safe interior photos by Brian J., used with permission.
January 5th, 2008
Gordy Gritters is a highly-respected benchrest gunsmith who has built many match-winning and record-setting rifles. Gordy has teamed up with Grizzly Industrial to produce a high-quality gunsmithing video on DVD. In the video, Gordy shows how to chamber and headspace a match barrel using a Grizzly G0509G 3-Phase Gunsmith Lathe. Below is a segment from the DVD showing Gordy fine-tuning the headspace as he fits a BAT Machine ‘MB’ action to the barrel. Working with precise indicators, you can see Gordy set the headspace to within a few ten-thousandths of an inch.
CLICK HERE to PLAY VIDEO
(6 megabyte file — Quicktime Plug-in Required)

Click HERE for YouTube FLASH Version (Faster Download)
 On the full DVD, available from Grizzly for $59.95, you can see Gordy do the complete job of chambering a barrel from start to finish, including fitting the barrel to a custom action. Gordy gives step by step instructions for all the following operations: On the full DVD, available from Grizzly for $59.95, you can see Gordy do the complete job of chambering a barrel from start to finish, including fitting the barrel to a custom action. Gordy gives step by step instructions for all the following operations:
1. Dialing in the barrel
2. Threading the barrel
3. Aligning the threaded shoulder
4. Predrilling/preboring the chamber
5. Reaming the chamber
6. Checking and setting headspace
7. Crowning the muzzle
8. Stamping and polishing the barrel


CLICK HERE for more photos from the DVD. The full DVD can be ordered from Grizzly’s Web Site.
January 2nd, 2008
 So what does a “worn-out” barrel really look like? Tom Myers answered that question when he removed a 6.5-284 barrel and cut it down the middle to reveal throat wear. As you can see, there is a gap of about 5mm before the lands begin and you can see how the lands have thinned at the ends. (Note: even in a new barrel, there would be a section of freebore, so not all the 5mm gap represents wear.) There is actually just about 2mm of lands worn away. Tom notes: “Since I started out, I’ve chased the lands, moving out the seating depth .086″ (2.18 mm). I always seat to touch. My final touch dimension was 2.440″ with a Stoney Point .26 cal collet.” So what does a “worn-out” barrel really look like? Tom Myers answered that question when he removed a 6.5-284 barrel and cut it down the middle to reveal throat wear. As you can see, there is a gap of about 5mm before the lands begin and you can see how the lands have thinned at the ends. (Note: even in a new barrel, there would be a section of freebore, so not all the 5mm gap represents wear.) There is actually just about 2mm of lands worn away. Tom notes: “Since I started out, I’ve chased the lands, moving out the seating depth .086″ (2.18 mm). I always seat to touch. My final touch dimension was 2.440″ with a Stoney Point .26 cal collet.”
Except for the 2mm of wear, the rifling otherwise looks decent, suggesting that setting back and rechambering this barrel could extend its useful life. Tom reports: “This was something I just thought I’d share if anyone was interested. I recently had to re-barrel my favorite prone rifle after its scores at 1,000 started to slip. I only ever shot Sierra 142gr MatchKings with VV N165 out of this barrel. It is a Hart and of course is button-rifled. I documented every round through the gun and got 2,300 over 4 years. Since I have the facilities, I used wire EDM (Electro Discharge Machining) to section the shot-out barrel in half. It was in amazingly good shape upon close inspection.”

Tom could have had this barrel set back, but he observed, “Lately I have had to increase powder charge to maintain 2,950 fps muzzle velocity. So to set it back would have only increased that problem. [And] I had a brand new 30″ Krieger all ready to screw on. I figured it was unlikely I’d get another full season on the old barrel, so I took it off.”
|


