|
|
January 1st, 2008
Dave Kiff of Pacific, Tool & Gauge (PT&G) has been making complete replacement bolts for Remington 700 actions for quite some time, but many of our readers may not be aware of this PT&G product. Why would one need a replacement bolt? First, this allows you to have different bolt-face sizes for the same action. For example, with two bolts you could shoot both a .308 Win and a 300 WSM from the same action. Second, the PT&G bolts are precision machined to the internal dimensions of your action. If you are having your Rem 700 action blue-printed (accurized) by a gunsmith, a new bolt from PT&G completes the job perfectly, and will give you a more precise-fitting bolt with less internal slop.

As Vince Bottomley explains, it may actually be more cost-effective to purchase a new bolt, rather than have your existing bolt milled and machined in the blue-printing process: “Accurizing a Rem 700 action is not a simple or cheap process. A lot of the work will be to the bolt itself — truing the lugs, skimming the bolt-face, fitting a Sako style extractor, new bolt-knob and maybe a new firing-pin. Even then, unless you have the bolt sleeved, it will rattle like the old clunker it probably is! Don’t waste your money! Go for one of the replacement bolts from Pacfic Tool & Gauge. PT&G offers a new bolt complete with new bolt-handle, firing pin, spring etc and the bolts come in different diameters so that you can get one to exactly fit your Remington action. This of course requires some accurate measuring, so it’s best to get your gunsmith to order the bolt. They are [a great] value and will cost a lot less than up-grading your existing bolt.”

Rem 700 replacement bolts start at about $125.00 for the bolt body only (complete bolts are also offered). PT&G bolts are available with either a standard Remington extractor or a Sako-style extractor, with .223, PPC, .308, or magnum bolt faces. The tolerances rival that of the bolts found in custom actions. You can order direct from PT&G in Oregon, (541) 826-5808, or you can purchase through vendors such as MidwayUSA.com, (bodies only, search for “PTG Bolt Body”). If you want a custom spec bolt, it’s probably best to have your gunsmith deal directly with Dave Kiff at Pacific Tool.
December 9th, 2007
Jason Baney, our 1000-yard editor, has done some pioneering work on Ultrasonic Case Cleaning. In general, ultrasonic cleaning is a “good thing” for accuracy, as it thoroughly cleans the inside of the case, preventing the stubborn build-up of soot and carbon that will eventually affect your internal case volume. However, there is one small “down-side” to ultrasonic cleaning, according to Jason.
Jason found that Ultrasonic cleaning leaves the inside of the case-necks so “squeaky clean” that there is excess friction when seating bullets. On a fired case that has been cleaned conventionally (no ultra-sound), a thin layer of carbon remains to lubricate the bullet entry and exit. To restore that lubricity in cases cleaned with ultrasound, Jason applies a dry lube to the inside of his case necks. Jason prefers the $10.95 moly dry lube kit from Neconos.com. With this kit, small carbon steel balls transfer moly to the neck when you place your brass nose-down in the container.

November 29th, 2007
 If you want to keep your wind-reading skills sharp during a long, cold winter spent mostly indoors, check out Shooter Ready, a Long-Range Shooting Simulation for home computers. A FREE DEMO is offered on the web. This is serious training software, not just a computer game. You choose the rifle, and the program provides different scenarios with various wind angles/speeds and target distances. The result of each shot is exactly calculated using ballistics formulas to show where the bullet hits on the target. If you want to keep your wind-reading skills sharp during a long, cold winter spent mostly indoors, check out Shooter Ready, a Long-Range Shooting Simulation for home computers. A FREE DEMO is offered on the web. This is serious training software, not just a computer game. You choose the rifle, and the program provides different scenarios with various wind angles/speeds and target distances. The result of each shot is exactly calculated using ballistics formulas to show where the bullet hits on the target.
 This simulation graphically displays how wind, altitude, and temperature affect the bullet in flight. The results for distance are given in both meters and yards. The program provides a variety of atmospheric conditions and you can practice Mil Dot ranging on three targets: A 12″ X 12″ swinging plate, a 30″ X 18″ knock down plate and a regulation 72″ X 19″ knock down plate. Chose from three chamberings: .308 Winchester, (175 gr), Windrunner .338 Lapua, and 50 BMG. Each caliber has 70 different range exercises, plus an advanced stage for each caliber with 25 different timed hold-offs and moving targets. Add in different atmospheric extremes and you get almost 300 different ranging scenarios. This simulation graphically displays how wind, altitude, and temperature affect the bullet in flight. The results for distance are given in both meters and yards. The program provides a variety of atmospheric conditions and you can practice Mil Dot ranging on three targets: A 12″ X 12″ swinging plate, a 30″ X 18″ knock down plate and a regulation 72″ X 19″ knock down plate. Chose from three chamberings: .308 Winchester, (175 gr), Windrunner .338 Lapua, and 50 BMG. Each caliber has 70 different range exercises, plus an advanced stage for each caliber with 25 different timed hold-offs and moving targets. Add in different atmospheric extremes and you get almost 300 different ranging scenarios.
CLICK HERE to START DEMO

The demo has sample stages from the CD version of Shooter Ready. A basic understanding of mil dot ranging, using a range card and some exterior ballistics is recommended.
November 26th, 2007
 Forum Member Dave B., aka “Gunamonth”, is a chemist/physicist with decades of experience working with the ultrasound process. He has achieved great results cleaning cases via ultrasound. Dave tried a variety of solutions and he favors a mix of water and Citranox®. This achieved the best results, and did not require a separate neutralizing step if you rinse the cases thoroughly after. Citranox, mixed 1:75 or 1:100 with water (distilled H20 is best), is inexpensive to use. Phospate-free Citranox® contains a blend of organic acids, anionic and non-ionic surfactants and alkanolamines. For more information on using Citranox®, check out THIS FORUM THREAD. Forum Member Dave B., aka “Gunamonth”, is a chemist/physicist with decades of experience working with the ultrasound process. He has achieved great results cleaning cases via ultrasound. Dave tried a variety of solutions and he favors a mix of water and Citranox®. This achieved the best results, and did not require a separate neutralizing step if you rinse the cases thoroughly after. Citranox, mixed 1:75 or 1:100 with water (distilled H20 is best), is inexpensive to use. Phospate-free Citranox® contains a blend of organic acids, anionic and non-ionic surfactants and alkanolamines. For more information on using Citranox®, check out THIS FORUM THREAD.
Dave notes: “I had a lot of communication with the technical VP of Alconox about trying to clean fired cases with an ultrasonic unit. He sent me a copy of his ultrasonic cleaning manual and recommended a product called Citranox®. So far I’ve been very impressed. With once- or twice-fired brass they clean up very quickly. The worst cases I tried were 6 Dashers that had been fired ten times with Varget and never cleaned. The worst fouling was in the bottom of the case around the flash hole. They took longer and I used a more concentrated cleaning solution but they did come out clean. The price is reasonable. I paid $35 a gallon and for once- or twice-fired cases I dilute the cleaner 100 to 1. There is much less chemical reaction with the brass than there is with vinegar. No weird colors, just shiny bright. I even used it with hot water, which speeds up the cleaning process. No need to neutralize. Just rinse in running water and they’re squeaky clean. The cleaner is mostly detergents with a little citric acid. Even at a 1:75 ratio my $35 worth of cleaner will make 75 gallons of solution. It doesn’t seem to be reusable but 75 gallons is a whole lot of solution when I only use about two cups at a time.”
November 24th, 2007
What’s better than a 6BR? A 6BR that produces a LOT less noise and less than half the recoil of a bare-muzzled gun. Our friend USMA89 has a 6BR “Texas Tackdriver” with a trued Rem 700 action and Robertson Composites F-Class stock. Smithed by GA Precision, it has delivered tiny groups at 200 yards with 107 Sierra MKs. With sound suppressor in place, USMA89 tells us, it’s like shooting a 22 mag rimfire: “Shooting with a suppressor or can is a great experience. In fact, once you start shooting with one, it is hard to go back to normal shooting. The recoil reduction is amazing, cutting perceived recoil by as much as 70%. Think of a suppressor as the ultimate muzzle break that reduces sound to boot.”
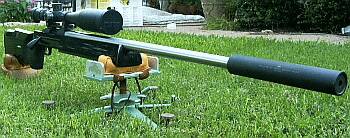
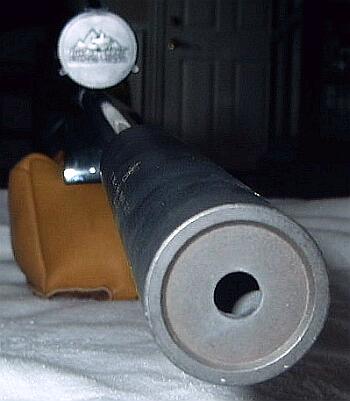
The cost of a good suppressor ranges from $600-$1000, and then there is the $200 to Uncle Sam for the tax stamp and the 3-6 month wait. (Currently, 33 states allow citizens to own suppressors in accordance with Federal regulations.) The suppressor on this gun is considered one of the best, a SWR Omega. USMA89 adds: “I also use a SRT suppressor and am very pleased with it as well. The SRT costs about $300-$400 less than the SWR and you get the same amount of sound reduction.” With a quality suppressor you can get from 33 to 36 db worth of sound suppression.
Once you have gone though the hoops the government has put in your way (check your state laws also!), mounting is easy. Get a good gunsmith to thread your barrel (5/8×24 is the normal class 3 thread) and screw it on. In general suppressed guns barrels are cut shorter for balance. USMA89 explains: “I went with a 28″ barrel and with the can it is a little front-heavy, but the stock’s wide fore-end compensates for this. If this were a ‘tactical’ weapon, I would have the barrel cut down to at least 22″, maybe less. Most people that use suppressors will tell you that they shoot better groups with a can than without. This is because there is less recoil, less ‘dirty air’ behind the bullet, and (in many cases) you get improved barrel harmonics.”
To learn more about silenced weapons, read this article on Firearm Sound Suppressors by Mark White.
November 13th, 2007
There was a lot of interest in Jeff Rogers’ Heavy Gun, featured in yesterday’s Daily Bulletin. Jeff is a race-car mechanic and engine builder in Australia, and you’ll find many innovative mechanical features on this rifle.
1. Drop Port for Magnum Case
Jeff reports: “The action is home-made. My shooting buddy Tony Z was the magician here–without his extensive machining experience, the action would still be on the drawing board. As you can see it is a Right Bolt, Left (loading) Port design. What makes it unique is the big gravity port, perhaps the only Drop Port ever made for a case of this size. The port will work will cases up to 2.850″ in length, with a .550″ max rim diameter.” The action is constructed from Swedish 709m chrome-moly steel measuring 2.00″ diameter x 10″ in length. It has roller-assist extraction to help with the high pressure loads Jeff runs. The action is both conventionally bedded and glued into the stock.

2. Removeable Aluminum Side Pods
The two alloy “side pods” were milled from 6061 T6 billet. Given airline weight limit of 32 kg per piece, Jeff made the pods modular (they are through-bolted), so the gun can be air-transported in two sections. Concerning the dual side-pod design, Jeff observed: “[This] is unconventional… but I wanted was something that was true [when bolted together]. Milling the thing up on every surface insured this and the pods are installed with dail indicators on assembly.”

3. Tension Barrel System
The Broughton barrel sits inside a threaded barrel sleeve that holds the barrel in tension. Tensioned barrels have been used on Heavy Guns before, but few have been as successful in competition as Jeff’s rig. Jeff tells us: “The 30-cal barrel is a 1.500″-diameter, 1:13 twist, 32″ Broughton. It is straight for 6″ then tapers to 1.250″ at 32″. The tension tube is 6061 T6 alloy 2.0″ outside diameter with a .187″ wall thickness. At the chamber end, a 431 stainless adaptor is fitted to the barrel, about 1.5″ long, stepped to a slip fit inside the tube for another 1.5 inches. This allows the main heat area of the chamber to sink into the tube. The tension tube is all jointed with a CAT high-temp anti-seize. On the muzzle end is a left hand 1.250x16tpi thread to take the tension nut. We have tried various tensions and found torque settings do not matter to the groups as long as the nut does not come loose. Because I can really rattle down those 10-shot groups with the Drop Port action, remember that the barrel grows in length before it gets a chance to transfer heat to the outer tube. If you shot the gun at pedestrian pace, then only 50 ft/lbs of tension is needed.”

November 8th, 2007
The editors of the NRA’s American Hunter magazine recently tested 10 brands of shooting glasses, determining how well the eyewear could shield users from shotgun birdshot. Eyewear samples were tested at 25, 15, 10, 8, and 5 yards, using #8 shot. One ANSI Z87.1-certified set of polycarbonate eyewear was then repeat-tested with #6 shot, #4 shot, #2 steel and buckshot.
CLICK HERE for Full TEST Report.

The tests provided some very important conclusions:
1. The glasses marked Z87.1+ (“plus” is a high-impact rating) performed the best. Overall, Z87.1-rated polycarbonate lenses provided excellent protection from birdshot at 10-15 yards and beyond. Some Z87.1+ eyewear even blocked birdshot at 8 yards.
2. You can’t necessarily rely on price as an indicator of quality. The $12 Bollé VX and the $5.95 Pyramex Rendezvous both worked better than some much more expensive brands. The $5.95 Pyramex, in fact, was one of only three products that stood up to the #8 birdshot at 8 yards. The Pyramex does carry a Z87.1+ rating.
3. Avoid no-name, un-rated plastic eyewear. American Hunter Editor Jeff Johnston writes: “It’s a mistake to assume that any plastic-lens sunglasses off the rack at the local 7-11 are made of polycarbonate and therefore are effective as shooting glasses—cheap plastics are not polycarbonates; in fact, wearing them could be worse than wearing nothing, as they can introduce sharp shards of plastic to your eyes in addition to the projectile(s) that caused them to break.”
November 6th, 2007
Here’s a simple procedure that lets you get a solid zero for a hunting rifle in just four shots. Of course you probably want to fire a few more rounds to confirm your zero before you head off to your hunting grounds, but this will let you get on-target with a minimum amount of time and ammo expended.
1. First, remove the bolt and boresight the rifle so you can see the center of the target through the bore. Secure the rifle in the rests to maintain its position as boresighted. Then, without moving the rifle, center the reticle. That should get you on paper. With the rifle solidly secured in front and rear rests or sandbags, aim at the center of a target placed at your zeroing distance (100 or 200 yards). Fire one shot. Then, return the gun to the exact position it was when you pulled the trigger, with the cross-hair centered on the target as before.
2. Locate, in the scope, where your first bullet landed on the target. Now, while you grip the rifle firmly so it doesn’t move, have a friend adjust the turrets on your scope. While you look through the scope, have your friend turn the windage and elevation turrets until the cross-hairs, as viewed through the scope, bisect the bullet hole on the target. In other words, you use the turrets to move the center of the reticle to the actual position of shot number one.
3. After you’ve adjusted the turrets, now re-aim the rifle so the cross-hairs are, once again, positioned on the target center. Keep the rifle firmly supported by your rest or sandbag. Take the second shot. You should find that the bullet now strikes in the center of the target.
4. Take a third shot with the cross-hairs aligned in the center of the target to confirm your zero. Make minor modifications to the windage and elevation as necessary.
5. Now shoot the rifle from a field rest (shooting sticks, bipod, or rucksack) as you would use when actually hunting. Confirm that your zero is unchanged. You may need to make slight adjustments. Some rifles, particularly those with flexy fore-arms, exhibit a different POI (point of impact) when fired from a bipod or ruck vs. a sandbag rest.

If you recently cleaned your rifle, you may want to fire two or three fouling shots before you start this procedure. But keep in mind that you want to duplicate the typical cold bore conditions that you’ll experience during the hunt. If you set your zero after three fouling shots, then make sure the bore is in a similar condition when you actually go out hunting.
October 25th, 2007
A quality mirage shield reduces the amount of optical distortion caused by heat waves rising from the barrel directly in front of the scope. On a hot day, after many rounds through the barrel, the benefit of a mirage shield can be quite dramatic. Benchrest shooters have used mirage shields for many years. Mirage shields can be just as beneficial for the serious varmint shooter. But, curiously, most varminters we know don’t employ mirage shields. We think they should. A mirage shield is a low-cost accessory that helps you get more hits and fewer misses.
As our friend Boyd Allen observed: “Varminters should use mirage shields. Think about it. You’ve invested thousands of dollars in a fancy varmint rifle and quality scope. You may have spent hundreds of dollars traveling to the varmint fields and spent dozens of hours loading up your ammo. Without a mirage shield on your barrel, once that barrel gets hot, you WILL get mirage effects that can make you miss a shot. A mirage shield costs just a few dollars. It really doesn’t make sense to go out to the varmint fields without one, if you plan on shooting lots of rounds. Barrel heat mirage can cause you to miss that critter, even if you have the most accurate rifle in the world.”
Dan Lilja offers a nice, wide mirage shield for $10. Dan notes: “Our benchrest mirage shield also works very well for field varmint rifles if there is a lot of action and the barrel is getting hot. The shield deflects image-distorting heat waves that come off of a hot barrel. The heat flows out past the edge of the shield and out of the line-of-sight of the rifle scope. These shields are 18” long, made of thin painted steel (like window blind material) and can be easily trimmed to length.”

Sinclair International also offers a 2″-wide venetian-blind style Mirage Shade, that costs just $3.95. It is available in two lengths, 18″ for BR barrels (item 06-7200), and 24″ for longer varmint barrels (item 06-7300). The Sinclair Shade is made of aluminum and can easily be trimmed to a shorter length. Like the Lilja shield, the Sinclair Mirage Shade attaches with adhesive-backed Velcro fasteners.

October 20th, 2007
Wipe-Out foam bore cleaner is a product we’ve used with great success on many rifles. With sufficient dwell time, it removes both carbon and copper fouling. You can combine it with Wipe-Out Accelerator or the new Patch-Out product to speed up cleaning time. Many shooters, including this editor, find that bore-brushing has been virtually eliminated with the regular use of Wipe-Out. (With some barrels however, you may still have to brush or use a bore paste if you notice stubborn carbon build-up in the throat area.)
Standard procedure with Wipe-Out is to insert your O-ring cleaning rod guide into the chamber and then squirt through the muzzle. However, this isn’t possible with all rifles. One of our readers wanted to try Wipe-Out, but he has a Remington 7400. This is a semi-automatic rifle with no pass-through in the rear of the receiver. There’s no way to insert a guide rod, and it’s also tricky to use a chamber plug.
READ Jason’s Wipe-Out Article Here
For rifles such as the Garand, M1A and other semi-autos, you can apply Wipe-Out through the breech if you use fitted, plastic tubing. Jason Baney has written a short article describing this process. In a nutshell, you need one piece of tubing that fits the chamber tightly and then connects with a second, smaller diameter tube that attaches to the Wipe-Out can. This avoids any “over-spray” of foam in the action area, providing a clean, simple solution. Just squirt for a second or so, and wait for white foam to come out of the muzzle. Be sure to keep Wipe-Out off fine wood stocks.


|


