|
|
October 19th, 2007
Here’s a nice do-it-yourself project for the winter. Simpson, maker of Strong-Tie fasteners, offers FREE Workbench Plans for a sturdy, 48″-wide bench with a pegboard backing and both upper and lower shelves. A complete list of fasteners and cut lengths is provided. For use as a loading bench with mounted presses, you can double-up the bench-top for extra ridigity. Without much difficulty, the plans can be adapted to build a wider bench if you prefer.

The same downloadable document also contains plans for an 80″-high 6-shelf unit, a 72″-high heavy-duty shelving unit (with 4 shelves), and a 48″-wide heavy-duty table.
October 16th, 2007
 When neck-turning cases, it’s a good idea to extend the cut slightly below the neck-shoulder junction. This helps keep neck tension more uniform after repeated firings, by preventing a build-up of brass where the neck meets the shoulder. One of our Forum members, Craig from Ireland, a self-declared “neck-turning novice”, was having some problems turning brass for his 20 Tactical cases. He was correctly attempting to continue the cut slightly past the neck-shoulder junction, but he was concerned that brass was being removed too far down the shoulder. When neck-turning cases, it’s a good idea to extend the cut slightly below the neck-shoulder junction. This helps keep neck tension more uniform after repeated firings, by preventing a build-up of brass where the neck meets the shoulder. One of our Forum members, Craig from Ireland, a self-declared “neck-turning novice”, was having some problems turning brass for his 20 Tactical cases. He was correctly attempting to continue the cut slightly past the neck-shoulder junction, but he was concerned that brass was being removed too far down the shoulder.
Craig writes: “Everywhere I have read about neck turning, [it says] you need to cut slightly into the neck/shoulder junction to stop doughnutting. I completely understand this but I cant seem to get my neck-turning tool set-up to just touch the neck/shoulder junction. It either just doesn’t touch [the shoulder] or cuts nearly the whole shoulder and that just looks very messy. No matter how I adjust the mandrel to set how far down the neck it cuts, it either doesn’t touch it or it cuts far too much. I think it may relate to the bevel on the cutter in my neck-turing tool…”

Looking at Craig’s pictures, we’d agree that he didn’t need to cut so far down into the shoulder. There is a simple solution for this situation. Craig is using a neck-turning tool with a rather shallow cutter bevel angle. This 20-degree angle is set up as “universal geometry” that will work with any shoulder angle. Unfortunately, as you work the cutter down the neck, a shallow angled-cutter tip such as this will remove brass fairly far down. You only want to extend the cut about 1/32 of an inch past the neck-shoulder junction. This is enough to eliminate brass build-up at the base of the neck that can cause doughnuts to form.

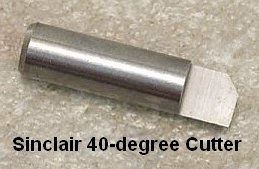
The answer here is simply to use a cutter tip with a wider angle — 30 to 40 degrees. The cutter for the K&M neck-turning tool (above) has a shorter bevel that better matches a 30° shoulder. There is also a 40° tip available. WalkerTexasRanger reports: “I went to a 40-degree cutter head just to address this same issue, and I have been much happier with the results. The 40-degree heads are available from Sinclair Int’l for $13 or so.” Forum Member CBonner concurs: “I had the same problem with my 7WSM… The 40-degree cutter was the answer.” Below is Sinclair’s 40° cutter for its NT1000 neck-turning tool. Item NT3140, it sells for $12.95. There is also a slightly more expensive 40° cutter for the NT3000 tool, item NT3340.
October 10th, 2007
Past NBRSA 1000-yard Champion Jerry Tierney has been experimenting with a “super-sized” mirage shield. Like other shooters, Jerry noticed that mirage produced by barrel heat was creating optical distortions, causing groups to open up on the target. He had fitted a conventional, narrow, venetian-blind style mirage band to his barrel using velcro fasteners. This had the expected beneficial effect, until Jerry’s round count rose to the point that the barrel heat was overcoming the narrow band’s shielding effect.
Jerry figured “if a narrow band is good, maybe a wide mirage band is even better”. Jerry experimented with materials and sizes, eventually settling on a 4-inch wide section of cardboard running from the scope foreward. He wrapped the cardboard with plastic strapping tape to add stiffness, and then, during his experiments, zip-tied the cardboard to the barrel. The venetian blind band was then placed on top of the cardboard. This gives him a two-tier mirage shield.

To Jerry’s surprise, with the jumbo mirage shield in place, the barrel remained accurate for a much longer round count. Jerry told us: “I thought the barrel was ‘going off’ as it heated up. But what I found, by using the big shield, was that the barrel stayed accurate even when it was hot. The barrel actually continued to shoot very well when hot–once I started using the bigger mirage shield. Mirage was causing the accuracy problems. With the big shield in place, I can put more rounds through the tube without seeing negative effects on the target. I concluded that this gun can shoot well with a hot barrel, so long as I kept the mirage under control. I know the cardboard shield looks funky, but it works. I can shoot longer strings without losing accuracy.”
September 30th, 2007
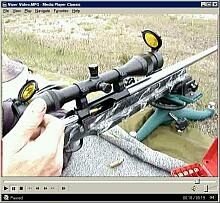
Many of you may not have seen how Jerry Stiller’s innovative Drop-Port functions with a 6BR or 6PPC case. Well we can tell you, Stiller Precision has one slick little system. Just retract the bolt and your case exits, nose-first, through a small port, coming to rest right under the gun. It works by gravity alone so you don’t need a conventional ejector, with the case alignment issues an ejector can create. (An ejector pushes on one side of the rim–some folks think this can push the case out of “perfect” alignment.) The drop-port is available both in the aluminum Viper and the Stainless Diamondback action. Case size is limited to PPC, 6BR, and 6BR Improved case length. Our Belgian friend David Bergen was kind enough to create a video showing his Viper Drop-Port in action. NOTE: This large, 7-megabyte file is best for users with high-speed connections. Left-Click the image to stream video. Right-Click and “save as” to download the file.
Download Video | Drop-Port Blueprint
September 29th, 2007
Some folks feel that they don’t have to worry about rust and corrosion on stainless steel barrels, actions, and other components. That’s not really true. “Stainless” is a bit of a misnomer. First, there are different types of stainless steel alloys, with different degrees of rust resistance. 300 series stainless is more corrosion resistant than the 416 stainless commonly used in barrels. The composition (by percentage weight) of 416 stainless is 0.15% carbon, 12-14% chromium and the rest iron. 416 stainless steel lacks the roughly 10% nickel content that makes the 300 series more corrosion resistant in atmospheric conditions.

Though some grades of stainless are more corrosion-resistent, ALL varieties of stainless steel can rust if they are not handled and stored properly. Forum reader Kells81 observed: “Wanna see some rusted stainless? Go to the big “C” brand store in Ft. Worth. Every stainless gun they have on the used gun rack is rusted.” Tom Easly of TRE Custom explains: “Sweat is very corrosive. Sweat and blood will rust many stainless steels. I hate to handle my guns or drip on them when I sweat. It really helps to just wipe them good with a wet rag, dry and wipe on a light coating of gun oil. I think most stainless barrels are made from type 416 stainless, and it is generally pretty corrosion resistant, but not when exposed to sweat, blood, or chlorates (corrosive priming), and some other electrolytes.”
Forum member Jacob, who is studying materials science at LSU, provides this technical information: “The basic resistance of stainless steel occurs because of its ability to form a protective coating on the metal surface. This coating is a ‘passive’ film which resists further ‘oxidation’ or rusting. The formation of this film is instantaneous in an oxidizing atmosphere such as air, water, or other fluids that contain oxygen. Once the layer has formed, we say that the metal has become ‘passivated’ and the oxidation or ‘rusting’ rate will slow down to less than 0.002″ per year (0.05 mm per year).
Unlike aluminum or silver, this passive film is invisible in stainless steel. It’s created when oxygen combines with the chrome in the stainless to form chrome oxide which is more commonly called ‘ceramic’. This protective oxide or ceramic coating is common to most corrosion resistant materials.
Halogen salts, especially chlorides, easily penetrate this passive film and will allow corrosive attack to occur. The halogens are easy to recognize because they end in the letters ‘ine’. Listed in order of their activity they are: fluorine, chlorine, bromine, iodine, astatine.
These are the same chemicals that will penetrate Teflon and cause trouble with Teflon coated or encapsulated o-rings and/ or similar coated materials. Chlorides are one of the most common elements in nature and if that isn’t bad enough, they’re also soluble, active ions. These provide the basis for electrolytes. The presence of electrolytic solutions can accelerate corrosion or chemical attack.”
 CONCLUSION: Stainless steel barrels and components won’t rust nearly as fast as blued steel, but you still have to take precautions — particularly removing sweat and corrosive salts from the barrel. Also, don’t let moisture build up inside or outside of the barrel. We recommend wiping your barrels and actions with Eezox, or Corrosion-X after each use. These are both extremely effective rust-fighters that go on thin, without leaving a greasy residue. (Eezox leaves a clear finish, while Corrosion-X has a slightly waxy finish.) Also store your guns in Bore-Store synthetic bags when the guns go in the safe. Bore-Stores wick away moisture, and the synthetic fleece inner surface is treated with rust-fighting chemicals. To discuss the issue of rust formation on stainless steel, visit this FORUM Thread. CONCLUSION: Stainless steel barrels and components won’t rust nearly as fast as blued steel, but you still have to take precautions — particularly removing sweat and corrosive salts from the barrel. Also, don’t let moisture build up inside or outside of the barrel. We recommend wiping your barrels and actions with Eezox, or Corrosion-X after each use. These are both extremely effective rust-fighters that go on thin, without leaving a greasy residue. (Eezox leaves a clear finish, while Corrosion-X has a slightly waxy finish.) Also store your guns in Bore-Store synthetic bags when the guns go in the safe. Bore-Stores wick away moisture, and the synthetic fleece inner surface is treated with rust-fighting chemicals. To discuss the issue of rust formation on stainless steel, visit this FORUM Thread.
September 22nd, 2007
This weekend, it officially becomes fall. With the changing of the seasons, now, more than ever, it’s important to protect your firearms from rust and corrosion. For guns stored in a safe or enclosed locker, a GoldenRod unit is a must-have accessory. The GoldenRod, marketed as a dehumidifier, is a small, low-wattage electric heating element you place in the safe. Running 24/7 at 140° F, the GoldenRod warms the air in your safe. This changes relative humidity and raises the dew point in the safe so water vapor does not condense on your arms and valuable accessories. When combined with Desiccant packs that absorb moisture, the GoldenRod is extremely effective at keeping your guns rust-free during long-term storage. We do recommend wiping down your guns with Boeshield, Eezox, or Corrosion-X before putting them in storage. These are three of the best corrosion-inhibiting metal coatings you can buy.

Now through September 30, 2007, MidwayUSA offers the 18″ GoldenRod heating unit (item 614184) for just $16.99, marked down from $19.99. This is rated for up to 200 cubic feet safe. All GoldenRods come with a detachable plugs for easy installation.
September 20th, 2007
For better accuracy and more consistent tracking, it is important to match your rear sand bag to the profile of your stock. Some stocks are curved on the bottom of the buttstock (also called the “toe”), while others have a flat, ranging from 3/8″ wide to as much as 3″. Additionally, the amount of down-angle or “drop” in a stock can vary considerably. Traditional hunting stocks have a lot of drop, whereas a 1000-yd BR stock may have “zero drop” — meaning they are completely straight from the bottom of the grip to the buttplate.
Stocks with a flat on the bottom rear normally work best in a sandbag that has a slot between the ears. (See photos below, courtesy Forum member Rayjay.) NOTE: Ideally, you do not want the flat resting directly on the stitching–it’s better to have the bottom of the stock contacting the sides of the ears a little bit above the center seam (Read comments). But you still need spacing between the ears to get the right fit–it should not be so tight as to pinch or “grab” the stock unevenly as seen in the second photo. With a more conventional round-bottomed stock, with a radiused toe, you’ll probably get best results from a bag with taller ears, and you should experiment with spacing.


Recently, Forum member Jon complained that his rifle was not tracking well, and needed to be re-positioned after every shot. Jon’s rifle has an HS Precision stock with a radius and quite a bit of drop. He was having the problem because he was using a bag with ears that were too short. See below.

Jon will have better results with a bag with taller ears and more spacing. Rayjay explains why Jon’s rifle wasn’t tracking well: “Everytime you fire the rifle the sand in the ears gets displaced. Then when you slide the rifle forward and work the bolt, etc., the sand moves around some more. Then on the next shot it displaces again… it is not consistent shot to shot.”

Jon also had a sling swivel stud on the rear underside of his stock. Swivel studs, both front and rear, can hang up on sandbags, causing a variety of problems. Ideally, when shooting with sandbags, remove the swivel studs. If that’s not possible, at least adjust your fore-end so the front swivel stud will NOT contact the front bag at all, and adjust the rear bag so that the swivel stud is not dragging between the ears.
September 16th, 2007
Experienced handloaders consider many factors in determining loads for their rifles: type and amount of powder, primer “hotness”, brass strength in the web area, case neck tension, bullet weight, diameter and bearing surface, freebore length, seating depth, barrel land/groove configuration, and ambient temperature. Some folks even compensate for the altitude and humidity at the range. That pretty much covers it right? Wrong. You can get in BIG Trouble if you don’t account for barrel fouling as well.
Barrel fouling is not often discussed in reloading articles. Yet barrel fouling (both carbon and copper) can dramatically increase pressure inside a bore. It can do this in many ways. First a build-up of carbon ahead of the throat can increase pressures by constricting the bore. Likewise, heavy copper build-up can constrict the bore over a significant amount of its length. This means the bullet is being driven through what is, effectively, a smaller hole. As well, even a light layer of copper can increase friction. Added friction means more heat, and heat and pressure are directly related.
If you have a barrel that fouls heavily, and you need to shoot 20+ rounds with no opportunity to remove the fouling (say during a match), you should adjust your loads down so they are safe when the barrel is fouled. Don’t assume that a load which is safe in a “squeaky clean” bore will remain safe as your bore gets heavily fouled. This is especially true with non-lapped factory barrels with heavy “chatter marks” from machining. Look at this photo, provided by Forum member Clark. It shows the SAME load (identical bullet and powder charge) fired in the same barrel, at progressively heavier levels of copper fouling:

Pretty scary, right? Cartridge ‘C’, fired in a heavily coppered barrel, shows signs of catastrophic case failure, as well as damage to the primer. By comparison, cartridge ‘A’ merely shows some cratering, but the primer pocket edges are still rounded. ‘A’ is probably at the upper limit of a safe load. ‘C’ is at truly dangerous overpressure–with the same amount of powder in the case. The only difference was the amount of fouling in the barrel–particularly heavy copper.
August 30th, 2007
 Is an FFL required to ship a long gun out of state? Can you use the U.S. Mail to ship firearms? Can you ship guns directly to a manufacturer for repairs? Is an FFL required to ship a long gun out of state? Can you use the U.S. Mail to ship firearms? Can you ship guns directly to a manufacturer for repairs?
Answers to these and many other questions are provided in a convenient Firearms Shipping FAQ created by Gunbroker.com, the leading online firearms auction site. The article does a decent job summarizing applicable Federal law and includes handy links to the statutes themselves so you can read them word for word.

| 48″ MidwayUSA ‘Quick Ship’ Box, #897166, $15.99. A foam-lined double-cardboard box offers some protection for your firearm. But we recommend you put valuable pistols and long guns in a sturdy plastic or metal hard case, INSIDE a cardboard shipping container. Make sure the contents can’t move around inside the box. Always insure for full replacement value (including tax and transfer fees). Photograph the gun BEFORE it’s shipped so you can document its original condition should it arrived damaged. |
We find that folks are often confused between the rules for handguns and long guns. Handguns may NEVER be shipped through the U.S. Mails unless you are an FFL holder. By contrast, a “civilian” (i.e. non license-holder) CAN ship a rifle or shotgun via the U.S. Postal Service. In fact the USPS may be the most economical and reliable shipping choice for long guns these days.
Another common misconception is that you need the services of an FFL for outbound shipping of a firearm. While placing your outbound shipment in the hands of an FFL-holder can have some benefits, if the recipient is a valid Federal FFL, and you have received a copy of his license for verification, you CAN ship a long gun yourself to the address on the license. You can also ship a handgun directly to an FFL holder (or the manufacture for repair), but you must use a common carrier such as FEDEX or UPS. (Only a licensed manufacturer, dealer, or importer can legally ship a handgun via the US Post Office.)

August 28th, 2007
 Here’s a great do-it-yourself project for the winter. Texan Robert Lewis made himself a great portable reloading bench from plywood mounted to a Black & Decker Workmate. The bench, roughly 22″ x 19″ on top, folds up to fit easily in your car’s trunk or behind the seats in a pick-up truck cab. Four recessed bolts hold the wood top section to the collapsible B&D Workmate.The sides and back of the unit are attached to the base with small nails. There is a small shelf (also nailed in place) which can be used to clamp a powder measure or hold a scale. Shown in the photo is a Harrell’s Benchrest measure and Harrell’s single-stage “C” press. Here’s a great do-it-yourself project for the winter. Texan Robert Lewis made himself a great portable reloading bench from plywood mounted to a Black & Decker Workmate. The bench, roughly 22″ x 19″ on top, folds up to fit easily in your car’s trunk or behind the seats in a pick-up truck cab. Four recessed bolts hold the wood top section to the collapsible B&D Workmate.The sides and back of the unit are attached to the base with small nails. There is a small shelf (also nailed in place) which can be used to clamp a powder measure or hold a scale. Shown in the photo is a Harrell’s Benchrest measure and Harrell’s single-stage “C” press.
Click for Larger Photo.
The whole unit can be built for about $65.00 with pine, or $80.00 with oak (as shown). Robert explained: “The Workmate was $40. If someone bought a 2’x4′ sheet of 3/4″ oak plywood, I think it is around $30. Using pine plywood would be about half that. Fasteners were $3. Spar Urethane would be $5.”
Robert told us: “I used a couple ideas I found on the web. The Larry Willis website gave me the idea to use the Black and Decker Workmate as a base. I found the Workmate on sale for $40 and the top is made from oak plywood I had in my shop. I sealed the wood with three coats of Spar Urethane. The whole thing folds into a nice package for transportation to and from the range.” Click Here to view a set of plans.

|


