|
|
August 30th, 2007
 Is an FFL required to ship a long gun out of state? Can you use the U.S. Mail to ship firearms? Can you ship guns directly to a manufacturer for repairs? Is an FFL required to ship a long gun out of state? Can you use the U.S. Mail to ship firearms? Can you ship guns directly to a manufacturer for repairs?
Answers to these and many other questions are provided in a convenient Firearms Shipping FAQ created by Gunbroker.com, the leading online firearms auction site. The article does a decent job summarizing applicable Federal law and includes handy links to the statutes themselves so you can read them word for word.

| 48″ MidwayUSA ‘Quick Ship’ Box, #897166, $15.99. A foam-lined double-cardboard box offers some protection for your firearm. But we recommend you put valuable pistols and long guns in a sturdy plastic or metal hard case, INSIDE a cardboard shipping container. Make sure the contents can’t move around inside the box. Always insure for full replacement value (including tax and transfer fees). Photograph the gun BEFORE it’s shipped so you can document its original condition should it arrived damaged. |
We find that folks are often confused between the rules for handguns and long guns. Handguns may NEVER be shipped through the U.S. Mails unless you are an FFL holder. By contrast, a “civilian” (i.e. non license-holder) CAN ship a rifle or shotgun via the U.S. Postal Service. In fact the USPS may be the most economical and reliable shipping choice for long guns these days.
Another common misconception is that you need the services of an FFL for outbound shipping of a firearm. While placing your outbound shipment in the hands of an FFL-holder can have some benefits, if the recipient is a valid Federal FFL, and you have received a copy of his license for verification, you CAN ship a long gun yourself to the address on the license. You can also ship a handgun directly to an FFL holder (or the manufacture for repair), but you must use a common carrier such as FEDEX or UPS. (Only a licensed manufacturer, dealer, or importer can legally ship a handgun via the US Post Office.)

August 28th, 2007
 Here’s a great do-it-yourself project for the winter. Texan Robert Lewis made himself a great portable reloading bench from plywood mounted to a Black & Decker Workmate. The bench, roughly 22″ x 19″ on top, folds up to fit easily in your car’s trunk or behind the seats in a pick-up truck cab. Four recessed bolts hold the wood top section to the collapsible B&D Workmate.The sides and back of the unit are attached to the base with small nails. There is a small shelf (also nailed in place) which can be used to clamp a powder measure or hold a scale. Shown in the photo is a Harrell’s Benchrest measure and Harrell’s single-stage “C” press. Here’s a great do-it-yourself project for the winter. Texan Robert Lewis made himself a great portable reloading bench from plywood mounted to a Black & Decker Workmate. The bench, roughly 22″ x 19″ on top, folds up to fit easily in your car’s trunk or behind the seats in a pick-up truck cab. Four recessed bolts hold the wood top section to the collapsible B&D Workmate.The sides and back of the unit are attached to the base with small nails. There is a small shelf (also nailed in place) which can be used to clamp a powder measure or hold a scale. Shown in the photo is a Harrell’s Benchrest measure and Harrell’s single-stage “C” press.
Click for Larger Photo.
The whole unit can be built for about $65.00 with pine, or $80.00 with oak (as shown). Robert explained: “The Workmate was $40. If someone bought a 2’x4′ sheet of 3/4″ oak plywood, I think it is around $30. Using pine plywood would be about half that. Fasteners were $3. Spar Urethane would be $5.”
Robert told us: “I used a couple ideas I found on the web. The Larry Willis website gave me the idea to use the Black and Decker Workmate as a base. I found the Workmate on sale for $40 and the top is made from oak plywood I had in my shop. I sealed the wood with three coats of Spar Urethane. The whole thing folds into a nice package for transportation to and from the range.” Click Here to view a set of plans.

August 13th, 2007
Let’s say you’ve purchased a new scope, and the spec-sheet indicates it is calibrated for quarter-MOA clicks. One MOA is 1.047″ inches at 100 yards, so you figure that’s how far your point of impact (POI) will move with four clicks. Well, unfortunately, you may be wrong. You can’t necessarily rely on what the manufacturer says. Production tolerances being what they are, you should test your scope to determine how much movement it actually delivers with each click of the turret. It may move a quarter-MOA, or maybe a quarter-inch, or maybe something else entirely. (Likewise scopes advertised as having 1/8-MOA clicks may deliver more or less than 1 actual MOA for 8 clicks.)
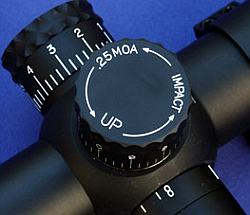 Reader Lindy explains how to check your clicks: “First, make sure the rifle is not loaded. Take a 40″ or longer carpenter’s ruler, and put a very visible mark (such as the center of an orange Shoot’N’C dot), at 37.7 inches. (On mine, I placed two dots side by side every 5 inches, so I could quickly count the dots.) Mount the ruler vertically (zero at top) exactly 100 yards away, carefully measured. Reader Lindy explains how to check your clicks: “First, make sure the rifle is not loaded. Take a 40″ or longer carpenter’s ruler, and put a very visible mark (such as the center of an orange Shoot’N’C dot), at 37.7 inches. (On mine, I placed two dots side by side every 5 inches, so I could quickly count the dots.) Mount the ruler vertically (zero at top) exactly 100 yards away, carefully measured.
Place the rifle in a good hold on sandbags or other rest. With your hundred-yard zero on the rifle, using max magnification, carefully aim your center crosshairs at the top of the ruler (zero end-point). Have an assistant crank on 36 (indicated) MOA (i.e. 144 clicks), being careful not to move the rifle. (You really do need a helper, it’s very difficult to keep the rifle motionless if you crank the knobs yourself.) With each click, the reticle will move a bit down toward the bottom of the ruler. Note where the center crosshairs rest when your helper is done clicking. If the scope is accurately calibrated, it should be right at that 37.7 inch mark. If not, record where 144 clicks puts you on the ruler, to figure out what your actual click value is. (Repeat this several times as necessary, to get a “rock-solid”, repeatable value.) You now know, for that scope, how much each click actually moves the reticle at 100 yards–and, of course, that will scale proportionally at longer distances. This optical method is better than shooting, because you don’t have the uncertainly associated with determining a group center.
Using this method, I discovered that my Leupold 6.5-20X50 M1 has click values that are calibrated in what I called ‘Shooter’s MOA’, rather than true MOA. That is to say, 4 clicks moved POI 1.000″, rather than 1.047″ (true MOA). That’s about a 5% error.
I’ve tested bunches of scopes, and lots have click values which are significantly off what the manufacturer has advertised. You can’t rely on printed specifications–each scope is different. Until you check your particular scope, you can’t be sure how much it really moves with each click.
I’ve found the true click value varies not only by manufacturer, but by model and individual unit. My Leupold 3.5-10 M3LR was dead on. So was my U.S.O. SN-3 with an H25 reticle, but other SN-3s have been off, and so is my Leupold 6.5-20X50M1. So, check ‘em all, is my policy.”
August 12th, 2007
 Forum member RidgeRunner has devised a clever shooting support for field use. He calls it the “Pogo Stick”. It’s simply welded stainless rod with a two-pronged base, and a ‘U’-shaped cradle that adjusts for height along a vertical shaft. RidgeRunner tells us: “It is very solid and made from stainless steel so it won’t rust under sweaty hands. The rifle hook, or support, slides up and down the main stem and secures with the knob. It has two prongs you tramp into the ground and is VERY stable. It is shiny, but I have been using this one since about 1983, and I can’t say I have noticed it spooking any whistlers. Before I had an actual bench to shoot off of, I used it to sight-in rifles. I would lay down and use a sand bag under the butt stock. Worked just fine.” Forum member RidgeRunner has devised a clever shooting support for field use. He calls it the “Pogo Stick”. It’s simply welded stainless rod with a two-pronged base, and a ‘U’-shaped cradle that adjusts for height along a vertical shaft. RidgeRunner tells us: “It is very solid and made from stainless steel so it won’t rust under sweaty hands. The rifle hook, or support, slides up and down the main stem and secures with the knob. It has two prongs you tramp into the ground and is VERY stable. It is shiny, but I have been using this one since about 1983, and I can’t say I have noticed it spooking any whistlers. Before I had an actual bench to shoot off of, I used it to sight-in rifles. I would lay down and use a sand bag under the butt stock. Worked just fine.”

Yep, that’s one big Pennsylvania groundhog in the photo. RidgeRunner reports: “This old boy has been giving me the slip for a couple weeks. I finally got a 52gr A-Max in him before the hay got high enough to hide him again. This sucker weighed 15 pounds. My heaviest to date I believe. The rifle is a Tikka 22/250 with a 4-16X Weaver 1/8-MOA dot scope. Nice and light for carry, nice and accurate too.”
July 28th, 2007
Some of our forum members have observed issues with the Acculab VIC-123, an 0.001g precision electronic balance made by Sartorius. The two main complaints seem to be sensitivity to drafts, and instability of zero, causing weight read-outs to “drift” over time. We have seen the latter problem in less expensive scales such as the PACT. (Read PACT report).
 Forum member Ronemus, who lists his profession as “instrumentation scientist”, offers the following advice: Forum member Ronemus, who lists his profession as “instrumentation scientist”, offers the following advice:
“It is necessary to isolate the scale from drafts and vibrations. Laboratory scales with this sort of resolution (.001g) generally have a housing around the pan with sliding doors for access and vibration isolators in the feet. Those scales cost thousands of dollars, and some features must be cut to reach a price we’re willing to pay. Unfortunately, the instruction manuals accompanying our scales generally aren’t very good at spelling out the steps necessary to have then operate to our satisfaction.
A small draft (one you can barely feel) can easily shift the reading a few tenths of a grain, so some sort of enclosure is needed. I use a cardboard file box with one end cut out, so 3 sides and the top remain, and that’s good enough for 0.1 gr (6 mg) stability; however, that may not be sufficient for 0.01 gr.
For stable zeros it’s necessary to warm up for at least a few hours (they’re generally left on continuously to avoid drift) and keep the room temperature fairly constant (within a few degrees).
Inexpensive scales are also susceptible to electrical noise, either riding the power line or through the air. Power line noise can be eliminated with a good filtered power strip (I recommend a Tripp-Lite Iso-Bar), not just a surge suppressor. Cordless and cell phones, fluorescent lights, wireless computer networks, baby monitors, etc. can cause problems at short range, so they should be kept away from the scale as much as possible.”
July 20th, 2007
Here is a simple, low-cost way to get reliable readings of case headspace when you “bump” the shoulder back on your 6BR, .243, or .308 Win brass. Credit Boyd Allen for this tip. First, you’ll need one .45acp case, with primer removed. Make sure the .45acp case is trimmed square and that it is round. We recommend you first run it through an expander, then size it, trim it and chamfer. Next, take the .45acp case and slip it over the neck of a fired, unsized case with the primer removed. Align the two cases between the jaws of your calipers and note the length from rim to rim (Top Photo, striped case).

OK, now you have the length for a fired case. Next, take a sized case (without primer) and do the same thing, placing the .45acp over the neck of the FL-sized case (Bottom Photo). The difference between the two numbers is the amount of “bump” or set-back you are applying to the shoulder. Here the difference is .0015″. The amount of bump you need varies with your chamber and your load, but .0015-.002″ is a good initial setting. By using this simple tool, you can avoid bumping the shoulder too much. This will also help you set-up the depth of your full-length die to get the proper amount of bump each time.

July 18th, 2007
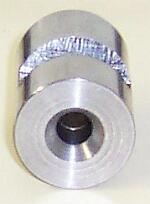 Rich DeSimone uses a handy “Stub Gauge” for setting shoulder “bump” and seating depth. The gauge is made from a section of barrel lopped off when the muzzle is crowned. The chambering reamer is run in about 1/4 of the way, enough to capture the neck and shoulder area of the case. Rich then uses his full-length die to “bump” a master case with the ideal amount of headspace for easy feeding and extraction. He takes that case and sets it in this Stub Gauge, and measures from the front of the gauge to the rim. He can then quickly compare any fired case to a his “master” case with optimal headspace. Since the gauge measures off the shoulder datum, this tells him how much to bump his fired brass. Rich DeSimone uses a handy “Stub Gauge” for setting shoulder “bump” and seating depth. The gauge is made from a section of barrel lopped off when the muzzle is crowned. The chambering reamer is run in about 1/4 of the way, enough to capture the neck and shoulder area of the case. Rich then uses his full-length die to “bump” a master case with the ideal amount of headspace for easy feeding and extraction. He takes that case and sets it in this Stub Gauge, and measures from the front of the gauge to the rim. He can then quickly compare any fired case to a his “master” case with optimal headspace. Since the gauge measures off the shoulder datum, this tells him how much to bump his fired brass.
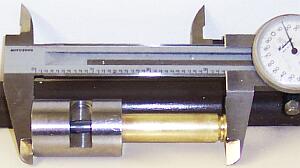
In addition, the Stub Gauge can be used to set bullet seating-depth. Rich has a channel cut transversely on one side of the gauge, exposing the throat area. Since the interior of the gauge is identical to the chamber in his gun, this lets him see where a seated bullet engages the rifling. He can tinker with bullet seating length until he gets just the right amount of land contact on the bullet, confirmed visually. Then he measures the case OAL and sets his seating dies accordingly. This is much handier than using a Stoney Point Tool to measure distance to the lands. As your barrel’s throat wears, you may seat your bullets out further to “chase the lands”, but the gauge provides a constant land engagement point, in the barrel’s “as new” condition. By measuring the difference between the land contact point on the gauge and the actual contact point on your barrel, you can determine throat “migration”.
July 13th, 2007
Electronic Scales can be a blessing. They are fast and easy to use (for the most part). But there is a potentially dangerous side as well. Here is a real-world example of problems you can encounter with common reloading scales.
I recently received a new box of Berger 95gr VLD bullets to test. These proved to be exceptionally uniform in base to ogive measurement so I decided to weigh them as well. I fired up my PACT electronic scale, letting it warm up for a full hour. Then I calibrated the unit using the check weights provided by PACT. I had a steady zero, the red cup tared (zeroed) correctly–everything looked good. I then started weighing the 95 VLDs, placing each bullet individually in a loading tray so I could repeat the measurements in order. After about 20 rounds I was interrupted by a phone call. I noted the weight (95.0 grains), wrote that down in my log book, removed the bullet, and took the call.

40 minutes later I returned to the loading room and re-weighed the SAME bullet. This time it registered 95.3 grains. Hmmm, I thought, that doesn’t seem right. Then I re-weighed each of the last five bullets (which were in order in the loading tray). Each one measured 0.3 grains higher than originally. I use the zero reset function to re-tare. Same results–0.3 grains high. Next I removed the red cup, re-zeroed and re-weighed without the cup. The bullets were still reading 0.3 grains high. Somehow the scale had lost its calibration.

Accordingly, I recalibrated the scale twice and re-weighed the bullets a third time. This time, following recalibration, they mostly measured the same as the first time, but a few registered 0.1 grain higher.
It was clear from this exercise that the scale had drifted 0.3 grains in a relatively short period of time. Even after the scale was recalibrated, some of the measurements were slightly different. This is cause for concern, obviously, if you are weighing powders. With small cases such as the 6PPC and 6BR, 0.3 grains will make a big difference in pressure. If you think you are loading 30.5 grains of Varget when in fact you are actually loading 30.8 grains, you’re in trouble.
What can one do to avoid this problem? First, allow a long warm-up time for the scale–3 hours or more. Second, recalibrate the scale before each loading session. Third, keep a check-weight handy and use that frequently to see if your scale is drifting. Fourth, there is some evidence that running the scale off a “line conditioner” that provides regulated voltage can help. This PACT unit did not have a line conditioner in place during our tests. Lastly, the “ultimate solution” is upgrading your scale. A higher-grade scale, such as the $275.00 Denver Instrument MXX-123, shown below, is much less likely to experience the problems of inconsistent read-outs and drifting zeros.
Denver Instrument MXX-123:

July 10th, 2007
RELOADING TIP: Andris Silins has come up with a simple way to measure length to the lands in your rifle:
“Here’s what I did to find length to lands for seating my bullets. I made four cuts into the neck of fire-formed brass. Then I pressed the bullet in lightly and chambered the entire gauge. As the cartridge chambers, the bullet slides back into the case to give you length to lands. It took less than five minutes to get it cut and working. A little light oil in the barrel just past the chamber helps ensure the bullet does not get stuck in the lands. It works great and is very accurate.
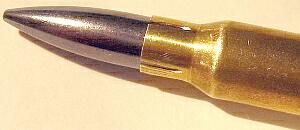
I made the cuts using a Dremel with a cut-off wheel. You can adjust tension two ways. First, you can make the cuts longer or shorter. Longer cuts = less tension. If you used only three cuts insted of four you would get more tension. The trick is to be gentle when you open and close the bolt. If you ram the bolt closed you may wedge the bullet into the lands. When you open the bolt it helps to keep a finger or two near by to guide the case out straight because the ejector wants to push it sideways.”
July 2nd, 2007
Here’s a great way to use an existing Stoney Point-style bullet comparator to measure smallbore case rim thickness. The Stoney Point tool, now sold by Hornady as the “Lock-N-Load Bullet Comparator“, comes with a red comparator body into which inserts of various calibers can be fitted. If you have a 6mm (.243) insert for the comparator, you can use it as a “poor man’s” rimfire rim-thickness gauge. It works perfectly for 22LR and 17HM2–just drop the rimfire round to be measured in the hole, and then slide the unit against the caliper jaws. For a slightly tighter fit, use the .223 insert and ream VERY slightly. But we think you’ll find the standard 6mm insert is just about perfect. We were able to get repeatable readings to about .0005″. This is an ideal “Zero-Cost” adaptation of a popular tool.

|


