|
|
June 29th, 2007
With the relentless pursuit of more velocity and the “next higher node” by many reloaders, it is important to pause and think about safety. And one has to remember that most brass will not hold up to high pressure the way Lapua or RWS does. Many readers have asked us–“How does one detect excess pressures.” Well first, one can obviously monitor the primer pockets and measure the diameter of the case near the web–excessive stretch or pocket loosening is a sure sign you’re running too hot. There are also many visual signs of over-pressure which you can see. Reader ScottyS provided this comparison photo of cases, showing the tell-tale signs of over-pressure.

Scotty tells us: “These samples were from a lot of Federal soft-point hunting ammunition that were fired in a custom .308 with a chamber on the tight side (although still allowing a .308 Winchester ‘GO’ gauge). Among the pressure symptoms were heavy recoil, sticky bolt lift, and the left case had to be manually removed from the boltface. This demonstrates why: 1) you should never assume that all lots of factory ammo are the same (and safe); and 2) you should ALWAYS wear eye protection. This also shows how high pressure can spike once you approach maximum load levels.” Scotty noted that there was a big pressure difference between the left case and the right case, although both were from the same lot of ammo. So take heed–always take precautions when testing new ammo, even if it is factory-loaded.
June 27th, 2007
Forum member Sunbuilder unveiled his new 6-6.5×47 Lapua Improved Varmint rifle today in our Forum. The stock is a beautiful hardwood laminate from Richard Franklin. It’s a rig to envy, with a Stiller Diamondback action, Lilja 30″ 8-twist barrel, and a NightForce 8x32x56 NXS on top. First class components all the way round. Sunbuilder (Scott) has had excellent success already–his two longest groundhog hits were at 778 and 810 yards. Scott writes: “I started hunting with my new rig last week, my first full custom rifle. It was inspired by 6mmBR.com–I’m not sure if I should thank you guys or curse you.” Scott has already seen the potential of his new cartridge: “My improved version of the 6×47 Lapua has a 40° shoulder and reduced body taper. Dave Kiff of PT&G did my reamer design, and he dubbed it the ‘Long Dasher’. The increased velocity potential of this cartridge is partially due to the slightly increased case capacity. The load I am shooting now is 40.5gr N160, Berger 105gr Match BT, .010″ jam, CCI BR4, .002″ neck tension at 3115 fps. This has an ES under 15 fps, and it will group under 2″ at 500 yards if conditions hold. This ‘Long Dasher’ (6-6.5×47) seems to have a lot of potential (and that’s an understatement).”
“I am learning to appreciate how small wind changes at longer ranges can turn a 1″ group into a 4″ one with just a slight shift! I tried several powders (H4350, N160, N560, H4831sc), and primers (CCI 450, BR4, Rem 7 1/2, Fed 205Ms). I got better velocity with H4350, but my barrel likes the N160. I did find a [high-speed] node with H4350.”

A Better Mount for the Spotter and Rangefinder
Scott designed and fabricated a very slick set-up to hold his Zeiss spotting scope and Leica CRF RangeFinder. He’s built a combo bracket that holds both units rock steady, with a parallel line of sight (same axis and elevation). Smart. Very smart. Scott explains: “I built a mount to connect my rangefinder to my spotting scope. The mount can be adjusted, so the spotting scope and rangefinder are both centered on the same object. The only way I have found to get repeatable long-range readings is to make them from a stable base.” Scott, we think you’ve got a winner here with your innovative and clever design. (And we like the idea of a 6-6.5×47 with a 40° shoulder.)

June 24th, 2007
Do you have a Wilson case trimmer but can’t afford the $84.00 to add the handy Micrometer upgrade (Sinclair Int’l item 05-4500)? Well Boyd Allen has come up with a clever use of a standard set of calipers that lets you set the cut length precisely within .001″. Just open the jaws of your caliper and put one jaw on the outboard end of the ring (with set screw) that holds the threaded length-adjusting rod. Set the other caliper jaw on the flat face at the end of the threaded rod that contacts the case rim. If you have a sample case set to the correct cut length, use that to set the position of the threaded rod. Then use your calipers to measure that length. This way you can repeat the cut length each time, or adjust the trimmed case precisely in .001″ increments.

If you change from one cartridge to another, just use your calipers to re-set the desired cut length. Alternatively, ReedG notes you can use the inside caliper jaws and measure directly from the end of the threaded rod to the cutter face. That’s a bit trickier, but it measures actual trim length.
June 20th, 2007
The $35.00 RCBS Precision MIC is a well-made and useful tool for measuring cartridge headspace and bullet seating depth. The Precision Mic measures from a datum point on the case shoulder to the base. Unfortunately the Precision MIC is not specifically made for the 6mmBR Norma, 22BR, 6XC or 6.5×47 Lapua cases. Don’t despair. Reader Caduceus has devised a clever way to adapt a .308 Winchester Precision Mic for short cases that match the .308 Win in rim diameter and case body diameter. He simply creates a spacer out of a pistol cartridge. He trimmed a 9mm case to 0.511″ and “found this to be a perfect fit which gave a zero micrometer reading when the FL-sized 6BR case was placed in it.”


 Caduceus explains: “I can use the 308 version of the RCBS Precision Mic to compare brass which has been fully sized in my 6BR body die with brass which has been fired in my chamber. With the spacer inserted, FL-resized cases mic 0.000” at the datum point on the shoulder. Using the same set-up, fire-formed cases measure +0.005”. In other words, my chamber has a headspace of +0.005″ above minimum dimensions. This is fairly typical of a custom rifle set up for switch-barrel use. If I were to FL-resize my brass down to minimum spec each time, this excessive working would shorten its life-cycle and might lead to case head separation. Now that I know the headspace of the chamber, I can substitute the standard shell holder on my press with a Redding +0.004” competition shell-holder. This ensures that my cases only receive 0.001” of shoulder set-back.” Caduceus explains: “I can use the 308 version of the RCBS Precision Mic to compare brass which has been fully sized in my 6BR body die with brass which has been fired in my chamber. With the spacer inserted, FL-resized cases mic 0.000” at the datum point on the shoulder. Using the same set-up, fire-formed cases measure +0.005”. In other words, my chamber has a headspace of +0.005″ above minimum dimensions. This is fairly typical of a custom rifle set up for switch-barrel use. If I were to FL-resize my brass down to minimum spec each time, this excessive working would shorten its life-cycle and might lead to case head separation. Now that I know the headspace of the chamber, I can substitute the standard shell holder on my press with a Redding +0.004” competition shell-holder. This ensures that my cases only receive 0.001” of shoulder set-back.”
Click HERE for a full article explaining how to adapt an RCBS Precision Mic for use with a 6BR. You can do the same thing with a 6XC or 6.5×47 case–just cut the spacer to a shorter length (for an 0.000″ mic reading). Note: You can also use this procedure with an RCBS .243 Winchester Precision Mic.
June 15th, 2007
Precision shooters favor premium brass from Lapua, Norma, or RWS. (Lake City also makes quality brass in military calibers.) Premium brass delivers better accuracy, more consistent velocities, and longer life. Shooters understand the importance of good brass, but many of us have no idea how cartridge cases are actually made. Here’s how it’s done.
The process starts with a brass disk stamped from strips of metal. Then, through a series of stages, the brass is extruded or drawn into a cylindrical shape. In the extrusion process the brass is squeezed through a die under tremendous pressure. This is repeated two or three times typically. In the more traditional “draw” process, the case is progressively stretched longer, in 3 to 5 stages, using a series of high-pressure rams forcing the brass into a form die. While extrusion may be more common today, RWS, which makes some of the most uniform brass in the world, still uses the draw process: “It starts with cup drawing after the bands have been punched out. RWS cases are drawn in three ‘stages’ and after each draw they are annealed, pickled, rinsed and subjected to further quality improvement measures. This achieves specific hardening of the brass cases and increases their resistance to extraordinary stresses.”

After the cases are extruded or drawn to max length, the cases are trimmed and the neck/shoulder are formed. Then the extractor groove (on rimless cases) is formed or machined, and the primer pocket is created in the base. One way to form the primer pocket is to use a hardened steel plug called a “bunter”. In the photos below you see the stages for forming a 20mm cannon case (courtesy OldAmmo.com), along with bunters used for Lake City rifle brass. This illustrates the draw process (as opposed to extrusion). The process of draw-forming rifle brass is that same as for this 20mm shell, just on a smaller scale.


River Valley Ordnance explains: “When a case is being made, it is drawn to its final draw length, with the diameter being slightly smaller than needed. At this point in its life, the head of the draw is slightly rounded, and there are no provisions for a primer. So the final drawn cases are trimmed to length, then run into the head bunter. A punch, ground to the intended contours for the inside of the case, pushes the draw into a cylindrical die and holds it in place while another punch rams into the case from the other end, mashing the bottom flat. That secondary ram holds the headstamp bunter punch.

The headstamp bunter punch has a protrusion on the end to make the primer pocket, and has raised lettering around the face to form the headstamp writing. This is, of course, all a mirror image of the finished case head. Small cases, such as 5.56×45, can be headed with a single strike. Larger cases, like 7.62×51 and 50 BMG, need to be struck once to form a dent for the primer pocket, then a second strike to finish the pocket, flatten the head, and imprint the writing. This second strike works the brass to harden it so it will support the pressure of firing.”
Thanks to Guy Hildebrand, of the Cartridge Collectors’ Exchange, OldAmmo.com, for providing this 20mm Draw Set photo. Bunter photo from River Valley Ordnance, RVOW.com.
June 14th, 2007
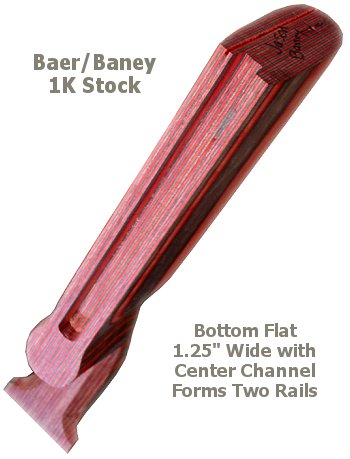
Thanks to sponsors Bruce Baer, Bartlein Barrels and smiths Mark King and Alex Sitman, we are developing a new long-range project gun with two barrels, one chambered in 6mm-6.5×47 and the other in 6.5×47 Lapua. For this project, Jason wanted a hybrid stock that combined features of the popular MBR Tooley-style stock, with an I-beam style fore-end, plus something new and different in the rear.


The new stock, crafted by Bruce Baer, features an I-beam style fore-end with long, straight flats similar to a McMillan Edge™ short-range BR stock. The underside of the fore-end is relieved to allow smoother tracking over a front sand bag. We’ve noticed a trend to wider flats in the back, so we specified a 1.25″ rear flat. We didn’t want to go ultra-wide (2.0″ +) to keep weight manageable and so that a conventional blank (1.5″ wide at comb) could be used. We were also concerned about friction and bag-handling if the flat was too wide. To lessen drag and improve tracking, Jason told Bruce to cut a relieved area, or “channel” in the underside of the toe. The idea here was to reduce friction and to provide improved contact with the ears of the rear bag. With a very wide flat, there is a tendency to ride on the stitching between the ears. With this design, we hope, the left and right edges of the rear flats will engage the ears.
June 3rd, 2007
Gun journalist and three-gun match competitor Zak Smith employs a simple, handy means to store come-up data on ones rifle in the field–a laminated data card. First generate a come-up table, using one of the free online ballistics programs such as JBM Ballistics. You can also put the information in an Excel spreadsheet or MS Word table and print it out. You want to keep it pretty small.
Below is a sample of a data card. For each distance, the card includes drop in inches, drop in MOA, drop in mils. It also shows drift for a 10-mph cross wind, expressed three ways–inches, MOA, and mils. Zak explained that “to save space… I printed data every 50 yards. For an actual data-card, I recommend printing data every 20 or 25 yards.” But Zak also advised that you’ll want to customize the card format to keep things simple: “The sample card has multiple sets of data to be more universal. But if you make your own data card, you can reduce the chance of a mistake by keeping it simple. Because I use scopes with MILS, my own card (bottom photo) just has three items: range, wind, drop in MILS only.”

Once you have the card you can fold it in half and then have it laminated at a local office store or Kinko’s. You can keep this in your pocket, tape it to your stock, or do as Zak does, and tie the laminated card to his rifle (see photo below). One thing to keep in mind is that both bullet drop and wind drift can change with altitude and ambient temperature. If you regularly shoot at both low and high altitudes, you may want to create multiple cards. To learn more about ballistic tables and data cards, check out the excellent “Practical Long-Range Rifle Shooting–Part 1″ article on Zak’s website. This article offers many other insights as well–including valuable tips on caliber and rifle selection.

May 30th, 2007
There’s been some controversy surrounding the “ideal” 6mm bullet diameter. This is compounded by the fact that 6mm match barrels are available with both .236″ and .237″ land diameters. It has become quite clear to us that bullet diameter is an important variable to consider when choosing the best projectile for your particular barrel. Some barrels prefer “fat” bullets while other barrels prefer “skinny” bullets.
Jason Baney recently took the time to measure 12 different sets of 6mm Match Bullets, including a couple different lots of the same bullet design. Interestingly, Jason did measure the “old” Berger 105 VLD, the “new” Berger 105 VLD (first lot from the new die), and the “new, improved” Berger 105 VLD from the new die, after it was polished. Ten (10) Bullets were measured per type. Each bullet was measured three times (3X) around the largest circumference, normally where a pressure ring would be located (some bullets have a pronounced pressure ring, others do not).

Download this CHART as an MS Word Document.
Columns one and two of the chart show the smallest and largest bullet diameters measured for each 10-bullet sample. The third column shows the extreme spread over each 10-bullet set. Note, these numbers are NOT averages, but represent the “low” and “high” diameters for each set. (FYI: Jason noted that while the Lapua Scenars measured very consistently the earlier 2005 “JEVDAK” lot had noticeably smaller meplats than the current 2007 lot.) A Mitutoyo Micrometer was used, zero-checked for each bullet.
May 27th, 2007
For the past year, Forum member John Skowron (John708) has been campaigning a 6BRX, built by Nat Lambeth (RustyStud). You’ll find the full history of John’s 6BRX project in this Forum Thread. With this rifle, John was the overall 1000-yard winner at Butner in February 2007.
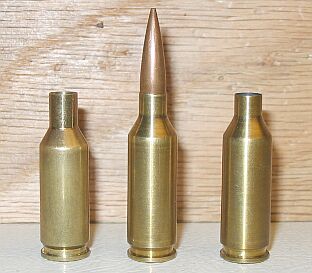
The 6mm BRX is based on the 6mm BR cartridge. The shoulder is moved forward, but the shoulder angle and case taper is the same as the parent cartridge. This way you can use standard dies for most purposes (although it is a good idea to have a custom full-length die so you can size the entire case body). Many of our readers have been interested in the 6mm Improved (BRX, Dasher etc.), but they’ve wondered about case durability and barrel life. John has answers for those questions:
6BRX Case Life
Case life running the Berger 105s at 3000+ fps is 14-15 reloads. Brass was discarded when the primer pockets became too loose. The 6BRX brass OAL after fireforming is 1.56″. Max OAL for the 6BRX is 1.58″. The brass never stretched enough to require trimming before discard. Anouther plus for the 6BRX and Lapua brass.
By the way don’t even bother with Remington-brand 6BR brass. The primer pockets were so loose after my standard fire-forming load I had to trash all the cases. Stick with the good stuff, Lapua.
6BRX Barrel Life
I now have 2570 rds through my 6mm BRX. I was just at the range today doing an accuracy test. I shot two 10-shot groups at 100 yards, one with 105gr Bergers, and the other with 107gr Sierras. Both were identical 0.44″ groups. Not bad for a rifle with 2500+ rounds through it.
Achieving this barrel life goal pretty much completes my 6mm BRX project. I’m now shooting a cartridge that has the same or better barrel life than the 260 Rem, it’s more accurate, with essentially equal wind drift. I’ll continue to post updates on barrel life. I think this barrel will last for another several hundred rounds.
Heavier Bullets
As far as shooting the DTAC 115s goes, I’ve temporarily abandoned that effort. The 105 Bergers, running 3050-3100 fps, give up very little wind drift to the 115s running at 2900-2950 fps. You might potentially get 3000 fps with the 115s using H4350 and throating the chamber to seat the bullets out. But since I very happy with the 105s and the way they’re performing at long range, I’m not going to change for now. [Editor’s Note: The Berger 105s in John’s latest reports were lot #559, from Berger’s new die.]
May 25th, 2007
Lapua brass is so good that you’ll be tempted to just load and shoot, if you have a “no-turn” chamber. However, some minimal case prep will ensure more uniform neck tension. This will produce better accuracy, more consistent bullet seating, and lower Extreme Spread and Standard Deviation (ES/SD). Lapua brass, particularly 6BR, 6.5×47, .243 Win and .308 Win comes from the factory with tighter-than-optimal necks. Before you seat bullets, at a minimum, you should inside chamfer the case mouths, after running an expander mandrel down the necks. The expander mandrels from both Sinclair and K&M will both leave the necks with enough neck tension (more than .001″) that you can then seat bullets without another operation. Put a bit of lube on the mandrel before running it down the necks–but remove any lube that gets inside the necks before seating bullets.
Both Sinclair and K&M Tools make a die body specifically to hold expander mandrels. The Sinclair version, item NT-EXP, is shown below. This $17.90 unit fits caliber-specific expander mandrels ($7.95) which measure approximately .001″ less than bullet diameter for each caliber. Once you run the Sinclair expander mandrel down the necks of Lapua brass, after you account for brass spring-back, you’ll have about .002″ neck tension. This will make the process of seating bullets go much more smoothly, and you will also iron out any dents in the case mouths. Once the case mouths are all expanded, and uniformly round, then do your inside neck chamfering/deburring. The same expander mandrels can be used to “neck-up” smaller diameter brass, or prepare brass for neck-turning. Note: an alternative to this procedure is to full-length size every case with an expander ball in place, prior to loading. That works too, but many reloaders may prefer to simply expand the necks, when using Lapua brass.

|


