|
|
May 22nd, 2007
Larry Medler has come up with another smart little invention–a simple, inexpensive Empty Chamber Indicator for rimfire rifles. It is made from a section of plastic “weed-wacker” line and a wooden ball from a hobby shop.

Larry explains: “At all Highpower rifle matches, silhouette matches, and other shooting events I have attended, Open Bore Indicators (OBI), or what are now called Empty Chamber Indicators (ECI) have been mandatory. The NRA’s yellow ECI for Highpower rifles is easy to use and has been well-received by the shooters. However, I have not seen ECIs used much for smallbore matches. In fact I had not seen a truely workable ECI for 22 rimfire rifles–until I visited Michigan’s Washtenaw Sportsman’s Club where I saw juniors using ECIs for their 17 Caliber Air Rifles. Someone at the club made the empty chamber indicators by attaching an 8″ piece of weed wacker line to a 1″-diameter wooden ball, painted bright yellow. I now make similar ECIs for the 22 rimfire silhouette matches I run.”
Construction Method: First, drill a 7/64” diameter hole all the way through the 1″-diameter wooden ball. Then enlarge half of that 1″-long hole using a 13/64” diameter drill. Next insert an 8″ piece of heavy duty (0.095″ diameter) weed wacker line through the ball, leaving about 2″ on the side with the bigger-diameter hole. Then, with the short end of the line, fold over the last half-inch so the line is doubled-over on itself. Then slide the line into the ball, stuffing the doubled-over section through the 13/64″ (large) hole. Finally, pull the longer end of the line until the doubled-over section is flush with the outside of the ball. This gives you a sturdy line attachment without messy adhesives. When the assembly’s complete, hold the ECI by the tail and dip the ball in yellow paint. If you’re making more than one ECI, you can drill horizontal holes in a spare block of wood and use that as a drying rack.
May 13th, 2007
 Among the many helpful and FREE services offered by Sierra Bullets, is the “X-Ring” Technical Newsletter. With contributions by bullet designers and Sierra’s team of tech experts, the X-Ring provides some great info on bullets and general reloading matters. Among the many helpful and FREE services offered by Sierra Bullets, is the “X-Ring” Technical Newsletter. With contributions by bullet designers and Sierra’s team of tech experts, the X-Ring provides some great info on bullets and general reloading matters.
Here are Questions answered by Sierra’s Carroll Pilant in the X-Ring.
Q. [Why do] some cases chamber easily, while others you almost have to crush them into the chamber when they are all the same batch of cases and all been full length sized?
A. The expander ball is pulling the neck / shoulder area up as it pulls out of the case. It usually squeaks as it comes out. Cure–Lube the inside of the case neck better, or slightly decrease the diameter of the expander ball ( about .003 under bullet diameter at the most ) and polish or both.
Q. I have a rifle that has a long throat and it doesn’t shoot boat tail bullets very well at all.
A. Try a flat-base bullet. They will often shoot better in a long throated or a worn throat gun than the boat tail bullets.
Q. Why do my case necks have a lot of smoke residue all the way down the case neck?
A. This usually comes from a mild load that doesn’t have enough pressure to seal the case neck against the chamber wall or the case necks have work hardened and aren’t sealing. Cure–Bump the powder charge up if it is a mild load; and, if the case necks have work hardened, either anneal the brass or replace it with new.
And here are some of Carroll’s Reloading Tips:
● When using a collet style case trimmer, try to tighten the collet down equally each time to keep lengths uniform. If you tighten it down hard, the case will be longer than one you tighten down lightly.
● A little lube on the pilot and cutter on a case trimmer every few cases will help keep it from trying to gall in the case mouth and helps keep the blades sharp and cutting smoothly. It makes trimming an easier task.
● Just because two bullets weigh the same doesn’t mean they can be loaded the same. The amount of bearing surface can vary drastically.
Editor’s Note: This last point by Carroll is something we have to emphasize often to novice reloaders. Not only do same-weight bullets vary in bearing surface, but you can have variances in shank diameter up to .001″ among bullets of the same weight and nominal diameter. Yes there are “skinny” bullets and “fat” bullets. Obviously the fatter bullets (given similar bearing surface) create more drag in the bore and this will affect the appropriate load.
SIERRA BULLETSMITHS — 1.800.223.8799

Back Row: Robert Treece | Carroll Pilant | Rich Machholz
Front Row: Duane Siercks | Paul Box | David Brown
May 12th, 2007
A friend of ours recently took delivery of a new barrel which was chambered by a smith who had done the original build on the rifle, but who had not headspaced the barrel on the action itself this time. The smith headspaced based on his old records. Our friend happily screwed on his nice, new barrel and headed to the range. After the first few rounds, with known, safe loads, he was seeing deep craters on his primers, and then he even pierced a few primers with loads that should never have done that. Interestingly, the brass was not showing any of the other pressure signs. This was with bullets seated .015″ out of the rifling.
We were thinking maybe too much firing pin extrusion or maybe he got a hot lot of powder. Then I asked him to email me dimensions off his fired cases compared to new, Lapua brass. He emailed me that his shoulder moved 0.0105″ forward. I sent an email back saying, “hey, that must be a typo, you meant 0.0015″ right–so your shoulder moved one and a half thousandths correct?” The answer was “No, the shoulder moved over TEN thousandths forward”. Ahah. This explained some of the cratering problem in his brass. His cases were able to bounce forward enough in the chamber so that the primer material was smearing over the firing pin. And now he has brass that is “semi-improved”.
The point of the story is always check your headspace when you receive a “pre-fit” barrel, even from the smith who built the rifle. Purchase Go/No Go gauges for all your calibers. Headspace is not just an accuracy issue, it can be a safety issue. Pierced primers are bad news. The debris from the primer cup can blow into the firing pin hole or ejector recess causing a myriad of problems.

May 7th, 2007
 Remotely-mounted video monitors offer many benefits for precision shooters. With an outboard LCD monitor, one can shoot “heads up” while watching downrange conditions and wind flags. Moreover one will no longer have to struggle with ultra-critical eye relief or strain to stay centered on a tiny exit pupil (as small as 1mm on high-magnification scopes). A remote screen that displays the view from the scope has obvious advantages for disabled shooters, and for military snipers (who can stay completely concealed). Varmint hunters operating at night and in low-light can also benefit, as the image from the scope can be boosted electronically to appear much brighter on the display. Remotely-mounted video monitors offer many benefits for precision shooters. With an outboard LCD monitor, one can shoot “heads up” while watching downrange conditions and wind flags. Moreover one will no longer have to struggle with ultra-critical eye relief or strain to stay centered on a tiny exit pupil (as small as 1mm on high-magnification scopes). A remote screen that displays the view from the scope has obvious advantages for disabled shooters, and for military snipers (who can stay completely concealed). Varmint hunters operating at night and in low-light can also benefit, as the image from the scope can be boosted electronically to appear much brighter on the display.
Alamo Four Star of Texas has pioneered a video display for hunters and disabled shooters, the Deros Vision System. In the pictures below, you can see the system mounted on a rifle and also placed on a Deros rifle fixture used by a disabled shooter. Priced at $995.00, the Deros Vision System is not cheap, but its benefits are obvious for special applications. We predict that, with time, major optics makers will all offer some kind of digital viewing system that can function with spotting scopes and rifle optics. The gimbaled mechanical gun fixture, sold separately, can be mounted directly to a wheelchair.


May 6th, 2007
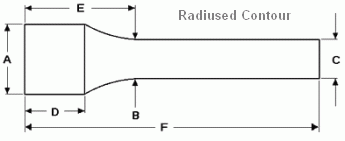
 Are you re-barreling a BR rifle and need to know if you will still make weight? Or perhaps you are trying to select the right contour to hit an optimal carry weight for a new varmint rifle? Dan Lilja offers FREE software that will calculate barrel weight for straight contour, straight taper, and radius-tapered barrels. Dan’s software even calculates how fluting alters barrel weight. Are you re-barreling a BR rifle and need to know if you will still make weight? Or perhaps you are trying to select the right contour to hit an optimal carry weight for a new varmint rifle? Dan Lilja offers FREE software that will calculate barrel weight for straight contour, straight taper, and radius-tapered barrels. Dan’s software even calculates how fluting alters barrel weight.
For general info on barrel weight calculation for straight and straight tapers, read this article on Lilja’s website. Click HERE for another article explaining weight calculation with barrels that have a radiused (curved) contour section.
Here are the free software programs offered by Dan Lilja. Right click and “Save As”:
Straight Contour (.exe file) | Straight Contour (Excel file)
Contoured Barrels with Radius (Excel file)
April 22nd, 2007
Regular readers of this website will know that we are big fans of Wipe-Out™ from SharpShoot-R™ Precision Products. Wipe-Out™ really works, and can save countless hours of cleaning, plus reduce wear and tear on your barrels. (Click HERE for related article.) The only shortcoming of Wipe-Out™ foam cleaner is that you’ll need to wait an hour or more to get the best cleaning results. This editor’s barrels like two applications of Wipe-Out with four hours total dwell time. Terry Paul, inventor of Wipe-Out™, has come up with a solution for shooters who want the benefits of Wipe-Out™ without the extended wait time.
 Terry’s new Patch-Out™ product is a non-petroleum-based liquid solvent that is effective on carbon and copper fouling. It does the job with just 15-25 minutes of soak time in the barrel. Unlike many other solvents, it does not leave a gummy residue in your barrel, and it doesn’t have to be “neutralized” after use. Terry’s new Patch-Out™ product is a non-petroleum-based liquid solvent that is effective on carbon and copper fouling. It does the job with just 15-25 minutes of soak time in the barrel. Unlike many other solvents, it does not leave a gummy residue in your barrel, and it doesn’t have to be “neutralized” after use.
Patch-Out™, as the name indicates, is applied with wet cotton patches. You can also use a brush, but you’ll probably find that you’ll get excellent results with only minimal brushing. After applying Patch-Out™, and letting it soak for 15-25 minutes, just use a dry patch. Because Patch-Out™ has a rust inhibitor, you don’t need to follow up with oil. Patch-Out™ is also safe to leave in your barrel overnight, just like Wipe-Out™. There is some evidence that, if you use a non-petroleum-based solvent such as Patch-Out™ and no oil, you can shoot more rounds through your barrel before a stubborn carbon ring will form just ahead of the throat. This is because that carbon ring is actually created, in part, from the “burn-off” of petroleum-based solvents and lubes. Patch-Out™ will be available from major suppliers including Brownells, MidwayUSA, and Midsouth Shooters Supply.
April 20th, 2007
 Reader Richard H. just tested his new CED M2 Chronograph, one of the first units in the country. This is an all-new design with many upgrades over the previous CED Millenium model. Clock speed was boosted to 48 mHz, expanding the measurable velocity range to 7,000 fps. Memory storage has been expanded 500%. You can now have up to 500 speed readings per string (and as many as 500 strings). CED claims: “Expanded digital chip design now gives the CED M2 the ability of reading velocities at much lower light levels. On clear days, this means the ability to chronograph from early morning till almost sunset.” If this claim is true, the CED M2 would definitely out-perform rival PACT and Shooting Chrony designs in marginal light conditions. Reader Richard H. just tested his new CED M2 Chronograph, one of the first units in the country. This is an all-new design with many upgrades over the previous CED Millenium model. Clock speed was boosted to 48 mHz, expanding the measurable velocity range to 7,000 fps. Memory storage has been expanded 500%. You can now have up to 500 speed readings per string (and as many as 500 strings). CED claims: “Expanded digital chip design now gives the CED M2 the ability of reading velocities at much lower light levels. On clear days, this means the ability to chronograph from early morning till almost sunset.” If this claim is true, the CED M2 would definitely out-perform rival PACT and Shooting Chrony designs in marginal light conditions.
We’ve found that, with most chronographs, the biggest problems are confusing controls and keypad sequences that are hard to remember. CED has addressed that with the new machine. The $199.00 CED M2 Chronograph features single function string removal (something we wish the Shooting Chrony had), and the M2 offers “one touch” calculation of the average of the three highest velocities in a string. Another major (and much appreciated) improvement is the addition of a USB interface. That offers simple “plug and play” compatibility with laptops and home PCs. USB connectivity will make it much easier to download Chrono data into the updated CED Data Collector software. For more info, contact Competitive Edge Dynamics, CEDHK.com, (610) 366-9752. Right now the CED M2 is back-ordered, but a new shipment is arriving in 2 weeks and M2s should be available by mid-May at Brownells and MidwayUSA.com.

Richard tells us: “I’ve been frustrated for a long time with my inability to get my extreme spreads below 30-50 fps and have wondered if my bargain-basement Chrony F-1 might be part of the problem. Well, after I got my Denver Instruments MXX-123 last month, the powder scale was no longer a credible culprit, so I went shopping for a new chrono. This is what I found. Initial results (only three 5-shot groups so far) suggest that ES with the CED M2 is only half of what the Chrony measured. In the Chrony’s defense though, it is surprisely good for something that costs less than half as much (also more convenient and more portable).” If anyone in the Sacramento, CA area has an Oehler Chrono, Richard would like to do a 3-way comparision test with the CED, Oehler, and Shooting Chrony. We’d all be interested in the results. Contact Mailbox@6mmBR.com and we’ll put you in touch with Richard.
April 8th, 2007
 Most rear sand-bags (from Edgewood, or Protektor, or SEB) are optimized for use on the bench with low-profile stock designs like the McMillan Edge or Kelbly Klub. If you use these bags when shooting from the ground F-Class style or with bipod, you may find the rifle is too low to the ground for comfort. Yes you can suck in your belly and crank down your front rest, but it makes more sense to elevate the rear bag. Jason Baney has a simple solution that costs under $4.00 in materials. Most rear sand-bags (from Edgewood, or Protektor, or SEB) are optimized for use on the bench with low-profile stock designs like the McMillan Edge or Kelbly Klub. If you use these bags when shooting from the ground F-Class style or with bipod, you may find the rifle is too low to the ground for comfort. Yes you can suck in your belly and crank down your front rest, but it makes more sense to elevate the rear bag. Jason Baney has a simple solution that costs under $4.00 in materials.
Get a small 12″x12″ section of 1″ thick plywood and trim it to fit the base of your bag, leaving maybe 1/2″ extra on all sides. Then get some rubberized, waffle-pattern GRIP-IT shelf-liner from your local home improvement center. Alternatively, if you want a more rigid base (with less ‘give’) for hard, flat ground, use high-durometer unlined Neoprene, available from industrial supply shops. Glue a layer of shelf liner or Neoprene on the bottom and top of the plywood. This will give good grip on your shooting mat and provide a stable, non-slip surface for the base of your sandbag. If you need more elevation, just use a thicker piece of wood, or sandwich two pieces together. If you have a heavy recoiling rifle and need a riser with more mass, put a metal plate (same dimensions) between the plywood and the bottom layer of rubber shelf-liner/neoprene. If you want a bag riser without the work of trimming and glueing, Dave Dohrmann sells high-durometer Neoprene riser pads in 1/2″ through 1″ thicknesses, starting at $25. Call Dave at 864-884-0155 or email dbugholes[@]aol.com. With textured surfaces top and bottom, Dave’s heavy pads work equally well to elevate your bag on the bench.

April 4th, 2007
Chris Long (Techshooter) has produced a detailed article on how to form 260 Remington Ackley Improved Cases. With nice, big photos illustrating the process, Chris explains how to form your cases, using either bullets, or an inert filler (no projectile). Chris also covers how to place a false shoulder in the cases prior to fire-forming. This creates a slight crush-fit, helping the shoulders to form more reliably, with fewer split necks. Chris formed cases using both Remington-brand 260 Rem cases, and Lapua .243 Win cases necked up to 6.5mm. Chris discusses how doughnuts can form when necking-up .243 Win brass and how doughnuts can interfere with bullet seating. Chris then explains how to remove the doughnuts using inside neck reaming. Click HERE to read article.

April 4th, 2007
On AccurateShooter.com’s Ballistics Page, you’ll find the excellent JBM Ballistics program. This not only calculates bullet trajectory with great precision, but will also output clicks so you can create your own “come-up” chart to keep with your rifle. In addition, you can download FREE versions of Pejsa and Point Blank ballistics software. Point Blank is also a database that stores your favorite loads. Pejsa, an Excel spreadsheet with a sophisticated drag formula, is a great choice for VLD bullets (.Zip version). We normally store loads in Point Blank (resident on the computer), and generate come-up tables with JBM or Pejsa (for VLDs).
Here are links to more FREE Ballistics programs:
Big Game Info Ballistics Calculator
NFA Ranging Ballistics Computer (Excel file Download)
Federal Cartridge Ballistics (for loaded ammo)
Remington Shoot Ballistics Software (Software Download)
Shooting Times Ballistics
(Choose caliber for sample ballistics by bullet weight.)

|


