This thought-provoking article is one of the 15 most popular Daily Bulletin features over the last 12 months. We are republishing this story today for readers who may have missed it the first time around…
Here’s a little known fact that may startle most readers, even experienced gunsmiths: your barrel wears out in a matter of seconds. The useful life of a typical match barrel, in terms of actual bullet-in-barrel time, is only a few seconds. How can that be, you ask? Well you need to look at the actual time that bullets spend traveling through the bore during the barrel’s useful life. (Hint: it’s not very long).
Bullet-Time-in-Barrel Calculations
If a bullet flies at 3000 fps, it will pass through a 24″ (two-foot) barrel in 1/1500th of a second. If you have a useful barrel life of 3000 rounds, that would translate to just two seconds of actual bullet-in-barrel operating time.
Ah, but it’s not that simple. Your bullet starts at zero velocity and then accelerates as it passes through the bore, so the projectile’s average velocity is not the same as the 3000 fps muzzle velocity. So how long does a centerfire bullet (with 3000 fps MV) typically stay in the bore? The answer is about .002 seconds. This number was calculated by Varmint Al, who is a really smart engineer dude who worked at the Lawrence Livermore Laboratory, a government think tank that develops neutron bombs, fusion reactors and other simple stuff.
On his Barrel Tuner page, Varmint Al figured out that the amount of time a bullet spends in a barrel during firing is under .002 seconds. Al writes: “The approximate time that it takes a 3300 fps muzzle velocity bullet to exit the barrel, assuming a constant acceleration, is 0.0011 seconds. Actual exit times would be longer since the bullet is not under constant acceleration.”
We’ll use the .002 number for our calculations here, knowing that the exact number depends on barrel length and muzzle velocity. But .002 is a good average that errs, if anything, on the side of more barrel operating life rather than less.
So, if a bullet spends .002 seconds in the barrel during each shot, and you get 3000 rounds of accurate barrel life, how much actual firing time does the barrel deliver before it loses accuracy? That’s simple math: 3000 x .002 seconds = 6 seconds.
Gone in Six Seconds. Want to Cry Now?
Six seconds. That’s how long your barrel actually functions (in terms of bullet-in-barrel shot time) before it “goes south”. Yes, we know some barrels last longer than 3000 rounds. On the other hand, plenty of .243 Win and 6.5-284 barrels lose accuracy in 1500 rounds or less. If your barrel loses accuracy at the 1500-round mark, then it only worked for three seconds! Of course, if you are shooting a “long-lived” .308 Win that goes 5000 rounds before losing accuracy, then you get a whopping TEN seconds of barrel life. Anyway you look at it, a rifle barrel has very little longevity, when you consider actual firing time.
People already lament the high cost of replacing barrels. Now that you know how short-lived barrels really are, you can complain even louder. Of course our analysis does give you even more of an excuse to buy a nice new Bartlein, Krieger, Shilen etc. barrel for that fine rifle of yours.
You may have heard the phrase “blueprinting an action”, but do you know what that really means? Do you know what operations are done to an action during the blueprinting process? To help you understand, gunsmith Bill Marr of RifleShooter.com has created a helpful article showing a Rem 700 blueprinting job start to finish. This article spotlights how the procedures can be done with manual tools. Bill, who runs 782 Custom Gunworks Ltd., can also perform many of these operations with modern automated machinery. In fact, Bill has written a follow-up article on Truing a Rem 700 receiver with a Lathe.
Bill explains: “Blue-printing, or truing a rifle action, ensures the receiver face, threads, lugs, bolt lugs, and bolt face are square to the center line of the receiver.” In Bill’s informative article, Bill shows how he blueprints a Remington 700 short action receiver with .308 Win bolt face. He covers the following procedures step by step:
Action Disassembly
Ream Minor Diameter of Receiver Threads
Square the Receiver Lugs
Square the Face of the Receiver
Lap the Bolt Lugs
Square the Bolt Face
Bill employed a variety of tools from Brownells to complete the blueprinting job, including: Remington 700 Armorer’s Kit; Manson Receiver Accurizing Kit; Bolt Lapping Kit; Bolt Face Truing Tool; Manson Receiver Ring Facing Cutter; Multi-Vise with Jaw Pads; Silicone Carbide Abrasive; and Do-Drill Cutting Oil.
Highlights from the Rifleshooter.com article:
1. Chasing the Threads
We use the bushings to guide the receiver tap. This chases the threads and ensures they are square.
2. Truing the Receiver Face
Using the receiver facing tool, the front of the receiver is trued. The tool is placed over the tap and turned by hand. We used Do Drill to lubricate it.
3. Lapping the Lugs
The bolt lapping tool screws into the front of the action and applies rearward pressure on the bolt face. A little bit of lapping compound is placed on the front of the receiver lugs. The bolt handle is then raised and lowered repeatedly. Note — it is critical that we do not get any lapping compound on any other surfaces.
4. Truing the Bolt Face
On this bolt, the central part of the bolt face was low. After the truing operation, this Rem 700 bolt face is now completely square to the action.
IMPORTANT: Rifleshooter.com states: “This article highlights our project and is presented for information purposes only. This provides an overview of the process and should not be attempted without the guidance and supervision of an experienced gunsmith“.
Bryan Litz and The Science of Accuracy Academy delivered a notable Podcast with vital information for all handloaders. This Podcast examines the effects of humidity variances on powder. Bryan notes: “If you want to know how much this can matter, we’re talking up to 200 fps difference for the same load of H4350 in 6.5 Creedmoor” at opposite extremes of humidity.
Bryan adds that “Most shooters don’t realize what a big deal this can be — it overshadows many of our efforts to make consistent velocity and hit targets. This can happen in loaded rounds not just for hand loading where you expose powder to ambient humidity. This is especially important for hunters considering the range of environments hunting ammo goes through.”
CLICK the above graphic to access first half of Podcast for free.
BONUS — Four More Science of Accuracy Podcasts
Here are four more of our favorite Podcasts from Bryan Litz’s Science of Accuracy Academy. Click on each item to hear the first half of each podcast for free.
Want More? Subscribe to The Science of Accuracy Academy
If you’d like to benefit from hearing ALL the full-length Science of Accuracy Academy Podcasts you can get a subscription to the Academy for just $9.95 per month. This grants you access to all Podcasts, exclusive videos, learning resources, and bullet data sheets.
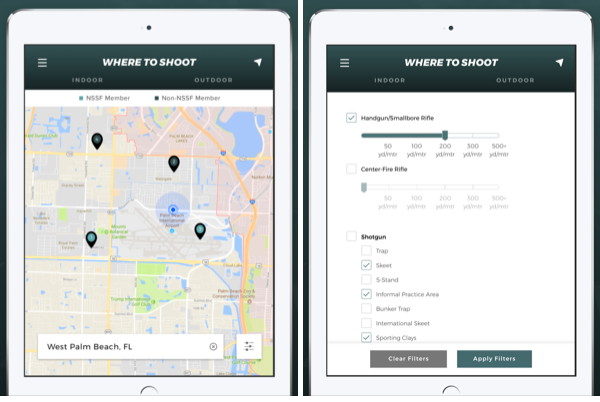
The Where To Shoot Mobile App quickly locates shooting ranges near you, drawing on North America’s most comprehensive directory of shooting ranges. Users can search by current location, state, or zip code. Once you locate a range, you can view activities offered along with a summary of range facilities. You can even get driving directions. If you don’t want to install an App, you can also access the NSSF shooting range database and maps via the NSSF Where-to-Shoot webpage.
The app is modeled after NSSF’s popular WhereToShoot.org® website and is updated frequently with range information for every U.S. state and Canadian province. Once you’ve located a place to shoot, the App can provide directions to the range. The App also includes video tips for shooters, news, and firearm-safety information.
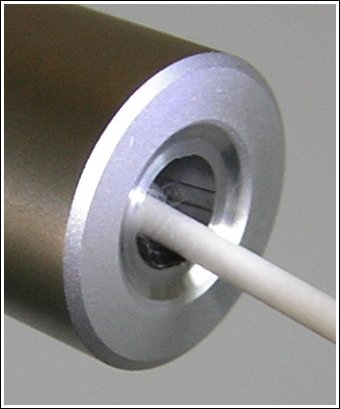
The last half-inch or so of your barrel is absolutely critical. Any damage (or abnormal wear) near the crown will cause a significant drop-off in accuracy. Here are ways you can check the end of your barrel, using a common Q-Tip.
Use Q-Tip for Barrel Inspection To find out if you have a burr or damage to your crown, you can use an ordinary Q-tip cotton swab. Check the edges of the crown by pulling the Q-tip gently out past the edge of the crown. If you have a burr, it will “grab” the cotton and leave strands behind.
Larry Willis has another way to use a Q-Tip: “Here’s a neat trick that will surprise you with how well it works.” Just insert a Q-Tip into your barrel (like the picture below), and it will reflect enough light so that you can get a real good look at the last half inch of rifling and the crown of your barrel. In most cases you’ll find that this works much better than a flashlight. Larry tells us: “I’ve used this method about a jillion times. Q-Tips are handy to keep in your cleaning supplies anyway. This is a good way to judge approximately how well you are cleaning your barrel when you’re at the range. It’s also the best way to examine your barrel when you’re in the field.”
Nikon offers eyepieces with reticles for its flagship Monarch Fieldscopes. Eyepiece reticles help spotters call shot corrections with precise click values (MOA or Mils).
Using a spotting scope seems simple. Just point it at the target and focus, right? Well, actually, it’s not that simple. Sometimes you want to watch mirage or trace, and that involves different focus and viewing priorities. Along with resolving bullet holes (or seeing other features on the target itself), you can use your spotting scope to monitor mirage. When watching mirage, you actually want to focus the spotting scope not on the target, but, typically, about two-thirds of the distance downrange. When spotting for another shooter, you can also use the spotting scope to watch the bullet trace, i.e. the vapor trail of the bullet. This will help you determine where the bullet is actually landing, even if it does not impact on the target backer.
In this video, SFC L.D. Lewis explains how to use a spotting scope to monitor mirage, and to watch trace. SFC Lewis is a former Army Marksmanship Unit member, U.S. Army Sniper School instructor, and current U.S. Army Reserve Service Rifle Shooting Team member. In discussing how precision shooters can employ spotting scopes, Lewis compares the use of a spotting scope for competition shooters vs. military snipers. NOTE: You may wish to turn up the audio volume, during the actual interview segment of this video.
Why You CANNOT Rely on the MV Printed on the Ammo Box!
When figuring out your come-ups with a ballistics solver or drop chart it’s “mission critical” to have an accurate muzzle velocity (MV). When shooting factory ammo, it’s tempting to use the manufacturer-provided MV which may be printed on the package. That’s not such a great idea says Bryan Litz of Applied Ballistics. Don’t rely on the MV on the box, Bryan advises — you should take out your chrono and run your own velocity tests. There are a number of reasons why the MV values on ammo packaging may be inaccurate. Below is a discussion of factory ammo MV from the Applied Ballistics Facebook Page.
Five Reasons You Cannot Trust the Velocity on a Box of Ammo:
1. You have no idea about the rifle used for the MV test.
2. You have no idea what atmospheric conditions were during testing, and yes it matters a lot.
3. You have no idea of the SD for the factory ammo, and how the manufacturer derived the MV from that SD. (Marketing plays a role here).
4. You have no idea of the precision and quality of chronograph(s) used for velocity testing.
5. You have no idea if the manufacturer used the raw velocity, or back-calculated the MV. The BC used to back track that data is also unknown.
1. The factory test rifle and your rifle are not the same. Aside from having a different chamber, and possibly barrel length some other things are important too like the barrel twist rate, and how much wear was in the barrel. Was it just recently cleaned, has it ever been cleaned? You simply don’t know anything about the rifle used in testing.
2. Temperature and Humidity conditions may be quite different (than during testing). Temperature has a physical effect on powder, which changes how it burns. Couple this with the fact that different powders can vary in temp-stability quite a bit. You just don’t know what the conditions at the time of testing were. Also a lot of factory ammunition is loaded with powder that is meter friendly. Meter friendly can often times be ball powder, which is less temperature stable than stick powder often times.
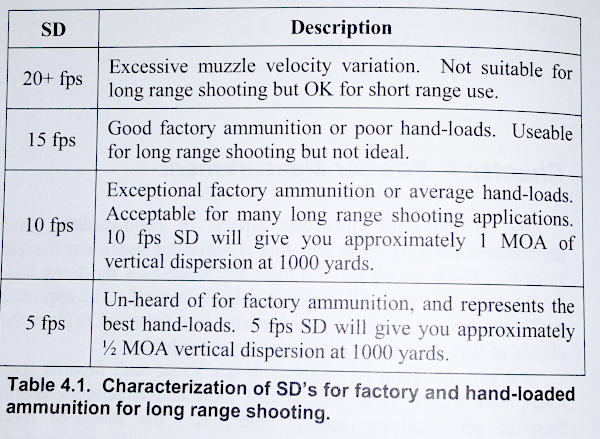
3. The ammo’s Standard Deviation (SD) is unknown. You will often notice that while MV is often listed on ammo packages, Standard Deviation (normally) is not. It is not uncommon for factory ammunition to have an SD of 18 or higher. Sometimes as high as 40+. As such is the nature of metering powder. With marketing in mind, did they pick the high, low, or average end of the SD? We really don’t know. You won’t either until you test it for yourself. For hand-loaded ammo, to be considered around 10 fps or less. Having a high SD is often the nature of metered powder and factory loads. The image below is from Modern Advancements in Long Range Shooting: Volume II.
4. You don’t know how MV was measured. What chronograph system did the manufacturer use, and how did they back track to a muzzle velocity? A chronograph does not measure true velocity at the muzzle; it simply measures velocity at the location it is sitting. So you need to back-calculate the distance from the chrono to the end of the barrel. This calculation requires a semi-accurate BC. So whose BC was used to back track to the muzzle or did the manufacturer even do that? Did they simply print the numbers displayed by the chronograph? What kind of chronograph setup did they use? We know from our Lab Testing that not all chronographs are created equal. Without knowing what chronograph was used, you have no idea the quality of the measurement.
5. The MV data may not be current. Does the manufacturer update that data for every lot? Or is it the same data from years ago? Some manufacturers rarely if ever re-test and update information. Some update it every lot (ABM Ammo is actually tested every single lot for 1% consistency). Without knowing this information, you could be using data for years ago.
CONCLUSION: Never use the printed MV off a box of ammo as anything more than a starting point, there are too many factors to account for. You must always either test for the MV with a chronograph, or use carefully obtained, live fire data. When you are using a Ballistic Solver such as the AB Apps or Devices integrated with AB, you need to know the MV to an accuracy down to 5 fps. The more reliable the MV number, the better your ballistics solutions.
Today we share some smart tips from a past F-Class and Sling Champion who is both a great shooter AND a ballistics wizard. Founder of Applied Ballistics LLC, Bryan Litz is the author of multiple books and creator of advanced Ballistics Software.
Bryan is also a highly skilled competitor. In 2015, Bryan Litz won the F-TR Mid-Range AND Long-Range National Championships hosted at Ben Avery. And at the 2014 Berger SW Nationals (SWN), Bryan took top honors among all sling shooters. If you only know Bryan Litz from his Applied Ballistics Books and DVDs, you may not realize that this guy is a also great marksman along with being an actual rocket scientist!
Given his impressive track record in both F-Class and Palma (Fullbore) out to 1000 yards, we asked Bryan if he had any advice for other long-range competitors.
First Bryan provided three tips concerning Ballistics, his special area of expertise. Next Bryan offered three more general tips about long-range competition — how to analyze your shooting, how to choose your ‘wind strategy’, and how to avoid the most costly mistakes, i.e. how to avoid the “train-wrecks”.
Bryan Litz won the 2015 F-TR Mid-Range and Long-Range Championships with this sleek rig:
Litz Ballistics Tips
Ballistics TIP ONE. If you’re having trouble getting your ballistic software to match actual drops, you need to look at a number of possible reasons. Here are some common issues that can cause problems.
Click Values Are Not Exact. Scopes and iron sights don’t always produce accurate adjustments. In other words, if your ballistics program predicts 30 MOA of drop, and you dial 30 MOA but hit low, it might be that your sight actually only moved 28 MOA (for example). To see if your sight is adjusting accurately, shoot a tall target at 100 yards and measure group separation when dialing your sight.
Barometric vs. Station Pressure. This is a commonly misunderstood input to ballistics programs. You can avoid this pitfall by remembering the following: station pressure is the actual measured pressure at your location, and you don’t need to tell the program your altitude when using station pressure. Barometric pressure is corrected for sea level. If you’re using barometric pressure, you also have to input your altitude.
Muzzle Velocity. Chronographs are not always as accurate as shooters think they are — your true MV may be off by 10-20 fps (or more). If your drop is different than predicted at long range, it might be because your muzzle velocity input is wrong.
Mixing Up BC (G1 vs. G7). Knowledgeable long range shooters know that the G7 standard is a more representative standard for modern LR bullets. However, using G7 BCs isn’t just a matter of clicking the ‘G7′ option in the program. The numeric value of the BC is different for G1 and G7. For example, the G1 BC of the Berger 155.5 grain Fullbore bullet is .464 but the G7 BC is .237. If you were to enter .464 but click on G7, the results would be way off.
Ballistics TIP TWO. A properly installed level is absolutely essential for long range shooting. Without a good level reference, your long range wind zero will be off due to minor canting of the rifle from side to side. You can verify that your level is installed correctly on a 100-yard ‘tall target’. Draw a plumb line straight up the target and verify that your groups track straight up this line as you go up in elevation.
Ballistics TIP THREE. If your long range ballistic predictions aren’t tracking, always come back and verify your 100-yard zero. Sometimes a simple zero shift can be misconstrued as errors in long range ballistics predictions.
Litz Competition Shooting Tips
Competition TIP ONE. Improving your scores in long range competition is a constant process of self-assessment. After each match, carefully analyze how you lost points and make a plan to improve. Beginning shooters will lose a lot of points to fundamental things like sight alignment and trigger control. Veteran shooters will lose far fewer points to a smaller list of mistakes. At every step along the way, always ask yourself why you’re losing points and address the issues. Sometimes the weak links that you need to work on aren’t your favorite thing to do, and success will take work in these areas as well.
Competition TIP TWO. Select your wind shooting strategy carefully. For beginners and veterans, most points are typically lost to wind. Successful shooters put a lot of thought into their approach to wind shooting. Sometimes it’s best to shoot fast and minimize the changes you’ll have to navigate. Other times it’s best to wait out a condition which may take several minutes. Develop a comfortable rest position so you have an easier time waiting when you should be waiting.
Competition TIP THREE. Actively avoid major train wrecks. Sounds obvious but it happens a lot. Select equipment that is reliable, get comfortable with it and have back-ups for important things. Don’t load on the verge of max pressure, don’t go to an important match with a barrel that’s near shot out, physically check tightness of all important screws prior to shooting each string. Observe what train wrecks you and others experience, and put measures in place to avoid them.
Looking down-range with F-TR rifle at Ben Avery Shooting Facility in Phoenix, Arizona.
Bullet Stability and Twist Rates
In this video, Bryan Litz talks about bullet in-flight stability and how to calculate barrel twist-rate requirements for long-range bullets. Bryan explains that bullet stability (for conventional projectiles) is basically provided by the spinning of the bullet. But this spin rate is a function of BOTH the nominal twist rate of the barrel AND the velocity of the projectile. Thus, when shooting the same bullet, a very high-speed cartridge may work with a slower barrel twist rate than is required for a lower-speed (less powerful) cartridge. For match bullets, shot at ranges to 1000 yards and beyond, Bryan recommends a twist rate that offers good stability.
You’ll find more expert information on long-range shooting and ballistics on the Applied Ballistics website and the Bryan Litz Ballistics Facebook page. Bryan’s most recent Facebook post talks about the Coriolis effect — the apparent drift of a rifle trajectory due to the rotation of the earth.
To learn more, we recommend you subscribe to the Applied Ballistics Science of Accuracy — with in-depth articles, brilliant podcasts, exclusive videos and more.
Smart gun owners know they need a good, solid gun safe. But when choosing a gun safe, what kind of lock should you select — electronic or mechanical? Both types have their advantages and disadvantages. This article will help you make the right choice for your needs and also get the most reliable performance from either type.
Gunsafes can be fitted with either an electronic keypad-style lock, or a conventional dial lock. In our Gunsafe Buyer’s Guide, we explain the important features of both dial and electronic lock systems. Many safe-makers will tell you that consumers prefer electronic locks for convenience. On the other hand, most of the locksmiths we’ve polled believe that the “old-fashioned” dial locks, such as the Sargent & Greenleaf model 6730, will be more reliable in the long run. CLICK HERE to learn more about the Pros and Cons of Mechanical (dial) Lock vs. Electronic (keypad) safe locking systems.
One safe supplier, The Safe Keeper, notes that mechanical (dial) locks tend to be more reliable over long periods: “When it comes to reliability, a mechanical lock is the way to go. Anything electronic is designed to fail sooner or later. For every 20 broken electronic locks we will get one mechanical. Bottom line is, it’s not that complicated to input a combination on a mechanical lock. Those extra 7 seconds just might save you from being locked out and having your safe drilled opened.”
This Liberty Safe video compares Mechanical (dial or key) vs. Electronic (keypad) safe locking systems.
Here is the opinion of RFB from Michigan. He is a professional locksmith with over two decades of experience servicing locks and safes of all brands and types:
What a Professional Locksmith Says:
For the convenience of quick opening, the electronic locks can’t be beat. However, for endurance and years of trouble-free use, the electronics can’t compare with the dial lock.
I’ve earned my living, the past 22 years, servicing locks of all types. This includes opening safes that can’t otherwise be opened. I do warranty work for several safe manufacturers (including Liberty). What I’ve learned in all those years is that manual dial locks have very few problems. The most common is a loose dial ring which can shift either left or right, which will result in the index point being in the wrong place for proper tumbler alignment. This is simple to fix.
Electronic locks, however, can have all kinds of issues, and none (except bad key-pad) are easy to fix, and when one goes bad, it must be drilled into to open it. IMO, it’s not a matter of ‘if’ an electronic lock will ultimately fail, but a matter of ‘when’ it will fail. Over the past 10 years or so, since electronics have become more and more prevalent, I’ve had to drill open bad electronic locks vs. bad manual dial locks on a ratio of about 20-1.
My professional opinion is to get the manual dial lock, unless you’ve got a good friend who is a locksmith/safecracker.
How Secure is Your Lock?
RFB tells us that both dial and electronic locks offer good security, provided it’s a good quality lock made by LaGard, Sargent & Greenleaf, Amsec, or Kaba/Ilco. However, RFB warns that “Some of the ‘cheaper’ locks (both manual and electronic) however, are very simple to bypass.
An electronic lock that’s glued or ‘stuck’ to the door with double-sided tape, and has its ‘brain’ on the outside of the lock in the same housing as the keypad, and merely sends power to an inner solenoid via a pair of wires through the door, is a thief’s best friend. The good ones have the brain inside the safe, inaccessible from the outside.
No amateur can ‘manipulate’ either a good manual or electronic lock. Both give you a theoretical one million possible combinations. I say ‘theoretical’ because there are many combinations that cannot, or should not, be used. You wouldn’t set your combo on a dial lock to 01-01-01 etc., nor would you set an electronic to 1-1-1-1-1-1, or 1-2-3-4-5-6.”
Tips for Dial Locks
RFB notes that “The speed, and ease of use, of a manual dial lock can be improved upon, simply by having your combo reset using certain guidelines. Avoid high numbers above 50. Having a 1st number in the 40s, 2nd number anywhere from 0-25, and 3rd number between 25 and 35 will cut dialing time in half, without compromising security. (For mechanical reasons I won’t get into here, the 3rd number of a good manual dial lock cannot — or should not — be set to any number between 95 & 20).”
Tips for Electronic Locks
Electronic locks can have the combination changed by the user much more easily than dial locks. That should be a good thing. However, RFB explains: “That can be a double-edged sword. More than a few times I’ve had to drill open a safe with an electronic lock that has had the combo changed incorrectly by the user, resulting in an unknown number that nobody can determine. Also, don’t forget that electronic locks have a ‘wrong-number lock-out’. I would NOT rely on the normal quickness of an electronic 6-number combo in an emergency situation. If for any reason (panic etc.) you punch in the wrong number several times, the lock will shut down for a 5-minute ‘penalty’.
Replace Electronic Lock Batteries Every Year
To get the most life out of any electronic (keypad Lock), you should change the battery at least once a year, whether it needs it or not. Low voltage won’t necessarily shut down the lock, but using it in a low voltage situation is bad for the electronics, and eventually will cause lock failure. So, If you do nothing else to maintain your digital-lock safe, replace the battery every year.
And get a fresh battery (with a release date) from the store — don’t just pull a battery out of a storage bin, even if it’s never been used. Old batteries can lost “juice” and physically degrade, even when in storage.
This article is Copyright 2023 AccurateShooter.com. No reproduction on any other website is authorized without payment of licensing fees or liquidated damages.
In this 54-minute video interview, Ken Clemens, co-owner of Brux Barrels, is interviewed by F-Class ace Erik Cortina for the Cortina Precision YouTube Channel. A lot of ground is covered, with many fascinating insights into barrel-making revealed. Watch and learn:
Interview with Ken Clemens, Co-owner of Brux Barrels
If you are involved in competitive shooting, and especially if you compete in F-Class or long-range benchrest, we recommend you take the time to watch this interview, perhaps in a couple of sessions because it runs for a lengthy 54 minutes. Ken Clemens explains the important procedures that go into making match-grade, cut-rifled barrels. Ken also explains some factors to consider when choosing a barrel-maker and specifying length, contour, land/groove configuration, and twist rates.
About BRUX Barrel-Making Methods
Brux starts with 4150 chrome-moly or 416R stainless steel double-stress-relieved bar stock — the best available. Barrels are bored with the Barnes gun drill, and reamed with an industry-standard Pratt & Whitney reamer. Brux uses solid carbide cutter hooks and employs special methods to achieve best results.
After the bore-cutting process is complete, each barrel is hand-lapped to high-precision standards. Multi-point inspections and meticulous hand processes (not possible in mass production) ensure extremely high quality. The Brux website says: “If there is the slightest deviation in surface finish or tolerance, the barrel is discarded.”
BRUX Specializes in Cut-Rifled Gun Barrels
Brux produces custom cut-rifled barrels, precision-crafted by professionals with extensive experience in both machine tools and competitive shooting. While Brux earned its reputation building great barrels for F-Class, benchrest, and long range competition, Brux also crafts hunting barrels. Brux states: “Hunters, big game and varmint, can benefit from the accuracy and dependability of a custom barrel made to your specifications.”
BRUX Barrels’ Owners Are Competitive Shooters
Brux owners and machinists are shooters themselves. So they understand how important a truly top-quality barrel can be. Everything else about a rifle can be great, but you need a superb barrel to win at the highest level. Owners Ken Clemens (pictured above) and Norm Brux are both seasoned shooters with years of experience using their own products.
Made in the USA — About the Home of Brux Barrels
The Wisconsin River Valley near Lodi has a storied history of hunting and shooting. The glacier spared many granite escarpments, leaving secluded glens and a topography rich in soil and wildlife habitat, which attracted families with old-world values and skills. Many of their descendants turned raw steel and iron into the tools necessary for farming – and some evolved to precision tooling and making gun barrels.
Wisconsin River Valley near Ferry Bluff State Natural Area.


 Gone in Six Seconds. Want to Cry Now?


 To find out if you have a burr or damage to your crown, you can use an ordinary Q-tip cotton swab. Check the edges of the crown by pulling the Q-tip gently out past the edge of the crown. If you have a burr, it will “grab” the cotton and leave strands behind.
 Using a spotting scope seems simple. Just point it at the target and focus, right? Well, actually, it’s not that simple. Sometimes you want to watch mirage or trace, and that involves different focus and viewing priorities. Along with resolving bullet holes (or seeing other features on the target itself), you can use your spotting scope to monitor mirage. When watching mirage, you actually want to focus the spotting scope not on the target, but, typically, about two-thirds of the distance downrange. When spotting for another shooter, you can also use the spotting scope to watch the bullet trace, i.e. the vapor trail of the bullet. This will help you determine where the bullet is actually landing, even if it does not impact on the target backer.


 Gunsafes can be fitted with either an electronic keypad-style lock, or a conventional dial lock. In our
  Tips for Dial Locks
 Replace Electronic Lock Batteries Every Year


