The Cartridge Comparison Guide is a remarkably comprehensive 340-page, spiral-bound book. Covering over 250 cartridges, the Second Edition of the Cartridge Comparison Guide is the product of many years of labor by Andrew Chamberlain, a Utah-based hunter. Andrew says his Guide “compares every factory available cartridge from the 17 calibers up to the 50 caliber cartridges”. (Sorry, most wildcat cartridges are not covered.) Chamberlain’s Guide also compiles cartridge data from major ammunition manufacturers such as Barnes, Federal, Hornady, Norma, Nosler, Remington, Sierra, Swift, Weatherby, and Winchester. It shows the optimal velocity achieved for each bullet weight and calculates bullet energy, recoil, and powder efficiency. Large color photos illustrate handgun and rifle cartridges.
The Cartridge Comparison Guide provides data for thousands of cartridge/bullet/velocity combos. Quick reference sheets and ballistics charts cover Trajectory, Velocity, and Energy out to 500 yards. The Cartridge Comparison Guide also offers a firearms lexicon, plus Appendices covering Cartridge Selection for Game Animals, Bullet Selection/Design, Bullet Expansion, and Wound Channel Characteristics.
New Content in Second Edition of Cartridge Comparison Guide
The Cartridge Comparison Guide (Second Edition) costs $39.99 plus shipping and tax. CLICK HERE to visit the Online Store where you can order the 340-page book. Here’s what’s new in the Second Edition:
Addition of Shotgun Ammunition (Both Slug and Shot loads).
Momentum Calculation for all Rifle, Shotgun and Handgun loads.
Integration of Shotgun Slug Ammunition with Center Fire Rifle Data Tables.
Factory Load Summary Added (Shows manufacturers and loads produced).
One factory load and one hand load for every bullet weight available in each cartridge.
Over 90 pages of additional ballistics content (roughly 35% more than in First Edition).
Great Resource for Hunters
One of Chamberlain’s main goals in creating the Cartridge Comparison Guide was to help hunters select the right cartridge for the job: “This started as a personal project to gather information on the more popular cartridges commonly used for hunting. I wanted to find the best all-around performing cartridge and rifle that a guy on a budget could shoot. I began comparing cartridge performance, versatility, bullet selection, powder efficiency, recoil generation vs. energy produced, standing ballistic data for different environments….”
Giant Cartridge Poster for Computer Wallpaper (1665×1080 pixels)
Here’s a great illustration of hundreds of cartridges and shotshell types. For dedicated reloaders, this would work great as desktop “wallpaper” for your computer. CLICK HERE for full-size image.
Most competitive shooters are pretty good about bore cleaning (some may even clean their bores too aggressively). However, we’ve found that many shooters neglect the chamber area and the bolt lug recesses. It’s too easy to clean the bore, slip out the guide rod and say “I’m done.” Sinclair Int’l explains why it’s important to clean the action interior: “Shooters use a lot of grease and oil on their bolts to reduce friction and to prevent wear[.] Unfortunately, both of these compounds attract grit, powder and primer residues. Cleaning your receiver is especially critical [with] custom actions where the fit between the action and bolt is held to very tight tolerances. Routine cleaning of the action will prevent unnecessary wear on the bolt body, locking lugs, and the action raceways/guide rails. Frequent action cleaning is also essential to keeping the trigger area free of debris which can cause trigger hang-ups and failures.”
Your rifle deserves a clean action and lug recesses. For action cleaning, our friend Danny Reever favors the PMA Action Cleaning Tool. This handy tool speeds up the cleaning process, letting you do a better job in less time. Danny reports: “I’ve been using the PMA Action Cleaning Tool Kit ($79.95) for quite some time. Previously, I used one of the old style (round knob) action-cleaning tools with cylindrical cotton rolls. I think the PMA Action Cleaning Tool Kit is easier to use, and possibly achieves better results. CLICK HERE to Read Full Tool Review.
Cleaning the Chamber
Combustion by-products, lubricants, and solvent residues can collect in your chamber. Severe build-up of grease and carbon can interfere with chambering. Also some solvents will promote corrosion. You need to keep your chambers clean.
1) Install a clean cotton mop of the correct size on the end of a chamber rod and insert the mop into the chamber. Rotate the mop several times to remove any brush bristles left behind and any excess solvent that was between the rod guide snout and the end of the chamber. Make sure the chamber is dry. Prior to storing a rifle you can oil the chamber but make sure the oil is removed prior to firing the rifle.
2) Alternatively, install an old bore brush on a chamber rod, overlap a couple of patches on the brush bristles, and wrap them around the brush completely. Then insert the patch-covered brush into the chamber while rotating it to remove the excess solvent and debris. Push it firmly into the neck area of the chamber. A similar method is to pierce a large patch on the end of the brush loop and insert it into the action, again rotating the brush as you push the patch up against the breech.
Cleaning the Lug Recess Area
The action lug recess area is one of the dirtiest places on a bolt-action rifle. To properly clean this area, always use a tool designed for the task, such as the $24.99 Sinclair Action Cleaning Tool (Brownells #749003115) which is part of the full Sinclair Action Cleaning Tool Kit ($48.99 at Brownells, #749004651).
1) Insert a cotton roll or cleaning felt into your lug recess cleaning tool and wet both ends and the face of the cotton roll/felt with solvent.
2) Insert the tool into the action and push it forward until it is positioned fully in the lug recess area and rotate the tool head several times. Then reverse the rotation for another few turns. While rotating the tool move it slightly in and out to cover the entire recess area and to also clean the breech face.
3) Remove the tool from the action and inspect the surface of the felt or cotton roll. If there is quite a bit of residue on both sides of the felt/roll, then repeat with another wet felt/roll.
4) When you feel the recess area is completely clean, insert a dry cotton roll into the tool and rotate the tool head to remove any remaining solvent and debris. If necessary, use a second dry cotton roll.
5) You can follow this step up with another pass of a mop or patches into the chamber to get any debris or solvent that pushed forward out of the lug recess area.
Want to shoot better scores at your next match? Here’s a smart, inexpensive do-it-yourself project from the good folks at Criterion Barrels. For less than a dollar or two in materials, in just a few minutes you can create a handy, effective mirage shield, custom-fitted to your favorite rifle.
All precision shooters should be familiar with mirage, a form of optical distortion caused primarily by variations in air temperature. Savvy shooters will use mirage as a valuable tool when gauging wind speed and direction. Natural mirage is unavoidable, but there are many techniques designed to limit its influence in long-range marksmanship.
A form of mirage can be produced by the barrel itself. Heat rising from the barrel may distort sight picture through your optics, leading to erratic results. Mirage caused by barrel heat can be reduced dramatically by a simple, light-weight mirage shield.
How to Make a Mirage Shield
A mirage shield is an extremely cost-effective way to eliminate a commonly-encountered problem. Making your own mirage shield is easy. Using old venetian blind strips and common household materials and tools, you can construct your own mirage shield for under one dollar.
Materials Required:
1. Vertical PVC Venetian blind panel
2. Three 1”x1” pieces adhesive-backed Velcro
3. Ruler or tape measure
4. Scissors or box cutter
5. Pencil or marker
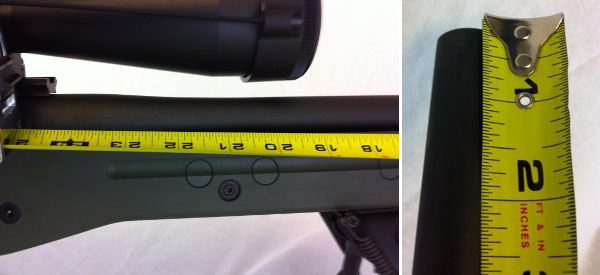
1. Measure the distance from the end of the receiver or rail to the crown of the barrel.
2. Using a pencil and ruler, measure the same distance and mark an even line across the blind.
3. Cut across the line using scissors or a box cutter, shortening the blind to the required length. (Remember, measure twice, cut once!)
4. Expose the adhesive backing on the loop side of the Velcro. Center and apply the Velcro strips on the barrel at regular intervals.
5. Expose the adhesive backing of the fuzzy side of the Velcro.
6. Place the blind on the upper side of the barrel. Apply downward pressure. Once the Velcro has secured itself to the barrel, separate the two sides. Proceed to mold both sides of the Velcro to fit the contour of their respective surfaces.
7. Reaffix the blind. Barrel related mirage is now a thing of the past!
NOTE: You can attach the Velcro on the opposite side of the blind if you want the blind to curve upwards. Some folks thinks that aids barrel cooling — it’s worth a try.
How to Remove and Re-Attach the Mirage Shield
Removal of your mirage shield is accomplished by simply removing the blind. You can un-install the Velcro by pulling off the strips and then gently removing any adhesive residue left behind using an appropriate solvent. (Simple cooking oil may do the job.) Caution: With fine, high-polish blued barrels, test any solvent on a non-visible section of the barrel. Before storing the gun, re-oil the barrel to remove active solvents and residual fingerprints.
SUMMARY: Powder can have a very long shelf life. You need to watch for changes in smell and color. A reddish tinge, almost like rust on the powder, is a bad sign, as is a foul odor, not to be confused with a normal chemical smell. Either of these signs indicate it is time to dispose of your powder by means other than shooting.
Ever wondered about the stability of the propellants in your reloading room? There are some important things you should know about powder storage, to ensure consistent powder performance and safety. Western Powders (which has been acquired by Hodgdon) published an informative Q & A series entitled Dear Labby: Questions for our Ballistics Lab . Here are some excerpts that pertain to powder storage and shelf life. Worried that your powder may be too old? Western’s experts explain how to check your propellants for warning signs.
Proper Powder Storage
Q: I live in southern Arizona where it is very hot. I am told powders will become unstable if stored in an area not air-conditioned. My wife says no powder or primers in the house. Can powder be stored in a refrigerator? What about using a fireproof safe? I would appreciate your ideas. — M.C.
Lab Answer: SAAMI guidelines are pretty clear on issues of storage. They recommend storing smokeless powder in containers that will not allow pressure to build if the powder is ignited — ruling out gun safes and refrigerators.
In their original containers, the lifespan of smokeless powders is quite long, even in hot, arid climates. In fact the lifespan is typically longer than the average handloader would need to store them. Stored safely in a garage or outbuilding, your powder should last years. If you see the powder developing a reddish tint, or giving off a foul odor, it is time to discard it.
Clumps in Powder Container
Q: I ordered some of your Accurate 1680 powder back about in December. I just now opened it … and it is full of clumps. My knowledge tells me that means moisture. Am I wrong? I just now broke the seal and it has been stored in a ammo can with desiccant packs around it and a dehumidifier running 14-16 hours a day. I can’t imagine this being my fault, if this does indicate moisture. I don’t know if the pink part on the label is suppose to be red or not, but it is definitely pink, so if it was red I am wondering if I was shipped an old container? I hope that this isn’t bad and I am stuck with it…
Lab Answer: All powder contains a certain amount of moisture. When the powder is stored or during shipping, it can go through temperature cycles. During the cycling, the moisture can be pulled to the surface and cause clumping. Clumping can also be caused by static electricity if too dry or the powder has limited graphite content. You can break up the clumps before metering and they shouldn’t be a problem. This will not affect the powder performance, so your product is fine. Accurate 1680 labels are designed in Pink. As a side note, specification for testing powder is at 70° F and 60% humidity.
Shelf Life and Packaging Dates
Q: Does powder ever get to old to use and what identifying marks does your company put on the canister for when it is made, You have helped me out a while ago when I asked about keeping my cowboy shooting under 950 fps and it works great less stress on the hand and the recoil is very minimum. — R.B.
Lab Answer: On one pound bottles, the number is on the corner in a silver box. If the powder was poured today, it would read 012815 followed by a lot number. The whole number would look something like 012815749. Eight pound bottles have a sticker on the bottom with an obvious date code. The lot number appears above the date.
The shooting season is now in full swing. When you head to the range you’ll want to be prepared. That means collecting all the gear you’ll need at the range. It’s easy to forget small, critical items, so we’ve provided a checklist of the small “extras” you should pack before you head out to the range. In addition to rifle, rests, ammo, targets, and cleaning gear, here are a dozen essentials you should include in your range bag.
• Shell-Holder — If you don’t have calipers, you can use a shell-holder to check for excessive case expansion from hot loads. If a fired case doesn’t slip into the shell-holder easily, your load is definitely TOO HOT.
• Extra Earplugs — Always use ear protection when shooting. We bring a 35mm film canister with extra sets of foam earplugs.
• Hex Wrench or Screwdriver for action screws — Action screws can work loose with time. Always bring the appropriate hex wrench or screwdriver whenever you go to the range.
• Small Wrench for Scope Rings — Check the tension of your scope base and ring fasteners before you go. Bring along a small Torx wrench for the ring screws (or other tool that fits your fasteners).
• Normal and Under-sized Jags — It is often wise to use one-caliber undersize jags when applying solvent with cotton patches. You should have a couple sizes in your range kit.
• Extra Batteries — Bring extra batteries for all your electronic gear — which can include chronograph, windmeter, digital camera, GPS etc.
• Small Notebook and Pen or Pencil — Use the notebook to record chron data, log group sizes, and make notes about wind and weather conditions.
• Adhesive dots — Bring a few sheets of adhesive dots (sold at office supply stores). Use small white or black dots as target pasters. Use larger red or orange dots as aiming points (target centers).
• Folding Chair or Camp Stool — This comes in handy if you’re spotting for another shooter, or if you reload away from the firing line.
• Water Bottle — You can’t shoot well if you’re dehydrated. Bring at least two quarts of water with you and keep a bottle at the bench.
• Surveyors’ Tape and Wood Stakes — You can make inexpensive wind indicators using surveyors’ tape attached to the top of wood stakes.
• Small Plastic Ruler — Use this to measure your group sizes. A transparent (see-through) ruler works best. Rulers are also useful for drawing lines on targets.
This list is not intended to be exclusive. There are many other items you may wish to include. Obviously bring safety glasses, and Sharpie-type pens are always handy to mark targets. We invite our readers to add other “essentials” to the list. The important thing is to plan ahead, packing your key items before you drive to the range.
Whether you should from the bench, or from prone, it’s great to have your cartridges in a convenient, easy-to-reach position. This article explains how you can build your own height-adjustable ammo caddy for a very low price (likely under $10.00). Credit Martin Tardif for this great Do-It-Yourself (DIY) project. Martin’s flex-arm caddy design works great for F-Open competitors as well as anyone who shoots with a pedestal front rest, either on the ground or from a bench. The ammo caddy attaches, via a flexible arm, to your front rest. The flexy arm allows you to position your ammunition close to your rifle’s feeding port. That makes it easy to grab cartridges and load them into the chamber without shifting your shooting position.
Kudos to Martin Tardif for his clever use of inexpensive materials when he crafted this ammo-caddy a few seasons back. The total cost of the whole project, according to Martin, was just $8.00! (With inflation, materials could run a bit more these days, but the project would still be very inexpensive.)
Martin Explains How to Build the Ammo Caddy
Here are some pics of my DIY P.L.A.B. (Port Level Ammo Block). I cannibalized the goose neck from a Craftsman bendy-style utility light and bought a 3.5″x 1″ Acetal disk on eBay. I then drilled out the disk to accept twenty .284 Winchester rounds and screwed the disk to the bendy arm. The arm, by itself, wasn’t sturdy enough to support my fully loaded ammo block, so I inserted a 1/8″-diameter steel rod cut to length into the arm before I screwed it to the disk. On this Bald Eagle rest, I wasn’t using the windage adjustment cable. That allowed me to secure the bottom end of the arm to the unused 5/16″ x 18 bolt hole for the cable. [Editor’s Note: For other pedestal rest types/brands you may need to drill a hole for the base of the flexy arm.]
Many novice hand-loaders believe that neck bushing Inside Diameter (ID) size is the only important factor in neck tension. In fact, many different things will influence the grip on your bullet and its ability to release from the case neck. To learn more about neck tension and “case grip”, take the time to read this article carefully. We bet you’ll gain knowledge that will let you load more accurate ammo, with better ES/SD.
Editor: Guys, this is a VERY important article. You really should read it over carefully, twice. Variations in the force required to release a bullet can significantly affect accuracy and ES/SD. You really need to know how the grip on bullet can be altered by many different factors.
Neck Tension (i.e. Grip on Bullets) Is a Complex Phenomenon
While we certainly have considerable control over neck tension by using tighter or looser bushings (with smaller or bigger Inside Diameters), bushing size is only one factor at work. It’s important to understand the multiple factors that can increase or decrease the resistance to bullet release. Think in terms of overall brass-on-bullet “grip” instead of just bushing size (or the internal neck diameter in non-bushing full-length sizing dies).
Bullet grip is affected by many things, such as:
1. Neck-wall thickness.
2. Amount of bullet bearing surface (shank) in the neck.
3. Surface condition inside of neck (residual carbon can act as a lubricant; ultrasonic cleaning makes necks “grabby”).
4. Length of neck (e.g. 6mmBR neck vs. 6mm Dasher).
5. Whether or not the bullets have an anti-friction coating.
6. The springiness of the brass (which is related to degree of work-hardening; number of firings etc.)
7. The bullet jacket material.
8. The outside diameter of the bullet and whether it has a pressure ridge.
9. Time duration between bullet seating and firing (necks can stiffen with time).
10. How often the brass is annealed.
11. Amount (length) of neck sized (e.g. you can size only half the neck).
12. Interior diameter of bushing, or neck section of non-bushing die. – and there are others…
One needs to understand that bushing size isn’t the beginning and end of neck tension questions, because, even if bushing size is held constant, the amount of bullet “grip” can change dramatically as the condition of your brass changes. Bullet “grip” can also change if you alter your seating depth, and it can even change if you ultrasonically clean your cases.
6-time U.S. National Long-Range Champion John Whidden adds: “Our tests show us that the condition of the necks in regards to lubed or not, carbon inside or not, squeaky clean or not, etc., matter even more than the size of the bushing used. An ultrasonically cleaned or brand new dry case neck make for some quite high seating force.”
In our Shooters’ Forum a reader asked: “How much neck tension should I use?” This prompted a lengthy Forum discussion in which other Forum members recommended a specific number based on their experience, such as .001″, .002″, or .003″. These numbers, as commonly used, correspond to the difference between case-neck OD after sizing and the neck OD of a loaded round, with bullet in place. In other words, the numbers refer to the nominal amount of interference fit (after sizing).
While these commonly-used “tension numbers” (of .001″, .002″ etc.) can be useful as starting points, neck tension is actually a fairly complex subject. The actual amount of “grip” on the bullet is a function of many factors, of which neck-OD reduction during sizing is just one. Understanding these many factors will help you maintain consistent neck tension as your brass “evolves” over the course of multiple reloadings.
Seating Depth Changes Can Increase or Decrease Grip on Bullet
You can do this simple experiment. Seat a boat-tail bullet in your sized neck with .150″ of bearing surface (shank) in the neck. Now remove the bullet with an impact hammer. Next, take another identical bullet and seat it with .300″ of bearing surface in another sized case (same bushing size/same nominal tension). You’ll find the deeper-seated bullet is gripped much harder.
Neck-Wall Thickness is Important Too
I have also found that thinner necks, particularly the very thin necks used by many 6mm PPC benchrest shooters, require more sizing to give equivalent “grip”. Again, do your own experiment. Seat a bullet in a case turned to .008″ neckwall thickness and sized down .003″. Now compare that to a case with .014″ neckwall thickness and sized down .0015″. You may find that the bullet in the thin necks actually pulls out easier, though it supposedly has more “neck tension”, if one were to consider bushing size alone.
In practical terms, because thick necks are less elastic than very thin necks, when you turn necks you may need to run tighter bushings to maintain the same amount of actual grip on the bullets (as compared to no-turn brass). Consequently, I suspect the guys using .0015″ “tension” on no-turn brass may be a lot closer to the guys using .003″ “tension” on turned necks than either group may realize.
Toward a Better Definition of Neck Tension
As a convenient short-cut, we tend to describe neck tension by bushing size alone. When a guy says, “I run .002 neck tension”, that normally means he is using a die/bushing that sizes the necks .002″ smaller than a loaded round. Well we know something about his post-sizing neck OD, but do we really have a reliable idea about how much force is required to release his bullets? Maybe not… This use of the term “neck tension” when we are really only describing the amount of neck diameter reduction with a die/bushing is really kind of incomplete.
My point here is that it is overly simplistic to ask, “should I load with .001 tension or .003?” In reality, an .001″ reduction (after springback) on a thick neck might provide MORE “grip” on a deep-seated bullet than an .003″ reduction on a very thin-walled neck holding a bullet with minimal bearing surface in the neck. Bushing ID is something we can easily measure and verify. We use bushing size as a descriptor of neck tension because it is convenient and because the other important factors are hard to quantify. But those factors shouldn’t be ignored if you want to maintain consistent neck tension for optimal accuracy.
Consistency and accuracy — that’s really what this all about isn’t it? We want to find the best neck tension for accuracy, and then maintain that amount of grip-on-bullet over time. To do that you need to look not only at your bushing size, but also at how your brass has changed (work-hardened) with time, and whether other variables (such as the amount of carbon in the neck) have changed. Ultimately, optimal neck tension must be ascertained experimentally. You have to go out and test empirically to see what works, in YOUR rifle, with YOUR bullets and YOUR brass. And you may have to change the nominal tension setting (i.e. bushing size) as your brass work-hardens or IF YOU CHANGE SEATING DEPTHS.
Remember that bushing size alone does not tell us all we need to know about the neck’s true “holding power” on a bullet, or the energy required for bullet release. True bullet grip is a more complicated phenomenon, one that is affected by numerous factors, some of which are very hard to quantify.
Wouldn’t it be nice to have a print resource at your fingertips that has hundreds of true-size cartridge illustrations, plus technical descriptions of thousands of popular cartridge types? That could be a real time-saver. It’s no wonder this book is an Amazon category best-seller.
If you’re a serious shooter, the latest 7th Edition of the Ammo Encyclopedia belongs in your library. Released in late 2022, this 928-page book is probably the most comprehensive and up-to-date book in print covering current and obsolete cartridge and shotshell types. The Ammo Encyclopedia is a massive resource work with 100+ chapters, covering thousands of handgun, rifle, and shotgun cartridges from the past century and a half. This 928-page edition includes over 150 new cartridge profiles. An expanded Trademark Index lists contact information for all current ammunition manufacturers.
One of the best features is a full-color section with actual size drawings of over 320 current rimfire/centerfire cartridges and shotshells. You won’t find that many “life-size” cartridge drawings in one place even on the internet. Cartridge profiles and ballistic charts have been expanded to include many new factory cartridges. An updated Cartridge Index lists both the standard and alternate names for each cartridge in chronological order. The authors have even included air rifle pellets and historical images and charts. This 928-page softcover book is now just $29.99 on Amazon, 40% off list price.
Comments from guys who bought the book:
“This book contains a vast array of information on many modern and even obsolete ammunition. Definitely recommend for any modern reloader novice or experienced.” – Duggaboy460
“It’s a great reference book for individuals who reload their own ammunition. There is a lot more info in this Edition. Everyone who likes this information should have it in their library.” – Reloader
“Very comprehensive with great photos and detailed information. A Must have for anybody with several guns/ammo.” – M.Ibarra
A new Vortex video series, Cartridge Talks Comparisons, looks at multiple variables along with ballistics gel tests to determine the comparative performance of popular cartridge types. Each Month, Cartridge Talks will examine and test two popular cartridges, comparing their head to head performance. In Episode 1, Vortex Nation™ hosts Mark Boardman and Ryan Muckenhirn pit the 6.5 Creedmoor and .308 Winchester cartridges against each other, examining projectile performance. Mark and Ryan then make conclusions about the applications best suited to each cartridge type.
Cartridge Comparison 14-minute video, Highlighting Ballistic Gel Testing
This first Cartridge Talks Episode pits the 6.5 Creedmoor against the .308 Winchester in a head-to-head, ballistics gel-induced bullet battle. Ballistics (drop/drift), penetration ability, terminal performance and other variables are tested with a variety of tools and tests. Viewers are invited to check out Episode 1, and suggest future cartridge battles in the comments section.
Here is the full 67-minute 6.5 Creedmoor vs. .308 Win Cartridge comparison video:
““With the myriad of cartridges available to the big game hunter, picking which chambering is best for you and your application can be a daunting task”, says Muckenhirn. “In Cartridges Talks, we put our biases on the shelf and put as much scientific process to this as possible. From ‘shootability’ and accessibility, to terminal performance as observed in ballistics gel, Cartridge Talks wades through the numbers and figures with you, loads you up with the pertinent information, and helps you select the ideal cartridge for your next hunt!”
Tactical competitor Zak Smith stores his elevation and wind drift data on a handy laminated data card. To make one, first generate a come-up table, using one of the free online ballistics programs such as JBM Ballistics. You can also put the info in an Excel spreadsheet or MS Word table and print it out.
Above is a sample of a data card. For each distance, the card includes drop in inches, drop in MOA, drop in Mils. It also shows drift for a 10-mph cross wind, expressed in inches, MOA, and mils. Zak explained that “to save space… I printed data every 50 yards. For an actual data-card, I recommend printing data every 20 or 25 yards.” But Zak also advised that you’ll want to customize the card format to keep things simple: “The sample card has multiple sets of data to be more universal. But if you make your own data card, you can reduce the chance of a mistake by keeping it simple.”
Once you have the card you can fold it in half and then have it laminated at a local office store or Kinko’s. Keep this in your pocket, tape it to your stock, or tie the laminated card to your rifle. If you regularly shoot at both low and high elevations, you may want to create multiple cards (since your ballistics change with altitude). To learn more about ballistic tables and data cards, check out the excellent “Practical Long-Range Rifle Shooting–Part 1″ article on Zak’s website.
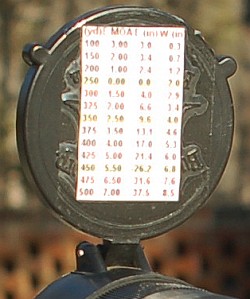
Scope-Cover Mounted Ballistics Table
Another option is to place your ballistics card on the back of the front flip-up scope cover. This set-up is used by Forum member Greg C. (aka “Rem40X”). With your ‘come-up’ table on the flip-up cover you can check your windage and elevation drops easily without having to move out of shooting position.
Greg tells us: “Placing my trajectory table on the front scope cover has worked well for me for a couple of years and thought I’d share. It’s in plain view and not under my armpit.
And the table is far enough away that my aging eyes can read it easily. To apply, just use clear tape on the front objective cover.”


 The Cartridge Comparison Guide is a remarkably comprehensive 340-page, spiral-bound book. Covering over 250 cartridges, the Second Edition of the Cartridge Comparison Guide is the product of many years of labor by Andrew Chamberlain, a Utah-based hunter. Andrew says his Guide “compares every factory available cartridge from the 17 calibers up to the 50 caliber cartridges”. (Sorry, most wildcat cartridges are not covered.) Chamberlain’s Guide also compiles cartridge data from major ammunition manufacturers such as Barnes, Federal, Hornady, Norma, Nosler, Remington, Sierra, Swift, Weatherby, and Winchester. It shows the optimal velocity achieved for each bullet weight and calculates bullet energy, recoil, and powder efficiency. Large color photos illustrate handgun and rifle cartridges.


 The shooting season is now in full swing. When you head to the range you’ll want to be prepared. That means collecting all the gear you’ll need at the range. It’s easy to forget small, critical items, so we’ve provided a checklist of the small “extras” you should pack before you head out to the range. In addition to rifle, rests, ammo, targets, and cleaning gear, here are a dozen essentials you should include in your range bag.
 • Shell-Holder — If you don’t have calipers, you can use a shell-holder to check for excessive case expansion from hot loads. If a fired case doesn’t slip into the shell-holder easily, your load is definitely TOO HOT.
 • Hex Wrench or Screwdriver for action screws — Action screws can work loose with time. Always bring the appropriate hex wrench or screwdriver whenever you go to the range.
 • Extra Batteries — Bring extra batteries for all your electronic gear — which can include chronograph, windmeter, digital camera, GPS etc.
 • Folding Chair or Camp Stool — This comes in handy if you’re spotting for another shooter, or if you reload away from the firing line.
 • Small Plastic Ruler — Use this to measure your group sizes. A transparent (see-through) ruler works best. Rulers are also useful for drawing lines on targets.


 In our
  Neck-Wall Thickness is Important Too


 Scope-Cover Mounted Ballistics Table


