The U.S. Army Marksmanship Unit published a series of reloading “how-to” articles on the USAMU Facebook page. A while back the USAMU’s reloading gurus looked at the subject of cartridge run-out and what can be done to produce straighter ammo. Tasked with producing thousands of rounds of ammo for team members, the USAMU’s reloading staff has developed smart methods for improving concentricity, even with budget-priced dies. For other hand-loading tips, visit the USAMU Facebook page.
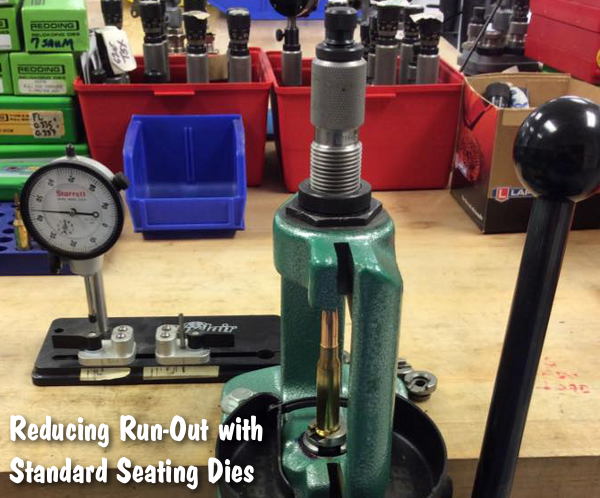
Minimizing Runout with Standard Seating Dies
This USAMU article explains how to set up standard bullet seating dies dies to minimize Total Indicated Run-out (TIR). The loading process is described using a single-stage press since most handloaders have one. A high-quality run-out gauge is essential for obtaining consistent, accurate results.
Having sized, primed, and charged our brass, the next step is bullet seating. Many approaches are possible; one that works well follows. When setting up a standard seating die, insert a sized, trimmed case into the shellholder and fully raise the press ram. Next, back the seating stem out and screw the die down until the internal crimping shoulder touches the case mouth.
Back the die out ¼ turn from this setting to prevent cartridge crimping. Next, lower the press ram and remove the case. Place a piece of flat steel (or window glass, which is quite flat) on the shellholder and carefully raise the ram.
Place tension on the die bottom with the flat steel on the shellholder. This helps center the die in the press threads. Check this by gently moving the die until it is well-centered. Keeping light tension on the die via the press ram, secure the die lock ring. If one were using a match style, micrometer-type seating die, the next step would be simple: run a charged case with bullet on top into the die and screw the seating stem down to obtain correct cartridge OAL.
However, with standard dies, an additional step can be helpful. When the die has a loosely-threaded seating stem, set the correct seating depth but don’t tighten the stem’s lock nut. Leave a loaded cartridge fully raised into the die to center the seating stem in the die. Then, secure the stem’s lock nut. Next, load sample cartridges and check them to verify good concentricity.
One can also experiment with variations such as letting the seating stem float slightly in the die to self-center, while keeping correct OAL. The run-out gauge will show any effects of changes upon concentricity. However, this method has produced excellent, practical results as evidenced by the experiment cited previously. These results (TIR Study 2) will reproduced below for the reader’s convenience.
First, however, let’s examine run-out figures of some factory-loaded match ammunition. This should give readers who are new to TIR gauges some perspective about the TIR ranges one might encounter.
TIR Study 1: 50 rounds Lake City M852 Match 7.62mm
(168 gr. Sierra MatchKings)
0.000” – 0.001” = 2%
0.001” – 0.002” = 30%
0.002” – 0.003” = 16%
0.003” – 0.004” = 22%
0.004” – 0.005” = 14%
0.005” – 0.006” = 14%
0.006” – 0.007” = 0%
0.007” – 0.008” = 2%
TIR Study 2: 50 rounds of .308 match ammo loaded using carefully-adjusted standard dies, vs. 50 using expensive “Match” dies from the same maker.
Standard dies, TIR:
0.000” — 0.001” = 52%;
0.001”– 0.002” = 40%;
0.002”– 0.003” = 8%.
None greater than 0.003”.
Note: both samples were loaded using the O-Ring method, i.e. with a rubber O-Ring placed under the locking ring of the Full-length sizing die to allow that die to float.
These tips are intended to help shooters obtain the best results from inexpensive, standard loading dies. Especially when using cases previously fired in a concentric chamber, as was done above, top-quality match dies and brass can easily yield ammo with virtually *no* runout, given careful handloading.
When neck-turning cases, it’s a good idea to extend the cut slightly below the neck-shoulder junction. This helps keep neck tension more uniform after repeated firings, by preventing a build-up of brass where the neck meets the shoulder. One of our Forum members, Craig from Ireland, a self-declared “neck-turning novice”, was having some problems turning brass for his 20 Tactical cases. He was correctly attempting to continue the cut slightly past the neck-shoulder junction, but he was concerned that brass was being removed too far down the shoulder.
Craig writes: “Everywhere I have read about neck turning, [it says] you need to cut slightly into the neck/shoulder junction to stop doughnutting. I completely understand this but I cant seem to get my neck-turning tool set-up to just touch the neck/shoulder junction. It either just doesn’t touch [the shoulder] or cuts nearly the whole shoulder and that just looks very messy. No matter how I adjust the mandrel to set how far down the neck it cuts, it either doesn’t touch it or it cuts far too much. I think it may relate to the bevel on the cutter in my neck-turning tool…”
Looking at Craig’s pictures, we’d agree that he didn’t need to cut so far down into the shoulder. There is a simple solution for this situation. Craig is using a neck-turning tool with a rather shallow cutter bevel angle. This 20-degree angle is set up as “universal geometry” that will work with any shoulder angle. Unfortunately, as you work the cutter down the neck, a shallow angled-cutter tip such as this will remove brass fairly far down. You only want to extend the cut about 1/32 of an inch past the neck-shoulder junction. This is enough to eliminate brass build-up at the base of the neck that can cause doughnuts to form.
The answer here is simply to use a cutter tip with a wider angle — 30 to 40 degrees. The cutter for the K&M neck-turning tool (above) has a shorter bevel that better matches a 30° shoulder. There is also a 40° tip available. PMA Tool and 21st Century Shooting also offer carbide cutters with a variety of bevel angles to exactly match your case shoulder angle*. WalkerTexasRanger reports: “I went to a 40-degree cutter head just to address this same issue, and I have been much happier with the results. The 40-degree heads are available from Sinclair Int’l for $15 or so.” Forum Member CBonner concurs: “I had the same problem with my 7WSM… The 40-degree cutter was the answer.” Below is Sinclair’s 40° Cutter for its NT-series neck-turning tools. Item NT3140, this 40° Cutter sells for $14.99. For the same price, Sinclair also sells the conventional 30° Cutter, item NT3100.
Al Nyhus has another clever solution: “The best way I’ve found to get around this problem is to get an extra shell holder and face it off .020-.025 and then run the cases into the sizing die. This will push the shoulder back .020-.025. Then you neck turn down to the ‘new’ neck/shoulder junction and simply stop there. Fireforming the cases by seating the bullets hard into the lands will blow the shoulder forward and the extra neck length you turned by having the shoulder set back will now be blended perfectly into the shoulder. The results are a case that perfectly fits the chamber and zero donuts.”
Make sure your firearms are stored securely. The NSSF’s Gun Storage Check Week runs September 1-7, 2024. This national awareness campaign is intended to ensure gun owners store their firearms securely, both to prevent theft and to reduce the risk of misuse and suicide.
Secure firearm storage is the most effective way to help prevent firearm accidents, suicides, and theft. Many secure storage options are available, including lock boxes, cable locks, and full-size safes, to secure firearms when not in use in homes and vehicles. When firearms are not under your direct control, you should place them in locked storage. We recommend large, heavy gun safes for rifle and shotgun storage. It’s best to buy a larger, heavier gun safe than you may think you need initially. We recommend your read our Gun Safe Buyers Guide.
We can do more to help prevent firearm-related accidents, suicides and thefts. During Gun Storage Check Week you should review storage practices and make changes, as needed, to prevent unauthorized access. “No one wants their gun in the hands of an unsupervised child, a person in crisis, an individual who lacks knowledge of safely operating firearms or a thief”, says Joe Bartozzi, President and CEO of NSSF.
Opportunity to WIN a FREE Hornady Lock Box
Those who visit GunStorageCheck.org will have the opportunity to win one of many Lock Boxes donated by Hornady. The NSSF will award gun safe prizes not only during September 1-7 but each week during the month of September during National Suicide Prevention Month.
Credit our buddy Joe Friedrich for this simple yet effective accessory for your benchrest rifle. Joe shoots a .22 LR benchrest rig with a barrel tuner. When he added weights to his tuner, he found his rifle no longer balanced well. He wanted to add some weight in the rear without drilling holes in the stock. He also wanted the weight to be removable, and easily placed on another rifle in his stable. He wanted a weight that could be moved from gun to gun as needed.
At a local sporting goods shop Joe found a 1.5-lb ankle weight that comes in a padded, tubular elastic cover. It’s like a 1.5-lb sausage in a soft, stretchy nylon cover. (Imagine a really fat, heavy bungee cord). Joe simply attached a plastic zip tie at the end to make a loop that fits perfectly over his buttstock. CLICK HERE for full-screen photo.
To “tune” the rifle’s balance, Joe just slides the ankle weight fore and aft on the stock. We have tried this moveable ankle weight on a variety of different BR stocks (including a McMillan Edge) and it worked perfectly. This is a great invention, and would work with sporter rifles and ARs just as well.
NOTE: Obviously, this ring will increase the measured weight of your rifle. So, if you are competing in a registered match with weight restrictions, you have to ensure that your rifle still makes class weight limits with the ankle weight ring in place.
Hunting season is starting soon. We know many of our readers will be driving to other states. If you plan to travel across state lines with your guns, this book can really help. With over 100 changes from last year, the 2024 edition of Traveler’s Guide to the Firearm Laws of the Fifty States is a must-read for anyone planning to travel around the country with firearms. In addition, the book also covers the firearms travel laws for Canada and Mexico.
For $15.95 you can purchase a state-by-state Traveler’s Guide to firearms laws. This book can help ensure you comply with all state laws during your trip. Highways Magazine states: “If you carry a weapon in your rig, you need this book.” This 68-page guide covers all firearms types and all 50 states. It even has info for Canada and Mexico. The Traveler’s Guide to the Firearm Laws of the Fifty States has sold more than 2,000,000 copies since it was first released in 1996.
This 27th edition of the Traveler’s Guide covers important topics such as carry of firearms in a motor vehicle, concealed carry reciprocity, which states preempt local gun regulation, tips on handling a traffic stop, concealed carry in state and National Parks, vehicle carry and possession on college campuses and much more. Best of all, the text is in plain, easy-to-read English.
Written and researched by J. Scott Kappas, an attorney and Class III Firearms Dealer, the 2024 Traveler’s Guide has a preface that defines many key terms important for anyone traveling with a firearm across state lines. The latest edition also has new formatting for easier reading.
The Traveler’s Guide is especially useful for shooters traveling in RVs and motorhomes. The American Rifleman Magazine declared: “This book is a must-have for truck drivers, motor home enthusiasts, campers and other travelers…easy to read and understand, well-organized and concise….” One reader from Texas adds: “I used to think that my RV was the same as my home when it came to gun carry….the Traveler’s Guide set me straight. Now I know my motorhome is subject to the same laws as any vehicle when it comes to guns.”
Many barrel-makers mark the twist rate and bore dimensions on their barrel blanks.
Does muzzle velocity change with faster or slower barrel twist rates? Absolutely, but much less than you might think. Faster twist rates do slow down bullets somewhat, but the speed loss is NOT that significant. With Bartlein .308 Win barrels of identical length and contour, a 1:12″-twist barrel was only 8 fps faster than a 1:8″-twist barrel. That was the result of testing by Applied Ballistics.
The Applied Ballistics team tested six (6) same-length/same-contour Bartlein barrels to observe how twist rate might affect muzzle velocity. This unique, multi-barrel test is featured in the book Modern Advancements in Long Range Shooting, Vol. 1. That book includes other fascinating field tests, including a comprehensive chronograph comparison.
Barrel Twist Rate vs. Velocity — What Tests Reveal by Bryan Litz
When considering barrel twist rates, it’s a common belief that faster twist rates will reduce muzzle velocity. The thinking is that the faster twist rate will resist forward motion of the bullet and slow it down. There are anecdotal accounts of this, such as when someone replaces a barrel of one brand/twist with a different brand and twist and observes a different muzzle velocity. But how do you know the twist rate is what affected muzzle velocity and not the barrel finish, or bore/groove dimensions? Did you use the same chronograph to measure velocity from both barrels? Do you really trust your chronograph?
Summary of Test Results
After all the smoke cleared, we found that muzzle velocity correlates to twist rate at the average rate of approximately 1.33 FPS per inch of twist. In other words, your velocity is reduced by about 5 FPS if you go from a 1:12″ twist to a 1:8″ twist. — Bryan Litz
Savage Test Rifle with Six Bartlein Barrels
Most shooters don’t have access to the equipment required to fully explore questions like this. These are exactly the kinds of things we examine in the book Modern Advancements in Long Range Shooting, Vol. 1. In that book, we present experiments conducted in the Applied Ballistics lab. Some of those experiments took on a “Myth Buster” tone as we sought to confirm (or deny) popular pre-conceptions. For example, here’s how we approached the question of barrel twist and muzzle velocity.
Six .308 Win Barrels from Bartlein — All Shot from the Same Rifle
We acquired six (6) barrels from the same manufacturer (Bartlein), all the same length and contour, and all chambered with the same reamer (SAAMI spec .308 Winchester). All these barrels were fitted to the same Savage Precision Target action, and fired from the same stock, and bench set-up. Common ammo was fired from all six barrels having different twist rates and rifling configurations. In this way, we’re truly able to compare what effect the actual twist rate has on muzzle velocity with a reasonable degree of confidence.
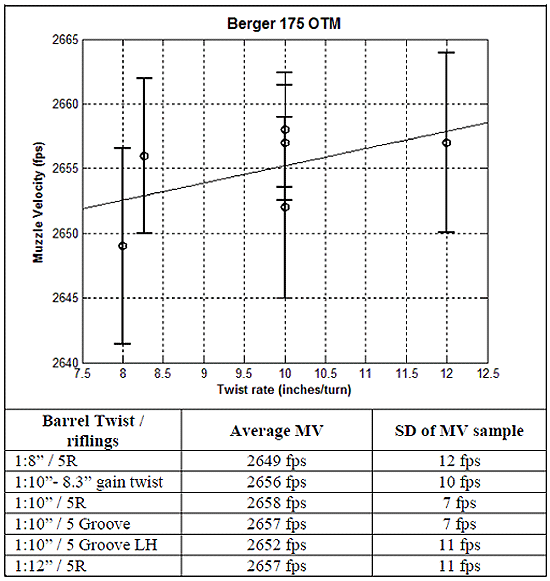
Prior to live fire testing, we explored the theoretical basis of the project, doing the physics. In this case, an energy balance is presented which predicts how much velocity you should expect to lose for a bullet that’s got a little more rotational energy from the faster twist. In the case of the .30 caliber 175 grain bullets, the math predicts a loss of 1.25 fps per inch-unit of barrel twist (e.g. a 1:8″ twist is predicted to be 1.25 fps slower than a 1:9″ twist).
Above, data shows relationship between Twist Rate and Muzzle Velocity (MV) for various barrel twist rates and rifling types. From fast to slow, the three 1:10″ twist barrels are: 5R (canted land), 5 Groove, 5 Groove left-hand twist.
We proceeded with testing all 6 barrels, with twist rates from 1:8″ to 1:12″. After all the smoke cleared, we found that muzzle velocity correlates to twist rate at the average rate of approximately 1.33 fps per inch of twist. In other words, your velocity is reduced by about 5 fps if you go from a 1:12″ twist to a 1:8″ twist. [Editor: That’s an average for all the lengths tested. The actual variance between 1:12″ and 1:8″ here was 8 FPS.] In this case the math prediction was pretty close, and we have to remember that there’s always uncertainty in the live fire results. Uncertainty is always considered in terms of what conclusions the results can actually support with confidence.
This is just a brief synopsis of a single test case. The coverage of twist rates in Modern Advancements in Long-Range Shooting Vol. 1 is more detailed, with multiple live fire tests. Results are extrapolated for other calibers and bullet weights. Needless to say, the question of “how twist rate affects muzzle velocity” is fully answered.
Other chapters in the book’s twist rate section include: · Stability and Drag — Supersonic
· Stability and Drag — Transonic
· Spin Rate Decay
· Effect of Twist rate on Precision
Other sections of the book include: Modern Rifles, Scopes, and Bullets as well as Advancements in Predictive Modeling. This book is sold through the Applied Ballistics online store. Modern Advancements in Long Range Shooting is also available as an eBook in Amazon Kindle format.
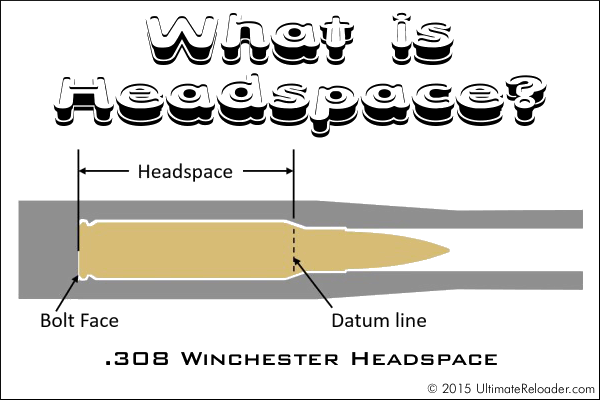
This illustration shows headspace measurement for the popular .308 Winchester cartridge, which headspaces on the shoulder. Image copyright 2015 Ultimate Reloader.
In this Brownells Tech Tip Video, Brownells gun tech Steve Ostrem explains what headspace is and why it’s one of the most critical measurements for nearly all firearms. Even if you’re an experienced rifle shooter, it’s worth watching this video to refresh your understanding of headspace measurements, and the correct use of “GO” and “NO-GO” gauges.
Headspace Definition
In firearms, headspace is the distance measured from the part of the chamber that stops forward motion of the cartridge (the datum reference) to the face of the bolt. Different cartridges have their datum lines in different positions in relation to the cartridge. For example, 5.56x45mm NATO ammunition headspaces off the shoulder of the cartridge, whereas .303 British headspaces off the forward rim of the cartridge. If the headspace is too short, ammunition that is in specification may not chamber correctly. If headspace is too large, the ammunition may not fit as intended or designed and the cartridge case may rupture, possibly damaging the firearm and injuring the shooter. (Source: Wikipedia)
Problems Caused by Too Much Headspace
Excessive headspace issues can include: light primer strikes, failure to fire, bulged/blown cases, case separations, split shoulders, or unseated primers after firing. Case ruptures caused by excessive headspace can lead to catastrophic failures causing serious injury. That is why headspace is such an important measurement.
Problems Cause by Too Little Headspace
Insufficent (or excessively tight) headspace can prevent the firearm from going into battery, resulting in failure to fire or deformation of the cartridge case. Various feeding and functioning problems can be caused by cases with too little headspace, even if a round can be chambered (with effort).
Headspace Gauges
Headspace is measured with a set of two headspace gauges: a “Go” gauge, and a “No-Go” gauge. Headspace gauges resemble the cartridges for the chambers they are designed to headspace, and are typically made of heat-treated tool steel. Both a “Go” and a “No-Go” gauge are required for a gunsmith to headspace a firearm properly. A third gauge, the “Field” gauge, is used (as the name implies) in the field to indicate the absolute maximum safe headspace. This gauge is used because, over time, the bolt and receiver will wear, the bolt and lugs compress, and the receiver may stretch, all causing the headspace to gradually increase from the “factory specs” measured by the “Go” and “No-Go” gauges. A bolt that closes on “No-Go” but not on “Field” is close to being unsafe to fire, and may malfunction on cartridges that are slightly out of spec. (Source: Wikipedia)
You need to understand Headspace Gauges and how to use them. There are “Go”, “No-Go”, and “Field” gauges. The “Field” is actually the longest. Brownells explains: “The GO gauge corresponds to the SAAMI minimum chamber length, while the FIELD gauge usually matches the maximum chamber depth, or slightly less. NO-GO gauges are an intermediate length between minimum and maximum, that, technically, is a voluntary dimension. A firearm that closes on a NO-GO gauge and does not close on a FIELD gauge may not give good accuracy and may have very short cartridge case life [.]”
Ever wondered how factory ammunition is produced, from start to finish? How are brass cases made, how are bullets created, and how are finished cartridges produced on automated assembly lines? Today’s video showcase features six major factories that, collectively, produce bullets, powder, and finished ammo. We start with the Berger Bullet plant, follow by Vihtavuori powder production in Europe. Then we show the Remington (now Vista Outdoor) ammo plant in Utah, along with a Federal plant that produces rimfire ammunition. Last but not least, there’s an excellent, very informative video from the Norma ammo factory, plus a Hornady ammo plant video.
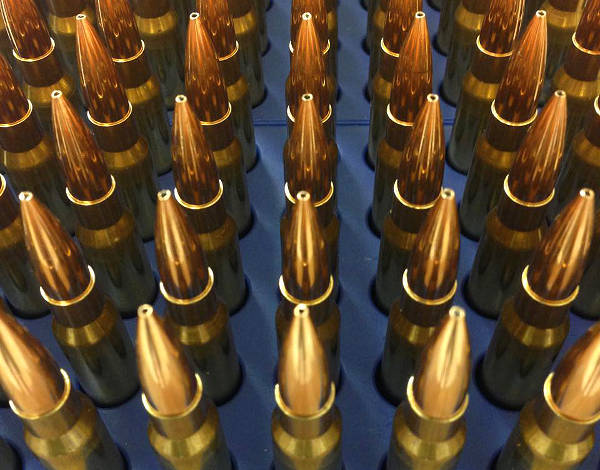
Bullets being seating at Hornady ammo factory.
Berger Bullets Factory Tour — Made in USA
In this video, Recoil TV takes a behind-the-scenes look at Berger Bullets, and how the outstanding, match-winning Berger bullets are created. The video covers the entire process — from raw materials, to the placement of bullet cores inside jackets, to the final ultra-consistent and uniform projectiles. To see the complete line of Berger Bullets, with full Ballistic data, visit BergerBullets.com
Vihtavuori Powder Production in Europe
Vihtavuori produces some of the most consistent, high-quality powder on the planet. Vihtavuori powders have been used to set world records and win countless championships in multiple disciplines. This excellent video goes inside Vihtavuori’s European production centers. It is really fascinating — you see how extruded powder starts with long spaghetti-like strings, before being finalized into the tiny sticks that we load.
Along with the powder production process, this video includes the entire VV production line, so you see how powder bottles are filled with powder and the tops of the bottles are secured by automated machines.
Remington Ammo Factory (Now Operated by Vista Outdoor)
This SHWATteam video visits the Remington ammunition plant in Arkansas. Vista Outdoor, the company that produces Federal, Speer and CCI ammo, purchased Remington’s ammunition business in Lonoke, Arkansas. Including the new high-tech plant in the back, this facility has the equivalent of 13+ football fields (1200 acres) under roof at its ammo plant, with over 1100 employees. Production capacity is impressive. When running at maximum output, this Remington ammo plant can crank out a staggering 7,000,000+ rounds every day. To produce that volume of ammunition, the facility needs a huge amount of resources: one million pounds of copper per month and 124,000 pounds of lead per day. Remington started manufacturing ammunition at this Lonoke facility in 1970, but some of the machines have been churning out ammo since long before.
Norma Factory Tour
Guys — honestly, if you do anything today on this site, watch this video. You won’t be disappointed. Guaranteed. This is a very informative (and surprisingly entertaining) video. Every serious hand-loader should watch this video to see how cartridge cases are made. The camera work and editing are excellent — there are many close-ups revealing key processes such as annealing and head-stamping.
VERY Informative Video Show Cartridge Brass and Ammunition Production:
Norma has released a fascinating video showing how bullets, brass, and ammunition are produced at the Norma Precision AB factory which opened in 1902. You can see how cartridges are made starting with brass disks, then formed into shape through a series of processes, including “hitting [the cup] with a 30-ton hammer”. After annealing (shown at 0:08″), samples from every batch of brass are analyzed to check metal grain structure and hardness. Before packing, each case is visually inspected by a human being (3:27″ time-mark).
Federal Rimfire Ammunition Production
Field & Stream Tours Federal Ammo Plant in Minnesota
A reporter for Field & Stream recently got a chance to tour the Federal ammunition production facility in Anoka, Minnesota. This large plant produces both rimfire and centerfire ammunition. While touring the plant, the reporter was allowed to capture video showing the creation of .22 LR rounds from start to finish. This is a fascinating video, well worth watching. Watch and learn how rimfire ammo is made.
Note to Viewers — After Starting Video, Click Speaker Icon to HEAR audio!
This revealing video shows all phases of .22 LR ammo production including cupping, drawing, annealing, washing, drying, head-stamping, priming, powder charging, bullet seating, crimping, waxing, inspection, and final packaging. We recommend you watch the video from start to finish. You’ll definitely learn some new things about rimfire ammo.
Hornady Ammunition Factory
If you wonder how ammo is made, starting with raw metal, check out this video from Hornady. It shows how bullet jackets are formed from copper, followed by insertion of a lead core. The jacket is then closed up over the core with the bullet taking its final shape in a die (a cannelure is applied on some bullet types). Next the video shows how cartridge brass is formed, starting with small cups of brass. The last part of the video shows how cases are primed and filled with powder, and how bullets are seated into the cases, using an automated process on a giant assembly-line.
On some internet shooting forums, self-declared “experts” advise new rifle shooters to stick to low-end factory rifles. These “experts” (many of whom don’t own a single really accurate rifle), claim that it will take years for a new shooter to learn how to shoot a rifle accurately. So, the argument goes, the accuracy offered by a precision-chambered rifle, with a custom barrel, is “wasted” on a new shooter.
We disagree with that viewpoint, at least when it comes to rifles shot from a rest. We’ve seen relatively new shooters, with help from a skilled mentor, do remarkably well with precision rifles right from the start. With a good bench gun, many new shooters can shoot well under 1 MOA on the first day. Certainly it takes time for a complete novice to learn how to handle the gun and to work the trigger smoothly. However, this editor has personally seen some inexperienced shooters try their hand at benchrest shooting, and within few month they are doing very well indeed at club shoots.
Accurate Rifles Reward Progress As Novices Build Skills
For bench shooting, we think a highly accurate rifle is a much better training device for a new shooter than a typical, cheap factory sporter. With a gun capable of 1.5-2.0 MOA at best, you can never really determine if a “flyer” is you or the gun. Conversely, when a novice shoots a gun that can put 5 shots through one ragged hole, if a shot goes way high or low, the shooter knows his aim, trigger control, or gun-handling is to blame. He (or she) can then correct the problem. And when the shooter does everything right, he or she will see a nice tight group on the target. The accurate rifle provides more meaningful feedback and it rewards progress. That helps the novice become a better shooter in a shorter period of time.
A while back, Forum Member Preacher and his “bunny hugger” niece from California proved this point. The young lady, with almost no shooting experience, took Preacher’s 6-6.5×47 and shot a sub-quarter-MOA, 3-shot group at 350 yards. Don’t tell her she needs to stick to a cheap factory rifle. Preacher reports: “My niece flew in from the west coast and came up to visit. When she saw a few of my full-blown varmint rifles, she wanted to shoot one. She did a super job even if she IS a ‘bunny hugger’. She pulled the 1.5 ounce Jewell on a few fired cases to check out the trigger pull and then got in behind the gun and put three shots into a 350-yard target with a one-inch circle.” We measured her group at 0.822″ (0.224 MOA). Don’t tell Preacher that accuracy is “wasted” on novices. He joked: “I sure don’t want her shooting at me ….”
Rifle Features BAT Action, Krieger Barrel, and Russo Laminated Stock:
For those who are interested, Preacher’s rifle features a BAT 3-lug action, 30″ Krieger 7.5-twist heavy contour barrel, and Russo stock (with clear coat by Preacher). Chambered in 6-6.5×47 Lapua, this gun “shoots the 108gr Bergers very well” according to Preacher. Yep, we agree with that — even when a novice “bunny-hugger” does the trigger-pulling.
“A bullet launched at a higher altitude is able to fly slightly farther (in the thinner air) for every increment of downward movement. Effectively, the bullet behaves as if it has a higher ballistic coefficient.”
A few seasons back a good friend ventured to the high country of Colorado to pursue elk. He recently zeroed his rifle in California, at a range just a few hundred feet Above Mean Sea Level (AMSL). He wondered if the higher altitude in Colorado could alter his ballistics. The answer is a definite yes. However the good news is that free ballistics calculators can help you plot reliable drop charts for various shooting locations, high or low.
The question has been posed: “What effect does altitude have on the flight of a bullet?” The simplistic answer is that, at higher altitudes, the air is thinner (lower density), so there is less drag on the bullet. This means that the amount of bullet drop is less at any given flight distance from the muzzle. Since the force of gravity is essentially constant on the earth’s surface (for practical purposes), the bullet’s downward acceleration doesn’t change, but a bullet launched at a higher altitude is able to fly slightly farther (in the thinner air) for every increment of downward movement. Effectively, at higher altitudes, the bullet behaves as if it has a higher ballistic coefficient.
Forum member Milanuk explains that the key factor is not altitude, but rather air pressure. Milanuk writes:
“In basic terms, as your altitude increases, the density of the air the bullet must travel through decreases, thereby reducing the drag on the bullet. Generally, the higher the altitude, the less the bullet will drop. For example, I shoot at a couple ranges here in the Pacific Northwest. Both are at 1000′ AMSL (Above Mean Sea Level) or less. I’ll need about 29-30 MOA to get from 100 yards to 1000 yards with a Berger 155gr VLD at 2960 fps. By contrast, in Raton, NM, located at 6600′ AMSL, I’ll only need about 24-25 MOA to do the same. That’s a significant difference.
Note that it is the barometric pressure that really matters, not simply the nominal altitude. The barometric pressure will indicate the reduced pressure from a higher altitude, but it will also show you the pressure changes as a front moves in, etc. which can play havoc w/ your calculated come-ups. Most altimeters are simply barometers that read in feet instead of inches of mercury.”
As Milanuk states, it is NOT altitude per se, but the LOCAL barometric pressure (sometimes called “station pressure”) that is key. The two atmospheric conditions that most effect bullet flight are air temperature, and barometric pressure. Normally, humidity has a negligible effect. It’s important to remember that the barometric pressure reported on the radio (or internet) may be stated as a sea level equivalency. So in Denver (at 6,000 feet AMSL), if the local pressure is 24″, the radio will report the barometric pressure to be 30″. If you do high altitude shooting at long range, bring along a Kestrel, or remember to mentally correct the radio station’s pressure, by 1″ per 1,000 feet.
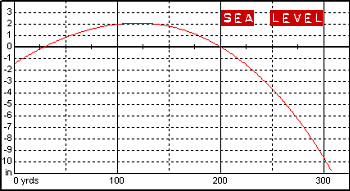
Trajectory of Bullet fired at Sea Level
Trajectory of Bullet fired at 20,000 feet
You can do your own experimental calculations using JBM Online Ballistics (free to use). Here is an extreme example, with two printouts (generated with Point Blank software), one showing bullet trajectory at sea level (0′ altitude) and one at 20,000 feet. For demonstration sake, we assigned a low 0.2 BC to the bullet, with a velocity of 3000 fps.
To learn more about all aspects of Exterior Ballistics, Hornady has a useful discussion of External Ballistics including the effects of altitude and temperature. To dig deeper, Sierra Bullets has a comprehensive Exterior Ballistics Resource Page with multiple sections from the Sierra Manual (4th and 5th Editions), including:
Example from Section 3.0: “When a bullet flies through the air, two types of forces act on the bullet to determine its path (trajectory) through the air. The first is gravitational force; the other is aerodynamics. Several kinds of aerodynamic forces act on a bullet: drag, lift, side forces, Magnus force, spin damping force, pitch damping force, and Magnus cross force. The most important of these aerodynamic forces is drag. All the others are very small in comparison when the bullet is spin-stabilized.”


 When neck-turning cases, it’s a good idea to extend the cut slightly below the neck-shoulder junction. This helps keep neck tension more uniform after repeated firings, by preventing a build-up of brass where the neck meets the shoulder. One of our Forum members, Craig from Ireland, a self-declared “neck-turning novice”, was having some problems turning brass for his 20 Tactical cases. He was correctly attempting to continue the cut slightly past the neck-shoulder junction, but he was concerned that brass was being removed too far down the shoulder.


 Credit our buddy Joe Friedrich for this simple yet effective accessory for your benchrest rifle. Joe shoots a .22 LR benchrest rig with a barrel tuner. When he added weights to his tuner, he found his rifle no longer balanced well. He wanted to add some weight in the rear without drilling holes in the stock. He also wanted the weight to be removable, and easily placed on another rifle in his stable. He wanted a weight that could be moved from gun to gun as needed.

 Written and researched by J. Scott Kappas, an attorney and Class III Firearms Dealer, the 2024 Traveler’s Guide has a preface that defines many key terms important for anyone traveling with a firearm across state lines. The latest edition also has new formatting for easier reading.


 Headspace Gauges


 Norma has released a fascinating video showing how bullets, brass, and ammunition are produced at the
  If you wonder how ammo is made, starting with raw metal, check out this video from


 The question has been posed: “What effect does altitude have on the flight of a bullet?” The simplistic answer is that, at higher altitudes, the air is thinner (lower density), so there is less drag on the bullet. This means that the amount of bullet drop is less at any given flight distance from the muzzle. Since the force of gravity is essentially constant on the earth’s surface (for practical purposes), the bullet’s downward acceleration doesn’t change, but a bullet launched at a higher altitude is able to fly slightly farther (in the thinner air) for every increment of downward movement. Effectively, at higher altitudes, the bullet behaves as if it has a higher ballistic coefficient.