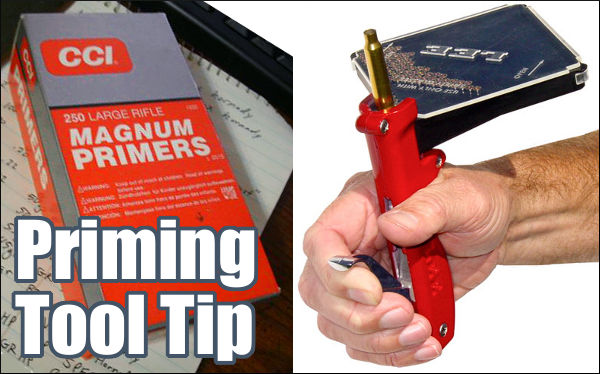
From time to time, we all encounter a primer that doesn’t go off. It’s normal to attribute the problem to a bad primer. But sometimes there are other explanations. George S., one of our Forum members, experienced a couple failures to fire, but he learned that the issue was his priming TOOL, not his primers. Here’s what George told us. There’s a lesson to be learned:
“I had issues with CCI 450s when I had my first 6BR barreled. I had probably three or four out of 20 rounds that failed to fire. the primers were dented but didn’t fire. I called CCI since I had bought a case of them. The tech was decent enough but had the audacity to tell me I was not seating the primers all the way in the pocket. I proceeded to let him know I had been reloading longer than he had been alive and I knew how to seat a primer.
Turns out that I did and I didn’t! I was using the RCBS primer tool I had used for years and the primers felt just fine to me. I finally decided to check the tool and since I had a new one I took the seating pins out and measured them. The seating pin on the tool I had been using for years was shorter by a few thousandths! I then used the pin from the new primer tool and darned if the primers that didn’t seat down to the bottom of the cup.
I switched to a K&M primer tool for seating the CCI primers and have not had a problem since. It was the combination of harder cup and lack of proper seating. I did call the CCI tech back and apologized for being an idiot.”
Another Forum member witnessed a problem cause by misuse of a priming tool: “I did … see a failure to fire on a Rem 9 1/2 primer only a week ago. That was in the new Rem muzzleloader that uses a primed case to ignite the pellets. After watching the muzzleloader’s owner seat his primers, I believe that it was operator error not the primer. He was seating the primer and then squeezing the priming tool so hard that his hands hurt after a few. We got that corrected.”
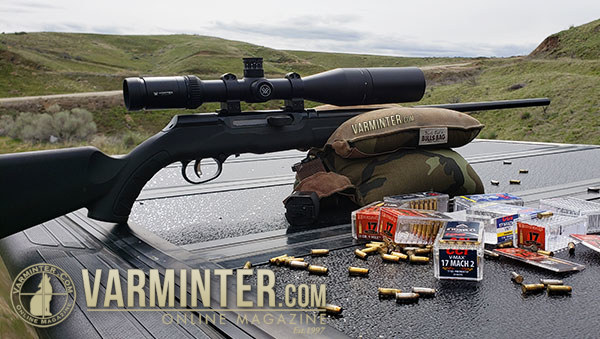
The 17 Mach 2 (aka “17 HM2″) is making a come-back. We’re glad. This high-velocity round fits actions and magazines designed for the .22 LR, so it’s an easy barrel-swap upgrade for most rimfire bolt-guns (semi-autos are more complicated). The 17 Mach 2 cartridge doesn’t deliver the velocity of the 17 HMR, but it is still way faster than a .22 LR. Expect 2000-2100 fps with 17 Mach 2 compared to 1250 fps for “High-Velocity” .22 LR ammo. And, importantly, 17 Mach 2 ammo is much less expensive than 17 HMR. If you shop around, you can get 50 rounds of 17 Mach 2 for about $8.50. That’s 43% cheaper than a better-than-average* $14.99 price of 17 HMR — a significant savings at 17 cents/round vs. 30 cents/round!
17 Mach 2 Major Selling Points:
1. 60% more velocity than typical “High-Velocity” .22 LR ammo.
2. 40% less cost than average 17 HMR ammo.
3. 17 Mach 2 OAL is compatible with .22 LR receivers and magazines.
17 Mach 2 — Best High Velocity Rimfire Bang for the Buck?
If you are looking for a capable, squirrel-busting round or a fun plinking round, you should definitely consider the 17 Mach 2, especially since CCI has committed to production of the little cartridge. CCI recently rolled out its “Gen 2″ 17 Mach 2 VNT Ammo with polymer tip (see top of article).
Considering that 17 HMR ammo is typically $15 to $17 per box, the 17 Mach 2 is a good value by comparison. It is available from vendors for about $8.50 per 50ct box. That’s $0.17 per round. When you consider overall “bang for the buck”, for many shooters, it makes sense to use the 17 Mach 2 rather than a 17 HMR. You save money, barrel life is a little longer, and the 17 Mach 2 is still a much more potent cartridge than the .22 LR. Check out this comparison, and note how the 17 Mach 2 has a much flatter trajectory than the .22 LR. For varmint shooting, the 17 Mach 2 is clearly the better choice.
And you can easily adapt a .22 LR Rifle to shoot the 17 Mach 2 just by changing the barrel. The magazine and bolt operation should work as the cartridge length, cartridge body diameter, and rim size is the same as the .22 LR.
Hornady’s 17 Mach 2 has a 2100 FPS muzzle velocity vs. 1255 FPS for “High-Velocity” .22 LR.
17 Mach 2 Rifle Reviews
Gun-makers have taken notice of the availability of 17 Mach 2 ammo, introducing new models chambered for this versatile little rimfire round. For a high-volume, small-species varminting, the 17 Mach 2 is much more effective than the .22 LR, and much less expensive than the larger 17 HMR.
New Savage A17 in 17 Mach 2
There are a number of reviews on new-generation 17 Mach 2 rifles. Recently Varminter.com reviewed the Savage A17 in 17 HM2. Editor Eric Mayer wrote: “This new addition to the A17 line comes at a time when the 17 Mach 2 round is experiencing a resurgence, with ammo now available from CCI and Hornady, including the lead-free NTX round from Hornady. This means … you don’t have to break the bank to buy a current, functioning, semi-auto 17 Mach 2 and you don’t have to … convert your 10/22.”
Eric shot four different types of 17 Mach 2 ammo, putting 1000+ rounds through the Savage. He was impressed: “I am very excited that Savage Arms has chambered their A17 rifle in the 17 Mach 2 / 17 HM2 round. After shooting the prototype, I can confidently say that this new A17 will become my go-to 17 Mach 2 rifle. This new rifle is a great option for varminters everywhere!”
Toggle Bolt Volquartsen Summit in 17 HM2
It’s rare for us to see a new rimfire that we’d really like to own, but the new Summit from Volquartsen fits the bill. This versatile rifle features a cool, straight-pull toggle bolt, similar to those on elite Biathlon rifles. You can see how this gun shoots in this informative 22 Plinkster video:
22 Plinkster Tests Volquartsen Summit Rifle in 17 Mach 2
The 17 Mach 2 (17 HM2) is making a comeback. Now leading manufacturers are offering this efficient little rimfire cartridge in some nice rifles. Both Anschutz and Volquartsen will offer new 17 Mach 2 rifles in 2019. The Volquartsen Summit features a lightweight, carbon fiber-wrapped barrel threaded 1/2-28 for brakes or suppressors. The Summit boasts a nice 1.75-lb trigger pull. The Summit’s CNC-machined receiver features a +20 MOA Rail. NOTE: The video shows a silhouette-style laminated wood stock. However, the Summit comes standard with a composite Magpul stock that actually works better for shooting from a bench.
*Note: The cheapest 17 HMR we found via nationwide search was $12.50/box, but MidwayUSA charges $19.99 for 50 rounds of most 17 HMR types. At most vendors you’ll pay $16-$18 per box for 17 HMR ammo.
As does Lapua and some other leading bullet-makers, Barnes now uses radar to determine bullet BC values and ballistic data for its match bullets and ammunition. Barnes employs advanced Doppler Radar to record bullet speeds at multiple distances out to 1500 yards.
The Doppler radar system gathers thousands of data points as a bullet flies downrange. This radar data is used to generate a bullet specific drag curve, and then fed into a modern 6 Degree of Freedom (DOF) [ballistics software program] to generate precise firing solutions.
Determining Bullet Ballistics with Doppler Radar Data
How do you build better (more precise) ammo drop tables? With radar, that’s how. Barnes Bullets is using Doppler Radar to develop the drop tables for its Precision Match line of factory ammunition. The Doppler radar allows Barnes to determine actual velocities at hundreds of points along a bullet’s flight path. This provides a more complete view of the ballistics “behavior” of the bullet, particularly at long range. Using Doppler radar, Barnes has learned that neither the G1 nor G7 BC models are perfect. Barnes essentially builds a custom drag curve for each bullet using Doppler radar findings.
Use of Doppler Radar to Generate Trajectory Solutions
by Barnes Bullets, LLC
Typical trajectory tables are generated by measuring only two values: muzzle velocity, and either time-of-flight to a downrange target, or a second downrange velocity. Depending on the test facility where this data is gathered, that downrange target or chronograph may only be 100 to 300 yards from the muzzle. These values are used to calculate the Ballistic Coefficient (BC value) of the bullet, and the BC value is then referenced to a standardized drag curve such as G1 or G7 to generate the trajectory table.
This approach works reasonably well for the distances encountered in most hunting and target shooting conditions, but breaks down rapidly for long range work. It’s really an archaic approach based on artillery firings conducted in the late 1800s and computational techniques developed before the advent of modern computers.
There is a better approach which has been utilized by modern militaries around the world for many years to generate very precise firing solutions. Due to the sizeable investment required, it has been slow to make its way into the commercial market. This modern approach is to use a Doppler radar system to gather thousands of data points as a bullet flies downrange. This radar data is used to generate a bullet specific drag curve, and then fed into a modern 6 Degree of Freedom (DOF) [ballistics software program] to generate precise firing solutions and greatly increase first-round hit probability. (The 6 DOF software accounts for x, y, and z position along with the bullet’s pitch, yaw, and roll rates.)
Bullet-Specific Drag Curves Derived from Radar Data
Barnes’ advanced Doppler radar system can track bullets out to 1500 meters, recording the velocity and time of flight of that bullet every few feet along the flight path. The noteworthy graph below shows a Doppler Radar-derived, bullet-specific drag curve alongside the more common G1 and G7 curves:
Neither of the standard curves is a particularly good match to our test bullet. In the legacy approach to generating a downrange trajectory table, the BC value is in effect a multiplier or a fudge factor that’s used to shift the drag curve of the test bullet to try and approximate one of the standard curves. This leads to heated arguments as to which of the standardized drag curves is a better fit, or if multiple BC values should be used to better approximate the standard curve (e.g., use one BC value when the velocity is between Mach 1 and Mach 2, and a different BC value when the velocity is between Mach 2 and Mach 3.) Barnes’ approach to creating trajectory tables is to generate bullet-specific drag curves, and use that data directly in a modern, state-of-the-art, 6 DOF ballistics program called Prodas to generate the firing solution.
Story tip from EdLongrange. We welcome reader submissions.
The Applied Ballistics Facebook Page features great, interesting new content posted multiple times each week. This resource features videos, test results, accuracy tips, and samples from Bryan Litz’s excellent books on ballistics and the three volume series on Modern Advancements in Long Range Shooting. Here are some highlights from Applied Ballistics’ Facebook posts from the past two weeks. Plus there’s a discount code, READ2024, that can save you 25% on Applied Ballistics books purchased in the month of March.
.22 LR Super Slow Motion Video — Watch the Bullet!
Watch .22 LR Rimfire Projectile Exiting Rifle Muzzle
This video, filmed with an ultra-high-speed camera, shows the milliseconds in time as a .22-caliber bullet travels the first 11 inches after leaving a .22 LR rifle barrel. Applied Ballistics states: “Notice that the bullet is fully obturated to the internal bore dimension — the step/rebate that exists on the unfired bullet where it meets the case gets expanded (obturated) and doesn’t exist on the fired bullet.”
How Important is Case Fill Ratio — You May Be Surprised
Conventional reloading practice is to select a powder that gives you a good case fill, meaning 90%-100% fill ratio for the cartridge and bullet you’re using. But why?
Some say that a higher fill ratio is good because it prevents the powder from settling differently in the case (which could lead to inconsistent ignition and greater MV SD). This explanation sounds good, and went unchallenged for a long time. However, Applied Ballistics has done some interesting testing that sheds new light on the density issue.
Modern Advancements in Long Range Shooting – Vol. 2 contains the results of Applied Ballistics tests of five different cartridge types — .223 Rem to .338 Lapua — loaded with different powders to produce fill ratios of 80%, 90%, and 100%. The testers wanted to see if 100% fill ratios actually gave better results (lower MV SDs) than the lower fill ratios.
Results of testing 3 different loads in 5 different cartridges — The highest MV SD was in fact measured in an 80% fill ratio load. However, the lowest MV SD was also measured for a different 80% load! Seems like the more we learn, the more questions we have. An informative Applied Ballistics podcast covers the Fill Ratio test. Visit Thescienceofaccuracy.com to access this and interesting podcasts.
EDITOR’s NOTE: There were multiple comments from Facebook readers stating that fill ratios 90% and above worked more consistently for them. And the reloading manuals warn against very low fill ratios.
Get 25% Off Applied Ballistics Books in March 2024
Applied Ballistics, through its Science of Accuracy webstore, is currently offering big savings on its popular books — considered to be the best print resources about rifle accuracy/ballistics ever published. This month you can save 25% on all six Applied Ballistics book titles by respected expert (and past national champion) Bryan Litz. Use Code READ2024 to get 25% of one or more of these books.
Get 25% OFF Applied Ballistics Books! Use code: READ2024 at checkout.
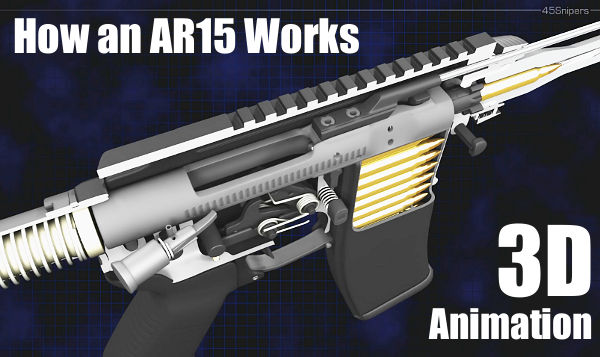
Americans love AR-platform rifles. However, they can be maintenance-intensive, as hot gasses are directed right back into the action to operate the bolt. Because ARs have a somewhat unique (and dirty) semi-auto operating system, we think all AR owners should learn how their rifles operate — from the inside out. This feature provides an “inside look” at the AR, with X-Ray and Cutaway views created through advanced 3D computer modeling.
AR15 Functions Revealed with 3D Computer Animation
Ever wondered how the parts inside an AR15 work together? Just exactly how does the reciprocating bolt carrier feed rounds from the magazine? How do the elements in the trigger group work and reset after each shot? How does the gas system bleed gas from the barrel and operate the bolt carrier? These and other questions are answered in this eye-opening video from 45Snipers. Using “cutaway” 3D computer animation, this 5-minute video shows all features of an AR15 inside and out. This fascinating firearms animation allows the viewer to look inside the upper and lower receivers, into the bolt carrier, chamber, barrel, and magazine.
This video starts off slow and has annoying background music, but it is well worth watching if you own or shoot any AR-platform rifle. It illustrates all the key operations during the charging, loading, firing, and ejection processes. The cutaway animation shows how rounds are stripped from the magazine and then chambered. It then shows how every part of the trigger group works, and how the firing pin strikes the primer. You can even watch the bullet move down the barrel before the empty shell casing is removed from the chamber and tossed out the ejection port. Here are sample frames from the video:
How AR-Platform Rifles Work — General Introduction
To help reader understand the general operation of AR-type rifles, this video shows the control functions of an AR and how the upper and lower sections work together.
Cutaway 3D Animation of AR15/M16 Action — Watch Video
Here is an excellent “cutaway” animation by Thomas Schwenke that shows how an AR-15 functions — how the entire loading cycle works from start to finish.
AR platform rifles are semi-automatics version of the M16. These feature distinctive upper and lower receivers which can be readily separated via front and rear pins. The upper includes the barrel, handguard, forward gas tube, and bolt assembly, while the lower contains grip, trigger group, fire selector, and mag well. In addition the lower is attached to the stock which encloses the buffer assembly.
The original ArmaLite AR-15 was a select-fire, air-cooled, gas-operated, magazine-fed rifle designed by American gun manufacturer ArmaLite in 1956. It was based on Armalite’s AR-10 rifle chambered for the 7.62×51 NATO (.308 Win). In 1959, ArmaLite sold its rights to the AR-10 and AR-15 to Colt. Some key modifications were made — most notably, the charging handle was re-located from under the carrying handle to the rear of the receiver. The redesigned rifle was adopted by the U.S. military as the M16 carbine, which went into production in March 1964.
Product innovation is all about “building a better mousetrap”, or in this case, building a better bore-cleaning patch. A real smart guy, Shane Smith, has invented a triangular patch that earned a patent. The U.S. Patent Office has awarded a utility patent for BoreSmith’s Triangle Patch™. This unique cleaning patch was designed by Shane Smith, a mathematician/physicist who employed his scientific and firearms knowledge to create innovative bore-cleaning products.
BoreSmith’s Triangle Patch™ (aka Pyramid Patch) presents more cleaning surface area to the bore wall than does a conventional square or round patch (of equivalent size). At the same time, the unique geometry makes Triangle Patches much less likely to jam in the barrel. This is because the notches in the sides of the triangle allow the patch to sit more uniformly on the jag (without bunching up). Also the Pyramid patch is much less likely to jam due to pleating. One reason conventional patches get stuck is unwanted 5-layer pleating. The special notches in the Pyramid patch remove all or most 5-layer pleating. As a result the patch does not bunch up and this also reduces rod bowing.
Triangle Patch Function and Geometry Explained (See 1:18 time-mark):
NOTE: Despite what you may see in this video, you should ALWAYS insert brushes and patches from the chamber end first, using a fitted cleaning rod bore guide. With bolt-action rifles, NEVER insert a cleaning rod (with brush or jag) in through the muzzle. This may damage the delicate crown of your barrel.
The Triangle Patches work great with Boresmith’s patented dual-diameter bore brushes:
Accurate, modular, and supremely versatile, the AR15 is America’s favorite semi-auto rifle. But let’s face it, the AR is a maintenance hog. The AR’s gas tube blows carbon and soot right into the middle of the bolt assembly where it cakes on to the metal. The AR bolt also has many tiny parts, and small recesses, which must be cleaned regularly. This author has seen numerous ARs fail simply because there was gunk (dried lube, carbon, brass shavings) in the ejector slot or extractor spring recess.
A Clean AR is a Happy AR — Whether You Run ‘Wet’ or ‘Dry’
There are various schools of thought when it comes to maintaining an AR. Some folks prefer to run their AR “dry” with minimal lube on the lugs and friction surfaces. Other shooters prefer to run their ARs “wet”, with lots of lube. But whatever your preference, you need to clean your AR regularly. And nothing is more important than the AR’s bolt/carrier assembly. Because it is involved in feeding, firing, and extracting, the AR-15 bolt/carrier assembly can be considered the most critical portion of the AR-15 from a maintenance standpoint.
Bolt Take-Down Guide on Top Quark Blog
The editor of the Top Quark Blog has created an excellent illustrated AR15 Bolt Take-Down Guide that shows how to disassemble an AR15 bolt and carrier for regular cleaning. Even if you’re an experienced AR15 shooter, you can learn something from this page (sample at right), and you may want to bookmark it for future reference. The photos are large and clear and there are helpful hints for each step of the process.
The author knows his stuff and offers some important insights. For example, he notes that “Extractor springs in most AR15 bolt assemblies are fairly weak, and this can lead to various extraction-related failures. One of the few high points about Colt assemblies is their usage of higher-strength extractor springs. You can tell the difference by looking at the inner plastic insert. ‘Normal’ springs feature a blue plastic insert, Colt strong springs have a black insert.”
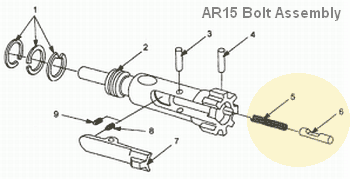
There is one notable oversight on this page — the author doesn’t cover disassembly and cleaning of the ejector assembly. This is actually quite important. A few small brass shavings, combined with carbon and lube in the ejector slot, WILL cause malfunctions. In fact, when this editor is called to diagnose problem ARs, the first things I look at (after swapping magazines) are the ejector recess and the slot for the extractor. Clogged ejectors are responsible for fail-to-ejects and other jams. It is essential that you keep the ejector hole clean. Old, gooey lube residues mixed with carbon and tiny brass shavings in the ejector recess will create all sorts of problems. As shown in the diagram below, it is simple to remove the ejector (#6) and ejector spring (#5), by drifting the ejector retaining pin (#4).
NOTE: The original Quark Blog Article appears to be offline (See Quark LINK.) However, this excellent article has been preserved via the WayBack Machine Internet Archives. CLICK HERE to access the Full Quark Blog Article via WayBack Machine Archive.
A fire in the home is always to be feared. And a fire in your reloading room can be disastrous. Near your reloading bench you probably have flammable solvents, and maybe gunpowder. What would happen if an electrical fire started in your reloading room? Would you be alerted? Do you have a proper fire extinguisher at hand?
Here’s a true story from Forum Member Joe O. (aka “Joecob”) that provides a valuable safety lesson. After Joe started up his old tumbler, an internal connector worked loose, causing an arc which started a fire in his basement reloading area. Luckily Joe had a functioning smoke detector, and a fire extinguisher.
Very few of us would worry about fire when we plug in a tumbler or other AC-powered reloading tool. But there is always the possibility of a malfunction and a fire. Quick thinking (and a handy extinguisher) prevented serious damage to Joe’s reloading room and house — but things could have been worse (much worse), had Joe not responded quickly.
Fire in the Reloading Room — Report by Joecob
The day before ‘Sandy’ hit I was cleaning brass the way I always have. I set the vibratory tumbler on the back of my reloading bench in the basement. I loaded the media hopper with 40 fired empty brass cases (and walnut media), plugged the cord in, turned the tumbler on and went back upstairs to watch TV. I could hear the tumbler running in the background.
About half an hour later I heard the basement smoke alarm go off. I ran downstairs. Flames were licking from the melting plastic of the tumbler.
I grabbed the nearby ABC cannister extinguisher and squirted out the fire and soaked the charred bench areas with water. Good thing I had the extinguisher! And I was glad I religiously store powder and primers properly — away from the bench (and everything else).
What caused the fire? It looks like an internal AC connector finally vibrated loose enough to arc and ignite the plastic. WHEH! I had been using that thing for 25 years the same way without mishap. Guess I should have known to periodically check the guts of a thing that plugs in and vibrates for a living?
Today I went out and bought a new even bigger ‘Pro’ ABC extinguisher, plus a dual-detector smoke alarm, and an ultrasonic cleaner. That experience was scarier than the storm. I hope this true account might help someone else to avoid a bad experience.
In his account, Joe refers to an “ABC” cannister fire extinguisher. The “ABC” refers to the fire classification rating: Class A (trash, wood, and paper), Class B (liquids and gases), and Class C (energized electrical equipment) fires. There are many brands of ABC-rated extinguishers.
The rechargeable Kidde Pro 210 Fire Extinguisher (SKU 21005779) contains four pounds of a multipurpose monoammonium phosphate dry chemical extinguishing agent. It has a discharge time of 13 to 15 seconds, a discharge range of 10 to 15 feet, and an operating pressure of 100 PSI. The seamless aluminum cylinder measures 4.5 inches in diameter and 15.7 inches tall. The Kidde 210 has a 6-year limited warranty. This is now $45.40 on Amazon, 29% off the regular price.
Berger Twist-Rate Stability Calculator
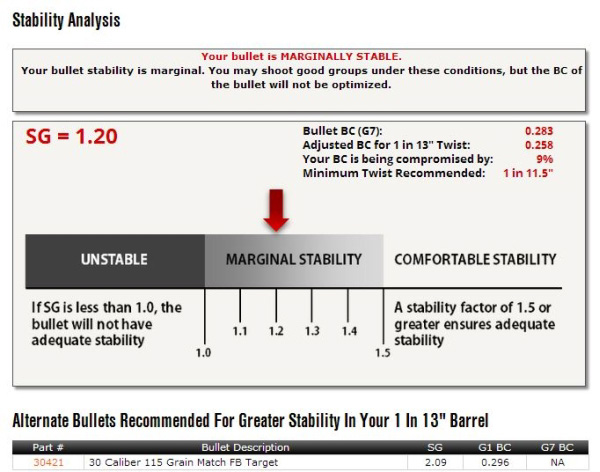
On the Berger Bullets website you’ll find a handy Twist-Rate Stability Calculator that predicts your gyroscopic stability factor (SG) based on mulitiple variables: velocity, bullet length, bullet weight, barrel twist rate, ambient temperature, and altitude. This cool tool tells you if your chosen bullet will really stabilize in your barrel.
How to Use Berger’s Twist Rate Calculator
Using the Twist Rate Calculator is simple. Just enter the bullet DIAMETER (e.g. .264), bullet WEIGHT (in grains), and bullet overall LENGTH (in inches). On its website, Berger conveniently provides this info for all its bullet types. For other brands, we suggest you weigh three examples of your chosen bullet, and also measure the length on three samples. Then use the average weight and length of the three. To calculate bullet stability, simply enter your bullet data (along with observed Muzzle Velocity, outside Temperature, and Altitude) and click “Calculate SG”. Try different twist rate numbers (and recalculate) until you get an SG value of 1.4 (or higher).
Gyroscopic Stability (SG) and Twist Rate
Berger’s Twist Rate Calculator provides a predicted stability value called “SG” (for “Gyroscopic Stability”). This indicates the Gyroscopic Stability applied to the bullet by spin. This number is derived from the basic equation: SG = (rigidity of the spinning mass)/(overturning aerodynamic torque).
If you have an SG under 1.0, your bullet is predicted not to stabilize. If you have between 1.0 and 1.1 SG, your bullet may or may not stabilize. If you have an SG greater than 1.1, your bullet should stabilize under optimal conditions, but stabilization might not be adequate when temperature, altitude, or other variables are less-than-optimal. That’s why Berger normally recommends at least 1.5 SG to get out of the “Marginal Stability” zone.
In his book Applied Ballistics For Long-Range Shooting, 3rd Ed., Bryan Litz (Berger Ballistician) recommends at least a 1.4 SG rating when selecting a barrel twist for a particular bullet. This gives you a safety margin for shooting under various conditions, such as higher or lower altitudes or temperatures.
Story idea from EdLongrange. We welcome reader submissions.
Want to see a bullet hit a target in ultra-slow motion? Watch this video to witness some amazing things — such as a bullet jacket peeling back like a banana-skin (at time-mark 7:30). A while back, Werner Mehl of Kurzzeit.com produced a 10-minute video for the SHOT Show. This video has has been watched over 10.6 million times, making it one of the most popular shooting-related videos in history. Employing cameras recording at up to 1,000,000 (one million) frames per second, Mehl’s bullet flight video has been called “astounding” and “mesmerizing”. If you haven’t seen it yet, sit back and enjoy!
Watch This Video! It’s Really Something Special…
LINK: Kurzzeit.com Video System and PVM-21 Chronograph
Click the link above to learn more about Werner Mehl and his super-sophisticated camera systems that can record at 1,000,000 frames per second. On the same linked page you can learn about the advanced PVM-21 chronograph (now sold as the BMC-19) designed by Werner. Operating “all-infrared, all the time”, the PVM-21/BMC-19 is the best optical chronograph we have tested for very low light conditions, or very tricky light conditions.






 This approach works reasonably well for the distances encountered in most hunting and target shooting conditions, but breaks down rapidly for long range work. It’s really an archaic approach based on artillery firings conducted in the late 1800s and computational techniques developed before the advent of modern computers.

 Some say that a higher fill ratio is good because it prevents the powder from settling differently in the case (which could lead to inconsistent ignition and greater MV SD). This explanation sounds good, and went unchallenged for a long time. However, Applied Ballistics has done some interesting testing that sheds new light on the density issue.



 A fire in the home is always to be feared. And a fire in your reloading room can be disastrous. Near your reloading bench you probably have flammable solvents, and maybe gunpowder. What would happen if an electrical fire started in your reloading room? Would you be alerted? Do you have a proper fire extinguisher at hand?
 I grabbed the nearby ABC cannister extinguisher and squirted out the fire and soaked the charred bench areas with water. Good thing I had the extinguisher! And I was glad I religiously store powder and primers properly — away from the bench (and everything else).
 In his account, Joe refers to an “ABC” cannister fire extinguisher. The “ABC” refers to the fire classification rating: Class A (trash, wood, and paper), Class B (liquids and gases), and Class C (energized electrical equipment) fires. There are many brands of ABC-rated extinguishers.